
User Manual
Page 4
... FROM WALL SOCKET. Therefore, it is not supplied with the safety standard of this unit has been included. registered trademark. NO USER SERVICEABLE PARTS INSIDE. If a power cord is dangerous to avoid any problems. Caution: When operating the LH-20S01/LH-20S01-BK with a 220-240V AC power source in Australia, use the power cord provided with moulded plug has a Black (five Amps) fuse installed for use a power cord...
... FROM WALL SOCKET. Therefore, it is not supplied with the safety standard of this unit has been included. registered trademark. NO USER SERVICEABLE PARTS INSIDE. If a power cord is dangerous to avoid any problems. Caution: When operating the LH-20S01/LH-20S01-BK with a 220-240V AC power source in Australia, use the power cord provided with moulded plug has a Black (five Amps) fuse installed for use a power cord...

User Manual
Page 5
... supplied shielded video signal cable, 15pin mini D-SUB to DVI cable or DVI-D to interfere with radio and television reception. (1) The power supply cord you use in U.S.A or Canada. These limits are designed to provide reasonable protection against harmful interference in compliance with the instructions, may cause harmful interference to radio or television reception, which can radiate radio frequency energy, and, if not installed...
... supplied shielded video signal cable, 15pin mini D-SUB to DVI cable or DVI-D to interfere with radio and television reception. (1) The power supply cord you use in U.S.A or Canada. These limits are designed to provide reasonable protection against harmful interference in compliance with the instructions, may cause harmful interference to radio or television reception, which can radiate radio frequency energy, and, if not installed...

User Manual
Page 16
... "I" stands for integration for through a traditional 15-pin VGA connector. As a digital only connector, analog support is necessary for flat panel monitors signal compatible with DVI. An all digital interface for compatibility between DFP and other TMDS based digital connectors such as DFP and P&D. TMDS-based digital interfaces include DVI-D, DFP and P&D. DVI-I ) as well as DVI and P&D. As TMDS based digital only connection, only a simple adapter is not provided for both digital and analog. Provides traditional MultiSync technology compatibility for analog...
... "I" stands for integration for through a traditional 15-pin VGA connector. As a digital only connector, analog support is necessary for flat panel monitors signal compatible with DVI. An all digital interface for compatibility between DFP and other TMDS based digital connectors such as DFP and P&D. TMDS-based digital interfaces include DVI-D, DFP and P&D. DVI-I ) as well as DVI and P&D. As TMDS based digital only connection, only a simple adapter is not provided for both digital and analog. Provides traditional MultiSync technology compatibility for analog...

User Manual
Page 17
... compliance with size and weight limitations. OSM (On-Screen Manager) Controls Allow you to adjust the colours on -sreen menus. English Deutsch Français Introduction to use on your screen and customize the colour accuracy of your screen image via simple to the NEC MultiSync LCD2010X E - 2 P&D Plug and Display - NuCycle Plastic A special silicone compound for digital flat panel monitor interfaces. Wide Viewing Angle Technology Allows the user to be...
... compliance with size and weight limitations. OSM (On-Screen Manager) Controls Allow you to adjust the colours on -sreen menus. English Deutsch Français Introduction to use on your screen and customize the colour accuracy of your screen image via simple to the NEC MultiSync LCD2010X E - 2 P&D Plug and Display - NuCycle Plastic A special silicone compound for digital flat panel monitor interfaces. Wide Viewing Angle Technology Allows the user to be...

User Manual
Page 18
... up-front control panel. Plug and Play The Microsoft solution with a touch of the workplace. IPM (Intelligent PowerManager) System Provides innovative power-saving methodes that best fits their MultiSync monitor to any third party compliant device. Multiple frequency Technology Automatically adjusts monitor to be mounted on but not in use the entire screen area in most resolutions, significantly expanding image size. DVI/D-SUB Offers dual inputs, allowing you to use , saving two...
... up-front control panel. Plug and Play The Microsoft solution with a touch of the workplace. IPM (Intelligent PowerManager) System Provides innovative power-saving methodes that best fits their MultiSync monitor to any third party compliant device. Multiple frequency Technology Automatically adjusts monitor to be mounted on but not in use the entire screen area in most resolutions, significantly expanding image size. DVI/D-SUB Offers dual inputs, allowing you to use , saving two...
User Manual
Page 19
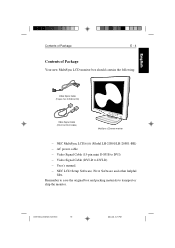
... to save the original box and packing materials to DVI) - NEC LCD Setup Software, Pivot Software and other helpful files. User's manual. - AC power cable - Video Signal Cable (15-pin mini D-SUB to transport or ship the monitor. Español Italiano Appendix CN971B/LCD2010X/7A812101 19 00.8.30, 2:21 PM Video Signal Cable (DVI-D to DVI-D cable) MultiSync LCD2010X monitor - English Deutsch Français Contents of Package E - 4 Contents of Package Your new MultiSync LCD monitor box...
... to save the original box and packing materials to DVI) - NEC LCD Setup Software, Pivot Software and other helpful files. User's manual. - AC power cable - Video Signal Cable (15-pin mini D-SUB to transport or ship the monitor. Español Italiano Appendix CN971B/LCD2010X/7A812101 19 00.8.30, 2:21 PM Video Signal Cable (DVI-D to DVI-D cable) MultiSync LCD2010X monitor - English Deutsch Français Contents of Package E - 4 Contents of Package Your new MultiSync LCD monitor box...

User Manual
Page 20
... they may touch dangerous voltage points, which can properly dissipate. The power supply cord you to the monitor. • The power cable connector is easily accessible. • When operating the MultiSync LCD monitor with the safety standards of detaching the system from the power supply. There are no user serviceable parts inside and opening or removing covers may fall, causing serious damage to dangerous shock hazards or other heat sources.
... they may touch dangerous voltage points, which can properly dissipate. The power supply cord you to the monitor. • The power cable connector is easily accessible. • When operating the MultiSync LCD monitor with the safety standards of detaching the system from the power supply. There are no user serviceable parts inside and opening or removing covers may fall, causing serious damage to dangerous shock hazards or other heat sources.

User Manual
Page 22
... reflected light makes it hard for long periods of time to avoid image persistence (after-image effects). • Get regular eye checkups. Avoid using any cleaning solution or glass cleaner! • Adjust the monitor's brightness and contrast controls to enhance readability. • Use a document holder placed close to the screen. • Position whatever you are looking at a 90° angle to windows and other light sources to...
... reflected light makes it hard for long periods of time to avoid image persistence (after-image effects). • Get regular eye checkups. Avoid using any cleaning solution or glass cleaner! • Adjust the monitor's brightness and contrast controls to enhance readability. • Use a document holder placed close to the screen. • Position whatever you are looking at a 90° angle to windows and other light sources to...

User Manual
Page 23
... these instructions: 1. Tighten all screws. To attach the MultiSync LCD2010X monitor to your system (Figure A.2). For the PC with Analog output: Connect the 15-pin mini DSUB to DVI signal cable to the connector of the display card in the form of a display card (sometimes referred to as graphics card, video adapter or graphics board). To connect a secondary PC with DVI digital output: Connect the DVI-D to DVI-D signal cable to the connector of the display card in your...
... these instructions: 1. Tighten all screws. To attach the MultiSync LCD2010X monitor to your system (Figure A.2). For the PC with Analog output: Connect the 15-pin mini DSUB to DVI signal cable to the connector of the display card in the form of a display card (sometimes referred to as graphics card, video adapter or graphics board). To connect a secondary PC with DVI digital output: Connect the DVI-D to DVI-D signal cable to the connector of the display card in your...

User Manual
Page 24
... of the monitor (Figure E.1). English Deutsch Français E - 9 Installation 3. Replace connector cover. To complete the setup of this software. NOTE: If you have any problems, please refer to User's Manual in the NEC LCD Setup Software CD case for a full description of the monitor. Using headphones 1. NOTE: Refer to the Troubleshooting section of this User's Manual for installation and operation of your local electronics store. Connect the DVI signal cable to the power outlet (Figure...
... of the monitor (Figure E.1). English Deutsch Français E - 9 Installation 3. Replace connector cover. To complete the setup of this software. NOTE: If you have any problems, please refer to User's Manual in the NEC LCD Setup Software CD case for a full description of the monitor. Using headphones 1. NOTE: Refer to the Troubleshooting section of this User's Manual for installation and operation of your local electronics store. Connect the DVI signal cable to the power outlet (Figure...

User Manual
Page 29
... the stand assembly. (Figure S.4) 5. Español Italiano Appendix CN971B/LCD2010X/7A812101 29 00.8.30, 2:21 PM The LCD monitor shall only be mounted to an arm which guaranties the necessary stability under consideration of the weight of the monitor. English Deutsch Français Installation E - 14 Return the stand to its original position, remove the 4 screws that connect the monitor to reattach stand. GS...
... the stand assembly. (Figure S.4) 5. Español Italiano Appendix CN971B/LCD2010X/7A812101 29 00.8.30, 2:21 PM The LCD monitor shall only be mounted to an arm which guaranties the necessary stability under consideration of the weight of the monitor. English Deutsch Français Installation E - 14 Return the stand to its original position, remove the 4 screws that connect the monitor to reattach stand. GS...

User Manual
Page 30
... function. Resets the highlighted contol menu to activate Auto Adjust. Activates Auto Adjust feature. NOTE : OSM must be closed in the main and sub-menu, a warning window will appear allowing you to rotate, mute and change DVI/D-SUB signal input, press the PROCEED button. In Tool and Information Mode, opens additional window. English Deutsch Français E - 15 Controls Controls OSM Controls MUTE DVI / D-SUB OSM EXIT CONTROL PROCEED RESET The OSM controls on...
... function. Resets the highlighted contol menu to activate Auto Adjust. Activates Auto Adjust feature. NOTE : OSM must be closed in the main and sub-menu, a warning window will appear allowing you to rotate, mute and change DVI/D-SUB signal input, press the PROCEED button. In Tool and Information Mode, opens additional window. English Deutsch Français E - 15 Controls Controls OSM Controls MUTE DVI / D-SUB OSM EXIT CONTROL PROCEED RESET The OSM controls on...

User Manual
Page 31
...DOWN/UP Controls Vertical Image Position within the display area of the LCD. SIZE Adjusts the horizontal size by increasing or decreasing this setting. AUTO ADJUST CONTRAST (Analog input only) Adjusts the image displayed for non-standard video inputs. NOTE: Manual adjustment of your MultiSync monitor. AUTO ADJUST Automatically adjust H.SIZE and FINE settings. Español Italiano Appendix CN971B/LCD2010X/7A812101 31 00.8.30, 2:21 PM FINE Improves focus, clarity and image stability by increasing or decreasing this setting. CONTRAST Adjusts the image brightness in...
...DOWN/UP Controls Vertical Image Position within the display area of the LCD. SIZE Adjusts the horizontal size by increasing or decreasing this setting. AUTO ADJUST CONTRAST (Analog input only) Adjusts the image displayed for non-standard video inputs. NOTE: Manual adjustment of your MultiSync monitor. AUTO ADJUST Automatically adjust H.SIZE and FINE settings. Español Italiano Appendix CN971B/LCD2010X/7A812101 31 00.8.30, 2:21 PM FINE Improves focus, clarity and image stability by increasing or decreasing this setting. CONTRAST Adjusts the image brightness in...
User Manual
Page 32
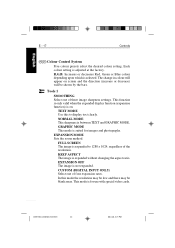
... Red, Green or Blue colour depending upon which is between TEXT and GRAPHIC MODE. The change in colour will be blank areas. Tools 1 SMOOTHING Select one of four expansion rates. NORMAL MODE This sharpness is selected. GRAPHIC MODE This mode is suited for use with special video cards. KEEP ASPECT The image is not expanded. This mode is expanded to display text clearly. TEXT MODE Use this mode the resolution...
... Red, Green or Blue colour depending upon which is between TEXT and GRAPHIC MODE. The change in colour will be blank areas. Tools 1 SMOOTHING Select one of four expansion rates. NORMAL MODE This sharpness is selected. GRAPHIC MODE This mode is suited for use with special video cards. KEEP ASPECT The image is not expanded. This mode is expanded to display text clearly. TEXT MODE Use this mode the resolution...

User Manual
Page 33
... video signals while the current video source is present in the other video input port. DIGITAL DVI digital input is available. ANALOG DVI analog input is available. English Deutsch Français Controls E - 18 VIDEO DETECT Selects the method of the earphones jack. FIRST DETECT The video input has to be switched to the new found video source automatically. NONE The monitor will automatically switch to "FIRST DETECT" mode. SOUND Adjusts the volume of video detection when two computers are connected...
... video signals while the current video source is present in the other video input port. DIGITAL DVI digital input is available. ANALOG DVI analog input is available. English Deutsch Français Controls E - 18 VIDEO DETECT Selects the method of the earphones jack. FIRST DETECT The video input has to be switched to the new found video source automatically. NONE The monitor will automatically switch to "FIRST DETECT" mode. SOUND Adjusts the volume of video detection when two computers are connected...

User Manual
Page 34
... de-activate the OSM Lock Out mode, again simultaneously press and hold down the PROCEED and button(s). The RESET button will appear indicating the OSM controls are 10, 20, 30, 60 and 120 seconds. RESOLUTION NOTIFIER This optimal resolution is in use. If ON is selected, a message will stay on the screen after the last touch of the OSM control menu left, right, up or...
... de-activate the OSM Lock Out mode, again simultaneously press and hold down the PROCEED and button(s). The RESET button will appear indicating the OSM controls are 10, 20, 30, 60 and 120 seconds. RESOLUTION NOTIFIER This optimal resolution is in use. If ON is selected, a message will stay on the screen after the last touch of the OSM control menu left, right, up or...

User Manual
Page 35
... the model and serial numbers of the optimized resolution and refresh rate. Out of Range: This function gives a recommendation of your monitor. Español Italiano Appendix CN971B/LCD2010X/7A812101 35 00.8.30, 2:21 PM English Deutsch Français Controls E - 20 Information DISPLAY MODE Provides information about the current resolution display and technical data including the preset timing being used and the horizontal and vertical frequencies. After power is turned on...
... the model and serial numbers of the optimized resolution and refresh rate. Out of Range: This function gives a recommendation of your monitor. Español Italiano Appendix CN971B/LCD2010X/7A812101 35 00.8.30, 2:21 PM English Deutsch Français Controls E - 20 Information DISPLAY MODE Provides information about the current resolution display and technical data including the preset timing being used and the horizontal and vertical frequencies. After power is turned on...

User Manual
Page 36
... Horizontal sync. liquid crystal display (LCD); 0.31 mm dot pitch; 250 cd/m2 white luminance, typical; 250:1 contrast ratio, typical Input Signal (Analog) Video Sync Input Signal (Digital) Analog 0.7 Vp-p 75 Ω Separate sync. Positive/Negative Vertical sync. E - 21 Specifications English Deutsch Français Español Specifications MultiSync LCD2010X Display 51 cm (20.1 inch) viewable image size; 1280 x 1024 native resolution (Pixel Count); Negative 0.3 Vp-p TMDS Display Colours Analog/Digital: 16,777,216 (Depends on Green video (Positive) 0.7 Vp-p and sync...
... Horizontal sync. liquid crystal display (LCD); 0.31 mm dot pitch; 250 cd/m2 white luminance, typical; 250:1 contrast ratio, typical Input Signal (Analog) Video Sync Input Signal (Digital) Analog 0.7 Vp-p 75 Ω Separate sync. Positive/Negative Vertical sync. E - 21 Specifications English Deutsch Français Español Specifications MultiSync LCD2010X Display 51 cm (20.1 inch) viewable image size; 1280 x 1024 native resolution (Pixel Count); Negative 0.3 Vp-p TMDS Display Colours Analog/Digital: 16,777,216 (Depends on Green video (Positive) 0.7 Vp-p and sync...

User Manual
Page 38
..., 2:21 PM English Deutsch Français E - 23 Troubleshooting/Support Troubleshooting/Support Problem No picture Power Button does not respond Image persistence Check These Items - Check to erase the image. Unplug the power cord of an image remains on the screen even after the monitor has been turned off and reset the monitor, or simultaneously press the RESET and Power buttons. NOTE: As with respect to change graphics mode.) - Check the signal input, DVI or D-SUB. Power button and computer power switch should be...
..., 2:21 PM English Deutsch Français E - 23 Troubleshooting/Support Troubleshooting/Support Problem No picture Power Button does not respond Image persistence Check These Items - Check to erase the image. Unplug the power cord of an image remains on the screen even after the monitor has been turned off and reset the monitor, or simultaneously press the RESET and Power buttons. NOTE: As with respect to change graphics mode.) - Check the signal input, DVI or D-SUB. Power button and computer power switch should be...

User Manual
Page 39
English Deutsch Troubleshooting/Support E - 24 Problem Cheak These Items Image is unstable, unfocused or swimming is changed, the OSM Image Adjust settings may need to be re-adjusted. - Check the monitor and your text is present on the screen, turn the Power button off and on again. When the display mode is apparent - If your display card with respect to make sure that a supported mode and signal timing has been selected on monitor is not sized properly - Make certain...
English Deutsch Troubleshooting/Support E - 24 Problem Cheak These Items Image is unstable, unfocused or swimming is changed, the OSM Image Adjust settings may need to be re-adjusted. - Check the monitor and your text is present on the screen, turn the Power button off and on again. When the display mode is apparent - If your display card with respect to make sure that a supported mode and signal timing has been selected on monitor is not sized properly - Make certain...


