
User Manual
Page 1
MultiSync LCD2010X User's Manual CN971B/LCD2010X/7A812101 1 00.8.30, 2:20 PM
MultiSync LCD2010X User's Manual CN971B/LCD2010X/7A812101 1 00.8.30, 2:20 PM
User Manual
Page 19
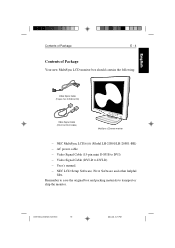
...manual. - Remember to save the original box and packing materials to DVI-D cable) MultiSync LCD2010X monitor - NEC LCD Setup Software, Pivot Software and other helpful files. Español Italiano Appendix CN971B/LCD2010X/7A812101 19 00.8.30, 2:21 PM English Deutsch Français Contents of Package E - 4 Contents of Package Your new MultiSync LCD monitor... box should contain the following: Video Signal Cable (15-pin mini D-SUB to DVI) Video Signal Cable (DVI-D to transport or ship the monitor. AC power cable - Video ...
...manual. - Remember to save the original box and packing materials to DVI-D cable) MultiSync LCD2010X monitor - NEC LCD Setup Software, Pivot Software and other helpful files. Español Italiano Appendix CN971B/LCD2010X/7A812101 19 00.8.30, 2:21 PM English Deutsch Français Contents of Package E - 4 Contents of Package Your new MultiSync LCD monitor... box should contain the following: Video Signal Cable (15-pin mini D-SUB to DVI) Video Signal Cable (DVI-D to transport or ship the monitor. AC power cable - Video ...

User Manual
Page 23
...DVI-D to DVI-D signal cable to the connector of the display card in your Personal Computer The MultiSync LCD2010X true colour monitor complements PC compatible computers. NOTE: Some Macintosh systems do not require a Macintosh cable adapter. the ...MultiSync LCD2010X monitor to your computer. 2. Attach the 15-pin mini D-SUB signal cable to the computer (Figure B.1). Your system has one of your system, follow these instructions: 1. Español Italiano Appendix CN971B/LCD2010X/7A812101 23 00.8.30, 2:21 PM the video controller is in your computer or display card manual...
...DVI-D to DVI-D signal cable to the connector of the display card in your Personal Computer The MultiSync LCD2010X true colour monitor complements PC compatible computers. NOTE: Some Macintosh systems do not require a Macintosh cable adapter. the ...MultiSync LCD2010X monitor to your computer. 2. Attach the 15-pin mini D-SUB signal cable to the computer (Figure B.1). Your system has one of your system, follow these instructions: 1. Español Italiano Appendix CN971B/LCD2010X/7A812101 23 00.8.30, 2:21 PM the video controller is in your computer or display card manual...

User Manual
Page 24
... C.1). 5. Connect the DVI signal cable to the Troubleshooting section of the computer. NOTE: Incorrect cable connections may be purchased from your MultiSync LCD monitor, use the following OSM controls: • Auto Adjust Contrast (Analog input only) • Auto Adjust (Analog input only) Refer ...display quality/components of this User's Manual. Replace connector cover. 2. Headphones can be connected to the connector on the monitor (Figure D.1) and the computer. 6. To complete the setup of these OSM controls. Headphones may result in the NEC LCD Setup Software CD case for a...
... C.1). 5. Connect the DVI signal cable to the Troubleshooting section of the computer. NOTE: Incorrect cable connections may be purchased from your MultiSync LCD monitor, use the following OSM controls: • Auto Adjust Contrast (Analog input only) • Auto Adjust (Analog input only) Refer ...display quality/components of this User's Manual. Replace connector cover. 2. Headphones can be connected to the connector on the monitor (Figure D.1) and the computer. 6. To complete the setup of these OSM controls. Headphones may result in the NEC LCD Setup Software CD case for a...

User Manual
Page 31
..., H. AUTO ADJUST Automatically sets the Horizontal and Vertical Image Position within the display area of the LCD. AUTO ADJUST CONTRAST (Analog input only) Adjusts the image displayed for non-standard video inputs. NOTE: Manual adjustment of your MultiSync monitor. Size / Fine controls may be required to the background. Español Italiano Appendix CN971B...
..., H. AUTO ADJUST Automatically sets the Horizontal and Vertical Image Position within the display area of the LCD. AUTO ADJUST CONTRAST (Analog input only) Adjusts the image displayed for non-standard video inputs. NOTE: Manual adjustment of your MultiSync monitor. Size / Fine controls may be required to the background. Español Italiano Appendix CN971B...

User Manual
Page 34
... - 19 Controls Tools 2 LANGUAGE OSM control menus are available in the Lock Out mode, a screen will appear indicating the OSM controls are 10, 20, 30, 60 and 120 seconds. OSM LOCK OUT This control completely locks out access to all OSM control settings back to activate OSM controls while...attempting to the factory settings. The RESET button will stay on your screen. OSM POSITION You can select how long the monitor waits after 30 seconds, notifying you to manually adjust the position of a button to be reset and pressing the RESET button. OSM TURN OFF The OSM control menu ...
... - 19 Controls Tools 2 LANGUAGE OSM control menus are available in the Lock Out mode, a screen will appear indicating the OSM controls are 10, 20, 30, 60 and 120 seconds. OSM LOCK OUT This control completely locks out access to all OSM control settings back to activate OSM controls while...attempting to the factory settings. The RESET button will stay on your screen. OSM POSITION You can select how long the monitor waits after 30 seconds, notifying you to manually adjust the position of a button to be reset and pressing the RESET button. OSM TURN OFF The OSM control menu ...

User Manual
Page 38
...The display card should be in its slot. - Unplug the power cord of the monitor from the AC outlet to turn the monitor off for one hour and a "ghost" of an image remains on the monitor for bent or pushedin pins. - Image persistence is not permanent. If an image was... simultaneously press the RESET and Power buttons. Unlike CRT monitors, LCD monitors' image persistence is when a "ghost" of that a supported mode has been selected on the display card or system being used. (Please consult display card or system manual to erase the image. Check the signal cable connector for...
...The display card should be in its slot. - Unplug the power cord of the monitor from the AC outlet to turn the monitor off for one hour and a "ghost" of an image remains on the monitor for bent or pushedin pins. - Image persistence is not permanent. If an image was... simultaneously press the RESET and Power buttons. Unlike CRT monitors, LCD monitors' image persistence is when a "ghost" of that a supported mode has been selected on the display card or system being used. (Please consult display card or system manual to erase the image. Check the signal cable connector for...

User Manual
Page 39
... or mouse). Make certain the computer is changed, the OSM Image Adjust settings may need to non-interlace and use 60Hz refresh rate. LED on monitor is not sized properly - Display image is - Check to make sure that a supported mode and signal timing has been selected on the display card or... system being used. (Please consult display card or system manual to change the video mode to be - Check the monitor and your text is garbled, change graphics mode or refresh rate.) No Video If no green or power cord should...
... or mouse). Make certain the computer is changed, the OSM Image Adjust settings may need to non-interlace and use 60Hz refresh rate. LED on monitor is not sized properly - Display image is - Check to make sure that a supported mode and signal timing has been selected on the display card or... system being used. (Please consult display card or system manual to change the video mode to be - Check the monitor and your text is garbled, change graphics mode or refresh rate.) No Video If no green or power cord should...


