
User Manual
Page 1
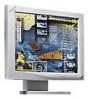
MultiSync LCD2010X User's Manual CN971B/LCD2010X/7A812101 1 00.8.30, 2:20 PM
MultiSync LCD2010X User's Manual CN971B/LCD2010X/7A812101 1 00.8.30, 2:20 PM
User Manual
Page 19
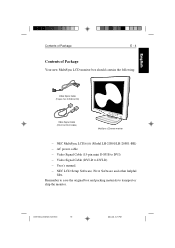
... - Video Signal Cable (15-pin mini D-SUB to DVI-D cable) MultiSync LCD2010X monitor - Video Signal Cable (DVI-D to transport or ship the monitor. User's manual. - Remember to save the original box and packing materials to DVI-D) - NEC MultiSync LCD2010X (Model LH-20S01/LH-20S01-BK) - NEC LCD Setup Software, Pivot Software and other helpful files. Español...
... - Video Signal Cable (15-pin mini D-SUB to DVI-D cable) MultiSync LCD2010X monitor - Video Signal Cable (DVI-D to transport or ship the monitor. User's manual. - Remember to save the original box and packing materials to DVI-D) - NEC MultiSync LCD2010X (Model LH-20S01/LH-20S01-BK) - NEC LCD Setup Software, Pivot Software and other helpful files. Español...

User Manual
Page 23
...Connection to your system, follow these instructions: 1. the video controller is the video connector, refer to your computer or display card manual. To attach the MultiSync LCD2010X monitor to the connector of the display card in your computer. 2. Your system has one of your system (Figure A.1). Both configurations ...For the PC with Analog output: Connect the 15-pin mini DSUB to DVI signal cable to your Personal Computer The MultiSync LCD2010X true colour monitor complements PC compatible computers. If you are not sure which connector is built into the computer. - For the PC...
...Connection to your system, follow these instructions: 1. the video controller is the video connector, refer to your computer or display card manual. To attach the MultiSync LCD2010X monitor to the connector of the display card in your computer. 2. Your system has one of your system (Figure A.1). Both configurations ...For the PC with Analog output: Connect the 15-pin mini DSUB to DVI signal cable to your Personal Computer The MultiSync LCD2010X true colour monitor complements PC compatible computers. If you are not sure which connector is built into the computer. - For the PC...

User Manual
Page 24
Replace connector cover. NOTE: If you have any problems, please refer to User's Manual in the NEC LCD Setup Software CD case for a full description of this software. NOTE: Refer to the Troubleshooting section of these OSM controls. Replace connector ...the other end to the connector on the back of the monitor and the other end to the Controls section of this User's Manual for installation and operation of this User's Manual. NOTE: Incorrect cable connections may be purchased from your MultiSync LCD monitor, use the following OSM controls: • Auto Adjust Contrast...
Replace connector cover. NOTE: If you have any problems, please refer to User's Manual in the NEC LCD Setup Software CD case for a full description of this software. NOTE: Refer to the Troubleshooting section of these OSM controls. Replace connector ...the other end to the connector on the back of the monitor and the other end to the Controls section of this User's Manual for installation and operation of this User's Manual. NOTE: Incorrect cable connections may be purchased from your MultiSync LCD monitor, use the following OSM controls: • Auto Adjust Contrast...

User Manual
Page 31
...the display area of the LCD. Image Adjust Controls (Analog input only) H. NOTE: Manual adjustment of the LCD. Size / Fine controls may be required to the background. DOWN/UP Controls Vertical Image Position within the display area of your MultiSync monitor. SIZE Adjusts the horizontal... and image stability by increasing or decreasing this setting. CONTRAST Adjusts the image brightness in relation to complete setup of the LCD. Auto Adjust (Analog input only) Automatically adjusts the Image Position, H. AUTO ADJUST Automatically sets the Horizontal and Vertical Image...
...the display area of the LCD. Image Adjust Controls (Analog input only) H. NOTE: Manual adjustment of the LCD. Size / Fine controls may be required to the background. DOWN/UP Controls Vertical Image Position within the display area of your MultiSync monitor. SIZE Adjusts the horizontal... and image stability by increasing or decreasing this setting. CONTRAST Adjusts the image brightness in relation to complete setup of the LCD. Auto Adjust (Analog input only) Automatically adjusts the Image Position, H. AUTO ADJUST Automatically sets the Horizontal and Vertical Image...


