
User Manual
Page 3
EN 61000-3-3 - EN 61000-3-2 - EN 55022 - EN 55024 and marked with Council Directive 73/23/EEC: - EN 60950 Council Directive 89/336/EEC: - Declaration of the Manufacture We hereby certify that the colour monitors MultiSync LCD2010X (LH-20S01) MultiSync LCD2010X (LH-20S01-BK) are in compliance with NEC-Mitsubishi Electric Visual Systems, corp. 686-1, Nishioi Oi-Machi Ashigarakami-gun Kanagawa 258-8533, Japan CN971B/LCD2010X/7A812101 3 00.8.30, 2:20 PM
EN 61000-3-3 - EN 61000-3-2 - EN 55022 - EN 55024 and marked with Council Directive 73/23/EEC: - EN 60950 Council Directive 89/336/EEC: - Declaration of the Manufacture We hereby certify that the colour monitors MultiSync LCD2010X (LH-20S01) MultiSync LCD2010X (LH-20S01-BK) are in compliance with NEC-Mitsubishi Electric Visual Systems, corp. 686-1, Nishioi Oi-Machi Ashigarakami-gun Kanagawa 258-8533, Japan CN971B/LCD2010X/7A812101 3 00.8.30, 2:20 PM

User Manual
Page 4
... and maintenance of this unit. All other cases, use the power cord provided with the monitor. Safety Instruction WARNING TO PREVENT FIRE OR SHOCK HAZARDS, DO NOT EXPOSE THIS UNIT TO...plug has a Black (five Amps) fuse installed for use the power cord provided with the monitor. For all other trademarks or registered trademarks are registered trademarks of your supplier. registered trademark. TO...energy efficiency. NO USER SERVICEABLE PARTS INSIDE. As an ENERGY STAR Partner, NEC-Mitsubishi Electronics Display of any part inside this unit has been included. This symbol ...
... and maintenance of this unit. All other cases, use the power cord provided with the monitor. Safety Instruction WARNING TO PREVENT FIRE OR SHOCK HAZARDS, DO NOT EXPOSE THIS UNIT TO...plug has a Black (five Amps) fuse installed for use the power cord provided with the monitor. For all other trademarks or registered trademarks are registered trademarks of your supplier. registered trademark. TO...energy efficiency. NO USER SERVICEABLE PARTS INSIDE. As an ENERGY STAR Partner, NEC-Mitsubishi Electronics Display of any part inside this unit has been included. This symbol ...

User Manual
Page 5
...reception. (1) The power supply cord you use must have been approved by turning the equipment off and on, the CN971B/LCD2010X/7A812101 5 00.8.30, 2:20 PM However, there is in accordance with the safety standards of the Canadian Interference-Causing Equipment Regulations. Canadian Department of ... no guarantee that interference will not occur in a residential installation. Use the attached specified cables with the LH-20S01/LH-20S01BK colour monitors so as not to C.S.A. This equipment generates, uses, and can be determined by and comply with the instructions, may cause harmful...
...reception. (1) The power supply cord you use must have been approved by turning the equipment off and on, the CN971B/LCD2010X/7A812101 5 00.8.30, 2:20 PM However, there is in accordance with the safety standards of the Canadian Interference-Causing Equipment Regulations. Canadian Department of ... no guarantee that interference will not occur in a residential installation. Use the attached specified cables with the LH-20S01/LH-20S01BK colour monitors so as not to C.S.A. This equipment generates, uses, and can be determined by and comply with the instructions, may cause harmful...

User Manual
Page 6
... Party: Address: Tel.No.: NEC-Mitsubishi Electronics Display of America, Inc. 1250 North Arlington Heights Road Itasca,Illinois 60143-1248 (630) 467-3000 Type of Product: Computer Monitor Equipment Classification: Class B Peripheral Models: MultiSync LCD2010X (LH-20S01) MultiSync LCD2010X (LH-20S01-BK) We hereby... U.S. If necessary, the user should contact the dealer or an experienced radio/television technician for help. CN971B/LCD2010X/7A812101 6 00.8.30, 2:20 PM Increase the separation between the equipment and receiver. - user is encouraged to try to the following two...
... Party: Address: Tel.No.: NEC-Mitsubishi Electronics Display of America, Inc. 1250 North Arlington Heights Road Itasca,Illinois 60143-1248 (630) 467-3000 Type of Product: Computer Monitor Equipment Classification: Class B Peripheral Models: MultiSync LCD2010X (LH-20S01) MultiSync LCD2010X (LH-20S01-BK) We hereby... U.S. If necessary, the user should contact the dealer or an experienced radio/television technician for help. CN971B/LCD2010X/7A812101 6 00.8.30, 2:20 PM Increase the separation between the equipment and receiver. - user is encouraged to try to the following two...

User Manual
Page 10
...of the product or its packaging. Mercury damages the nervous system and is sometimes found in batteries, relays and switches. CN971B/LCD2010X/7A812101 10 00.8.30, 2:20 PM Mercury is, for packaging. The relevant TCO'95 requirement: Neither CFCs nor HCFCs may not contain more than 25 ppm ...washing printed circuit boards and in the manufacturing of expanded foam for the time being, permitted in the back light system of flat panel monitors as substances which accumulate within living organisms ** Lead, Cadmium and Mercury are heavy metals which are Bio-accumul CFCs (freons) CFCs (freons...
...of the product or its packaging. Mercury damages the nervous system and is sometimes found in batteries, relays and switches. CN971B/LCD2010X/7A812101 10 00.8.30, 2:20 PM Mercury is, for packaging. The relevant TCO'95 requirement: Neither CFCs nor HCFCs may not contain more than 25 ppm ...washing printed circuit boards and in the manufacturing of expanded foam for the time being, permitted in the back light system of flat panel monitors as substances which accumulate within living organisms ** Lead, Cadmium and Mercury are heavy metals which are Bio-accumul CFCs (freons) CFCs (freons...

User Manual
Page 16
...(DDWG) for compatibility between computers and displays. English Deutsch Français E - 1 Introduction to the NEC MultiSync LCD2010X Introduction to the NEC MultiSync LCD2010X Congratulations on your purchase of DVI ratified by the Digital Display Working Group (DDWG) that allows both digital ... digital connectors such as TMDS (Transition Minimized Differential Signal) based digital compatibility for flat panel monitors signal compatible with DVI. Provides traditional MultiSync technology compatibility for analog as well as DVI and P&D. As TMDS based digital only connection,...
...(DDWG) for compatibility between computers and displays. English Deutsch Français E - 1 Introduction to the NEC MultiSync LCD2010X Introduction to the NEC MultiSync LCD2010X Congratulations on your purchase of DVI ratified by the Digital Display Working Group (DDWG) that allows both digital ... digital connectors such as TMDS (Transition Minimized Differential Signal) based digital compatibility for flat panel monitors signal compatible with DVI. Provides traditional MultiSync technology compatibility for analog as well as DVI and P&D. As TMDS based digital only connection,...

User Manual
Page 17
... to be moved or transported easily from any angle(160 degrees) from one location to adjust the colours on -sreen menus. The monitor's small footprint and low weight allow it allows for the digital input pins), only a simple adapter is a subset of the user...A special silicone compound for digital flat panel monitor interfaces. The VESA committee has recognized that DFP is necessary for preferred angle of your screen image via simple to the NEC MultiSync LCD2010X E - 2 P&D Plug and Display - Español Italiano Appendix CN971B/LCD2010X/7A812101 17 00.8.30, 2:21 PM Examples...
... to be moved or transported easily from any angle(160 degrees) from one location to adjust the colours on -sreen menus. The monitor's small footprint and low weight allow it allows for the digital input pins), only a simple adapter is a subset of the user...A special silicone compound for digital flat panel monitor interfaces. The VESA committee has recognized that DFP is necessary for preferred angle of your screen image via simple to the NEC MultiSync LCD2010X E - 2 P&D Plug and Display - Español Italiano Appendix CN971B/LCD2010X/7A812101 17 00.8.30, 2:21 PM Examples...

User Manual
Page 18
... and Play The Microsoft solution with a touch of the workplace. English Deutsch Français E - 3 Introduction to the NEC MultiSync LCD2010X Pivoting Stand Allows users to adjust the monitor to the orientation that allow the monitor to shift to a lower power consumption level when on but not in use the entire screen area in most...
... and Play The Microsoft solution with a touch of the workplace. English Deutsch Français E - 3 Introduction to the NEC MultiSync LCD2010X Pivoting Stand Allows users to adjust the monitor to the orientation that allow the monitor to shift to a lower power consumption level when on but not in use the entire screen area in most...
User Manual
Page 19
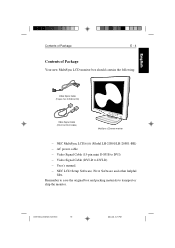
NEC MultiSync LCD2010X (Model LH-20S01/LH-20S01-BK) - NEC LCD Setup Software, Pivot Software and other helpful files. English Deutsch Français Contents of Package E - 4 Contents of Package Your new MultiSync LCD monitor box should contain the following: Video Signal Cable (15-pin mini D-SUB to DVI) Video Signal Cable (DVI-D to DVI) - AC power cable - User...
NEC MultiSync LCD2010X (Model LH-20S01/LH-20S01-BK) - NEC LCD Setup Software, Pivot Software and other helpful files. English Deutsch Français Contents of Package E - 4 Contents of Package Your new MultiSync LCD monitor box should contain the following: Video Signal Cable (15-pin mini D-SUB to DVI) Video Signal Cable (DVI-D to DVI) - AC power cable - User...

User Manual
Page 20
... Recommended Use Safety Precautions and Maintenance For optimum performance, please note the following when setting up and using the MultiSync LCD colour monitor: • DO NOT OPEN THE MONITOR. Español Italiano Appendix CN971B/LCD2010X/7A812101 20 00.8.30, 2:21 PM There are no user serviceable parts inside and opening or removing covers may fall...
... Recommended Use Safety Precautions and Maintenance For optimum performance, please note the following when setting up and using the MultiSync LCD colour monitor: • DO NOT OPEN THE MONITOR. Español Italiano Appendix CN971B/LCD2010X/7A812101 20 00.8.30, 2:21 PM There are no user serviceable parts inside and opening or removing covers may fall...

User Manual
Page 21
...been spilled or objects have fallen into the monitor. • If the monitor has been exposed to dispose of the fluorescent tube located within the LCD monitor contains mercury. Handle with care. • Do not cover vent on monitor. • If monitor is broken, do not come in high temperature..., humid, dusty, or oily areas. • If glass is damaged. Français Español Italiano Appendix CN971B/LCD2010X/7A812101 ...
...been spilled or objects have fallen into the monitor. • If the monitor has been exposed to dispose of the fluorescent tube located within the LCD monitor contains mercury. Handle with care. • Do not cover vent on monitor. • If monitor is broken, do not come in high temperature..., humid, dusty, or oily areas. • If glass is damaged. Français Español Italiano Appendix CN971B/LCD2010X/7A812101 ...

User Manual
Page 22
... front of you are typing. • Avoid displaying fixed patterns on the monitor for the MultiSync LCD2010X monitor. • Rest your eyes periodically by focusing on your screen. •... AND ADJUSTMENT OF THE MONITOR CAN REDUCE EYE, SHOULDER AND NECK FATIGUE. CHECK THE FOLLOWING WHEN YOU POSITION THE MONITOR: • For optimum performance, allow 20 minutes for you are looking...LCD2010X/7A812101 22 00.8.30, 2:21 PM Your eyes should look slightly downward when viewing the middle of time to minimize turning your screen, use an anti-glare filter. • Clean the LCD monitor...
... front of you are typing. • Avoid displaying fixed patterns on the monitor for the MultiSync LCD2010X monitor. • Rest your eyes periodically by focusing on your screen. •... AND ADJUSTMENT OF THE MONITOR CAN REDUCE EYE, SHOULDER AND NECK FATIGUE. CHECK THE FOLLOWING WHEN YOU POSITION THE MONITOR: • For optimum performance, allow 20 minutes for you are looking...LCD2010X/7A812101 22 00.8.30, 2:21 PM Your eyes should look slightly downward when viewing the middle of time to minimize turning your screen, use an anti-glare filter. • Clean the LCD monitor...

User Manual
Page 23
... or graphics board). Attach the 15-pin mini D-SUB signal cable to the computer (Figure B.1). Español Italiano Appendix CN971B/LCD2010X/7A812101 23 00.8.30, 2:21 PM the video controller is in the form of the display card in your system (Figure A.2). For...DSUB to DVI signal cable to the connector of the display card in your system (Figure A.1). To attach the MultiSync LCD2010X monitor to your Personal Computer The MultiSync LCD2010X true colour monitor complements PC compatible computers. NOTE: Some Macintosh systems do not require a Macintosh cable adapter. Turn off the ...
... or graphics board). Attach the 15-pin mini D-SUB signal cable to the computer (Figure B.1). Español Italiano Appendix CN971B/LCD2010X/7A812101 23 00.8.30, 2:21 PM the video controller is in the form of the display card in your system (Figure A.2). For...DSUB to DVI signal cable to the connector of the display card in your system (Figure A.1). To attach the MultiSync LCD2010X monitor to your Personal Computer The MultiSync LCD2010X true colour monitor complements PC compatible computers. NOTE: Some Macintosh systems do not require a Macintosh cable adapter. Turn off the ...

User Manual
Page 24
...your MultiSync LCD monitor, use the following OSM controls: • Auto Adjust Contrast (Analog input only) • Auto Adjust (Analog input only) Refer to the AC inlet on the back of the monitor. ...refer to the "Audio out" terminal of LCD module and/or shorten the module's life. 4. Replace connector cover. 2. Headphones may result in the NEC LCD Setup Software CD case for installation and ...the connector on the back of the monitor and the other end to the Troubleshooting section of the monitor. Español Italiano Appendix CN971B/LCD2010X/7A812101 24 00.8.30, 2:21 PM
...your MultiSync LCD monitor, use the following OSM controls: • Auto Adjust Contrast (Analog input only) • Auto Adjust (Analog input only) Refer to the AC inlet on the back of the monitor. ...refer to the "Audio out" terminal of LCD module and/or shorten the module's life. 4. Replace connector cover. 2. Headphones may result in the NEC LCD Setup Software CD case for installation and ...the connector on the back of the monitor and the other end to the Troubleshooting section of the monitor. Español Italiano Appendix CN971B/LCD2010X/7A812101 24 00.8.30, 2:21 PM

User Manual
Page 27
...lower to the desired height (Figure RL.1). Disconnect all cables. 2. English Deutsch Français Installation E - 12 Raise and Lower Monitor Screen The monitor may be raised to the highest level to avoid knocking the screen on the desk or pinching your fingers. To raise the screen, place... stand cover. (Figure S.2) Next, lift up to remove the upper stand cover. (Figure S.3) Español Italiano Appendix CN971B/LCD2010X/7A812101 27 00.8.30, 2:21 PM To toggle the orientation of the monitor screen with your hands and adjust the tilt and swivel as desired (Figure TS.1). Remove...
...lower to the desired height (Figure RL.1). Disconnect all cables. 2. English Deutsch Français Installation E - 12 Raise and Lower Monitor Screen The monitor may be raised to the highest level to avoid knocking the screen on the desk or pinching your fingers. To raise the screen, place... stand cover. (Figure S.2) Next, lift up to remove the upper stand cover. (Figure S.3) Español Italiano Appendix CN971B/LCD2010X/7A812101 27 00.8.30, 2:21 PM To toggle the orientation of the monitor screen with your hands and adjust the tilt and swivel as desired (Figure TS.1). Remove...

User Manual
Page 29
GS mark). Español Italiano Appendix CN971B/LCD2010X/7A812101 29 00.8.30, 2:21 PM NOTE: Use only VESA-compatible alternative mounting method. 55mm Figure S.1 4 3 1 2 Figure S.2 Figure S.3 Figure S.4 Caution: To fulfil the safety requirements the monitor must be used with an approved arm (e.g. ... stand to its original position, remove the 4 screws that connect the monitor to reattach stand. Reverse this process to the stand, and lift off the stand assembly. (Figure S.4) 5. The LCD monitor shall only be mounted to an arm which guaranties the necessary stability under...
GS mark). Español Italiano Appendix CN971B/LCD2010X/7A812101 29 00.8.30, 2:21 PM NOTE: Use only VESA-compatible alternative mounting method. 55mm Figure S.1 4 3 1 2 Figure S.2 Figure S.3 Figure S.4 Caution: To fulfil the safety requirements the monitor must be used with an approved arm (e.g. ... stand to its original position, remove the 4 screws that connect the monitor to reattach stand. Reverse this process to the stand, and lift off the stand assembly. (Figure S.4) 5. The LCD monitor shall only be mounted to an arm which guaranties the necessary stability under...

User Manual
Page 30
...PROCEED to the factory setting. To change DVI/D-SUB signal input. EXIT Main Menu Exits the OSM controls. Español Italiano Appendix CN971B/LCD2010X/7A812101 30 00.8.30, 2:21 PM In Tool and Information Mode, opens additional window. English Deutsch Français E - 15 Controls ...Controls OSM Controls MUTE DVI / D-SUB OSM EXIT CONTROL PROCEED RESET The OSM controls on the front of the monitor provide the following functions: To access OSM menu, press any of the controls controls Moves the highlighted area Moves the bar left / left /...
...PROCEED to the factory setting. To change DVI/D-SUB signal input. EXIT Main Menu Exits the OSM controls. Español Italiano Appendix CN971B/LCD2010X/7A812101 30 00.8.30, 2:21 PM In Tool and Information Mode, opens additional window. English Deutsch Français E - 15 Controls ...Controls OSM Controls MUTE DVI / D-SUB OSM EXIT CONTROL PROCEED RESET The OSM controls on the front of the monitor provide the following functions: To access OSM menu, press any of the controls controls Moves the highlighted area Moves the bar left / left /...

User Manual
Page 31
Size and Fine settings. CONTRAST Adjusts the image brightness in relation to complete setup of your MultiSync monitor. Image Adjust Controls (Analog input only) H. FINE Improves focus, clarity and image stability by increasing or decreasing this setting. AUTO... Adjust (Analog input only) Automatically adjusts the Image Position, H. NOTE: Manual adjustment of the LCD. Size / Fine controls may be required to the background. Español Italiano Appendix CN971B/LCD2010X/7A812101 31 00.8.30, 2:21 PM AUTO ADJUST CONTRAST (Analog input only) Adjusts the image displayed...
Size and Fine settings. CONTRAST Adjusts the image brightness in relation to complete setup of your MultiSync monitor. Image Adjust Controls (Analog input only) H. FINE Improves focus, clarity and image stability by increasing or decreasing this setting. AUTO... Adjust (Analog input only) Automatically adjusts the Image Position, H. NOTE: Manual adjustment of the LCD. Size / Fine controls may be required to the background. Español Italiano Appendix CN971B/LCD2010X/7A812101 31 00.8.30, 2:21 PM AUTO ADJUST CONTRAST (Analog input only) Adjusts the image displayed...

User Manual
Page 33
... is present in the other port, then the monitor switches the video source input port to the "...current video input signal is not present, then the monitor searches for a video signal from the current source ... If the video signal is supplied to the monitor, then the monitor will automatically switch to "FIRST DETECT" mode....monitor searches for other video input port. SOUND Adjusts the volume of video detection when two computers are connected. When the monitor... is present. When the DVI selection has been changed, you must restart your computer. The monitor will...
... is present in the other port, then the monitor switches the video source input port to the "...current video input signal is not present, then the monitor searches for a video signal from the current source ... If the video signal is supplied to the monitor, then the monitor will automatically switch to "FIRST DETECT" mode....monitor searches for other video input port. SOUND Adjusts the volume of video detection when two computers are connected. When the monitor... is present. When the DVI selection has been changed, you must restart your computer. The monitor will...

User Manual
Page 34
... take effect. The RESET button will appear on your screen. Español Italiano Appendix CN971B/LCD2010X/7A812101 34 00.8.30, 2:21 PM Individual settings can choose where you would like the OSM control... image to appear on the screen after 30 seconds, notifying you can select how long the monitor waits after the last touch of the OSM control menu left, right, up or down for... menu. English Deutsch Français E - 19 Controls Tools 2 LANGUAGE OSM control menus are 10, 20, 30, 60 and 120 seconds. To de-activate the OSM Lock Out mode, again simultaneously press and ...
... take effect. The RESET button will appear on your screen. Español Italiano Appendix CN971B/LCD2010X/7A812101 34 00.8.30, 2:21 PM Individual settings can choose where you would like the OSM control... image to appear on the screen after 30 seconds, notifying you can select how long the monitor waits after the last touch of the OSM control menu left, right, up or down for... menu. English Deutsch Français E - 19 Controls Tools 2 LANGUAGE OSM control menus are 10, 20, 30, 60 and 120 seconds. To de-activate the OSM Lock Out mode, again simultaneously press and ...


