User Guide
Page 3
... the Compact Wireless-G Internet Video Camera 6 Camera LED 6 Camera Head 6 Camera Reset Button 6 Camera Ports 7 Camera Stand 7 Chapter 4: Connecting the Compact Wireless-G Internet Video Camera for Setup 8 Overview 8 Connection to a Wired Network for Setup 8 Moving the Camera to a Different Network 9 Chapter 5: Setting up and Mounting the Compact Wireless-G Internet Video Camera 10 Setup Wizard 10 Placement Options 19 Chapter 6: Installing and Using the Compact Wireless-G Internet Video Camera Multi-Camera Viewer & Recorder Utility 21 Overview 21 Installing the...
... the Compact Wireless-G Internet Video Camera 6 Camera LED 6 Camera Head 6 Camera Reset Button 6 Camera Ports 7 Camera Stand 7 Chapter 4: Connecting the Compact Wireless-G Internet Video Camera for Setup 8 Overview 8 Connection to a Wired Network for Setup 8 Moving the Camera to a Different Network 9 Chapter 5: Setting up and Mounting the Compact Wireless-G Internet Video Camera 10 Setup Wizard 10 Placement Options 19 Chapter 6: Installing and Using the Compact Wireless-G Internet Video Camera Multi-Camera Viewer & Recorder Utility 21 Overview 21 Installing the...

User Guide
Page 4
... Wizard for the SoloLink DDNS Service 33 SoloLink Registration of Additional Cameras 43 Chapter 8: Using the Compact Wireless-G Internet Video Camera's Web-based Utility 45 Overview 45 How to Access the Web-based Utility 45 View Video 46 Setup 47 Help 60 Appendix A: Troubleshooting 61 Common Problems and Solutions 61 Frequently Asked Questions 63 Appendix B: Wireless Security 66 Security Precautions 66 Security Threats Facing Wireless Networks 66 Appendix C: Upgrading Firmware 69 Appendix D: Windows Help 70 Appendix E: Glossary 71 Appendix F: Specifications...
... Wizard for the SoloLink DDNS Service 33 SoloLink Registration of Additional Cameras 43 Chapter 8: Using the Compact Wireless-G Internet Video Camera's Web-based Utility 45 Overview 45 How to Access the Web-based Utility 45 View Video 46 Setup 47 Help 60 Appendix A: Troubleshooting 61 Common Problems and Solutions 61 Frequently Asked Questions 63 Appendix B: Wireless Security 66 Security Precautions 66 Security Threats Facing Wireless Networks 66 Appendix C: Upgrading Firmware 69 Appendix D: Windows Help 70 Appendix E: Glossary 71 Appendix F: Specifications...
User Guide
Page 7
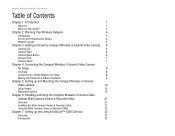
... Available Port Screen 44 Figure 8-1: Camera's Default IP Address 45 Figure 8-2: Web-based Utility Welcome 45 Figure 8-3: Security Warning Screen 46 Figure 8-4: View Video Screen 46 Figure 8-5: Web Utility Login Screen 47 Figure 8-6: Basic Screen 47 Figure 8-7: Basic - LAN and Wireless Settings Screen 48 Figure 8-9: Wireless Security - WPA Personal Screen 49 Figure 8-10: Wireless Security - WEP Screen 49 Figure 8-11: Image Screen 50 Figure 8-12: Administrator Screen 52 Figure 8-13: Upgrade Firmware Screen 52 Figure 8-14: Users Screen 53 Device Settings Screen 48...
... Available Port Screen 44 Figure 8-1: Camera's Default IP Address 45 Figure 8-2: Web-based Utility Welcome 45 Figure 8-3: Security Warning Screen 46 Figure 8-4: View Video Screen 46 Figure 8-5: Web Utility Login Screen 47 Figure 8-6: Basic Screen 47 Figure 8-7: Basic - LAN and Wireless Settings Screen 48 Figure 8-9: Wireless Security - WPA Personal Screen 49 Figure 8-10: Wireless Security - WEP Screen 49 Figure 8-11: Image Screen 50 Figure 8-12: Administrator Screen 52 Figure 8-13: Upgrade Firmware Screen 52 Figure 8-14: Users Screen 53 Device Settings Screen 48...
User Guide
Page 9
...-Camera Viewer & Recorder Utility lets you record the video stream to help you integrate the Camera into its included stand for choosing the Linksys Compact Wireless-G Internet Video Camera. Use the instructions in its own web server, so it wide open an appropriate port on the Router, and then create password-protected accounts to manage access to the Camera, or leave it can also turn on a predetermined schedule. This Camera sends live video stream if the situation warrants. Ethernet: an IEEE standard network...
...-Camera Viewer & Recorder Utility lets you record the video stream to help you integrate the Camera into its included stand for choosing the Linksys Compact Wireless-G Internet Video Camera. Use the instructions in its own web server, so it wide open an appropriate port on the Router, and then create password-protected accounts to manage access to the Camera, or leave it can also turn on a predetermined schedule. This Camera sends live video stream if the situation warrants. Ethernet: an IEEE standard network...

User Guide
Page 10
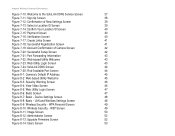
... install and use the Compact Wireless-G Internet Video Camera Utility on your PC, so you can view and record video. • Chapter 7: Setting up the Linksys SoloLink™ DDNS Service This chapter discusses the advantages of the SoloLink DDNS Service and walks you through the setup procedure. • Chapter 8: Using the Compact Wireless-G Internet Video Camera Web-based Utility This chapter describes the Web-based Utility and the features available, so you can use and alter advanced configuration settings. • Appendix A: Troubleshooting...
... install and use the Compact Wireless-G Internet Video Camera Utility on your PC, so you can view and record video. • Chapter 7: Setting up the Linksys SoloLink™ DDNS Service This chapter discusses the advantages of the SoloLink DDNS Service and walks you through the setup procedure. • Chapter 8: Using the Compact Wireless-G Internet Video Camera Web-based Utility This chapter describes the Web-based Utility and the features available, so you can use and alter advanced configuration settings. • Appendix A: Troubleshooting...
User Guide
Page 11
Compact Wireless-G Internet Video Camera • Appendix C: Upgrading Firmware This appendix explains how you can upgrade the Camera's firmware. • Appendix D: Windows Help This appendix describes how you can use Windows Help for instructions about networking, such as installing the TCP/IP protocol. • Appendix E: Glossary This appendix gives a brief glossary of terms frequently used in this Guide? Chapter 1: Introduction 3 What's in networking. • Appendix F: Specifications This appendix provides the technical specifications for the...
Compact Wireless-G Internet Video Camera • Appendix C: Upgrading Firmware This appendix explains how you can upgrade the Camera's firmware. • Appendix D: Windows Help This appendix describes how you can use Windows Help for instructions about networking, such as installing the TCP/IP protocol. • Appendix E: Glossary This appendix gives a brief glossary of terms frequently used in this Guide? Chapter 1: Introduction 3 What's in networking. • Appendix F: Specifications This appendix provides the technical specifications for the...

User Guide
Page 18
... D:\wvc54gc.exe (if "D" is the letter of this button. Install Viewer & Recorder Utility. Click the Setup SoloLink DDNS Service button to open the PDF file of your CD-ROM drive). After reading the License Agreement, click Next if you through the installation and configuration procedure. 1. Setup SoloLink DDNS Service. If it does not, click the Start button and choose Run. Click the Setup button to end the installation. Figure 5-1: Setup Wizard - Welcome Screen Chapter 5: Setting up and Mounting the Compact Wireless-G Internet Video Camera Setup Wizard...
... D:\wvc54gc.exe (if "D" is the letter of this button. Install Viewer & Recorder Utility. Click the Setup SoloLink DDNS Service button to open the PDF file of your CD-ROM drive). After reading the License Agreement, click Next if you through the installation and configuration procedure. 1. Setup SoloLink DDNS Service. If it does not, click the Start button and choose Run. Click the Setup button to end the installation. Figure 5-1: Setup Wizard - Welcome Screen Chapter 5: Setting up and Mounting the Compact Wireless-G Internet Video Camera Setup Wizard...
User Guide
Page 26
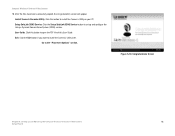
... this User Guide. Click this button to open the PDF file of this button to install the Camera's Utility later. Go to set up and Mounting the Compact Wireless-G Internet Video Camera 18 Setup Wizard Click the Setup SoloLink DDNS Service button to the "Placement Options" section. Install Viewer & Recorder Utility. Figure 5-18: Congratulations Screen Chapter 5: Setting up and configure the Linksys Dynamic Domain Name System (DDNS) service. Compact Wireless-G Internet Video Camera 18. Click the Exit button if you want to install the Camera's Utility on your PC. User Guide.
... this User Guide. Click this button to open the PDF file of this button to install the Camera's Utility later. Go to set up and Mounting the Compact Wireless-G Internet Video Camera 18 Setup Wizard Click the Setup SoloLink DDNS Service button to the "Placement Options" section. Install Viewer & Recorder Utility. Figure 5-18: Congratulations Screen Chapter 5: Setting up and configure the Linksys Dynamic Domain Name System (DDNS) service. Compact Wireless-G Internet Video Camera 18. Click the Exit button if you want to install the Camera's Utility on your PC. User Guide.
User Guide
Page 29
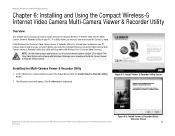
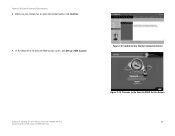
... 6: Installing and Using the Compact Wireless-G Internet Video Camera Multi-Camera Viewer & Recorder Utility Overview Figure 6-2: Install Viewer & Recorder Utility Welcome Screen 21 The View Video feature will not work with Netscape. Installing the Multi-Camera Viewer & Recorder Utility 1. On the Welcome or Congratulations screen of the Setup Wizard, click the Install Viewer & Recorder Utility button. 2. Netscape users should use Internet Explorer version 5.5 or higher. Click the Next button to easily view and record the Camera's video. NOTE: To view video using a web browser...
... 6: Installing and Using the Compact Wireless-G Internet Video Camera Multi-Camera Viewer & Recorder Utility Overview Figure 6-2: Install Viewer & Recorder Utility Welcome Screen 21 The View Video feature will not work with Netscape. Installing the Multi-Camera Viewer & Recorder Utility 1. On the Welcome or Congratulations screen of the Setup Wizard, click the Install Viewer & Recorder Utility button. 2. Netscape users should use Internet Explorer version 5.5 or higher. Click the Next button to easily view and record the Camera's video. NOTE: To view video using a web browser...
User Guide
Page 30
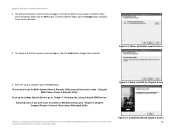
... Camera Web-based Utility." Advanced users: If you want to use the Multi-Camera Viewer & Recorder Utility, proceed to Install the Program screen will appear. Figure 6-4: Ready to begin the installation. Compact Wireless-G Internet Video Camera 3. To install the Multi-Camera Viewer & Recorder Utility files in the default folder, click the Next button. When the setup is complete, click the Finish button. The Ready to the next section, "Using the Multi-Camera Viewer & Recorder Utility." To set up the Linksys SoloLink DDNS Service." Figure 6-3: Choose Destination Location Screen...
... Camera Web-based Utility." Advanced users: If you want to use the Multi-Camera Viewer & Recorder Utility, proceed to Install the Program screen will appear. Figure 6-4: Ready to begin the installation. Compact Wireless-G Internet Video Camera 3. To install the Multi-Camera Viewer & Recorder Utility files in the default folder, click the Next button. When the setup is complete, click the Finish button. The Ready to the next section, "Using the Multi-Camera Viewer & Recorder Utility." To set up the Linksys SoloLink DDNS Service." Figure 6-3: Choose Destination Location Screen...

User Guide
Page 31
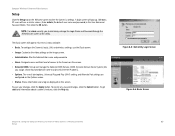
...Chapter 6: Installing and Using the Compact Wireless-G Internet Video Camera Multi-Camera Viewer & Recorder Utility Using the Multi-Camera Viewer & Recorder Utility Figure 6-6: Multi-Camera Viewer & Recorder Utility Icon Figure 6-7: Main Screen 23 To configure the Utility settings, click the Utility Settings button. button in the upper right-hand corner. NOTE: This Multi-Camera Viewer & Recorder Utility is divided into three sections, Camera Status, Camera functions, and viewing windows for Channels 1-8 of a specific Camera, select a Camera. You will be displayed in two locations, one...
...Chapter 6: Installing and Using the Compact Wireless-G Internet Video Camera Multi-Camera Viewer & Recorder Utility Using the Multi-Camera Viewer & Recorder Utility Figure 6-6: Multi-Camera Viewer & Recorder Utility Icon Figure 6-7: Main Screen 23 To configure the Utility settings, click the Utility Settings button. button in the upper right-hand corner. NOTE: This Multi-Camera Viewer & Recorder Utility is divided into three sections, Camera Status, Camera functions, and viewing windows for Channels 1-8 of a specific Camera, select a Camera. You will be displayed in two locations, one...
User Guide
Page 39
... appear. button to designate a different directory. Compact Wireless-G Internet Video Camera Utility Settings To configure the settings of time you want from the dropdown menu. The default is C:\Program Files\Linksys\Wireless-G Internet Video Camera\Snapshot. To change the Directory, Recording Time Frame, Disk Allocation for recording. The default is C:\Program Files\Linksys\Wireless-G Internet Video Camera\Motion. The Utility Settings screen will be saved. Snapshot Directory. Chapter 6: Installing and Using the Compact Wireless-G Internet Video Camera Multi-Camera Viewer...
... appear. button to designate a different directory. Compact Wireless-G Internet Video Camera Utility Settings To configure the settings of time you want from the dropdown menu. The default is C:\Program Files\Linksys\Wireless-G Internet Video Camera\Snapshot. To change the Directory, Recording Time Frame, Disk Allocation for recording. The default is C:\Program Files\Linksys\Wireless-G Internet Video Camera\Motion. The Utility Settings screen will be saved. Snapshot Directory. Chapter 6: Installing and Using the Compact Wireless-G Internet Video Camera Multi-Camera Viewer...
User Guide
Page 44
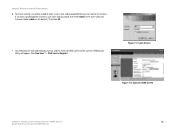
... New User ? - Click here to enter a user name and password before you can access the Camera. To ensure security, you have not changed the Camera's user name and password, then enter admin in the User name and Password fields (admin is the default). Then click OK. 7. Figure 7-7: Login Screen Figure 7-8: SoloLink DDNS Screen Chapter 7: Setting up , and the SoloLink DDNS screen of the Camera's Web-based Utility will appear. Your web browser will be asked to Register. Compact Wireless-G Internet Video Camera 6.
... New User ? - Click here to enter a user name and password before you can access the Camera. To ensure security, you have not changed the Camera's user name and password, then enter admin in the User name and Password fields (admin is the default). Then click OK. 7. Figure 7-7: Login Screen Figure 7-8: SoloLink DDNS Screen Chapter 7: Setting up , and the SoloLink DDNS screen of the Camera's Web-based Utility will appear. Your web browser will be asked to Register. Compact Wireless-G Internet Video Camera 6.
User Guide
Page 45
Figure 7-9: Confirm Active Internet Connection Screen Chapter 7: Setting up a NEW Account. Make sure your network has an active Internet connection. Click Continue. 9. On the Welcome to the SoloLink DDNS Service screen, click Set up the Linksys SoloLink™ DDNS Service Setup Wizard for the SoloLink DDNS Service Figure 7-10: Welcome to the SoloLink DDNS Service Screen 37 Compact Wireless-G Internet Video Camera 8.
Figure 7-9: Confirm Active Internet Connection Screen Chapter 7: Setting up a NEW Account. Make sure your network has an active Internet connection. Click Continue. 9. On the Welcome to the SoloLink DDNS Service screen, click Set up the Linksys SoloLink™ DDNS Service Setup Wizard for the SoloLink DDNS Service Figure 7-10: Welcome to the SoloLink DDNS Service Screen 37 Compact Wireless-G Internet Video Camera 8.
User Guide
Page 55
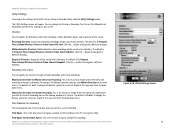
... button. The Basic screen will see a similar screen.) Enter admin (the default user name and password) in the User Name and Password fields. Customize the video settings on this screen. • SoloLink DDNS. Status information and a log are configured on the Options screen. • Status. Figure 8-5: Web Utility Login Screen Figure 8-6: Basic Screen Chapter 8: Using the Compact Wireless-G Internet Video Camera's Web-based Utility 47 Setup Compact Wireless-G Internet Video Camera Setup Click the Setup tab on this screen. Alter the Administrator name and password o • Users...
... button. The Basic screen will see a similar screen.) Enter admin (the default user name and password) in the User Name and Password fields. Customize the video settings on this screen. • SoloLink DDNS. Status information and a log are configured on the Options screen. • Status. Figure 8-5: Web Utility Login Screen Figure 8-6: Basic Screen Chapter 8: Using the Compact Wireless-G Internet Video Camera's Web-based Utility 47 Setup Compact Wireless-G Internet Video Camera Setup Click the Setup tab on this screen. Alter the Administrator name and password o • Users...

User Guide
Page 56
... to ad-hoc mode, select its channel setting from a DHCP server, then select Automatic Configuration - LED Operation. Click the Disable radio button if you want the Camera to alter the Camera's settings, including the network and wireless configuration. If the Camera will obtain an IP address automatically from the drop-down menu. If the Camera is set to the Camera. Chapter 8: Using the Compact Wireless-G Internet Video Camera's Web-based Utility Setup Figure 8-7: Basic - Device Settings Screen Figure 8-8: Basic - You...
... to ad-hoc mode, select its channel setting from a DHCP server, then select Automatic Configuration - LED Operation. Click the Disable radio button if you want the Camera to alter the Camera's settings, including the network and wireless configuration. If the Camera will obtain an IP address automatically from the drop-down menu. If the Camera is set to the Camera. Chapter 8: Using the Compact Wireless-G Internet Video Camera's Web-based Utility Setup Figure 8-7: Basic - Device Settings Screen Figure 8-8: Basic - You...

User Guide
Page 57
... changes, click the Apply button. You can use , WEP or WPA Personal (all devices on those products.) After entering the Passphrase, click the Generate button to generate them . This setting should not be displayed after you want to use a Passphrase to create WEP key(s). To save your wireless network must have generated them . Chapter 8: Using the Compact Wireless-G Internet Video Camera's Web-based Utility Setup Figure 8-9: Wireless Security - WPA Personal Screen...
... changes, click the Apply button. You can use , WEP or WPA Personal (all devices on those products.) After entering the Passphrase, click the Generate button to generate them . This setting should not be displayed after you want to use a Passphrase to create WEP key(s). To save your wireless network must have generated them . Chapter 8: Using the Compact Wireless-G Internet Video Camera's Web-based Utility Setup Figure 8-9: Wireless Security - WPA Personal Screen...
User Guide
Page 60
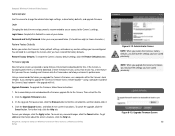
...-the upgrade will fail. Login Changing the default name and password is no need to www.linksys.com and download the firmware upgrade file for free. Upgrade Firmware. Then extract the file. 2. Chapter 8: Using the Compact Wireless-G Internet Video Camera's Web-based Utility Setup Figure 8-12: Administrator Screen NOTE: When you restore the Camera's factory defaults, you will need to download a newer firmware version, unless that version has a new feature that when you have configured. Login Name. If you have restored the factory defaults. Click the Start Upgrade button...
...-the upgrade will fail. Login Changing the default name and password is no need to www.linksys.com and download the firmware upgrade file for free. Upgrade Firmware. Then extract the file. 2. Chapter 8: Using the Compact Wireless-G Internet Video Camera's Web-based Utility Setup Figure 8-12: Administrator Screen NOTE: When you restore the Camera's factory defaults, you will need to download a newer firmware version, unless that version has a new feature that when you have configured. Login Name. If you have restored the factory defaults. Click the Start Upgrade button...

User Guide
Page 61
... click the Apply button. To add a new user, Complete the User Name, User Password, and Confirm Password fields. To clear the changes you enter in the database will be allowed to view the Camera's video. To cancel any unsaved changes, click the Cancel button. Figure 8-14: Users Screen Chapter 8: Using the Compact Wireless-G Internet Video Camera's Web-based Utility 53 Setup They will be asked to eight users into the database. These users are then listed...
... click the Apply button. To add a new user, Complete the User Name, User Password, and Confirm Password fields. To clear the changes you enter in the database will be allowed to view the Camera's video. To cancel any unsaved changes, click the Cancel button. Figure 8-14: Users Screen Chapter 8: Using the Compact Wireless-G Internet Video Camera's Web-based Utility 53 Setup They will be asked to eight users into the database. These users are then listed...
User Guide
Page 70
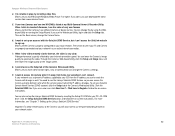
... Cameras, I view video remotely via the Internet, the video is very slow. You can download the latest version from home, but I have two Cameras and see the video of the Camera's Web-based Utility. Make sure you use to use the Linksys SoloLink DDNS Service, so you use the port forwarding feature on the Basic screen, change the Camera's settings. 9. You need to reach the Camera will also have different camera or device names. Follow the on -screen instructions. Appendix A: Troubleshooting...
... Cameras, I view video remotely via the Internet, the video is very slow. You can download the latest version from home, but I have two Cameras and see the video of the Camera's Web-based Utility. Make sure you use to use the Linksys SoloLink DDNS Service, so you use the port forwarding feature on the Basic screen, change the Camera's settings. 9. You need to reach the Camera will also have different camera or device names. Follow the on -screen instructions. Appendix A: Troubleshooting...


