Quick Reference
Page 1
...fax Press Stop/Clear to the scan destination. 5 Press Go/Send. ©Copyright Lexmark International, Inc., 2002. You must restart the fax sending process. Press Menu > repeatedly until you see your fax destination. Press Stop/Clear when all the pages have already scanned into memory, press Menu > until...shortcut number assigned to cancel sending a fax. Scan a document 1 At your PC, type the IP address of the MFP in the URL field of your browser or use the ScanBack Utility to define your scan profile. 2 Locate the network-attached MFP you want to use . 3 Place your originals...
...fax Press Stop/Clear to the scan destination. 5 Press Go/Send. ©Copyright Lexmark International, Inc., 2002. You must restart the fax sending process. Press Menu > repeatedly until you see your fax destination. Press Stop/Clear when all the pages have already scanned into memory, press Menu > until...shortcut number assigned to cancel sending a fax. Scan a document 1 At your PC, type the IP address of the MFP in the URL field of your browser or use the ScanBack Utility to define your scan profile. 2 Locate the network-attached MFP you want to use . 3 Place your originals...
User's Reference
Page 3
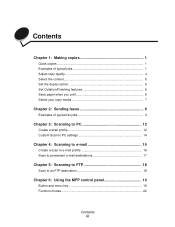
... faxes 8 Examples of typical fax jobs 9 Chapter 3: Scanning to PC 12 Create a scan profile 12 Custom Scan to PC settings 14 Chapter 4: Scanning to e-mail 16 Create a scan to e-mail profile 16 Scan to permanent e-mail destinations 17 Chapter 5: Scanning to FTP 18 Scan to an FTP destination 18 Chapter 6: Using the MFP control panel 19 Button and menu key 19...
... faxes 8 Examples of typical fax jobs 9 Chapter 3: Scanning to PC 12 Create a scan profile 12 Custom Scan to PC settings 14 Chapter 4: Scanning to e-mail 16 Create a scan to e-mail profile 16 Scan to permanent e-mail destinations 17 Chapter 5: Scanning to FTP 18 Scan to an FTP destination 18 Chapter 6: Using the MFP control panel 19 Button and menu key 19...
User's Reference
Page 17
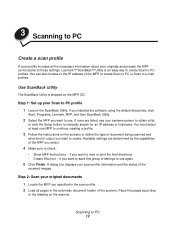
... of settings to use . Step 2: Scan your Scan to PC profile 1 Launch the ScanBack Utility. Scanning to e-mail profiles. If you installed the software using the default directories, click Start, Programs, Lexmark, MFP, and then ScanBack Utility. 2 Select the MFP you want to use again 5 Click Finish...can also browse to the IP address of the MFP to create Scan to PC or Scan to PC 12 3 Scanning to PC Create a scan profile A scan profile includes all pages in the scan profile. 2 Load all the necessary information about your scan profile information and the status of the received ...
... of settings to use . Step 2: Scan your Scan to PC profile 1 Launch the ScanBack Utility. Scanning to e-mail profiles. If you installed the software using the default directories, click Start, Programs, Lexmark, MFP, and then ScanBack Utility. 2 Select the MFP you want to use again 5 Click Finish...can also browse to the IP address of the MFP to create Scan to PC or Scan to PC 12 3 Scanning to PC Create a scan profile A scan profile includes all pages in the scan profile. 2 Load all the necessary information about your scan profile information and the status of the received ...
User's Reference
Page 18
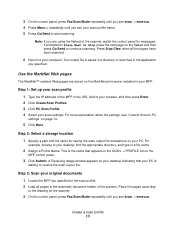
...Step 1: Set up your scan profile 1 Type the IP address of the MFP in a file name. 2 Assign a Profile Name. A Receiving Image window appears on the scanner. 3 On the control panel, press Fax/Scan Mode repeatedly until you see "Custom Scan to PC settings" on your PC. Press Stop/Clear when... to start scanning. For more explanation about the settings, see your PC is waiting to receive the scan output file. This is saved in a directory or launched in the application you specified in the SCAN → PROFILE list on the MFP control panel. 3 Click Submit. Step 3: Scan your original ...
...Step 1: Set up your scan profile 1 Type the IP address of the MFP in a file name. 2 Assign a Profile Name. A Receiving Image window appears on the scanner. 3 On the control panel, press Fax/Scan Mode repeatedly until you see "Custom Scan to PC settings" on your PC. Press Stop/Clear when... to start scanning. For more explanation about the settings, see your PC is waiting to receive the scan output file. This is saved in a directory or launched in the application you specified in the SCAN → PROFILE list on the MFP control panel. 3 Click Submit. Step 3: Scan your original ...
User's Reference
Page 19
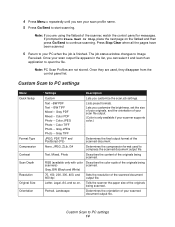
... Next Or Stop, place the next page on . Press Stop/Clear when all the pages have been scanned. 6 Return to Image Received. The job status window changes to your PC when the job is only available if your scanner supports color.) JPEG, PDF, TIFF and PostScript (PS...only with color Describes the color scale of the originals being scanners) scanned. 4 Press Menu > repeatedly until you see your scan profile name. 5 Press Go/Send to PC settings Menu Quick Setup Format Type Compression Contrast Scan Depth Resolution Original Size Orientation Settings Description Custom Lets you are using...
... Next Or Stop, place the next page on . Press Stop/Clear when all the pages have been scanned. 6 Return to Image Received. The job status window changes to your PC when the job is only available if your scanner supports color.) JPEG, PDF, TIFF and PostScript (PS...only with color Describes the color scale of the originals being scanners) scanned. 4 Press Menu > repeatedly until you see your scan profile name. 5 Press Go/Send to PC settings Menu Quick Setup Format Type Compression Contrast Scan Depth Resolution Original Size Orientation Settings Description Custom Lets you are using...
User's Reference
Page 20
Custom Scan to activate the scan profile. Specifies the original is to be located. Select this name in the MFP control panel to PC settings 15 Menu Save to Profile Name Duplex Settings Type in the path or browse to the location Type in a unique name Both or Single (only available with duplex scanners) Description Location path where scanned file is a duplex page. Name that appears in the MFP control panel.
Custom Scan to activate the scan profile. Specifies the original is to be located. Select this name in the MFP control panel to PC settings 15 Menu Save to Profile Name Duplex Settings Type in the path or browse to the location Type in a unique name Both or Single (only available with duplex scanners) Description Location path where scanned file is a duplex page. Name that appears in the MFP control panel.
User's Reference
Page 27
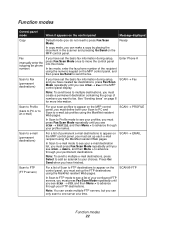
.... Press Go/ Send when you see SCAN → Fax in the scanner and pressing Go/Send on the MFP control panel. SCAN ® FTP Function modes 22 SCAN → Fax Scan to Profile (back to PC or to an e-mail) For your profile names. SCAN → EMAIL Scan to FTP (FTP servers) For a ...list of Scan to FTP destinations to appear on the control ...
.... Press Go/ Send when you see SCAN → Fax in the scanner and pressing Go/Send on the MFP control panel. SCAN ® FTP Function modes 22 SCAN → Fax Scan to Profile (back to PC or to an e-mail) For your profile names. SCAN → EMAIL Scan to FTP (FTP servers) For a ...list of Scan to FTP destinations to appear on the control ...

User's Reference
Page 60
destinations 30 profile 16 setup 16 Scan to PC customizing settings 14 profile 13 setup 13 scanning control panel modes 22 selecting copy content 5 copy media 7 setting a password for job accounts 35 setting duplex option 6 shortcut list 51 T tracking usage 34 troubleshooting copying 38 faxing, receiving 42 faxing, sending 41 job accounting 48 network scanning 46 scan to e-mail 46, 48 scan to FTP 47, 50 Index 55
destinations 30 profile 16 setup 16 Scan to PC customizing settings 14 profile 13 setup 13 scanning control panel modes 22 selecting copy content 5 copy media 7 setting a password for job accounts 35 setting duplex option 6 shortcut list 51 T tracking usage 34 troubleshooting copying 38 faxing, receiving 42 faxing, sending 41 job accounting 48 network scanning 46 scan to e-mail 46, 48 scan to FTP 47, 50 Index 55


