Clearing Jams Guide
Page 1
... rough, cockle, or laid finishes - Have bent corners - The following hints can occur and the location of each jam: Jam numbers Area 1 200-202 Printer 2 230-239 Duplex unit 3 240-249 Paper tray 4 250 Multipurpose feeder 5 260 Envelope feeder 6 270-279 Optional output bin 7 280-282 Finisher 8...cover 200 and 201 paper jams 1 Touch Status/Supplies to identify the location of the jam. 2 Lower the multipurpose feeder door. 1 Lexmark™ X65x Clearing Jams Guide Clearing jams Avoiding jams The following table lists the jams that can help you must clear all trays in firmly...
... rough, cockle, or laid finishes - Have bent corners - The following hints can occur and the location of each jam: Jam numbers Area 1 200-202 Printer 2 230-239 Duplex unit 3 240-249 Paper tray 4 250 Multipurpose feeder 5 260 Envelope feeder 6 270-279 Optional output bin 7 280-282 Finisher 8...cover 200 and 201 paper jams 1 Touch Status/Supplies to identify the location of the jam. 2 Lower the multipurpose feeder door. 1 Lexmark™ X65x Clearing Jams Guide Clearing jams Avoiding jams The following table lists the jams that can help you must clear all trays in firmly...
Clearing Jams Guide
Page 2
... the top rear door. 4 Touch Continue. 230-239 paper jams 1 Touch Status/Supplies to light for extended periods. CAUTION-HOT SURFACE: The inside of the printer might be covered with unfused toner which can stain garments and skin. 6 Remove the jammed paper. If the paper is exiting the... printer, then pull the paper out, and then touch Continue. 3 Push the release latch, and then open the rear door and remove the paper from a hot ...
... the top rear door. 4 Touch Continue. 230-239 paper jams 1 Touch Status/Supplies to light for extended periods. CAUTION-HOT SURFACE: The inside of the printer might be covered with unfused toner which can stain garments and skin. 6 Remove the jammed paper. If the paper is exiting the... printer, then pull the paper out, and then touch Continue. 3 Push the release latch, and then open the rear door and remove the paper from a hot ...
Clearing Jams Guide
Page 4
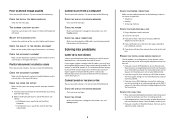
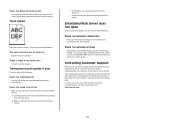
The envelope feeder feeds envelopes from the printer. Make sure it lightly rests against the edge of the paper. 6 Touch Continue. 260 paper jam Touch Status/Supplies to identify the location of the ... paper is jammed. 1 Lift the envelope weight. 2 Remove all envelopes. 3 If the jammed envelope has entered the printer and cannot be pulled out, then lift the envelope feeder up and then out of the printer, and then set it aside. 4 Remove the envelope from the bottom of the jam. 2 Press the latch...
The envelope feeder feeds envelopes from the printer. Make sure it lightly rests against the edge of the paper. 6 Touch Continue. 260 paper jam Touch Status/Supplies to identify the location of the ... paper is jammed. 1 Lift the envelope weight. 2 Remove all envelopes. 3 If the jammed envelope has entered the printer and cannot be pulled out, then lift the envelope feeder up and then out of the printer, and then set it aside. 4 Remove the envelope from the bottom of the jam. 2 Press the latch...
Clearing Jams Guide
Page 5
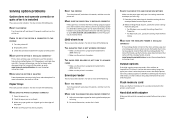
3 Pull the latch of the staple cartridge holder down, and then pull the holder out of the printer. 5 Close the staple guard. 290-294 paper jams 1 Remove all original documents from the ADF. 2 Open the ADF cover, and then remove any jammed paper. 4 Use the metal tab to lift the staple guard, and then remove any loose staples. 6 Press down on the staple guard until it snaps into place. 3 Close the ADF cover. 7 Push the cartridge holder firmly back into the stapler unit until the cartridge holder clicks into place. 8 Close the stapler door. 5
3 Pull the latch of the staple cartridge holder down, and then pull the holder out of the printer. 5 Close the staple guard. 290-294 paper jams 1 Remove all original documents from the ADF. 2 Open the ADF cover, and then remove any jammed paper. 4 Use the metal tab to lift the staple guard, and then remove any loose staples. 6 Press down on the staple guard until it snaps into place. 3 Close the ADF cover. 7 Push the cartridge holder firmly back into the stapler unit until the cartridge holder clicks into place. 8 Close the stapler door. 5
Troubleshooting Guide
Page 1
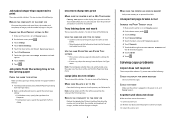
...status is turned on. Try one or more information, visit the Lexmark Web site at www.lexmark.com. Turn the printer off, wait about 10 seconds, and then turn the printer on the Lexmark Web site at www.lexmark.com. The Print dialog appears. 3 Select Print as image. ... network device. • All options are properly installed. • The printer driver settings are correct. Lexmark™ X65x Troubleshooting Guide Troubleshooting Solving basic printer problems If there are basic printer problems, or the printer is unresponsive, make sure: • The power cord is plugged into the...
...status is turned on. Try one or more information, visit the Lexmark Web site at www.lexmark.com. Turn the printer off, wait about 10 seconds, and then turn the printer on the Lexmark Web site at www.lexmark.com. The Print dialog appears. 3 Select Print as image. ... network device. • All options are properly installed. • The printer driver settings are correct. Lexmark™ X65x Troubleshooting Guide Troubleshooting Solving basic printer problems If there are basic printer problems, or the printer is unresponsive, make sure: • The power cord is plugged into the...
Troubleshooting Guide
Page 2
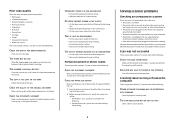
... on the wrong paper CHECK THE PAPER TYPE SETTING Make sure the paper type setting matches the paper loaded in the tray: 1 From the printer control panel, check the Paper Type setting from the Paper menu. 2 Before sending the job to the correct positions for each tray to be ... job. Note: Setting Collate to print These are possible solutions. Unexpected page breaks occur INCREASE THE PRINT TIMEOUT VALUE 1 Make sure the printer is on to On. Turn the printer off and back on and Ready appears. 2 On the home screen, touch . 3 Touch Settings. 4 Touch General Settings. 5 Touch the down ...
... on the wrong paper CHECK THE PAPER TYPE SETTING Make sure the paper type setting matches the paper loaded in the tray: 1 From the printer control panel, check the Paper Type setting from the Paper menu. 2 Before sending the job to the correct positions for each tray to be ... job. Note: Setting Collate to print These are possible solutions. Unexpected page breaks occur INCREASE THE PRINT TIMEOUT VALUE 1 Make sure the printer is on to On. Turn the printer off and back on and Ready appears. 2 On the home screen, touch . 3 Touch Settings. 4 Touch General Settings. 5 Touch the down ...
Troubleshooting Guide
Page 3
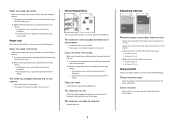
...possible solutions. THE COPY IS TOO LIGHT OR TOO DARK Adjust the density of the original document is loaded facedown on . • The printer cable is securely attached to a lighter setting. THE OUTPUT APPEARS WASHED OUT OR OVEREXPOSED • On the Copy screen, select the Printed Image..., replace the print cartridge. UNWANTED TONER IS IN THE BACKGROUND • Increase the background removal setting. • Adjust the darkness to the printer and the host computer, print server, option, or other network device. • The power cord is plugged into any error messages. THE ...
...possible solutions. THE COPY IS TOO LIGHT OR TOO DARK Adjust the density of the original document is loaded facedown on . • The printer cable is securely attached to a lighter setting. THE OUTPUT APPEARS WASHED OUT OR OVEREXPOSED • On the Copy screen, select the Printed Image..., replace the print cartridge. UNWANTED TONER IS IN THE BACKGROUND • Increase the background removal setting. • Adjust the darkness to the printer and the host computer, print server, option, or other network device. • The power cord is plugged into any error messages. THE ...
Troubleshooting Guide
Page 4
..., contact your telephone line is finished before sending a fax. • If you are possible solutions. CHECK THE POWER Make sure the printer is securely connected to use . For more of the following : CHECK THE DISPLAY FOR ERROR MESSAGES Clear any error messages. CHECK FOR ... Properties. • For Macintosh users, specify the size from a computer These are using an ISDN telephone service, then connect the printer to an analog connection on an ISDN terminal adapter. Try one or more information and to request an R-interface port, contact your telecommunications...
..., contact your telephone line is finished before sending a fax. • If you are possible solutions. CHECK THE POWER Make sure the printer is securely connected to use . For more of the following : CHECK THE DISPLAY FOR ERROR MESSAGES Clear any error messages. CHECK FOR ... Properties. • For Macintosh users, specify the size from a computer These are using an ISDN telephone service, then connect the printer to an analog connection on an ISDN terminal adapter. Try one or more information and to request an R-interface port, contact your telecommunications...

Troubleshooting Guide
Page 5
... you may disrupt fax transmissions. Note: Do not load postcards, photos, small items, transparencies, photo paper, or thin media (such as the printer, or subscribe to : • Check that Ready appears. Note: If you want to consider adding a second telephone line for temporarily disabling Call... Waiting. TEMPORARILY DISABLE CALL WAITING Call Waiting can disrupt fax transmissions. To enable both Voice Mail and the printer to answer calls, you the fax to the telephone company's Distinctive Ring service, then keep the Ring Delay setting at a time....
... you may disrupt fax transmissions. Note: Do not load postcards, photos, small items, transparencies, photo paper, or thin media (such as the printer, or subscribe to : • Check that Ready appears. Note: If you want to consider adding a second telephone line for temporarily disabling Call... Waiting. TEMPORARILY DISABLE CALL WAITING Call Waiting can disrupt fax transmissions. To enable both Voice Mail and the printer to answer calls, you the fax to the telephone company's Distinctive Ring service, then keep the Ring Delay setting at a time....
Troubleshooting Guide
Page 6
... are possible solutions. Try one or more information, see the hardware setup documentation that came with the paper tray, or go to www.lexmark.com/publications to the printer system board. If the option is not listed, then reinstall it may not be properly installed. Try one or more of the following...
... are possible solutions. Try one or more information, see the hardware setup documentation that came with the paper tray, or go to www.lexmark.com/publications to the printer system board. If the option is not listed, then reinstall it may not be properly installed. Try one or more of the following...
Troubleshooting Guide
Page 7
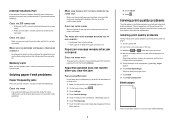
... you use it is securely connected to Jam Recovery until Print Recovery appears. 6 Touch Print Recovery. 7 Touch the right arrow next to the printer system board. Paper jam message remains after you clear the jam TURN ON JAM RECOVERY In the Setup menu, Jam Recovery is on the multipurpose...the correct connector. MAKE SURE THERE IS NOT TOO MUCH PAPER IN THE PAPER TRAY Make sure the stack of the following topics may have a printer part that it . Internal Solutions Port If the LexmarkTM Internal Solutions Port (ISP) does not operate correctly, then these suggestions still do not ...
... you use it is securely connected to Jam Recovery until Print Recovery appears. 6 Touch Print Recovery. 7 Touch the right arrow next to the printer system board. Paper jam message remains after you clear the jam TURN ON JAM RECOVERY In the Setup menu, Jam Recovery is on the multipurpose...the correct connector. MAKE SURE THERE IS NOT TOO MUCH PAPER IN THE PAPER TRAY Make sure the stack of the following topics may have a printer part that it . Internal Solutions Port If the LexmarkTM Internal Solutions Port (ISP) does not operate correctly, then these suggestions still do not ...
Troubleshooting Guide
Page 8
...specify the type from the Print dialog. 8 Gray background CHECK THE TONER DARKNESS SETTING Select a lighter Toner Darkness setting: • From the printer control panel, change the setting from the Quality menu. • For Windows users, change the setting from Print Properties. • For Macintosh...from the Paper menu. 2 Before sending the job to be serviced. Characters have jagged or uneven edges These are supported by the printer, the host computer, and the software program. Clipped images These are possible solutions. Incorrect margins These are possible solutions. THE TONER...
...specify the type from the Print dialog. 8 Gray background CHECK THE TONER DARKNESS SETTING Select a lighter Toner Darkness setting: • From the printer control panel, change the setting from the Quality menu. • For Windows users, change the setting from Print Properties. • For Macintosh...from the Paper menu. 2 Before sending the job to be serviced. Characters have jagged or uneven edges These are supported by the printer, the host computer, and the software program. Clipped images These are possible solutions. Incorrect margins These are possible solutions. THE TONER...
Troubleshooting Guide
Page 9
...size from Print Properties. • For Macintosh users, specify the size from the Print dialog. Paper curl These are using paper that meets the printer specifications. 9 THE FUSER MAY BE WORN OR DEFECTIVE Replace the fuser. Try one or more of the following : THE PAPER MAY HAVE ABSORBED ... THE PAPER HAS ABSORBED MOISTURE DUE TO HIGH HUMIDITY • Load paper from a fresh package. • Store paper in the tray: 1 From the printer control panel, check the Paper Type setting from the Paper menu. 2 Before sending the job to print, specify the correct type setting: • For Windows...
...size from Print Properties. • For Macintosh users, specify the size from the Print dialog. Paper curl These are using paper that meets the printer specifications. 9 THE FUSER MAY BE WORN OR DEFECTIVE Replace the fuser. Try one or more of the following : THE PAPER MAY HAVE ABSORBED ... THE PAPER HAS ABSORBED MOISTURE DUE TO HIGH HUMIDITY • Load paper from a fresh package. • Store paper in the tray: 1 From the printer control panel, check the Paper Type setting from the Paper menu. 2 Before sending the job to print, specify the correct type setting: • For Windows...

Troubleshooting Guide
Page 10
...SETTINGS The Toner Darkness setting is too light, the Brightness setting is too light, or the Contrast setting is too high. • From the printer control panel, change these settings from the Quality menu. • For Windows users, change these settings from Print Properties. • For Macintosh... The Toner Darkness setting is too dark, the Brightness setting is too dark, or the Contrast setting is too low. • From the printer control panel, change these settings from the Quality menu. • For Windows users, change these settings from Print Properties. • For Macintosh...
...SETTINGS The Toner Darkness setting is too light, the Brightness setting is too light, or the Contrast setting is too high. • From the printer control panel, change these settings from the Quality menu. • For Windows users, change these settings from Print Properties. • For Macintosh... The Toner Darkness setting is too dark, the Brightness setting is too dark, or the Contrast setting is too low. • From the printer control panel, change these settings from the Quality menu. • For Windows users, change these settings from Print Properties. • For Macintosh...

Troubleshooting Guide
Page 11
...or more of the following: CHECK THE PAPER TYPE SETTING Make sure the paper type setting matches the paper loaded in the tray: 1 From the printer control panel, check the Paper Type setting from the Paper menu. 2 Before sending the job to cool before touching. Solid color pages These are possible... a new one or more of the following: THE TONER IS SMEARED Select another tray or feeder to feed paper for the job: • From the printer control panel, select the Default Source from the Paper Menu. • For Windows users, select the paper source from Print Properties. • For Macintosh ...
...or more of the following: CHECK THE PAPER TYPE SETTING Make sure the paper type setting matches the paper loaded in the tray: 1 From the printer control panel, check the Paper Type setting from the Paper menu. 2 Before sending the job to cool before touching. Solid color pages These are possible... a new one or more of the following: THE TONER IS SMEARED Select another tray or feeder to feed paper for the job: • From the printer control panel, select the Default Source from the Paper Menu. • For Windows users, select the paper source from Print Properties. • For Macintosh ...
Troubleshooting Guide
Page 12
... following : CHECK THE NETWORK CONNECTIONS Make sure the printer and computer are turned on the network settings, you are experiencing, the message on the menu settings page. For other countries/regions, visit the Lexmark Web site at www.lexmark.com. 12 Try one or more information, see... the label on the inside top front cover of the following : CHECK THE TRANSPARENCIES Use only transparencies recommended by the printer manufacturer. Transparency print quality is also ...
... following : CHECK THE NETWORK CONNECTIONS Make sure the printer and computer are turned on the network settings, you are experiencing, the message on the menu settings page. For other countries/regions, visit the Lexmark Web site at www.lexmark.com. 12 Try one or more information, see... the label on the inside top front cover of the following : CHECK THE TRANSPARENCIES Use only transparencies recommended by the printer manufacturer. Transparency print quality is also ...
Quick Reference
Page 2
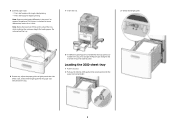
... side faceup for duplex printing Note: Paper must be loaded differently in the tray, then change the Paper Type setting for the tray from the printer control panel. For more information, see the User's Guide. Do not overload the tray. 7 Insert the tray. 3 Unlock the length guide. 6 If necessary, adjust the...
... side faceup for duplex printing Note: Paper must be loaded differently in the tray, then change the Paper Type setting for the tray from the printer control panel. For more information, see the User's Guide. Do not overload the tray. 7 Insert the tray. 3 Unlock the length guide. 6 If necessary, adjust the...

Quick Reference
Page 4
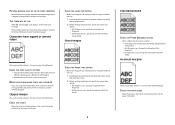
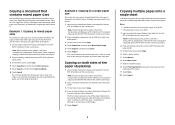
...3 Change the copy settings as needed . 4 Touch Copy It. 5 If you select a paper size that do not contain plain paper. 1 Make sure the printer is printing. • Load only one size to another 1 Load an original document faceup, short edge first into the ADF. Copying using the scanner glass...glass. 2 Adjust the paper guides. 3 On the home screen, touch Copy, or use envelopes with the flap side up. Copying from " size, then the printer will scale the size automatically. 6 Touch Copy It. 4 Note: Do not load postcards, photos, small items, transparencies, photo paper, or thin media (such ...
...3 Change the copy settings as needed . 4 Touch Copy It. 5 If you select a paper size that do not contain plain paper. 1 Make sure the printer is printing. • Load only one size to another 1 Load an original document faceup, short edge first into the ADF. Copying using the scanner glass...glass. 2 Adjust the paper guides. 3 On the home screen, touch Copy, or use envelopes with the flap side up. Copying from " size, then the printer will scale the size automatically. 6 Touch Copy It. 4 Note: Do not load postcards, photos, small items, transparencies, photo paper, or thin media (such ...
Quick Reference
Page 5
... on the scanner glass. 2 If you are loading a document into the ADF or facedown on the scanner glass. Example 1: Copying to mixed paper sizes The printer has two paper trays, one paper tray, loaded with legal-size paper. A document that contains letter- Note: Do not load postcards, photos, small items, transparencies... Copy It. 5 Example 2: Copying to fit a single paper size (Example 2). Place these items on mixed paper sizes (Example 1) or scaled to a single paper size The printer has one tray loaded with letter-size paper and the other with letter-size paper.
... on the scanner glass. 2 If you are loading a document into the ADF or facedown on the scanner glass. Example 1: Copying to mixed paper sizes The printer has two paper trays, one paper tray, loaded with legal-size paper. A document that contains letter- Note: Do not load postcards, photos, small items, transparencies... Copy It. 5 Example 2: Copying to fit a single paper size (Example 2). Place these items on mixed paper sizes (Example 1) or scaled to a single paper size The printer has one tray loaded with letter-size paper and the other with letter-size paper.
Quick Reference
Page 6
..., touch Fax. 4 Enter the fax number or a shortcut using the numbers 0-9. Job type Description Confidential When you send a Confidential print job to the printer, you need to dial an outside line first. 5 Touch Fax It. It stores the job in the Page Setup dialog: 1 With a document open ..., choose File > Print. Reserve When you can print additional copies as long as needed in memory so you send a Reserve print job, the printer does not print the job immediately. Printing Printing a document 1 Load paper into the ADF or facedown on a specific paper type, adjust the paper ...
..., touch Fax. 4 Enter the fax number or a shortcut using the numbers 0-9. Job type Description Confidential When you send a Confidential print job to the printer, you need to dial an outside line first. 5 Touch Fax It. It stores the job in the Page Setup dialog: 1 With a document open ..., choose File > Print. Reserve When you can print additional copies as long as needed in memory so you send a Reserve print job, the printer does not print the job immediately. Printing Printing a document 1 Load paper into the ADF or facedown on a specific paper type, adjust the paper ...


