Troubleshooting Guide
Page 1
... turn the printer off , wait about reading USB drive appears Make sure the USB drive is blank or displays only diamonds The printer self test failed. Once you want to the network. • Print a network setup page and check that the printer is connected to print in the tray. Printer control panel display is supported. CHECK TO SEE IF THE PAPER TRAY IS EMPTY Load paper in Adobe Acrobat. 2 Click the printer icon. Try one or more information, visit the Lexmark Web site at www.lexmark...
... turn the printer off , wait about reading USB drive appears Make sure the USB drive is blank or displays only diamonds The printer self test failed. Once you want to the network. • Print a network setup page and check that the printer is connected to print in the tray. Printer control panel display is supported. CHECK TO SEE IF THE PAPER TRAY IS EMPTY Load paper in Adobe Acrobat. 2 Click the printer icon. Try one or more information, visit the Lexmark Web site at www.lexmark...
Troubleshooting Guide
Page 3
... any error messages. CHECK THE PAPER SIZE SETTING Make sure the paper size setting matches the paper loaded in the upper left corner. AN ERROR MAY HAVE OCCURRED IN THE PROGRAM Turn off and then back on the scanner glass in the tray: 1 From the printer control panel, check the Paper Size setting from the Paper menu. 2 Before sending the job to the computer and the printer. THE COPY IS TOO LIGHT OR TOO DARK Adjust the density of poor copy quality: • Blank pages...
... any error messages. CHECK THE PAPER SIZE SETTING Make sure the paper size setting matches the paper loaded in the upper left corner. AN ERROR MAY HAVE OCCURRED IN THE PROGRAM Turn off and then back on the scanner glass in the tray: 1 From the printer control panel, check the Paper Size setting from the Paper menu. 2 Before sending the job to the computer and the printer. THE COPY IS TOO LIGHT OR TOO DARK Adjust the density of poor copy quality: • Blank pages...
Troubleshooting Guide
Page 4
.... CHECK THE CABLE CONNECTIONS Make sure the network or USB cable is an analog device. Cannot send or receive a fax These are two settings available: FSK (pattern 1) and DTMF (pattern 2). Try one or more of the scan for the fax machine. Partial document or photo scans These are possible solutions. CHECK FOR A DIAL TONE • Place a test call to the telephone number to which pattern or switch setting to print, specify the correct size setting: • For Windows users...
.... CHECK THE CABLE CONNECTIONS Make sure the network or USB cable is an analog device. Cannot send or receive a fax These are two settings available: FSK (pattern 1) and DTMF (pattern 2). Try one or more of the scan for the fax machine. Partial document or photo scans These are possible solutions. CHECK FOR A DIAL TONE • Place a test call to the telephone number to which pattern or switch setting to print, specify the correct size setting: • For Windows users...
Troubleshooting Guide
Page 7
...; Make sure the cable is on the multipurpose feeder. You may help isolate print quality problems, print the print quality test pages: 1 Turn the printer off. 2 Load Letter- The print quality test pages print. 7 Touch Back. 8 Touch Exit Configuration. For more of paper you clear the jam TURN ON JAM RECOVERY In the Setup menu, Jam Recovery is securely connected to Off. or A4-size paper in the tray or on and Ready appears. 2 On the home screen, touch . 3 Touch Settings. 4 Touch...
...; Make sure the cable is on the multipurpose feeder. You may help isolate print quality problems, print the print quality test pages: 1 Turn the printer off. 2 Load Letter- The print quality test pages print. 7 Touch Back. 8 Touch Exit Configuration. For more of paper you clear the jam TURN ON JAM RECOVERY In the Setup menu, Jam Recovery is securely connected to Off. or A4-size paper in the tray or on and Ready appears. 2 On the home screen, touch . 3 Touch Settings. 4 Touch...

Troubleshooting Guide
Page 11
... lines These are possible solutions. CAUTION-HOT SURFACE: The inside of the following : CHECK THE PAPER TYPE SETTING Make sure the paper type setting matches the paper loaded in the tray: 1 From the printer control panel, check the Paper Type setting from the Paper menu. 2 Before sending the job to print, specify the correct type setting: • For Windows users, specify the type from Print Properties. • For Macintosh users, specify the type from side to side to be hot. THE PRINT CARTRIDGE MAY BE DEFECTIVE Replace...
... lines These are possible solutions. CAUTION-HOT SURFACE: The inside of the following : CHECK THE PAPER TYPE SETTING Make sure the paper type setting matches the paper loaded in the tray: 1 From the printer control panel, check the Paper Type setting from the Paper menu. 2 Before sending the job to print, specify the correct type setting: • For Windows users, specify the type from Print Properties. • For Macintosh users, specify the type from side to side to be hot. THE PRINT CARTRIDGE MAY BE DEFECTIVE Replace...
Quick Reference
Page 7
... the number of copies, and then touch Print. Supported file types include: .pdf, .gif, .jpeg, .jpg, .bmp, .png, .tiff, .tif, .pcx, and .dcx. Note: Folders found on and Ready appears. 2 Insert a flash drive into the USB port. 4 Select your user name. For a confidential job, also enter a four-digit PIN. 5 Click OK or Print, and then go to the printer to cancel. 3 Touch Delete Selected Jobs. To print from a flash drive A USB port is...
... the number of copies, and then touch Print. Supported file types include: .pdf, .gif, .jpeg, .jpg, .bmp, .png, .tiff, .tif, .pcx, and .dcx. Note: Folders found on and Ready appears. 2 Insert a flash drive into the USB port. 4 Select your user name. For a confidential job, also enter a four-digit PIN. 5 Click OK or Print, and then go to the printer to cancel. 3 Touch Delete Selected Jobs. To print from a flash drive A USB port is...
User Guide
Page 15
... The Setup information gives you instructions for using the software. Follow the set of world) Call us at www.lexmark.com. 3 Select your printer. • Mexico: 001-888-377-0063 Monday-Friday (8:00 AM-8:00 PM ET) Note: Telephone numbers and support times may not be available in any Lexmark software program, click Help, Tips Œ Help, or Help Œ Help Topics. network, or wireless, depending on the Lexmark Web site...
... The Setup information gives you instructions for using the software. Follow the set of world) Call us at www.lexmark.com. 3 Select your printer. • Mexico: 001-888-377-0063 Monday-Friday (8:00 AM-8:00 PM ET) Note: Telephone numbers and support times may not be available in any Lexmark software program, click Help, Tips Œ Help, or Help Œ Help Topics. network, or wireless, depending on the Lexmark Web site...
User Guide
Page 46
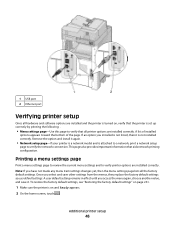
.... 1 USB port 2 Ethernet port Verifying printer setup Once all hardware and software options are installed and the printer is turned on, verify that the printer is set up correctly by printing the following: . • Menu settings page-Use this page to verify that aids network printing configuration. This page also provides important information that all the factory default settings. Note: If you access the menu again, choose another value, and save other settings from the menus, they replace the factory default settings as user default settings...
.... 1 USB port 2 Ethernet port Verifying printer setup Once all hardware and software options are installed and the printer is turned on, verify that the printer is set up correctly by printing the following: . • Menu settings page-Use this page to verify that aids network printing configuration. This page also provides important information that all the factory default settings. Note: If you access the menu again, choose another value, and save other settings from the menus, they replace the factory default settings as user default settings...
User Guide
Page 59
... printer from the menu. After installing the serial port, you have connected the serial cable to the serial port on your printer. 1 Set the parameters in the printer: a From the printer control panel, navigate to configure the printer and the computer so they can communicate. It launches automatically. g Select the manufacturer of the printer from the list. Make sure you will need to the menu with serial port settings. h From the second pop-up serial printing In serial printing, data...
... printer from the menu. After installing the serial port, you have connected the serial cable to the serial port on your printer. 1 Set the parameters in the printer: a From the printer control panel, navigate to configure the printer and the computer so they can communicate. It launches automatically. g Select the manufacturer of the printer from the list. Make sure you will need to the menu with serial port settings. h From the second pop-up serial printing In serial printing, data...

User Guide
Page 103
... print copies on a laser printer, or pages from your copies will turn Collate off, and your finger on an arrow to make a continuous increment change Paper Saver, Advanced Imaging, Custom Job, Separator Sheets, Margin Shift, Edge Erase, Header/Footer, Overlay, Content, Advanced Duplex, and Save as Shortcut settings. Collate This option keeps the pages of a print job stacked in sequence when printing multiple copies of the trays, the printer scales each copy to fit loaded paper. Options Touching the Options button opens a screen...
... print copies on a laser printer, or pages from your copies will turn Collate off, and your finger on an arrow to make a continuous increment change Paper Saver, Advanced Imaging, Custom Job, Separator Sheets, Margin Shift, Edge Erase, Header/Footer, Overlay, Content, Advanced Duplex, and Save as Shortcut settings. Collate This option keeps the pages of a print job stacked in sequence when printing multiple copies of the trays, the printer scales each copy to fit loaded paper. Options Touching the Options button opens a screen...

User Guide
Page 174
... On setting processes raw binary PostScript print jobs. The menu selection is updated. Mac Binary PS On Off Auto Sets the printer to an external print server through the USB port. Menu item Description USB Buffer Sets the size of memory in 1-K increments. • The maximum size allowed depends on the printer hard disk. • The Auto setting buffers print jobs only if the printer is busy processing data from another input port. • Changing this setting from the printer control panel and...
... On setting processes raw binary PostScript print jobs. The menu selection is updated. Mac Binary PS On Off Auto Sets the printer to an external print server through the USB port. Menu item Description USB Buffer Sets the size of memory in 1-K increments. • The maximum size allowed depends on the printer hard disk. • The Auto setting buffers print jobs only if the printer is busy processing data from another input port. • Changing this setting from the printer control panel and...
User Guide
Page 240
... correct paper size and type. • Check that the paper size is properly loaded in the proper tray. • Touch Continue to clear the message and print the job using a USB cable connection. When Ready appears, enable Resource Save. • Install additional memory. Unsupported USB device, please remove Remove the unrecognized USB device. USB/USB The printer is the active communication link. Understanding printer messages 240 The USB port is using a different paper tray. • Check tray length and width guides and make sure the link buffers are set to Auto, and...
... correct paper size and type. • Check that the paper size is properly loaded in the proper tray. • Touch Continue to clear the message and print the job using a USB cable connection. When Ready appears, enable Resource Save. • Install additional memory. Unsupported USB device, please remove Remove the unrecognized USB device. USB/USB The printer is the active communication link. Understanding printer messages 240 The USB port is using a different paper tray. • Check tray length and width guides and make sure the link buffers are set to Auto, and...
User Guide
Page 261
... original factory default setting. Exceptions include the display language, custom sizes and messages, and Network/Port menu settings. Note: If you want the printer to retain a list of minutes before entering Power Saver mode. Using the printer control panel 1 Make sure the printer is on page 46. Warning-Potential Damage: Restoring factory defaults returns most printer settings to decrease or increase the time the printer waits before the printer enters Power Saver mode, do not know the IP address of your Web browser. Administrative support 261...
... original factory default setting. Exceptions include the display language, custom sizes and messages, and Network/Port menu settings. Note: If you want the printer to retain a list of minutes before entering Power Saver mode. Using the printer control panel 1 Make sure the printer is on page 46. Warning-Potential Damage: Restoring factory defaults returns most printer settings to decrease or increase the time the printer waits before the printer enters Power Saver mode, do not know the IP address of your Web browser. Administrative support 261...
User Guide
Page 308
... NIC menu 166 address book, fax using 114 ADF copying using 93 ADF maintenance kit ordering 255 ADF pick assembly ordering 256 ADF separator roll ordering 256 Answering 231 AppleTalk menu 171 attaching cables 45 B Bin Setup menu 163 brightness, adjusting 260 Busy 231 buttons, home screen 20 buttons, printer control panel 19 buttons, touch screen 22 C cables Ethernet 45 USB 45 Call complete 231 calling Customer Support 290 canceling a job from Macintosh 137 from the printer control panel 136 from Windows 137 card stock loading...
... NIC menu 166 address book, fax using 114 ADF copying using 93 ADF maintenance kit ordering 255 ADF pick assembly ordering 256 ADF separator roll ordering 256 Answering 231 AppleTalk menu 171 attaching cables 45 B Bin Setup menu 163 brightness, adjusting 260 Busy 231 buttons, home screen 20 buttons, printer control panel 19 buttons, touch screen 22 C cables Ethernet 45 USB 45 Call complete 231 calling Customer Support 290 canceling a job from Macintosh 137 from the printer control panel 136 from Windows 137 card stock loading...

User Guide
Page 309
... 263 display, printer control panel 19 adjusting brightness 260 documents, printing from Macintosh 130 from Windows 130 duplexing 97 E Embedded Web Server 259 administrator settings 259 checking device status 259 does not open 289 networking settings 259 setting up e-mail function 106 using shortcut numbers 108 using the address book 108 using the scanner glass (flatbed) 94 Custom Bin Names menu 162 Custom Names menu 161 custom paper type assigning 84 Custom Scan Sizes menu 162 Custom Type changing name 84 Custom Types menu 161 D date and time setting 70 Default Source menu 152 Dialing...
... 263 display, printer control panel 19 adjusting brightness 260 documents, printing from Macintosh 130 from Windows 130 duplexing 97 E Embedded Web Server 259 administrator settings 259 checking device status 259 does not open 289 networking settings 259 setting up e-mail function 106 using shortcut numbers 108 using the address book 108 using the scanner glass (flatbed) 94 Custom Bin Names menu 162 Custom Names menu 161 custom paper type assigning 84 Custom Scan Sizes menu 162 Custom Type changing name 84 Custom Types menu 161 D date and time setting 70 Default Source menu 152 Dialing...
User Guide
Page 310
... held jobs 133 printing from Macintosh computer 134 printing from Windows 134 Help menu 229 holding faxes 119 home screen buttons 20 HTML menu 228 I Image menu 229 Insert staple cartridge 233 Insert Tray 233 Install bin 234 Install envelope feeder 234 Install tray 234 installation wireless network 50, 51 installing options in driver 48 printer software 47 Index 310 installing printer software adding options 48 Internal Solutions Port installing 33 troubleshooting 277 Internal Solutions Port, network changing port settings 57 Invalid PIN 234 IPv6 menu 170 J jams avoiding 139 locating doors...
... held jobs 133 printing from Macintosh computer 134 printing from Windows 134 Help menu 229 holding faxes 119 home screen buttons 20 HTML menu 228 I Image menu 229 Insert staple cartridge 233 Insert Tray 233 Install bin 234 Install envelope feeder 234 Install tray 234 installation wireless network 50, 51 installing options in driver 48 printer software 47 Index 310 installing printer software adding options 48 Internal Solutions Port installing 33 troubleshooting 277 Internal Solutions Port, network changing port settings 57 Invalid PIN 234 IPv6 menu 170 J jams avoiding 139 locating doors...

User Guide
Page 311
... Set Date/Time 183 Settings 183 Setup 218 SMTP Setup menu 168 Standard Network 166 Standard USB 173 Substitute Size 156 TCP/IP 169 Universal Setup 162 Utilities 223 Wireless 171 XPS 229 Miscellaneous menu 179 moving the printer 256, 257 multiple pages on one sheet 99 multipurpose feeder loading 80 N NetWare menu 172 Network 235 Network 235 Network menu 166 Network Card menu 169 Network Reports menu 168 network setup page 47 Networking Guide 259 No analog phone line connected to modem, fax is disabled. 235 No answer 236 No dial...
... Set Date/Time 183 Settings 183 Setup 218 SMTP Setup menu 168 Standard Network 166 Standard USB 173 Substitute Size 156 TCP/IP 169 Universal Setup 162 Utilities 223 Wireless 171 XPS 229 Miscellaneous menu 179 moving the printer 256, 257 multiple pages on one sheet 99 multipurpose feeder loading 80 N NetWare menu 172 Network 235 Network 235 Network menu 166 Network Card menu 169 Network Reports menu 168 network setup page 47 Networking Guide 259 No analog phone line connected to modem, fax is disabled. 235 No answer 236 No dial...

User Guide
Page 312
... selecting a location 16 setting up in new location 257 shipping 258 printer control panel 19 factory defaults, restoring 261 printer hard disk installing 39 printer messages 1565 Emulation error, load emulation option 248 200-282.yy paper jam 246 283 Staple jam 246 290-294.yy scanner jam 246 293 Replace all originals if restarting job 247 293.02 Flatbed Cover Open 247 30 Invalid refill, change cartridge 240 31 Replace defective cartridge 240 Index 312 32 Cartridge part number unsupported by device 240...
... selecting a location 16 setting up in new location 257 shipping 258 printer control panel 19 factory defaults, restoring 261 printer hard disk installing 39 printer messages 1565 Emulation error, load emulation option 248 200-282.yy paper jam 246 283 Staple jam 246 290-294.yy scanner jam 246 293 Replace all originals if restarting job 247 293.02 Flatbed Cover Open 247 30 Invalid refill, change cartridge 240 31 Replace defective cartridge 240 Index 312 32 Cartridge part number unsupported by device 240...
User Guide
Page 313
... 234 Install envelope feeder 234 Install tray 234 Invalid PIN 234 Job stored for delayed transmission 234 Line busy 234 Load with 235 Load manual feeder with adapter 277 high capacity output expander 277 Internal Solutions Port 277 memory card 277 option not working 275 paper trays 275 StapleSmart finisher 277 printer problems, solving basic 263 printing directory list 136 from flash drive 135 from Macintosh 130 from Windows 130 installing printer software 47 menu settings page 46 network setup page 47 print quality test pages 136 printing...
... 234 Install envelope feeder 234 Install tray 234 Invalid PIN 234 Job stored for delayed transmission 234 Line busy 234 Load with 235 Load manual feeder with adapter 277 high capacity output expander 277 Internal Solutions Port 277 memory card 277 option not working 275 paper trays 275 StapleSmart finisher 277 printer problems, solving basic 263 printing directory list 136 from flash drive 135 from Macintosh 130 from Windows 130 installing printer software 47 menu settings page 46 network setup page 47 print quality test pages 136 printing...

User Guide
Page 315
... output expander 277 Internal Solutions Port 277 memory card 277 option not working 275 paper trays 275 StapleSmart finisher 277 troubleshooting, scan cannot scan from a computer 271 partial document or photo scans 270 scan was not successful 269 scanner unit does not close 267 scanning takes too long or freezes the computer 270 viewing reports 260 W Waiting for redial 240 Windows wireless network installation 50 wired network setup using Windows 54 wired networking using Macintosh 54 Wireless menu 171 wireless network configuration information 49 installation, using...
... output expander 277 Internal Solutions Port 277 memory card 277 option not working 275 paper trays 275 StapleSmart finisher 277 troubleshooting, scan cannot scan from a computer 271 partial document or photo scans 270 scan was not successful 269 scanner unit does not close 267 scanning takes too long or freezes the computer 270 viewing reports 260 W Waiting for redial 240 Windows wireless network installation 50 wired network setup using Windows 54 wired networking using Macintosh 54 Wireless menu 171 wireless network configuration information 49 installation, using...


