Clearing Jams Guide
Page 1
... too tightly against the paper or envelopes. • Push all jammed paper from the paper path. Have rough, cockle, or laid finishes - Open doors and covers and remove trays to load them. • Do not load too much paper. Envelope recommendations • To reduce wrinkling, use paper that... jam occurs, a message indicating the jam location appears. Are stuck together or damaged in any exposed adhesive when the flap is printing. Lexmark™ X65x Clearing Jams Guide Clearing jams Avoiding jams The following table lists the jams that can help you must clear all trays in ...
... too tightly against the paper or envelopes. • Push all jammed paper from the paper path. Have rough, cockle, or laid finishes - Open doors and covers and remove trays to load them. • Do not load too much paper. Envelope recommendations • To reduce wrinkling, use paper that... jam occurs, a message indicating the jam location appears. Are stuck together or damaged in any exposed adhesive when the flap is printing. Lexmark™ X65x Clearing Jams Guide Clearing jams Avoiding jams The following table lists the jams that can help you must clear all trays in ...
Clearing Jams Guide
Page 2
...drum on the underside of the jam. Warning-Potential Damage: The jammed paper may be hot. 3 Push the release latch, and then open the rear door and remove the paper from a hot component, allow the surface to cool before touching. CAUTION-HOT SURFACE: The inside of the printer. If the paper...handle whenever you are holding the cartridge. 5 Place the print cartridge aside. If the paper is not exiting the printer: 1 Pull down the top rear door. 4 Lift and pull the print cartridge out of the printer might be covered with unfused toner which can stain garments and skin. 6 Remove the jammed...
...drum on the underside of the jam. Warning-Potential Damage: The jammed paper may be hot. 3 Push the release latch, and then open the rear door and remove the paper from a hot component, allow the surface to cool before touching. CAUTION-HOT SURFACE: The inside of the printer. If the paper...handle whenever you are holding the cartridge. 5 Place the print cartridge aside. If the paper is not exiting the printer: 1 Pull down the top rear door. 4 Lift and pull the print cartridge out of the printer might be covered with unfused toner which can stain garments and skin. 6 Remove the jammed...
Clearing Jams Guide
Page 3
... paper. Straighten the edges on a level surface. 4 Load the paper into the multipurpose feeder. 3 3 Pull down the bottom rear door. 4 Push the tab down. 5 Remove the jammed paper. 6 Close the bottom rear door. 7 Insert the standard tray. 8 Touch Continue. 240-249 paper jams 1 Touch Status/Supplies to identify the location of the...
... paper. Straighten the edges on a level surface. 4 Load the paper into the multipurpose feeder. 3 3 Pull down the bottom rear door. 4 Push the tab down. 5 Remove the jammed paper. 6 Close the bottom rear door. 7 Insert the standard tray. 8 Touch Continue. 240-249 paper jams 1 Touch Status/Supplies to identify the location of the...
Clearing Jams Guide
Page 4
... Continue. 280-282 paper jams 1 Touch Status/Supplies to identify the location of the jam. 2 Pull down the StapleSmartTM finisher door. 3 Remove the jammed paper. 4 Close the StapleSmart finisher door. 5 Touch Continue. 283 staple jams 1 Touch Status/Supplies to identify the location of the jam. 2 Press the latch to identify the location... Continue. 270-279 paper jams To clear a jam in the high-capacity output stacker or the 4-bin mailbox: 1 Touch Status/Supplies to open the stapler door. 4
... Continue. 280-282 paper jams 1 Touch Status/Supplies to identify the location of the jam. 2 Pull down the StapleSmartTM finisher door. 3 Remove the jammed paper. 4 Close the StapleSmart finisher door. 5 Touch Continue. 283 staple jams 1 Touch Status/Supplies to identify the location of the jam. 2 Press the latch to identify the location... Continue. 270-279 paper jams To clear a jam in the high-capacity output stacker or the 4-bin mailbox: 1 Touch Status/Supplies to open the stapler door. 4
Clearing Jams Guide
Page 5
3 Pull the latch of the staple cartridge holder down, and then pull the holder out of the printer. 5 Close the staple guard. 290-294 paper jams 1 Remove all original documents from the ADF. 2 Open the ADF cover, and then remove any jammed paper. 4 Use the metal tab to lift the staple guard, and then remove any loose staples. 6 Press down on the staple guard until it snaps into place. 3 Close the ADF cover. 7 Push the cartridge holder firmly back into the stapler unit until the cartridge holder clicks into place. 8 Close the stapler door. 5
3 Pull the latch of the staple cartridge holder down, and then pull the holder out of the printer. 5 Close the staple guard. 290-294 paper jams 1 Remove all original documents from the ADF. 2 Open the ADF cover, and then remove any jammed paper. 4 Use the metal tab to lift the staple guard, and then remove any loose staples. 6 Press down on the staple guard until it snaps into place. 3 Close the ADF cover. 7 Push the cartridge holder firmly back into the stapler unit until the cartridge holder clicks into place. 8 Close the stapler door. 5
Clearing Jams Guide
Page 6
4 Open the scanner cover, and then remove any jammed pages. 5 Open the bottom ADF door, and then remove any jammed pages. 6 Close the bottom ADF door and scanner cover. 7 Touch Restart Job. 6
4 Open the scanner cover, and then remove any jammed pages. 5 Open the bottom ADF door, and then remove any jammed pages. 6 Close the bottom ADF door and scanner cover. 7 Touch Restart Job. 6
Quick Reference
Page 3
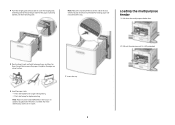
... the edges on the side of the tray which indicates the maximum height for loading paper. Loading the multipurpose feeder 1 Pull down the multipurpose feeder door. 5 Flex the sheets back and forth to the correct position for duplex printing Note: Paper must be loaded differently in the trays if an optional...
... the edges on the side of the tray which indicates the maximum height for loading paper. Loading the multipurpose feeder 1 Pull down the multipurpose feeder door. 5 Flex the sheets back and forth to the correct position for duplex printing Note: Paper must be loaded differently in the trays if an optional...
Quick Reference
Page 8
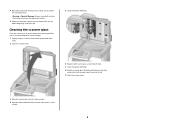
.... 1 Slightly dampen a soft, lint-free cloth or paper towel with water. 2 Open the scanner cover. 5 Open the bottom ADF door. 6 Wipe the ADF scanner glass under the ADF door. 7 Close the bottom ADF door. 8 Wipe the scanner glass (flatbed) and backing material by moving the cloth or paper towel from side to your...
.... 1 Slightly dampen a soft, lint-free cloth or paper towel with water. 2 Open the scanner cover. 5 Open the bottom ADF door. 6 Wipe the ADF scanner glass under the ADF door. 7 Close the bottom ADF door. 8 Wipe the scanner glass (flatbed) and backing material by moving the cloth or paper towel from side to your...

User Guide
Page 16
... airflow of the ASHRAE 62 standard. • Provide a flat, sturdy, and stable surface. • Keep the printer: - If you plan to open trays, covers, and doors.
... airflow of the ASHRAE 62 standard. • Provide a flat, sturdy, and stable surface. • Keep the printer: - If you plan to open trays, covers, and doors.
User Guide
Page 21
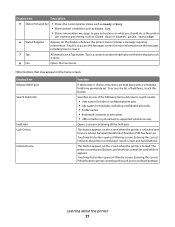
... appears. Display item Description 5 Status message bar • Shows the current printer status such as Ready or Busy. • Shows printer conditions such as Close door or Insert print cartridge. 6 Status/Supplies Appears on the display whenever the printer status includes a message requiring intervention.
... appears. Display item Description 5 Status message bar • Shows the current printer status such as Ready or Busy. • Shows printer conditions such as Close door or Insert print cartridge. 6 Status/Supplies Appears on the display whenever the printer status includes a message requiring intervention.

User Guide
Page 27
...: This operation requires a flathead screwdriver. Additional printer setup 27 CAUTION-SHOCK HAZARD: If you have any cables going into the printer. 1 Open the system board door. 2 Loosen the screw(s) on the system board cover.
...: This operation requires a flathead screwdriver. Additional printer setup 27 CAUTION-SHOCK HAZARD: If you have any cables going into the printer. 1 Open the system board door. 2 Loosen the screw(s) on the system board cover.
User Guide
Page 30
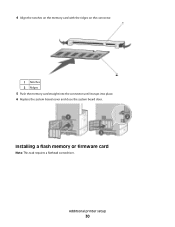
Additional printer setup 30 Installing a flash memory or firmware card Note: This task requires a flathead screwdriver. 4 Align the notches on the memory card with the ridges on the connector. 1 Notches 2 Ridges 5 Push the memory card straight into the connector until it snaps into place. 6 Replace the system board cover and close the system board door.
Additional printer setup 30 Installing a flash memory or firmware card Note: This task requires a flathead screwdriver. 4 Align the notches on the memory card with the ridges on the connector. 1 Notches 2 Ridges 5 Push the memory card straight into the connector until it snaps into place. 6 Replace the system board cover and close the system board door.

User Guide
Page 32
Notes: • The entire length of the connector on the card must touch and be flush against the system board. • Be careful not to damage the connectors. 5 Replace the system board cover and close the system board door. Additional printer setup 32 4 Push the card firmly into place.
Notes: • The entire length of the connector on the card must touch and be flush against the system board. • Be careful not to damage the connectors. 5 Replace the system board cover and close the system board door. Additional printer setup 32 4 Push the card firmly into place.
User Guide
Page 39
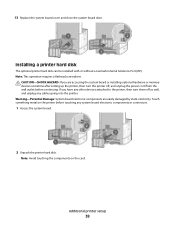
... power cord from the wall outlet before touching any cables going into the printer. 13 Replace the system board cover and close the system board door. CAUTION-SHOCK HAZARD: If you have any other devices attached to the printer, then turn the printer off as well, and unplug any system board... the card. If you are easily damaged by static electricity. Installing a printer hard disk The optional printer hard disk can be installed with or without a Lexmark Internal Solutions Port (ISP). Note: Avoid touching the components on the printer before continuing.
... power cord from the wall outlet before touching any cables going into the printer. 13 Replace the system board cover and close the system board door. CAUTION-SHOCK HAZARD: If you have any other devices attached to the printer, then turn the printer off as well, and unplug any system board... the card. If you are easily damaged by static electricity. Installing a printer hard disk The optional printer hard disk can be installed with or without a Lexmark Internal Solutions Port (ISP). Note: Avoid touching the components on the printer before continuing.

User Guide
Page 42
Additional printer setup 42 Note: The plugs and receptacles are color coded. 4 Replace the system board cover and close the system board door. c Insert the plug of the printer hard disk interface cable into the receptacle of the system board. b Attach the two provided screws to secure the printer hard disk mounting bracket.
Additional printer setup 42 Note: The plugs and receptacles are color coded. 4 Replace the system board cover and close the system board door. c Insert the plug of the printer hard disk interface cable into the receptacle of the system board. b Attach the two provided screws to secure the printer hard disk mounting bracket.

User Guide
Page 45
Attaching cables Connect the printer to the Ethernet port Additional printer setup 45 Be sure to match the following: • The USB symbol on the cable with the USB symbol on the printer • The appropriate Ethernet cable to the computer using a USB cable or Ethernet cable. 5 Insert the plug of the fax card interface cable into the receptacle of the system board. 6 Replace the system board cover and close the system board door.
Attaching cables Connect the printer to the Ethernet port Additional printer setup 45 Be sure to match the following: • The USB symbol on the cable with the USB symbol on the printer • The appropriate Ethernet cable to the computer using a USB cable or Ethernet cable. 5 Insert the plug of the fax card interface cable into the receptacle of the system board. 6 Replace the system board cover and close the system board door.

User Guide
Page 80
Straighten the edges on a level surface. Loading paper and specialty media 80 Paper * Avoid touching the print side of paper or specialty media back and forth to scratch them. Do not fold or crease them . Be careful not to loosen them, and then fan them . Loading the multipurpose feeder 1 Pull down the multipurpose feeder door. 2 Pull out the extension until it is fully extended. 3 Slide the width guide to the far right. 4 Flex the sheets of transparencies.
Straighten the edges on a level surface. Loading paper and specialty media 80 Paper * Avoid touching the print side of paper or specialty media back and forth to scratch them. Do not fold or crease them . Be careful not to loosen them, and then fan them . Loading the multipurpose feeder 1 Pull down the multipurpose feeder door. 2 Pull out the extension until it is fully extended. 3 Slide the width guide to the far right. 4 Flex the sheets of transparencies.

User Guide
Page 140
... jammed paper from the paper path. The following table lists the jams that can occur and the location of the jam. 2 Lower the multipurpose feeder door. Open doors and covers and remove trays to identify the location of each jam: Jam numbers Area 1 200-202 Printer 2 230-239 Duplex unit 3 240-249...
... jammed paper from the paper path. The following table lists the jams that can occur and the location of the jam. 2 Lower the multipurpose feeder door. Open doors and covers and remove trays to identify the location of each jam: Jam numbers Area 1 200-202 Printer 2 230-239 Duplex unit 3 240-249...

User Guide
Page 142
... CAUTION-HOT SURFACE: The inside of injury from there. 7 Align and reinstall the print cartridge. 8 Close the front cover. 9 Close the multipurpose feeder door. 10 Touch Continue. 202 paper jam Touch Status/Supplies to identify the location of the jam. Warning-Potential Damage: The jammed paper may be hot... and skin. 6 Remove the jammed paper. If the paper is not exiting the printer: 1 Pull down the top rear door. 2 Remove the jammed paper. 3 Close the top rear door. 4 Touch Continue. Clearing jams 142 If the paper is exiting the printer, then pull the paper out, and then touch...
... CAUTION-HOT SURFACE: The inside of injury from there. 7 Align and reinstall the print cartridge. 8 Close the front cover. 9 Close the multipurpose feeder door. 10 Touch Continue. 202 paper jam Touch Status/Supplies to identify the location of the jam. Warning-Potential Damage: The jammed paper may be hot... and skin. 6 Remove the jammed paper. If the paper is not exiting the printer: 1 Pull down the top rear door. 2 Remove the jammed paper. 3 Close the top rear door. 4 Touch Continue. Clearing jams 142 If the paper is exiting the printer, then pull the paper out, and then touch...

User Guide
Page 143
Clearing jams 143 230-239 paper jams 1 Touch Status/Supplies to identify the location of the jam. 2 Pull the standard tray out. 3 Pull down the bottom rear door. 4 Push the tab down. 5 Remove the jammed paper. 6 Close the bottom rear door. 7 Insert the standard tray. 8 Touch Continue.
Clearing jams 143 230-239 paper jams 1 Touch Status/Supplies to identify the location of the jam. 2 Pull the standard tray out. 3 Pull down the bottom rear door. 4 Push the tab down. 5 Remove the jammed paper. 6 Close the bottom rear door. 7 Insert the standard tray. 8 Touch Continue.


