
User's Guide
Page 3
...or fax only 13 Understanding the parts of the printer...20 Using the printer control panel buttons and menus 23 Using the printer control panel ...23 Using the printer menus ...26 Saving settings...28 Using the printer software...30 Installing printer software ...30 Installing the optional XPS driver (... models only 45 Wireless network compatibility...45 Information you will need to set up the printer on a wireless network 45 Installing the printer on a wireless network...45 Installing the printer on other computers...46 Interpreting the colors of the Wi-Fi indicator light 47 Special ...
...or fax only 13 Understanding the parts of the printer...20 Using the printer control panel buttons and menus 23 Using the printer control panel ...23 Using the printer menus ...26 Saving settings...28 Using the printer software...30 Installing printer software ...30 Installing the optional XPS driver (... models only 45 Wireless network compatibility...45 Information you will need to set up the printer on a wireless network 45 Installing the printer on a wireless network...45 Installing the printer on other computers...46 Interpreting the colors of the Wi-Fi indicator light 47 Special ...
User's Guide
Page 4
...Windows only 49 Switching between USB and wireless connections (Macintosh only 50 Advanced wireless setup...51 Creating an ad hoc wireless network ...51 Adding a printer to an existing ad hoc wireless network 53 Using WPS (Wi-Fi Protected Setup)...54 Frequently asked questions...54 Where do I find my WEP key...59 How are infrastructure and ad hoc networks different 59 Finding the signal strength...60 How can I improve wireless signal strength? ...61 Can I use my printer on a USB and a network connection at the same time 62 What is a MAC address?...62 How do I find the MAC address? ...62 What...
...Windows only 49 Switching between USB and wireless connections (Macintosh only 50 Advanced wireless setup...51 Creating an ad hoc wireless network ...51 Adding a printer to an existing ad hoc wireless network 53 Using WPS (Wi-Fi Protected Setup)...54 Frequently asked questions...54 Where do I find my WEP key...59 How are infrastructure and ad hoc networks different 59 Finding the signal strength...60 How can I improve wireless signal strength? ...61 Can I use my printer on a USB and a network connection at the same time 62 What is a MAC address?...62 How do I find the MAC address? ...62 What...
User's Guide
Page 5
...Inserting a memory card ...85 Inserting a flash drive ...86 Printing photos...87 Printing photos using the printer control panel ...87 Printing photos from the computer using the printer software 88 Printing photos from a memory device using the printer software 88 Printing photos from a PictBridge-enabled digital camera 90 Printing photos stored on a memory ... copies...98 Copying photos...98 Enlarging or reducing images...98 Adjusting copy quality...99 Making a copy lighter or darker...99 Collating copies using the printer control panel 100 Repeating an image on one page...101 Contents 5
...Inserting a memory card ...85 Inserting a flash drive ...86 Printing photos...87 Printing photos using the printer control panel ...87 Printing photos from the computer using the printer software 88 Printing photos from a memory device using the printer software 88 Printing photos from a PictBridge-enabled digital camera 90 Printing photos stored on a memory ... copies...98 Copying photos...98 Enlarging or reducing images...98 Adjusting copy quality...99 Making a copy lighter or darker...99 Collating copies using the printer control panel 100 Repeating an image on one page...101 Contents 5
User's Guide
Page 6
... List...109 Blocking junk faxes...109 Blocking unwanted changes to fax settings...110 Maintaining the printer 111 Maintaining print cartridges...111 Installing print cartridges...111 Removing a used print cartridge ...112 Refilling print cartridges...113 Using genuine Lexmark print cartridges...113 Aligning print cartridges ...114 Cleaning the print cartridge nozzles...114 Checking ink...
... List...109 Blocking junk faxes...109 Blocking unwanted changes to fax settings...110 Maintaining the printer 111 Maintaining print cartridges...111 Installing print cartridges...111 Removing a used print cartridge ...112 Refilling print cartridges...113 Using genuine Lexmark print cartridges...113 Aligning print cartridges ...114 Cleaning the print cartridge nozzles...114 Checking ink...
User's Guide
Page 7
... on the display...121 Power button is not lit ...122 Software did not install...122 Page does not print...123 Solving printer power problems ...126 Removing and reinstalling the software ...126 Enabling the USB port in Windows ...127 Wireless troubleshooting...128 Wireless troubleshooting...still orange ...142 Wireless print server not installed ...143 "Communication not available" message displays when printing wirelessly 143 Communication with printer lost when connected to Virtual Private Network (VPN 144 Resetting the internal wireless print server to factory default settings 144 Fax ...
... on the display...121 Power button is not lit ...122 Software did not install...122 Page does not print...123 Solving printer power problems ...126 Removing and reinstalling the software ...126 Enabling the USB port in Windows ...127 Wireless troubleshooting...128 Wireless troubleshooting...still orange ...142 Wireless print server not installed ...143 "Communication not available" message displays when printing wirelessly 143 Communication with printer lost when connected to Virtual Private Network (VPN 144 Resetting the internal wireless print server to factory default settings 144 Fax ...

User's Guide
Page 10
... In Windows Vista, click . • In Windows XP and earlier, click Start. 2 Click All Programs or Programs, and then select the printer program folder from the list. 3 From the program, click Help to view the main page of the Help. The Help installs automatically with the... bar does not appear if the application is the active application. Electronic User's Guide Complete instructions for using the printer. Windows Help Additional instructions for using the printer software on a Macintosh operating system. Note: If you want to make sure that the application that you have ...
... In Windows Vista, click . • In Windows XP and earlier, click Start. 2 Click All Programs or Programs, and then select the printer program folder from the list. 3 From the program, click Help to view the main page of the Help. The Help installs automatically with the... bar does not appear if the application is the active application. Electronic User's Guide Complete instructions for using the printer. Windows Help Additional instructions for using the printer software on a Macintosh operating system. Note: If you want to make sure that the application that you have ...
User's Guide
Page 11
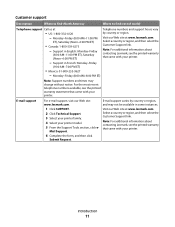
...Mexico: 01-800-253-9627 - E-mail support For e-mail support, visit our Web site: www.lexmark.com. 1 Click SUPPORT. 2 Click Technical Support. 3 Select your printer family. 4 Select your printer. Mail Support. 6 Complete the form, and then click Submit Request. Support in some instances. ... a country or region, and then select the Customer Support link. Note: For additional information about contacting Lexmark, see the printed warranty that came with your printer model. 5 From the Support Tools section, click e- Customer support Description Where to find (North America)...
...Mexico: 01-800-253-9627 - E-mail support For e-mail support, visit our Web site: www.lexmark.com. 1 Click SUPPORT. 2 Click Technical Support. 3 Select your printer family. 4 Select your printer. Mail Support. 6 Complete the form, and then click Submit Request. Support in some instances. ... a country or region, and then select the Customer Support link. Note: For additional information about contacting Lexmark, see the printed warranty that came with your printer model. 5 From the Support Tools section, click e- Customer support Description Where to find (North America)...
User's Guide
Page 12
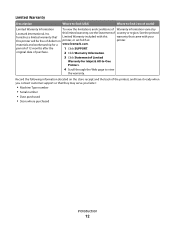
... to find (USA) Where to view the warranty. Record the following information (located on the store receipt and the back of the printer), and have it ready when you contact customer support so that came with this warranty that they may serve you faster: •...the Statement of country or region. original date of purchase. 2 Click Warranty Information. 3 Click Statement of Limited Warranty for a www.lexmark.com. Limited Warranty Description Where to find (rest of world) Limited Warranty Information To view the limitations and conditions of Warranty information varies by...
... to find (USA) Where to view the warranty. Record the following information (located on the store receipt and the back of the printer), and have it ready when you contact customer support so that came with this warranty that they may serve you faster: •...the Statement of country or region. original date of purchase. 2 Click Warranty Information. 3 Click Statement of Limited Warranty for a www.lexmark.com. Limited Warranty Description Where to find (rest of world) Limited Warranty Information To view the limitations and conditions of Warranty information varies by...
User's Guide
Page 13
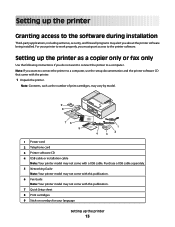
... publication. 7 Quick Setup sheet 8 Print cartridges 9 Stick-on overlays for your printer to work properly, you want to connect the printer to a computer. Note: If you must grant access to the printer software. Note: Contents, such as a copier only or fax only Use the... may not come with the printer. 1 Unpack the printer. For your language Setting up the printer as the number of print cartridges, may vary by model. 9 8 1 2 3 76 5 1 4 2 3 1 Power cord 2 Telephone cord 3 Printer software CD 4 USB cable or installation cable Note: Your printer model may not come with this...
... publication. 7 Quick Setup sheet 8 Print cartridges 9 Stick-on overlays for your printer to work properly, you want to connect the printer to a computer. Note: If you must grant access to the printer software. Note: Contents, such as a copier only or fax only Use the... may not come with the printer. 1 Unpack the printer. For your language Setting up the printer as the number of print cartridges, may vary by model. 9 8 1 2 3 76 5 1 4 2 3 1 Power cord 2 Telephone cord 3 Printer software CD 4 USB cable or installation cable Note: Your printer model may not come with this...
User's Guide
Page 14
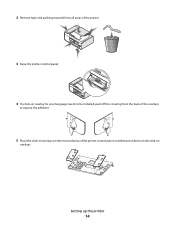
Setting up the printer 14 2 Remove tape and packing material from all areas of the printer. 3 Raise the printer control panel. 4 If a stick-on overlay for your language needs to be installed, peel off the covering from the back of the overlays to expose the adhesive. 5 Place the stick-on overlays on the recessed areas of the printer control panel, and then press down on the stick-on overlays.
Setting up the printer 14 2 Remove tape and packing material from all areas of the printer. 3 Raise the printer control panel. 4 If a stick-on overlay for your language needs to be installed, peel off the covering from the back of the overlays to expose the adhesive. 5 Place the stick-on overlays on the recessed areas of the printer control panel, and then press down on the stick-on overlays.
User's Guide
Page 15
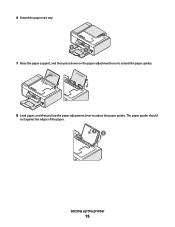
The paper guides should rest against the edges of the paper. 12 Setting up the paper adjustment lever to adjust the paper guides. 6 Extend the paper exit tray. 2 1 7 Raise the paper support, and then press down on the paper adjustment lever to extend the paper guides. 8 Load paper, and then pull up the printer 15
The paper guides should rest against the edges of the paper. 12 Setting up the paper adjustment lever to adjust the paper guides. 6 Extend the paper exit tray. 2 1 7 Raise the paper support, and then press down on the paper adjustment lever to extend the paper guides. 8 Load paper, and then pull up the printer 15
User's Guide
Page 16
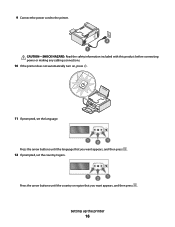
9 Connect the power cord to the printer. 2 1 CAUTION-SHOCK HAZARD: Read the safety information included with this product before connecting power or making any cabling connections. 10 If the printer does not automatically turn on, press . 11 If prompted, set the language. 1 2 1 Press the arrow buttons until the language that you want appears, and then press . 12 If prompted, set the country/region. 1 2 1 Press the arrow buttons until the country or region that you want appears, and then press . Setting up the printer 16
9 Connect the power cord to the printer. 2 1 CAUTION-SHOCK HAZARD: Read the safety information included with this product before connecting power or making any cabling connections. 10 If the printer does not automatically turn on, press . 11 If prompted, set the language. 1 2 1 Press the arrow buttons until the language that you want appears, and then press . 12 If prompted, set the country/region. 1 2 1 Press the arrow buttons until the country or region that you want appears, and then press . Setting up the printer 16
User's Guide
Page 17
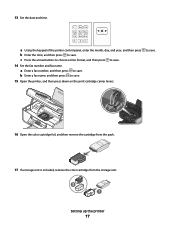
..., and then remove the cartridge from the pack. 17 If a storage unit is included, remove the color cartridge from the storage unit. 2 1 Setting up the printer 17 to save . c Press the arrow buttons to choose a time format, and then press to save . 15 Open the... printer, and then press down on the print cartridge carrier levers. a Using the keypad of the printer control panel, enter the month, day, and year, and then press b Enter the time, and then press to...
..., and then remove the cartridge from the pack. 17 If a storage unit is included, remove the color cartridge from the storage unit. 2 1 Setting up the printer 17 to save . c Press the arrow buttons to choose a time format, and then press to save . 15 Open the... printer, and then press down on the print cartridge carrier levers. a Using the keypad of the printer control panel, enter the month, day, and year, and then press b Enter the time, and then press to...
User's Guide
Page 18
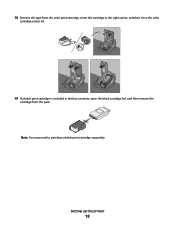
Setting up the printer 18 18 Remove the tape from the color print cartridge, insert the cartridge in the right carrier, and then close the color cartridge carrier lid. 19 If a black print cartridge is included in the box contents, open the black cartridge foil, and then remove the cartridge from the pack. Note: You may need to purchase a black print cartridge separately.
Setting up the printer 18 18 Remove the tape from the color print cartridge, insert the cartridge in the right carrier, and then close the color cartridge carrier lid. 19 If a black print cartridge is included in the box contents, open the black cartridge foil, and then remove the cartridge from the pack. Note: You may need to purchase a black print cartridge separately.
User's Guide
Page 19
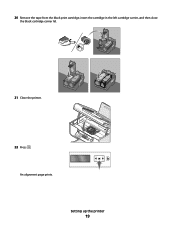
An alignment page prints. Setting up the printer 19 20 Remove the tape from the black print cartridge, insert the cartridge in the left cartridge carrier, and then close the black cartridge carrier lid. 21 Close the printer. 22 Press .
An alignment page prints. Setting up the printer 19 20 Remove the tape from the black print cartridge, insert the cartridge in the left cartridge carrier, and then close the black cartridge carrier lid. 21 Close the printer. 22 Press .
User's Guide
Page 20
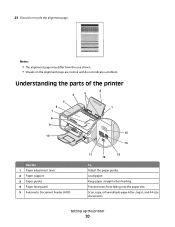
Understanding the parts of the printer 2 4 3 5 6 1 7 8 9 10 W I F I PRINTING WI F I PRINTING 15 14 Use the 1 Paper adjustment lever 2 Paper support 3 Paper guides 4 Paper feed guard 5 Automatic Document Feeder (ADF) 11 13 12 ... the paper slot. Prevent items from the one shown. • Streaks on the alignment page are normal and do not indicate a problem. Setting up the printer 20 23 Discard or recycle the alignment page. Scan, copy, or fax multiple-page letter-, legal-, and A4-size documents.
Understanding the parts of the printer 2 4 3 5 6 1 7 8 9 10 W I F I PRINTING WI F I PRINTING 15 14 Use the 1 Paper adjustment lever 2 Paper support 3 Paper guides 4 Paper feed guard 5 Automatic Document Feeder (ADF) 11 13 12 ... the paper slot. Prevent items from the one shown. • Streaks on the alignment page are normal and do not indicate a problem. Setting up the printer 20 23 Discard or recycle the alignment page. Scan, copy, or fax multiple-page letter-, legal-, and A4-size documents.
User's Guide
Page 21
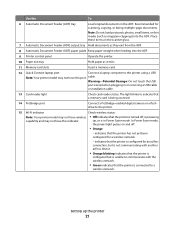
...ADF. Warning-Potential Damage: Do not touch the USB port except when plugging in the ADF. The light blinks to indicate that the printer is in Power Saver mode. Setting up , or is connected to communicate with the wireless network. • Green indicates that a ...memory card is being accessed. 14 PictBridge port Connect a PictBridge-enabled digital camera or a flash drive to the printer using a USB Note: Your printer model may not have this port. Use the To 6 Automatic Document Feeder (ADF) tray Load original documents in or removing a USB...
...ADF. Warning-Potential Damage: Do not touch the USB port except when plugging in the ADF. The light blinks to indicate that the printer is in Power Saver mode. Setting up , or is connected to communicate with the wireless network. • Green indicates that a ...memory card is being accessed. 14 PictBridge port Connect a PictBridge-enabled digital camera or a flash drive to the printer using a USB Note: Your printer model may not have this port. Use the To 6 Automatic Document Feeder (ADF) tray Load original documents in or removing a USB...
User's Guide
Page 22
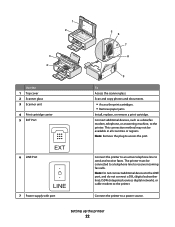
...cartridge. Note: Remove the plug to a power source. Connect the printer to access the port. Setting up the printer 22 This connection method may not be connected to a telephone line to the printer. The printer must be available in all countries or regions. Note: Do not connect...not connect a DSL (digital subscriber line), ISDN (integrated services digital network), or cable modem to send and receive faxes. Connect the printer to an active telephone line to the printer. 1 2 3 4 Use the 1 Top cover 2 Scanner glass 3 Scanner unit 4 Print cartridge carrier 5 EXT Port 6 LINE...
...cartridge. Note: Remove the plug to a power source. Connect the printer to access the port. Setting up the printer 22 This connection method may not be connected to a telephone line to the printer. The printer must be available in all countries or regions. Note: Do not connect...not connect a DSL (digital subscriber line), ISDN (integrated services digital network), or cable modem to send and receive faxes. Connect the printer to an active telephone line to the printer. 1 2 3 4 Use the 1 Top cover 2 Scanner glass 3 Scanner unit 4 Print cartridge carrier 5 EXT Port 6 LINE...
User's Guide
Page 23
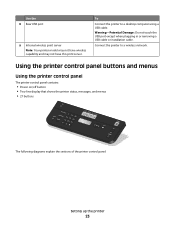
... a desktop computer using a USB cable. Using the printer control panel buttons and menus Using the printer control panel The printer control panel contains: • Power on/off button • Two-line display that shows the printer status, messages, and menus • 27 buttons ON COPY SCAN FAX PHOTO ...The following diagrams explain the sections of the printer control panel: Setting up the printer 23 Warning-Potential Damage: Do not touch the USB port except when plugging in or removing a USB cable or installation cable. ...
... a desktop computer using a USB cable. Using the printer control panel buttons and menus Using the printer control panel The printer control panel contains: • Power on/off button • Two-line display that shows the printer status, messages, and menus • 27 buttons ON COPY SCAN FAX PHOTO ...The following diagrams explain the sections of the printer control panel: Setting up the printer 23 Warning-Potential Damage: Do not touch the USB port except when plugging in or removing a USB cable or installation cable. ...
User's Guide
Page 24
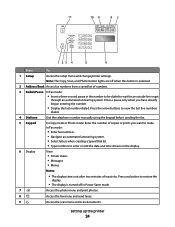
... Book Access fax numbers from a saved list of inactivity. 11 10 9 87 1 23 4 5 6 Press To 1 Setup Access the setup menu and change printer settings. Press any button to view the last five numbers dialed. 4 Dialtone Dial the telephone number manually using the keypad before sending the fax. 5 Keypad...button lights are off in the number to be dialed to enter or edit the date and time shown on the display. 6 Display View: • Printer status • Messages • Menus Notes: • The display times out after two minutes of numbers. 3 Redial/Pause In Fax mode: •...
... Book Access fax numbers from a saved list of inactivity. 11 10 9 87 1 23 4 5 6 Press To 1 Setup Access the setup menu and change printer settings. Press any button to view the last five numbers dialed. 4 Dialtone Dial the telephone number manually using the keypad before sending the fax. 5 Keypad...button lights are off in the number to be dialed to enter or edit the date and time shown on the display. 6 Display View: • Printer status • Messages • Menus Notes: • The display times out after two minutes of numbers. 3 Redial/Pause In Fax mode: •...


