

Troubleshooting Guide
Page 5
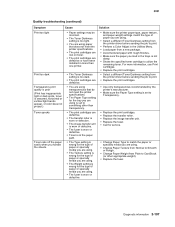
...the printer's manufacturer. • Make sure the Paper Type setting is set to the color displayed on the control panel. Toner specks • Replace the print cartridge that corresponds to the color displayed on the control panel. • Replace the transfer roller. • Replace the image ... finishes. • Make sure the paper you load in the trays is not damp. • Shake the specified print cartridge to utilize the remaining toner. • Replace the print cartridge that corresponds to Transparency. For paper less than 20 lb bond (75 g/m2), choose the Light setting.
...the printer's manufacturer. • Make sure the Paper Type setting is set to the color displayed on the control panel. Toner specks • Replace the print cartridge that corresponds to the color displayed on the control panel. • Replace the transfer roller. • Replace the image ... finishes. • Make sure the paper you load in the trays is not damp. • Shake the specified print cartridge to utilize the remaining toner. • Replace the print cartridge that corresponds to Transparency. For paper less than 20 lb bond (75 g/m2), choose the Light setting.
User's Guide
Page 4
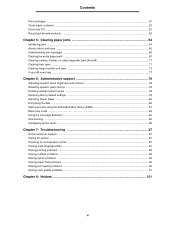
Contents Print cartridges ...61 Toner waste container ...62 Fuser and ITU ...62 Recycling Lexmark products ...63 Chapter 5: Clearing paper jams 64 Identifying jams ...64 Access doors and trays ...65 Understanding jam messages ...66 Clearing the entire paper path ...67 ...
Contents Print cartridges ...61 Toner waste container ...62 Fuser and ITU ...62 Recycling Lexmark products ...63 Chapter 5: Clearing paper jams 64 Identifying jams ...64 Access doors and trays ...65 Understanding jam messages ...66 Clearing the entire paper path ...67 ...
User's Guide
Page 60
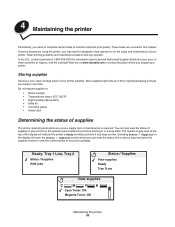
... printing or in this key operator. In the U.S., contact Lexmark at www.lexmark.com or contact the place where you bought your print cartridge. Tray 1 Low, Tray 2 Status / Supplies Held jobs Status / Supplies View supplies Ready Tray 1Low View supplies C M YK Cyan Toner: OK Magenta Toner: OK Maintaining the printer 60 In other countries or...
... printing or in this key operator. In the U.S., contact Lexmark at www.lexmark.com or contact the place where you bought your print cartridge. Tray 1 Low, Tray 2 Status / Supplies Held jobs Status / Supplies View supplies Ready Tray 1Low View supplies C M YK Cyan Toner: OK Magenta Toner: OK Maintaining the printer 60 In other countries or...
Service Manual
Page 44
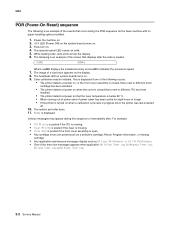
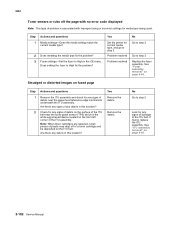
... system board comes on . 4. The following occurs: • The printer detects at power on, or the front cover assembly is closed, that a new or different toner cartridge has been installed. • The printer detects at power on when the cover is closed that a new or different ITU has been installed. • The...
... system board comes on . 4. The following occurs: • The printer detects at power on, or the front cover assembly is closed, that a new or different toner cartridge has been installed. • The printer detects at power on when the cover is closed that a new or different ITU has been installed. • The...

Service Manual
Page 56
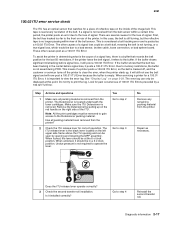
... The ITU has an optical sensor that watches for the last 50 revolutions. There are several causes for the device indicated. Note: All the print cartridges must be one of the belt. Yes Go to step 2 No Remove any remaining packing material from the belt sensor within view of the image...before signal loss, it is a buffer that records the belt position for a piece of signal. Due to memory restrictions, the buffer is located underneath the toner cartridges. Do not try to the front or rear of the ITU. Remove the detensioner by a 100.02 ITU Error. 5061 Error codes and paper jam...
... The ITU has an optical sensor that watches for the last 50 revolutions. There are several causes for the device indicated. Note: All the print cartridges must be one of the belt. Yes Go to step 2 No Remove any remaining packing material from the belt sensor within view of the image...before signal loss, it is a buffer that records the belt position for a piece of signal. Due to memory restrictions, the buffer is located underneath the toner cartridges. Do not try to the front or rear of the ITU. Remove the detensioner by a 100.02 ITU Error. 5061 Error codes and paper jam...
Service Manual
Page 59
... gain access to the Detensioner packing material. Due to memory restrictions, the buffer is located underneath the toner cartridges. The error log can be seen by opening and lowering the MPF assembly. Note: All the print cartridges must be displayed at the 6 o'clock position. Has all packing material is important to step 3 No...
... gain access to the Detensioner packing material. Due to memory restrictions, the buffer is located underneath the toner cartridges. The error log can be seen by opening and lowering the MPF assembly. Note: All the print cartridges must be displayed at the 6 o'clock position. Has all packing material is important to step 3 No...

Service Manual
Page 143
... broken or missing. If the problem continues, check the page count. Does a new toner cartridge fix the problem? Uneven printing • If all colors have another toner problem. Has all packing material been removed? Is the cartridge seated correctly? Try a new toner cartridge. Diagnostic information 2-101 No Got to the ITU belt in the area of...
... broken or missing. If the problem continues, check the page count. Does a new toner cartridge fix the problem? Uneven printing • If all colors have another toner problem. Has all packing material been removed? Is the cartridge seated correctly? Try a new toner cartridge. Diagnostic information 2-101 No Got to the ITU belt in the area of...
Service Manual
Page 144
... ITU assembly and check for any debris in this location? Are there any signs of debris near the toner patch sensor (TPS) which is associated with no error code displayed Note: This type of problem is... belt near the paper feed reference edge mechanism underneath the ITU assembly. Remove the debris. 5061 Toner smears or rubs off of a toner cartridge and be deposited on the ITU belt. See "ITU assembly removal" on page 4-44. See...? Does setting the fuser to step 2. Note: When toner cartridges are replaced, small pieces of damage to step 2 Look for media type being used.
... ITU assembly and check for any debris in this location? Are there any signs of debris near the toner patch sensor (TPS) which is associated with no error code displayed Note: This type of problem is... belt near the paper feed reference edge mechanism underneath the ITU assembly. Remove the debris. 5061 Toner smears or rubs off of a toner cartridge and be deposited on the ITU belt. See "ITU assembly removal" on page 4-44. See...? Does setting the fuser to step 2. Note: When toner cartridges are replaced, small pieces of damage to step 2 Look for media type being used.
Service Manual
Page 149
... • Call for the tray you load in more information, see Print cartridges. • Replace the print cartridges. Diagnostic information 2-107 For more than transparency. • Select a different Toner Darkness setting from the printer driver before sending the job to print. •...Toner Darkness setting is too light. • You are using paper that do not meet the printer specifications. • The print cartridges are low on toner. • The print cartridges are defective or have been installed in the trays is not damp. • Shake the specified toner cartridge...
... • Call for the tray you load in more information, see Print cartridges. • Replace the print cartridges. Diagnostic information 2-107 For more than transparency. • Select a different Toner Darkness setting from the printer driver before sending the job to print. •...Toner Darkness setting is too light. • You are using paper that do not meet the printer specifications. • The print cartridges are low on toner. • The print cartridges are defective or have been installed in the trays is not damp. • Shake the specified toner cartridge...
Service Manual
Page 166
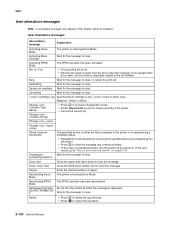
... have changed the media. • Select Use current to clear. Activating Menu Changes Wait for the message to cancel the operation. 2-124 Service Manual Cartridge Low Specified toner cartridge is entering Demo Mode. Busy Wait for the message to either not fully connected to "982.xx error service check" on media currently in...
... have changed the media. • Select Use current to clear. Activating Menu Changes Wait for the message to cancel the operation. 2-124 Service Manual Cartridge Low Specified toner cartridge is entering Demo Mode. Busy Wait for the message to either not fully connected to "982.xx error service check" on media currently in...
Service Manual
Page 171
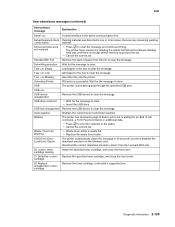
... the active communication link. Diagnostic information 2-129 Submitting selection Wait for an End of paper from the Lexmark Web site. 30 toner cartridge missing Install the specified toner cartridge, and close the front cover. 31 Defective Replace the specified toner cartridge, and close the front cover. USB hub unsupported Remove the USB device to process the job...
... the active communication link. Diagnostic information 2-129 Submitting selection Wait for an End of paper from the Lexmark Web site. 30 toner cartridge missing Install the specified toner cartridge, and close the front cover. 31 Defective Replace the specified toner cartridge, and close the front cover. USB hub unsupported Remove the USB device to process the job...
Service Manual
Page 173
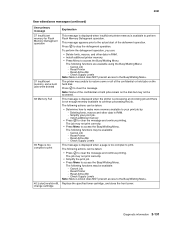
... Lockout does NOT prevent access to access the Busy/Waiting Menu. The following functions may be accessed. Reset Active Bin - Replace the specified toner cartridge, and close the front cover. Simplify your print job by: - Install additional memory • Press to your print job. - Check ... to restore some held jobs were deleted 38 Memory Full 39 Page is too complex to print 40 [color] invalid refill, change cartridge This message is displayed when insufficient printer memory is available to the actual start of the deframent operation. Cancel Job - Diagnostic information ...
... Lockout does NOT prevent access to access the Busy/Waiting Menu. The following functions may be accessed. Reset Active Bin - Replace the specified toner cartridge, and close the front cover. Simplify your print job by: - Install additional memory • Press to your print job. - Check ... to restore some held jobs were deleted 38 Memory Full 39 Page is too complex to print 40 [color] invalid refill, change cartridge This message is displayed when insufficient printer memory is available to the actual start of the deframent operation. Cancel Job - Diagnostic information ...
Service Manual
Page 177
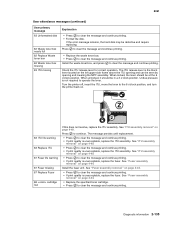
...4-49. • Press to clear the message and continue printing. Press to clear the message and continue printing. • Replace the waste toner box. • Press to continue. See "ITU assembly removal" on page 4-44. 5061 User attendance messages (continued) User primary message 63...insert the ITU, move the lever to the 6 o'clock position, and turn the printer back on page 4-44. • Replace the specified toner cartridge. • Press to clear the message and continue printing. • If print quality is unacceptable, replace the ITU assembly. Install the fuser unit...
...4-49. • Press to clear the message and continue printing. Press to clear the message and continue printing. • Replace the waste toner box. • Press to continue. See "ITU assembly removal" on page 4-44. 5061 User attendance messages (continued) User primary message 63...insert the ITU, move the lever to the 6 o'clock position, and turn the printer back on page 4-44. • Replace the specified toner cartridge. • Press to clear the message and continue printing. • If print quality is unacceptable, replace the ITU assembly. Install the fuser unit...
Service Manual
Page 182
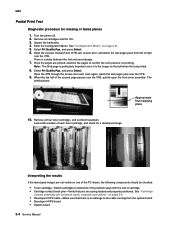
...the vacuum transport belt (VTB) jam access door, and watch the test pages pass over the VTB. When the top half of each toner cartridge, and check for missing or faded planes 1. Inspect the bellcranks. 4. Note: The third page is particularly important since it is a... and yellow)" on one of the PC drums, the following components should be checked: • Toner cartridge-Switch cartridges to determine if the problem stays with the slot or cartridge. • Cartridge contact block pins-Verify that there is not printing. 5061 Partial Print Test Diagnostic procedure for a ...
...the vacuum transport belt (VTB) jam access door, and watch the test pages pass over the VTB. When the top half of each toner cartridge, and check for missing or faded planes 1. Inspect the bellcranks. 4. Note: The third page is particularly important since it is a... and yellow)" on one of the PC drums, the following components should be checked: • Toner cartridge-Switch cartridges to determine if the problem stays with the slot or cartridge. • Cartridge contact block pins-Verify that there is not printing. 5061 Partial Print Test Diagnostic procedure for a ...

Service Manual
Page 249
Remove the assembly. Remove the four front right handle cover assembly screws (A) type "323" on page 7-3 for the part number. 1. Remove the toner cartridges. 3. Open the front cover assembly. 5061 2. Repair information 4-21 Front right handle cover assembly removal Se "Front right handle cover assembly" on page 4-3 and the screw (B) from the front lower right cover. 4.
Remove the assembly. Remove the four front right handle cover assembly screws (A) type "323" on page 7-3 for the part number. 1. Remove the toner cartridges. 3. Open the front cover assembly. 5061 2. Repair information 4-21 Front right handle cover assembly removal Se "Front right handle cover assembly" on page 4-3 and the screw (B) from the front lower right cover. 4.
Service Manual
Page 262
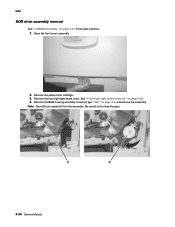
Be careful not to drop the gear. 4-34 Service Manual Remove the front right light shield cover. Remove the BOR housing assembly screw (A) type "323" on page 7-27 for the part numbers. 1. Open the front cover assembly. 2. Note: Gear (B) can easily fall from the assembly. 5061 BOR drive assembly removal See "Lift/BOR assembly" on page 4-3, and remove the assembly. See "Front right light shield removal" on page 4-42. 4. Remove the yellow toner cartridge. 3.
Be careful not to drop the gear. 4-34 Service Manual Remove the front right light shield cover. Remove the BOR housing assembly screw (A) type "323" on page 7-27 for the part numbers. 1. Open the front cover assembly. 2. Note: Gear (B) can easily fall from the assembly. 5061 BOR drive assembly removal See "Lift/BOR assembly" on page 4-3, and remove the assembly. See "Front right light shield removal" on page 4-42. 4. Remove the yellow toner cartridge. 3.
Service Manual
Page 263
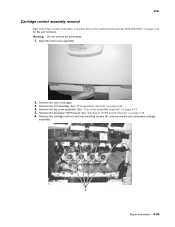
... front and rear mounting screws (A), and remove the rail of selected cartridge assembly. 5061 Cartridge contact assembly removal See "Cartridge contact assembly, complete Also order cable tie parts packet (P/N 40X1648)" on page 4-13. 5. Remove the developer HVPS board. Remove the toner cartridges. 3. See "Developer HVPS board removal" on page 4-49. 4. A Repair information 4-35 See "ITU...
... front and rear mounting screws (A), and remove the rail of selected cartridge assembly. 5061 Cartridge contact assembly removal See "Cartridge contact assembly, complete Also order cable tie parts packet (P/N 40X1648)" on page 4-13. 5. Remove the developer HVPS board. Remove the toner cartridges. 3. See "Developer HVPS board removal" on page 4-49. 4. A Repair information 4-35 See "ITU...
Service Manual
Page 277
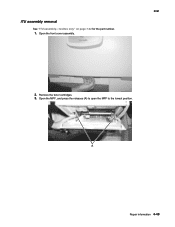
Remove the toner cartridges. 3. Open the front cover assembly. 5061 2. Repair information 4-49 ITU assembly removal See "ITU assembly-1xx/3xx only" on page 7-22 for the part number. 1. Open the MPF, and press the releases (A) to open the MPF to the lowest position.
Remove the toner cartridges. 3. Open the front cover assembly. 5061 2. Repair information 4-49 ITU assembly removal See "ITU assembly-1xx/3xx only" on page 7-22 for the part number. 1. Open the MPF, and press the releases (A) to open the MPF to the lowest position.

Service Manual
Page 307
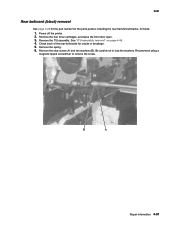
Remove the ITU assembly. Remove the spring (A). Repair information 4-79 See "ITU assembly removal" on page 4-49. 4. Check each of the rear bellcranks for yellow, cyan, and magenta. 1. 5061 Rear bellcrank removal (cyan, magenta, yellow) See page 7-25 for the part numbers for the parts packet, including the rear transfer bellcranks, for cracks or breakage. 5. Power off the printer. 2. Remove the four toner cartridges, and leave the front door open. 3.
Remove the ITU assembly. Remove the spring (A). Repair information 4-79 See "ITU assembly removal" on page 4-49. 4. Check each of the rear bellcranks for yellow, cyan, and magenta. 1. 5061 Rear bellcrank removal (cyan, magenta, yellow) See page 7-25 for the part numbers for the parts packet, including the rear transfer bellcranks, for cracks or breakage. 5. Power off the printer. 2. Remove the four toner cartridges, and leave the front door open. 3.
Service Manual
Page 309
Be careful not to remove the screw. See "ITU assembly removal" on page 4-49. 4. Remove the stop screw (A) and two washers (B). Power off the printer. 2. Remove the four toner cartridges, and leave the front door open. 3. Check each of the rear bellcranks for black. 1. Recommend using a magnetic tipped screwdriver to lose the washers. Remove the spring. 6. Repair information 4-81 Remove the ITU assembly. 5061 Rear bellcrank (black) removal See page 7-25 for the part number for the parts packet, including the rear transfer bellcranks, for cracks or breakage. 5.
Be careful not to remove the screw. See "ITU assembly removal" on page 4-49. 4. Remove the stop screw (A) and two washers (B). Power off the printer. 2. Remove the four toner cartridges, and leave the front door open. 3. Check each of the rear bellcranks for black. 1. Recommend using a magnetic tipped screwdriver to lose the washers. Remove the spring. 6. Repair information 4-81 Remove the ITU assembly. 5061 Rear bellcrank (black) removal See page 7-25 for the part number for the parts packet, including the rear transfer bellcranks, for cracks or breakage. 5.


