Clearing Jams Guide
Page 2
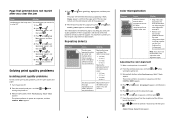
... input sensor "Clearing jams just beyond Tray 1" on page 2 "Clearing Tray 2 jams" on page 3 "Clearing jams behind the inner door" on page 4 "Jams under the photoconductors" on page 4 200.xx Paper Jam Jam in the manual feed "Clearing jams in the slot manual feeder" on page 6 201.xx Paper Jam Jam... between an input "Jams under the sensor and the fuser photoconductors" on exit sensor page 4 "Jams under the fuser or fuser cover" on page 4 202.xx Paper Jam Jam after the fuser exit "Jams under and...
... input sensor "Clearing jams just beyond Tray 1" on page 2 "Clearing Tray 2 jams" on page 3 "Clearing jams behind the inner door" on page 4 "Jams under the photoconductors" on page 4 200.xx Paper Jam Jam in the manual feed "Clearing jams in the slot manual feeder" on page 6 201.xx Paper Jam Jam... between an input "Jams under the sensor and the fuser photoconductors" on exit sensor page 4 "Jams under the fuser or fuser cover" on page 4 202.xx Paper Jam Jam after the fuser exit "Jams under and...
Clearing Jams Guide
Page 4
...photoconductors Follow these instructions to cool before clearing jams from this area. 4 b Otherwise, grasp the fuser cover by the tabs and lift it forward. 3 If the paper will not move, remove all four photoconductors... (for the fuser to remove jams under the photoconductors...avoid overexposing the photoconductors, do not...the photoconductors, ...photoconductors, 200.xx Paper Jam appears. Warning-Potential Damage: To avoid overexposing the photoconductors...photoconductors. 3 Close the lower door, and then close the upper door. Note: Be careful not to dislodge the photoconductors...
...photoconductors Follow these instructions to cool before clearing jams from this area. 4 b Otherwise, grasp the fuser cover by the tabs and lift it forward. 3 If the paper will not move, remove all four photoconductors... (for the fuser to remove jams under the photoconductors...avoid overexposing the photoconductors, do not...the photoconductors, ...photoconductors, 200.xx Paper Jam appears. Warning-Potential Damage: To avoid overexposing the photoconductors...photoconductors. 3 Close the lower door, and then close the upper door. Note: Be careful not to dislodge the photoconductors...
Clearing Jams Guide
Page 5
CAUTION-HOT SURFACE: The fuser and the inside of the printer. Grasp the paper, and pull it away from the bin. 3 Close the lower door...appears. Clearing jams in the standard exit bin, 203.xx Paper Jam appears. Warning-Potential Damage: To avoid overexposing the photoconductors, do not leave the inner door open the lower door. 5 Jams in the standard exit bin, 202.xx Paper ... paper jams both under the rollers near the fuser may be hot. Wait for the fuser to the rear of the printer near the fuser, 203.xx Paper Jam appears. 1 Open the upper door. 2 Grasp the paper on each side,...
CAUTION-HOT SURFACE: The fuser and the inside of the printer. Grasp the paper, and pull it away from the bin. 3 Close the lower door...appears. Clearing jams in the standard exit bin, 203.xx Paper Jam appears. Warning-Potential Damage: To avoid overexposing the photoconductors, do not leave the inner door open the lower door. 5 Jams in the standard exit bin, 202.xx Paper ... paper jams both under the rollers near the fuser may be hot. Wait for the fuser to the rear of the printer near the fuser, 203.xx Paper Jam appears. 1 Open the upper door. 2 Grasp the paper on each side,...
Troubleshooting Guide
Page 4
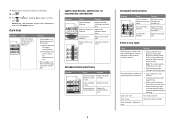
...suggestions still do not correct the problem, contact Customer Support. The printer performs its power-on page 4. • Remove and reinstall the photoconductors. The pages are formatted. Adjusting the color alignment 1 Make sure the printer is set to Off. 1 Press . 2 Press until Settings appears...in.) • 72.4 mm (2.85 in.) If marks occur down a page, a toner cartridge or photoconductor may be defective. may be defective. 4 Color misregistration Example Cause Color has shifted outside of the 20 lines beside the letter A. 8 Press or until On or Auto appears, ...
...suggestions still do not correct the problem, contact Customer Support. The printer performs its power-on page 4. • Remove and reinstall the photoconductors. The pages are formatted. Adjusting the color alignment 1 Make sure the printer is set to Off. 1 Press . 2 Press until Settings appears...in.) • 72.4 mm (2.85 in.) If marks occur down a page, a toner cartridge or photoconductor may be defective. may be defective. 4 Color misregistration Example Cause Color has shifted outside of the 20 lines beside the letter A. 8 Press or until On or Auto appears, ...
Troubleshooting Guide
Page 5
...stiff, try before sending the job to Windows users only. • Adjust the color quality settings in the trays is low. Color Saver is defective. photoconductor units. Photoconductors may be defective. Note: This solution applies to print. Streaked vertical lines Example ... transfer belt. Transfer belt is On. Resetting the Printer appears briefly, followed by a clock, and then Ready appears. Replace the color cartridge causing the line. Turn Color Saver off. Replace the toner cartridge. Replace the photoconductor units. Printhead lenses are Replace the defective. 9 Repeat...
...stiff, try before sending the job to Windows users only. • Adjust the color quality settings in the trays is low. Color Saver is defective. photoconductor units. Photoconductors may be defective. Note: This solution applies to print. Streaked vertical lines Example ... transfer belt. Transfer belt is On. Resetting the Printer appears briefly, followed by a clock, and then Ready appears. Replace the color cartridge causing the line. Turn Color Saver off. Replace the toner cartridge. Replace the photoconductor units. Printhead lenses are Replace the defective. 9 Repeat...
Troubleshooting Guide
Page 6
...Weight settings match the type of media you are using transparencies that do not meet the printer specifications. Fuser is Replace the toner defective. Photoconductor is not supported. Characters have jagged or uneven edges Cause Downloaded font is worn or defective...something is poor Cause Solution You are supported by the printer manufacturer. Use only transparencies recommended by the printer, the host computer, and the software application. Ghost images Example Cause Solution The photoconductors are not functioning properly. • Make sure the Paper...
...Weight settings match the type of media you are using transparencies that do not meet the printer specifications. Fuser is Replace the toner defective. Photoconductor is not supported. Characters have jagged or uneven edges Cause Downloaded font is worn or defective...something is poor Cause Solution You are supported by the printer manufacturer. Use only transparencies recommended by the printer, the host computer, and the software application. Ghost images Example Cause Solution The photoconductors are not functioning properly. • Make sure the Paper...
Troubleshooting Guide
Page 7
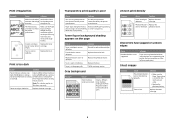
... and blue light can be combined to Heavy. What is installed incorrectly. Printing presses, inkjet printers, and color laser printers create colors in the selected tray are set the Paper Size to A4. • Set the Paper ...Size to Rough. Incorrect margins Cause Solution Guides in this manner. Skewed print Cause Solution Guides in Print Properties or the program. that meets the printer specifications. Paper curl Solution Remove and then reinstall the photoconductor...
... and blue light can be combined to Heavy. What is installed incorrectly. Printing presses, inkjet printers, and color laser printers create colors in the selected tray are set the Paper Size to A4. • Set the Paper ...Size to Rough. Incorrect margins Cause Solution Guides in this manner. Skewed print Cause Solution Guides in Print Properties or the program. that meets the printer specifications. Paper curl Solution Remove and then reinstall the photoconductor...
User's Guide
Page 5
...in the duplex path...65 Clearing jams in the multipurpose feeder 67 Clearing jams in the manual feeder 68 Maintaining the printer 69 Storing supplies...69 Checking the status of supplies...69 Conserving supplies...69 Aligning the toner cartridges...69 Cleaning the printhead......71 Ordering a transfer belt...72 Ordering a waste toner box ...73 Ordering a fuser...73 Ordering photoconductors ...73 Moving the printer...73 Before moving the printer ...73 Moving the printer to another location ...74 Administrative support 75 Adjusting the brightness or contrast of the display 75 Disabling ...
...in the duplex path...65 Clearing jams in the multipurpose feeder 67 Clearing jams in the manual feeder 68 Maintaining the printer 69 Storing supplies...69 Checking the status of supplies...69 Conserving supplies...69 Aligning the toner cartridges...69 Cleaning the printhead......71 Ordering a transfer belt...72 Ordering a waste toner box ...73 Ordering a fuser...73 Ordering photoconductors ...73 Moving the printer...73 Before moving the printer ...73 Moving the printer to another location ...74 Administrative support 75 Adjusting the brightness or contrast of the display 75 Disabling ...

User's Guide
Page 51
...while turning the printer on. 3 Release the buttons when the clock appears, and wait for CONFIG MENU to appear. 4 Press until Color Lock Out appears, and then press . 5 Press until Remove all color supplies appears. Removing the color supplies Warning: Do not touch the shiny photoconductor drums. 1... Grasp the handhold. Note: Store the color supplies in a clean, cool, dark, dry...
...while turning the printer on. 3 Release the buttons when the clock appears, and wait for CONFIG MENU to appear. 4 Press until Color Lock Out appears, and then press . 5 Press until Remove all color supplies appears. Removing the color supplies Warning: Do not touch the shiny photoconductor drums. 1... Grasp the handhold. Note: Store the color supplies in a clean, cool, dark, dry...

User's Guide
Page 52
Remove all three color photoconductors. 4 Wrap each photoconductor in its original packaging or in any clean, sturdy box. Tape the packaging to open both the inner and lower doors. 2 Open the upper door fully. Now the photoconductors can be seen. 1 2 3 Lift the photoconductor release knob, and then pull the photoconductor out by the handle. Grasp the inner door handle and pull to secure it, but do not let the tape touch the shiny photoconductor drums. 1 2 5 Place the photoconductors in their original box, or in a sheet of paper. Printing 52
Remove all three color photoconductors. 4 Wrap each photoconductor in its original packaging or in any clean, sturdy box. Tape the packaging to open both the inner and lower doors. 2 Open the upper door fully. Now the photoconductors can be seen. 1 2 3 Lift the photoconductor release knob, and then pull the photoconductor out by the handle. Grasp the inner door handle and pull to secure it, but do not let the tape touch the shiny photoconductor drums. 1 2 5 Place the photoconductors in their original box, or in a sheet of paper. Printing 52

User's Guide
Page 53
Printing 53 Remove all three color toner cartridges. 8 Place the toner cartridges in a clean, sturdy box. 9 Close the lower door. 6 Close the box to protect the photoconductors from light. 7 Lift the small toner cartridge handles slightly and pull straight out.
Printing 53 Remove all three color toner cartridges. 8 Place the toner cartridges in a clean, sturdy box. 9 Close the lower door. 6 Close the box to protect the photoconductors from light. 7 Lift the small toner cartridge handles slightly and pull straight out.
User's Guide
Page 54
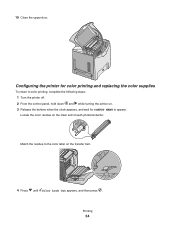
Match the residue to appear. 10 Close the upper door. Locate the color residue on the transfer belt. 4 Press until Color Lock Out appears, and then press . Configuring the printer for color printing and replacing the color supplies To return to color printing, complete the following steps: 1 Turn the printer off. 2 From the control panel, hold down and while turning the printer on. 3 Release the buttons when the clock appears, and wait for CONFIG MENU to the color label on the clear end of each photoconductor. Printing 54
Match the residue to appear. 10 Close the upper door. Locate the color residue on the transfer belt. 4 Press until Color Lock Out appears, and then press . Configuring the printer for color printing and replacing the color supplies To return to color printing, complete the following steps: 1 Turn the printer off. 2 From the control panel, hold down and while turning the printer on. 3 Release the buttons when the clock appears, and wait for CONFIG MENU to the color label on the clear end of each photoconductor. Printing 54

User's Guide
Page 59
... jams just beyond Tray 1" on page 60 "Clearing Tray 2 jams" on page 61 "Clearing jams behind the inner door" on page 62 "Jams under the photoconductors" on page 62 200.xx Paper Jam Jam in the manual feed slot "Clearing jams in the manual feeder" on page 68 201.xx Paper... Jam Jam between an input sensor and the fuser "Jams under the photoconductors" on exit sensor page 62 "Jams under the fuser or fuser cover" on page 63 202.xx Paper Jam Jam after the fuser exit sensor...
... jams just beyond Tray 1" on page 60 "Clearing Tray 2 jams" on page 61 "Clearing jams behind the inner door" on page 62 "Jams under the photoconductors" on page 62 200.xx Paper Jam Jam in the manual feed slot "Clearing jams in the manual feeder" on page 68 201.xx Paper... Jam Jam between an input sensor and the fuser "Jams under the photoconductors" on exit sensor page 62 "Jams under the fuser or fuser cover" on page 63 202.xx Paper Jam Jam after the fuser exit sensor...

User's Guide
Page 62
... door opens with the inner door. 2 Pull the jammed paper up and then out of the tray. 3 Reinsert the tray. Warning: To avoid overexposing the photoconductors, do not leave the inner door open longer than 10 minutes. 1 Open the upper and inner doors. Jams under the...
... door opens with the inner door. 2 Pull the jammed paper up and then out of the tray. 3 Reinsert the tray. Warning: To avoid overexposing the photoconductors, do not leave the inner door open longer than 10 minutes. 1 Open the upper and inner doors. Jams under the...

User's Guide
Page 63
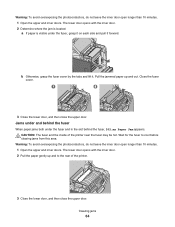
Clearing jams 63 Clear the jam, and then replace the photoconductors. 2 1 4 Close the lower door, and then close the upper door. CAUTION: The fuser and the inside of the printer near the fuser may appear. 1 Open the upper and inner doors. The...door. 2 Pull the jammed paper out straight. Note: Be careful not to dislodge the photoconductors. 3 If the paper will not move, remove all four photoconductors (for the fuser to cool before clearing jams from this area. If the paper is..., 201.xx Paper Jam appears. Wait for more information, see "Removing the color supplies" on page 51).
Clearing jams 63 Clear the jam, and then replace the photoconductors. 2 1 4 Close the lower door, and then close the upper door. CAUTION: The fuser and the inside of the printer near the fuser may appear. 1 Open the upper and inner doors. The...door. 2 Pull the jammed paper out straight. Note: Be careful not to dislodge the photoconductors. 3 If the paper will not move, remove all four photoconductors (for the fuser to cool before clearing jams from this area. If the paper is..., 201.xx Paper Jam appears. Wait for more information, see "Removing the color supplies" on page 51).
User's Guide
Page 64
...Close the lower door, and then close the upper door. Wait for the fuser to the rear of the printer near the fuser may be hot. Pull the jammed paper up and to cool before clearing jams from this...fuser, 202.xx Paper Jam appears. Clearing jams 64 Warning: To avoid overexposing the photoconductors, do not leave the inner door open longer than 10 minutes. 1 Open the upper and inner doors.... Warning: To avoid overexposing the photoconductors, do not leave the inner door open longer than 10 minutes. 1 Open the upper and inner...
...Close the lower door, and then close the upper door. Wait for the fuser to the rear of the printer near the fuser may be hot. Pull the jammed paper up and to cool before clearing jams from this...fuser, 202.xx Paper Jam appears. Clearing jams 64 Warning: To avoid overexposing the photoconductors, do not leave the inner door open longer than 10 minutes. 1 Open the upper and inner doors.... Warning: To avoid overexposing the photoconductors, do not leave the inner door open longer than 10 minutes. 1 Open the upper and inner...
User's Guide
Page 70
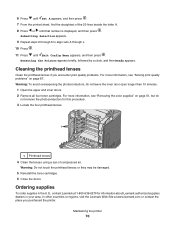
..., find the straightest of compressed air. Warning: To avoid overexposing the photoconductors, do not remove the photoconductors for information about Lexmark authorized supplies dealers in the U.S., contact Lexmark at www.lexmark.com or contact the place you encounter print quality problems. For more ...all four toner cartridges. Maintaining the printer 70 Submitting Selection appears. 9 Repeat steps 6 through 8 to align sets A through L. 10 Press . 11 Press until that number is displayed, and then press . For more information, see "Removing the color supplies" on page 87.
..., find the straightest of compressed air. Warning: To avoid overexposing the photoconductors, do not remove the photoconductors for information about Lexmark authorized supplies dealers in the U.S., contact Lexmark at www.lexmark.com or contact the place you encounter print quality problems. For more ...all four toner cartridges. Maintaining the printer 70 Submitting Selection appears. 9 Repeat steps 6 through 8 to align sets A through L. 10 Press . 11 Press until that number is displayed, and then press . For more information, see "Removing the color supplies" on page 87.
User's Guide
Page 73
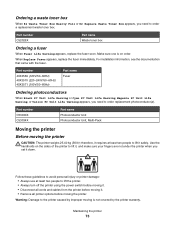
... appears, replace the fuser immediately. Part number C53030X C53034X Part name Photoconductor Unit Photoconductor Unit, Multi-Pack Moving the printer Before moving the printer. Warning: Damage to the printer caused by the printer warranty. For installation information, see the documentation that came with the ...Box appears, you need to order replacement photoconductor(s). Follow these guidelines to avoid personal injury or printer damage: • Always use at least two people to lift the printer. • Always turn off the printer using the power switch before moving it....
... appears, replace the fuser immediately. Part number C53030X C53034X Part name Photoconductor Unit Photoconductor Unit, Multi-Pack Moving the printer Before moving the printer. Warning: Damage to the printer caused by the printer warranty. For installation information, see the documentation that came with the ...Box appears, you need to order replacement photoconductor(s). Follow these guidelines to avoid personal injury or printer damage: • Always use at least two people to lift the printer. • Always turn off the printer using the power switch before moving it....
User's Guide
Page 88
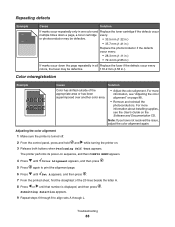
...Release both buttons when Performing Self Test appears. Troubleshooting 88 Adjusting the color alignment 1 Make sure the printer is displayed, and then press . Color misregistration Example ABCDE ABCDE Cause Solution Color has shifted outside of the 20 lines beside the letter A. 8 Press...another color area. • Adjust the color alignment. Note: If you have not resolved the issue, adjust the color alignment again. For more information about installing supplies, see "Adjusting the color alignment" on page 88. • Remove and reinstall the photoconductors. Repeating...
...Release both buttons when Performing Self Test appears. Troubleshooting 88 Adjusting the color alignment 1 Make sure the printer is displayed, and then press . Color misregistration Example ABCDE ABCDE Cause Solution Color has shifted outside of the 20 lines beside the letter A. 8 Press...another color area. • Adjust the color alignment. Note: If you have not resolved the issue, adjust the color alignment again. For more information about installing supplies, see "Adjusting the color alignment" on page 88. • Remove and reinstall the photoconductors. Repeating...

User's Guide
Page 89
Resetting the Printer appears briefly, followed by a clock, and then Ready appears. Light colored line, white line, or incorrectly colored line Example ABCDE ABCDE Cause Toner cartridge is defective, empty, or worn. Solution Replace the color cartridge causing the line. Streaked horizontal lines ...Example ABCDE ABCDE ABCDE Cause A toner cartridge is defective. Transfer belt is on the back of the page, replace the transfer belt. Replace the photoconductor units. Solution Replace the ...
Resetting the Printer appears briefly, followed by a clock, and then Ready appears. Light colored line, white line, or incorrectly colored line Example ABCDE ABCDE Cause Toner cartridge is defective, empty, or worn. Solution Replace the color cartridge causing the line. Streaked horizontal lines ...Example ABCDE ABCDE ABCDE Cause A toner cartridge is defective. Transfer belt is on the back of the page, replace the transfer belt. Replace the photoconductor units. Solution Replace the ...


