Lexmark 11C0200 - Optra SC 1275 Color Laser Printer Support and Manuals
Get Help and Manuals for this Lexmark item

View All Support Options Below
Free Lexmark 11C0200 manuals!
Problems with Lexmark 11C0200?
Ask a Question
Free Lexmark 11C0200 manuals!
Problems with Lexmark 11C0200?
Ask a Question
Popular Lexmark 11C0200 Manual Pages
Service Manual - Page 4

... Page Count ...2-58 Viewing the Error Log...2-58 Clearing the Error Log ...2-59 Exiting Diagnostic Mode...2-59 Print Quality Test Page ...2-60 Print Quality Test Page ...2-61 Repair Information ...3-1 Precautions for Disassembly and Cleaning ...3-1 Instructions for Handling the PWBs with MOS ICs...3-1 Precautions for Handling the Drum Cartridge ...3-2 Parts not to be touched ...3-2 Precautions...
Service Manual - Page 5

... Detecting Board (PWB-B) Removal ...3-16 Toner Cartridge Rack Removal ...3-16 Mechanical Controller Board Frame Removal...3-19 Paper Size/Cassette Detecting Board (PWB-E) Removal 3-19 Paper Take-Up Removal ...3-19 Suction Assembly Removal...3-25 Suction Fan Motor Removal ...3-27 Locations ...4-1 Parts of the Printer ...4-1 Parts of the Printer...4-2 Printing Process ...4-6 Switches and Sensors...
Service Manual - Page 9
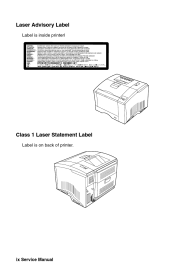
ix Service Manual Laser Advisory Label
Label is inside printerl
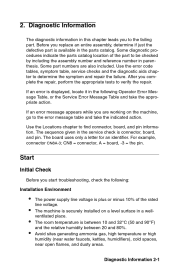
Class 1 Laser Statement Label
Label is on back of printer.
Service Manual - Page 23

... VDC Application-Specific Integrated Circuit Customer Setup Dynamic Random Access Memory Electrically Erasable Programmable ReadOnly Memory Electrophotographic Process Electrostatic Discharge Field Replaceable Unit High ... Access Memory Used Parts Replacement Volts alternating current Volts direct current
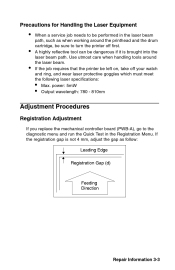
Paper Feed Operation • •
Paper can be fed into the printer from the Multi-Purpose...
Service Manual - Page 36
... you complete the repair, perform the appropriate tests to be checked by including the assembly number and reference number in the following : Installation Environment
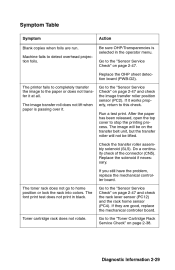
The power supply line voltage is securely installed on the machine, go to the failing part. Before you start troubleshooting, check the following Operator Error Message Table, or the Service Error Message Table and...
Service Manual - Page 37

...; • •
Avoid sites exposed to provide additional information about the current state of the display. Operator Error Message Table
The operator panel messages are divided into three groups: Status, Attendance, and Service. Service messages indicate printer problems that the operator must resolve.
Make a trial print with paper from a newly opened package, and check the...
Service Manual - Page 49

...; All downloaded fonts and macros not written to flash are not allowed until the problem is not enough free space in the Setup Menu to On and send the print job again. • Press Go to flash operations. Or, to reset the printer: • Press to access the Busy menu. • Select Reset...
Service Manual - Page 53
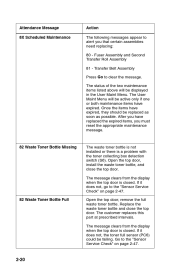
... is not enough free space in connector 3. The Hard Disk Option can be replaced. If the error condition remains, the disk is lost. Attendance Message 58 Too Many Disks Installed
Action You have installed more than one Hard Disk Option. Turn off the printer and remove the extra Hard Disk Option.
61 Defective Disk
The...
Service Manual - Page 55
... the "Sensor Service Check" on page 2-47.
2-20 Attendance Message 8X Scheduled Maintenance
Action The following messages appear to alert you must reset the appropriate maintenance message.
82 Waste Toner Bottle Missing
The waste toner bottle is not installed or there is a problem with the toner collecting box detection switch (S6). Replace the waste...
Service Manual - Page 56
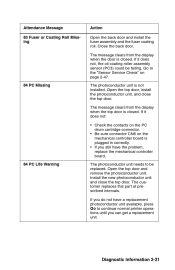
... is not installed. If it does not: • Check the contacts on the PC drum cartridge connector. • Be sure connector CN6 on the mechanical controller board is plugged in correctly. • If you still have a replacement photoconductor unit available, press Go to continue normal printer operations until you do not have the problem, replace the...
Service Manual - Page 61
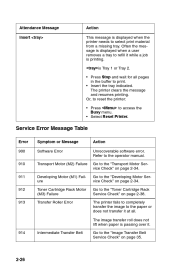
... lift when paper is displayed when the printer needs to select print material from a missing tray. Service Error Message Table
Error 900 910 911 912 913 Symptom or Message Software Error Transport Motor (M2) Failure Developing Motor (M1) Failure Toner Cartridge Rack Motor (M3) Failure Transfer Roller Error Action Unrecoverable software error. Attendance Message Insert
Action This message...
Service Manual - Page 62

... Service Check" on page 2-39. Go to the new one.
916 917 920 930
939 941 942 943 944 945 946 947 950 953 954 960 961 962
Mechanical Controller Board COMM Error Code ROM Error Font ROM Error Controller Card, Font Error Controller Card Error
Memory Error DRAM (J9) Memory Error Option DRAM (J10) Memory Error Option DRAM (J12)
Replace...
Service Manual - Page 64
... you still have the problem, replace the mechanical controller board. The toner rack does not go to stop the printing process. The printer fails to completely transfer the image to the "Sensor Service Check" on page 2-47 and check the rack lever sensor (PC12) and the rack home sensor (PC4). Toner cartridge rack does not...
Service Manual - Page 100
Use utmost care when handling tools around the printhead and the drum cartridge, be sure to turn the printer off your watch and ring, and wear laser protective goggles which must meet the following laser specifications: • Max. If the job requires that the printer be left on, take off first. A highly reflective tool can...
Service Manual - Page 209

... 3-2 parts of the printer 4-1 power supply cooling fan motor service check 2-39 power unit frame removal 3-14 power unit removal 3-13 precautions for disassembly and cleaning 3-1 print tests 2-50 printed circuit boards 4-19 printhead cooling fan service check 2-39 printhead frame removal 3-15 printhead removal 3-11 printing process 4-6
service checks 2-33 service error message table 2-26 setting...
Lexmark 11C0200 Reviews
We have not received any reviews for Lexmark yet.