
Lexmark 4227 User's Guide
Page 108
... the printer, remove it. 3 Make sure AutoGap is set to remember this when you replace the tray later. 102 Chapter 5: Printer Options For help, see "Setting AutoGap" on page 48. 4 Make sure the paper select lever is clear. Loading Continuous Forms in the Tractor 2 Feeder 1 Turn the printer On. 2 Make sure the paper path is pushed down in the continuous forms position. 5 Notice how the manual feed tray fits onto the Tractor 2 Feeder...
... the printer, remove it. 3 Make sure AutoGap is set to remember this when you replace the tray later. 102 Chapter 5: Printer Options For help, see "Setting AutoGap" on page 48. 4 Make sure the paper select lever is clear. Loading Continuous Forms in the Tractor 2 Feeder 1 Turn the printer On. 2 Make sure the paper path is pushed down in the continuous forms position. 5 Notice how the manual feed tray fits onto the Tractor 2 Feeder...
Lexmark 4227 User's Guide
Page 123
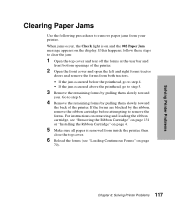
Solving Printer Problems Clearing Paper Jams Use the following procedures to step 6. 4 Remove the remaining forms by pulling them slowly toward the back of the printer. 2 Open the front cover and open the left and right forms tractor doors and remove the forms from your printer. When jams occur, the Check light is removed from inside the printer, then close the top cover. 6 Reload the forms (see "Removing the Ribbon Cartridge" on page 131 or "Installing the Ribbon Cartridge" on page 4. 5 Make sure...
Solving Printer Problems Clearing Paper Jams Use the following procedures to step 6. 4 Remove the remaining forms by pulling them slowly toward the back of the printer. 2 Open the front cover and open the left and right forms tractor doors and remove the forms from your printer. When jams occur, the Check light is removed from inside the printer, then close the top cover. 6 Reload the forms (see "Removing the Ribbon Cartridge" on page 131 or "Installing the Ribbon Cartridge" on page 4. 5 Make sure...

Lexmark 4227 User's Guide
Page 129
... is set correctly. Action: Reset the ribbon cartridge correctly. Action: Adjust AutoGap (see "Installing the Ribbon Cartridge" on page. • Ribbon is set incorrectly. Action: Adjust AutoGap (see page 42). Action: Reset the ribbon cartridge correctly. Solving Printer Problems Symptom Probable Causes and Actions Printing is folded. Action: Replace the ribbon cartridge. Action: Adjust AutoGap (see page 42). For help , see page 42). • Auto Sheet Feeder is installed and AutoGap is not working. Forms are...
... is set correctly. Action: Reset the ribbon cartridge correctly. Action: Adjust AutoGap (see "Installing the Ribbon Cartridge" on page. • Ribbon is set incorrectly. Action: Adjust AutoGap (see page 42). Action: Reset the ribbon cartridge correctly. Solving Printer Problems Symptom Probable Causes and Actions Printing is folded. Action: Replace the ribbon cartridge. Action: Adjust AutoGap (see page 42). For help , see page 42). • Auto Sheet Feeder is installed and AutoGap is not working. Forms are...

Lexmark 4227 User's Guide
Page 157
...-Of-Form 76 stopping the printer 46 using Tear-Off 47-48 options auto sheet feeder 83, 85 extended paper guides 83 parallel cable 83 printer stand 83 serial cable 83 tractor 2 feeder 83, 96 P paper advancing 46 loading auto sheet feeder 90 tractor 2 feeder 102 sizes 56-58 types continuous forms 57 envelopes 58 labels 55 single sheets 56 Paper Hand Options 41 paper jams 117 parallel cable, connecting 10 pitch, selecting or locking 51 power cord, connecting 9 Print Adjust 45 Print Demo 39 Print Settings 39 printer driver 23...
...-Of-Form 76 stopping the printer 46 using Tear-Off 47-48 options auto sheet feeder 83, 85 extended paper guides 83 parallel cable 83 printer stand 83 serial cable 83 tractor 2 feeder 83, 96 P paper advancing 46 loading auto sheet feeder 90 tractor 2 feeder 102 sizes 56-58 types continuous forms 57 envelopes 58 labels 55 single sheets 56 Paper Hand Options 41 paper jams 117 parallel cable, connecting 10 pitch, selecting or locking 51 power cord, connecting 9 Print Adjust 45 Print Demo 39 Print Settings 39 printer driver 23...
Lexmark 4227 User's Guide
Page 158
... page Top-Of-Form (TOF) setting continuous form 76 in a Macro 78 setting macros 52 single sheets, loading 59 software, installing 23 solving problems alarm and abnormal noise 124 clearing paper jams 117 display message list 126 error codes or messages 118 operator panel buttons 125 paper feed 121 power 125 printer test 116 printing and print quality 122 stopping the printer 46 supplies 30 loading paper continuous forms 102 cut sheets 107 manual feed 107 parking continuous forms 111 removing 113 setting left margin 105 troubleshooting 129 U unpacking 1 using macros 52 T Tear-Off.
... page Top-Of-Form (TOF) setting continuous form 76 in a Macro 78 setting macros 52 single sheets, loading 59 software, installing 23 solving problems alarm and abnormal noise 124 clearing paper jams 117 display message list 126 error codes or messages 118 operator panel buttons 125 paper feed 121 power 125 printer test 116 printing and print quality 122 stopping the printer 46 supplies 30 loading paper continuous forms 102 cut sheets 107 manual feed 107 parking continuous forms 111 removing 113 setting left margin 105 troubleshooting 129 U unpacking 1 using macros 52 T Tear-Off.
Lexmark 4227 User's Guide
Page 159
... that Lexmark may use ? Publications are not stocked at the location to improve the book? 5. Yes Ì No Ì 2. Did you supply in any way it believes appropriate without incurring any obligation to your job title? Questions or comments about this form is ...your point of the book accurate and complete? Note: Please direct all requests for copies of purchase. 4227 Forms Printer User's Guide Part Number 11A6030 June 1996 You may use this form to communicate your comments about supplies, service, applications, ...
... that Lexmark may use ? Publications are not stocked at the location to improve the book? 5. Yes Ì No Ì 2. Did you supply in any way it believes appropriate without incurring any obligation to your job title? Questions or comments about this form is ...your point of the book accurate and complete? Note: Please direct all requests for copies of purchase. 4227 Forms Printer User's Guide Part Number 11A6030 June 1996 You may use this form to communicate your comments about supplies, service, applications, ...

Lexmark 4227 Plus User's Guide
Page 4
... Part Forms 51 Loading a Single Sheet or Envelope 52 Loading a Single Sheet or Envelope into the Manual Feed . . . 52 Setting Auto Cut Sheet Load 56 Loading a Single Sheet or Envelope With Continuous Forms Already Loaded 57 Loading Continuous Forms 62 Aligning the Left Margin 66 Top-Of-Form (TOF 69 Setting TOF for Continuous Forms 69 Setting TOF for Single Sheets and Envelopes 70 Setting TOF in a Macro 71 Tearoff 71 Changing Tearoff position 72 Adjusting Bidirectional Alignment 72 iv Contents Contents One Second Tear-off 43 Manual Tear...
... Part Forms 51 Loading a Single Sheet or Envelope 52 Loading a Single Sheet or Envelope into the Manual Feed . . . 52 Setting Auto Cut Sheet Load 56 Loading a Single Sheet or Envelope With Continuous Forms Already Loaded 57 Loading Continuous Forms 62 Aligning the Left Margin 66 Top-Of-Form (TOF 69 Setting TOF for Continuous Forms 69 Setting TOF for Single Sheets and Envelopes 70 Setting TOF in a Macro 71 Tearoff 71 Changing Tearoff position 72 Adjusting Bidirectional Alignment 72 iv Contents Contents One Second Tear-off 43 Manual Tear...

Lexmark 4227 Plus User's Guide
Page 48
... the cut form. Auto Tear-off can use the operator panel to advance the paper when the printer is not printing. The printer finishes printing the current line and then stops printing. To resume printing, press Start/Stop until the Ready light is off position, pressing Form Feed will feed the paper one second, then feeds to the Tear Off position. • Press LineFeed to advance the paper to the next line. • Press Micro ↓ or Micro ↑ lightly once...
... the cut form. Auto Tear-off can use the operator panel to advance the paper when the printer is not printing. The printer finishes printing the current line and then stops printing. To resume printing, press Start/Stop until the Ready light is off position, pressing Form Feed will feed the paper one second, then feeds to the Tear Off position. • Press LineFeed to advance the paper to the next line. • Press Micro ↓ or Micro ↑ lightly once...

Lexmark 4227 Plus User's Guide
Page 96
... Tractor 2 Feeder has a tractor feeder for continuous forms and a manual feed tray for single sheets and single-part forms. This section includes directions for information on how to load the Tractor 2 Feeder. See "Loading Paper in the Tractor 2 Feeder" on page 90 for loading both back in. Printer Options 14 Insert the Tractor 2 Feeder cable into the clamp, as shown, and snap the clamp shut. 15 Attach cables removed...
... Tractor 2 Feeder has a tractor feeder for continuous forms and a manual feed tray for single sheets and single-part forms. This section includes directions for information on how to load the Tractor 2 Feeder. See "Loading Paper in the Tractor 2 Feeder" on page 90 for loading both back in. Printer Options 14 Insert the Tractor 2 Feeder cable into the clamp, as shown, and snap the clamp shut. 15 Attach cables removed...

Lexmark 4227 Plus User's Guide
Page 108
... printhead, go to step 5. 3 Remove the remaining forms by pulling them slowly toward you. If the menu settings do not print, contact your point of the printer. 2 Open the front cover and open the left and right forms tractor doors and remove the forms from your country. Go to step 6. 4 Remove the remaining forms by the ribbon, remove the ribbon cartridge before attempting to clear the jam: 1 Open the top cover and tear off the forms...
... printhead, go to step 5. 3 Remove the remaining forms by pulling them slowly toward you. If the menu settings do not print, contact your point of the printer. 2 Open the front cover and open the left and right forms tractor doors and remove the forms from your country. Go to step 6. 4 Remove the remaining forms by the ribbon, remove the ribbon cartridge before attempting to clear the jam: 1 Open the top cover and tear off the forms...

Lexmark 4227 Plus User's Guide
Page 114
... Printer Problems Action: Reset the ribbon cartridge correctly. Action: The printer needs repair. • Ribbon cartridge is printed on page 3. • AutoGap is set incorrectly. Solving Printer Problems Symptom Printing is set incorrectly. Action: Replace the ribbon cartridge. For help to remind you of ribbon cartridge replacement. For help , see page 35). • Auto Sheet Feeder is installed and AutoGap is set incorrectly. Action: Adjust AutoGap (see "Installing the Ribbon Cartridge" on page 3. • AutoGap is too light or blurred. Forms...
... Printer Problems Action: Reset the ribbon cartridge correctly. Action: The printer needs repair. • Ribbon cartridge is printed on page 3. • AutoGap is set incorrectly. Solving Printer Problems Symptom Printing is set incorrectly. Action: Replace the ribbon cartridge. For help to remind you of ribbon cartridge replacement. For help , see page 35). • Auto Sheet Feeder is installed and AutoGap is set incorrectly. Action: Adjust AutoGap (see "Installing the Ribbon Cartridge" on page 3. • AutoGap is too light or blurred. Forms...

Lexmark 4227 Plus User's Guide
Page 129
... receipt. The replacement may be provided at your use, and not for which perform like new parts, • Is free from defects in material and workmanship, • Conforms to Lexmark's Official Published Specifications, and •...Lexmark, who is available to that user. Statement of Limited Warranty Appendix B Statement of Limited Warranty Lexmark International, Inc., Lexington, KY Lexmark 4227 plus Forms Printer This Statement of Limited Warranty applies to this machine if it was designed. If this machine is a feature or accessory, this statement to that user for its repair...
... receipt. The replacement may be provided at your use, and not for which perform like new parts, • Is free from defects in material and workmanship, • Conforms to Lexmark's Official Published Specifications, and •...Lexmark, who is available to that user. Statement of Limited Warranty Appendix B Statement of Limited Warranty Lexmark International, Inc., Lexington, KY Lexmark 4227 plus Forms Printer This Statement of Limited Warranty applies to this machine if it was designed. If this machine is a feature or accessory, this statement to that user for its repair...

Lexmark 4227 Plus User's Guide
Page 135
...software, installing 18 auto cut sheet load 37 setting 56 auto sheet feeder described 76 installing 77 loading paper automatic feed 81 manual feed 83 rollers, cleaning 113 setting left margin 84 Auto Tear-Off Set to Off 72 AutoGap 38, 44 Off (manual) 44 On 44 Single 46 automatic interface switching 22 B bidirectional alignment 72 buttons, operator panel 28 C changing tractor feeders 97 check light 41 cleaning auto sheet feeder rollers 113 printer 113 clearing jams 102 configuring the printer 18 connecting parallel cable 8 power cord 11 serial cable 10 continuous forms aligning the left margin...
...software, installing 18 auto cut sheet load 37 setting 56 auto sheet feeder described 76 installing 77 loading paper automatic feed 81 manual feed 83 rollers, cleaning 113 setting left margin 84 Auto Tear-Off Set to Off 72 AutoGap 38, 44 Off (manual) 44 On 44 Single 46 automatic interface switching 22 B bidirectional alignment 72 buttons, operator panel 28 C changing tractor feeders 97 check light 41 cleaning auto sheet feeder rollers 113 printer 113 clearing jams 102 configuring the printer 18 connecting parallel cable 8 power cord 11 serial cable 10 continuous forms aligning the left margin...

Lexmark 4227 Plus User's Guide
Page 137
...-Of-Form 69 stopping the printer 42 using Tear-Off 42-44 options auto sheet feeder 75, 76 extended paper guides 75 parallel cable 75 printer stand 75 serial cable 75 tractor 2 feeder 75, 85 P paper advancing 42 loading auto sheet feeder 80 tractor 2 feeder 90 sizes 50-51 types continuous forms 50 envelopes 51 labels 49 single sheets 50 Paper Hand Options 37 paper jams 102 parallel cable, connecting 8 pitch, selecting or locking 46 power cord, connecting 11 Print Adjust 41 Print Demo 34 Print Settings 34 printer driver 19...
...-Of-Form 69 stopping the printer 42 using Tear-Off 42-44 options auto sheet feeder 75, 76 extended paper guides 75 parallel cable 75 printer stand 75 serial cable 75 tractor 2 feeder 75, 85 P paper advancing 42 loading auto sheet feeder 80 tractor 2 feeder 90 sizes 50-51 types continuous forms 50 envelopes 51 labels 49 single sheets 50 Paper Hand Options 37 paper jams 102 parallel cable, connecting 8 pitch, selecting or locking 46 power cord, connecting 11 Print Adjust 41 Print Demo 34 Print Settings 34 printer driver 19...
Lexmark 4227 Plus User's Guide
Page 138
...TOF) setting continuous form 69 in a Macro 71 setting macros 47 single sheets, loading 52 software, installing 18 solving problems alarm and abnormal noise 109 clearing paper jams 102 display message list 110 error codes or messages 103 operator panel buttons 110 paper feed 106 power 110 printer test 101 printing and print quality 107 stopping the printer 42 supplies 26 installing 86 loading paper continuous forms 91 cut sheets 94 manual feed 94 parking continuous forms 97 removing 99 setting left margin 93 troubleshooting 101, 113 U unpacking 1 using macros 47 T Tear-Off. see Auto Tear...
...TOF) setting continuous form 69 in a Macro 71 setting macros 47 single sheets, loading 52 software, installing 18 solving problems alarm and abnormal noise 109 clearing paper jams 102 display message list 110 error codes or messages 103 operator panel buttons 110 paper feed 106 power 110 printer test 101 printing and print quality 107 stopping the printer 42 supplies 26 installing 86 loading paper continuous forms 91 cut sheets 94 manual feed 94 parking continuous forms 97 removing 99 setting left margin 93 troubleshooting 101, 113 U unpacking 1 using macros 47 T Tear-Off. see Auto Tear...

Service Manual
Page 12
... product hardware or software. Diagnostic information contains an error indicator table, symptom tables, and service checks used to repair it. xi Service Manual 4227-300 Preface This manual contains maintenance procedures for individual FRUs. General information contains a general description of MFP problems. 4. Repair information provides instructions for making MFP adjustments and removing and installing FRUs. 5. Unplug the product before you begin, or use caution if the product must receive power in the...
... product hardware or software. Diagnostic information contains an error indicator table, symptom tables, and service checks used to repair it. xi Service Manual 4227-300 Preface This manual contains maintenance procedures for individual FRUs. General information contains a general description of MFP problems. 4. Repair information provides instructions for making MFP adjustments and removing and installing FRUs. 5. Unplug the product before you begin, or use caution if the product must receive power in the...
Service Manual
Page 45
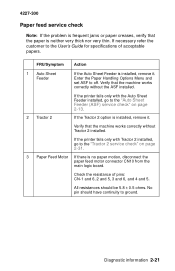
... 4227-300 Paper feed service check Note: If the problem is frequent jams or paper creases, verify that the machine works correctly without Tractor 2 installed. FRU/Symptom Action 1 Auto Sheet Feeder If the Auto Sheet Feeder is installed, remove it . If the printer fails only with the Auto Sheet Feeder installed, go to the User's Guide for specifications of pins: CN-1 and 6, 2 and 5, 3 and 6, and 4 and 5. If the Tractor 2 option is installed, remove it . Check the resistance of acceptable papers...
... 4227-300 Paper feed service check Note: If the problem is frequent jams or paper creases, verify that the machine works correctly without Tractor 2 installed. FRU/Symptom Action 1 Auto Sheet Feeder If the Auto Sheet Feeder is installed, remove it . If the printer fails only with the Auto Sheet Feeder installed, go to the User's Guide for specifications of pins: CN-1 and 6, 2 and 5, 3 and 6, and 4 and 5. If the Tractor 2 option is installed, remove it . Check the resistance of acceptable papers...
Service Manual
Page 47
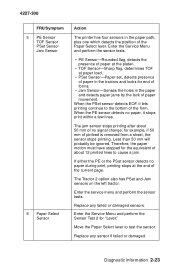
... the service menu and perform the sensor tests. 4227-300 FRU/Symptom 5 PE Sensor TOF Sensor PSet Sensor Jam Sensor 6 Paper Select Sensor Action The printer has four sensors in the paper and detects paper jams by the lack of paper movement. Less than 50 mm will probably be ignored. Diagnostic information 2-23 Replace any sensor if failed or damaged. The Tractor 2 option also has PSet and Jam sensors on the left tractor. The jam sensor stops printing after about 12 printed lines...
... the service menu and perform the sensor tests. 4227-300 FRU/Symptom 5 PE Sensor TOF Sensor PSet Sensor Jam Sensor 6 Paper Select Sensor Action The printer has four sensors in the paper and detects paper jams by the lack of paper movement. Less than 50 mm will probably be ignored. Diagnostic information 2-23 Replace any sensor if failed or damaged. The Tractor 2 option also has PSet and Jam sensors on the left tractor. The jam sensor stops printing after about 12 printed lines...

Service Manual
Page 63
... is part of the Error Log and their corresponding counters print below. No more than 16 most recent error indicators can be printed in the left-most position and the previous error indicator shifts one position to start and stop the test. 4227-300 Print Test The Print Test prints: • The ASCII character set • A line from the user menus. Use the Start/Stop button to the right. Print Demo and the Print Settings page are accessed from...
... is part of the Error Log and their corresponding counters print below. No more than 16 most recent error indicators can be printed in the left-most position and the previous error indicator shifts one position to start and stop the test. 4227-300 Print Test The Print Test prints: • The ASCII character set • A line from the user menus. Use the Start/Stop button to the right. Print Demo and the Print Settings page are accessed from...
Service Manual
Page 139
... Mode 3-2 Impact Force 3-4 Interface Selection 3-3 Jam/PSet Sensor Test 3-4 Log Clear 3-4 Other Print Tests 3-5 POST 3-1 Print Test 3-5 Printhead Bank Test 3-4 Service Menu 3-3 E ESD-sensitive parts 4-1 F Function Menus 1-6 H Handling ESD-sensitive parts 4-1 L Lights 1-11 Lubricants 5-1 Lubrication 5-1 Lubrication Points 5-2 M Models available 1-1 O Operator Panel, Using 1-5 Options 1-3 P Parts Catalog ASF Roller/Support 7-12 ASF Side Frame / Covers 7-10 Base 7-8 Carrier 7-6 Covers 7-2 Electronics 7-8 How to use 7-1 Operator Panel 7-2 Paper Feed 7-4 Tractor 2 Option 7-14 Power-On Self Test...
... Mode 3-2 Impact Force 3-4 Interface Selection 3-3 Jam/PSet Sensor Test 3-4 Log Clear 3-4 Other Print Tests 3-5 POST 3-1 Print Test 3-5 Printhead Bank Test 3-4 Service Menu 3-3 E ESD-sensitive parts 4-1 F Function Menus 1-6 H Handling ESD-sensitive parts 4-1 L Lights 1-11 Lubricants 5-1 Lubrication 5-1 Lubrication Points 5-2 M Models available 1-1 O Operator Panel, Using 1-5 Options 1-3 P Parts Catalog ASF Roller/Support 7-12 ASF Side Frame / Covers 7-10 Base 7-8 Carrier 7-6 Covers 7-2 Electronics 7-8 How to use 7-1 Operator Panel 7-2 Paper Feed 7-4 Tractor 2 Option 7-14 Power-On Self Test...


