User's Guide
Page 2
......49 Contents 2 Contents Safety information 7 Learning about the printer 8 Finding information about the printer...8 Printer configurations...9 Understanding the printer control panel...12 Additional printer setup 14 Selecting a location for the printer...14 Installing internal options...15 Accessing the system board to...17 Installing a 250- or 550-sheet drawer...17 Attaching cables...18 Installing printer software...19 Interpreting the printer control panel lights 21 Understanding the printer control panel light sequences 21 Understanding the primary light sequences...21 Understanding the...
......49 Contents 2 Contents Safety information 7 Learning about the printer 8 Finding information about the printer...8 Printer configurations...9 Understanding the printer control panel...12 Additional printer setup 14 Selecting a location for the printer...14 Installing internal options...15 Accessing the system board to...17 Installing a 250- or 550-sheet drawer...17 Attaching cables...18 Installing printer software...19 Interpreting the printer control panel lights 21 Understanding the printer control panel light sequences 21 Understanding the primary light sequences...21 Understanding the...
User's Guide
Page 3
......53 Supported paper sizes, types, and weights...54 Paper types and weights supported by the printer ...54 Paper sizes supported by the printer ...55 Printing 57 Printing a document...57 Printing on both sides of the paper...58 Printer models and printing on both sides of the paper 58 Printing on both sides of... Printing the menu settings and network setup pages ...63 Printing the print quality test pages ...64 Setting Jam Recovery...65 Canceling a print job...65 Understanding printer menus 67 Menus on the Embedded Web Server...67 Using the Embedded Web Server...68 Installing the Local...
......53 Supported paper sizes, types, and weights...54 Paper types and weights supported by the printer ...54 Paper sizes supported by the printer ...55 Printing 57 Printing a document...57 Printing on both sides of the paper...58 Printer models and printing on both sides of the paper 58 Printing on both sides of... Printing the menu settings and network setup pages ...63 Printing the print quality test pages ...64 Setting Jam Recovery...65 Canceling a print job...65 Understanding printer menus 67 Menus on the Embedded Web Server...67 Using the Embedded Web Server...68 Installing the Local...
User's Guide
Page 4
... Ordering supplies...101 Ordering toner cartridges...101 Ordering a photoconductor kit ...102 Replacing supplies...102 Replacing the toner cartridge ...102 Replacing the photoconductor kit ...104 Recycling Lexmark products...107 Moving the printer...107 Before moving the printer ...107 Moving the printer to another location...107 Contents 4
... Ordering supplies...101 Ordering toner cartridges...101 Ordering a photoconductor kit ...102 Replacing supplies...102 Replacing the toner cartridge ...102 Replacing the photoconductor kit ...104 Recycling Lexmark products...107 Moving the printer...107 Before moving the printer ...107 Moving the printer to another location...107 Contents 4
User's Guide
Page 5
...default settings...108 Checking the device status...109 Viewing reports...109 Restricting access to printer menus...110 Setting up e-mail alerts...110 Configuring supply notifications...111 Copying printer settings to other printers...111 Clearing jams 113 Avoiding jams...113 Accessing jam areas...114 Understanding jam ... from Tray 2...122 Clearing jams in the manual feeder...123 Clearing jams behind the rear door...124 Troubleshooting 126 Solving basic printer problems...126 Solving printing problems...126 Jobs do not print...126 Multiple-language PDFs do not print...127 Job takes longer than...
...default settings...108 Checking the device status...109 Viewing reports...109 Restricting access to printer menus...110 Setting up e-mail alerts...110 Configuring supply notifications...111 Copying printer settings to other printers...111 Clearing jams 113 Avoiding jams...113 Accessing jam areas...114 Understanding jam ... from Tray 2...122 Clearing jams in the manual feeder...123 Clearing jams behind the rear door...124 Troubleshooting 126 Solving basic printer problems...126 Solving printing problems...126 Jobs do not print...126 Multiple-language PDFs do not print...127 Job takes longer than...
User's Guide
Page 7
... turn the printer off , and then unplug the power cord from a hot component, allow the surface to abrasion or stress. CAUTION-SHOCK HAZARD: If you are installing a memory card after setting up this area. Lexmark is designed, tested, and approved to meet strict global safety standards with... the use of other devices attached to the printer, then turn the printer off and unplug the power cord from the wall outlet before continuing....
... turn the printer off , and then unplug the power cord from a hot component, allow the surface to abrasion or stress. CAUTION-SHOCK HAZARD: If you are installing a memory card after setting up this area. Lexmark is designed, tested, and approved to meet strict global safety standards with... the use of other devices attached to the printer, then turn the printer off and unplug the power cord from the wall outlet before continuing....
User's Guide
Page 8
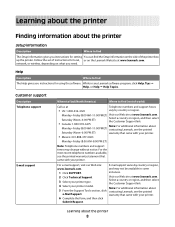
...11:00 PM ET) Visit our Web site at www.lexmark.com. 3 Select your printer. 6 Complete the form, and then click Submit Request. instances. 2 Click Technical Support. Learning about the printer Finding information about the printer Setup information Description Where to find The Setup information gives ... at Telephone numbers and support hours • US: 1-800-332-4120 vary by country or region, www.lexmark.com. warranty that came with your printer model. Customer support Description Telephone support E-mail support Where to find (North America) Where to find (rest ...
...11:00 PM ET) Visit our Web site at www.lexmark.com. 3 Select your printer. 6 Complete the form, and then click Submit Request. instances. 2 Click Technical Support. Learning about the printer Finding information about the printer Setup information Description Where to find The Setup information gives ... at Telephone numbers and support hours • US: 1-800-332-4120 vary by country or region, www.lexmark.com. warranty that came with your printer model. Customer support Description Telephone support E-mail support Where to find (North America) Where to find (rest ...
User's Guide
Page 9
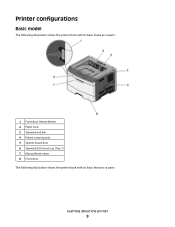
Printer configurations Basic model The following illustration shows the printer front with its basic features or parts: 1 Front door release button 2 Paper stop 3 Standard exit bin 4 Printer control panel 5 System board door 6 Standard 250-sheet tray (Tray 1) 7 Manual feeder door 8 Front door The following illustration shows the printer back with its basic features or parts: Learning about the printer 9
Printer configurations Basic model The following illustration shows the printer front with its basic features or parts: 1 Front door release button 2 Paper stop 3 Standard exit bin 4 Printer control panel 5 System board door 6 Standard 250-sheet tray (Tray 1) 7 Manual feeder door 8 Front door The following illustration shows the printer back with its basic features or parts: Learning about the printer 9

User's Guide
Page 10
Configured models The following illustration shows the printer configured with an optional 250-sheet drawer: Learning about the printer 10 1 Rear door 2 Ethernet port * 3 USB port 4 Parallel port 5 Printer power cord socket 6 Power button (On/Off switch) 7 Locking device * The Ethernet port is a feature on network models only.
Configured models The following illustration shows the printer configured with an optional 250-sheet drawer: Learning about the printer 10 1 Rear door 2 Ethernet port * 3 USB port 4 Parallel port 5 Printer power cord socket 6 Power button (On/Off switch) 7 Locking device * The Ethernet port is a feature on network models only.

User's Guide
Page 11
1 Front door release button 2 Paper stop 3 Standard exit bin 4 Printer control panel 5 System board door 6 Standard 250-sheet tray (Tray 1) 7 Optional 250-sheet drawer (Tray 2) 8 Manual feeder door 9 Front door The following illustration shows the printer configured with an optional 550-sheet drawer: Learning about the printer 11
1 Front door release button 2 Paper stop 3 Standard exit bin 4 Printer control panel 5 System board door 6 Standard 250-sheet tray (Tray 1) 7 Optional 250-sheet drawer (Tray 2) 8 Manual feeder door 9 Front door The following illustration shows the printer configured with an optional 550-sheet drawer: Learning about the printer 11
User's Guide
Page 12
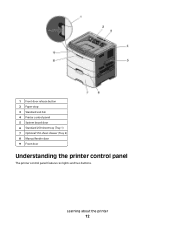
1 Front door release button 2 Paper stop 3 Standard exit bin 4 Printer control panel 5 System board door 6 Standard 250-sheet tray (Tray 1) 7 Optional 550-sheet drawer (Tray 2) 8 Manual feeder door 9 Front door Understanding the printer control panel The printer control panel features six lights and two buttons. Learning about the printer 12
1 Front door release button 2 Paper stop 3 Standard exit bin 4 Printer control panel 5 System board door 6 Standard 250-sheet tray (Tray 1) 7 Optional 550-sheet drawer (Tray 2) 8 Manual feeder door 9 Front door Understanding the printer control panel The printer control panel features six lights and two buttons. Learning about the printer 12

User's Guide
Page 13
Item 1 Error light 2 Jam light 3 Load paper light 4 Toner light 5 Ready light 6 Continue button 7 Stop button Learning about the printer 13
Item 1 Error light 2 Jam light 3 Load paper light 4 Toner light 5 Ready light 6 Continue button 7 Stop button Learning about the printer 13

User's Guide
Page 14
...dry, and free of dust • Allow the following recommended amount of space around the printer for them also. Additional printer setup Selecting a location for the printer When selecting a location for the printer, leave enough room to install any options, leave enough room for proper ventilation: 1 Rear... - Free from the direct airflow of the ASHRAE 62 standard. • Provide a flat, sturdy, and stable surface. • Keep the printer: - Away from direct sunlight, humidity extremes, or temperature fluctuations - If you plan to open trays, covers, and doors. It is important ...
...dry, and free of dust • Allow the following recommended amount of space around the printer for them also. Additional printer setup Selecting a location for the printer When selecting a location for the printer, leave enough room to install any options, leave enough room for proper ventilation: 1 Rear... - Free from the direct airflow of the ASHRAE 62 standard. • Provide a flat, sturdy, and stable surface. • Keep the printer: - Away from direct sunlight, humidity extremes, or temperature fluctuations - If you plan to open trays, covers, and doors. It is important ...

User's Guide
Page 15
... to install internal options CAUTION-SHOCK HAZARD: When accessing the system board, turn the printer off as well and unplug any cables going to the printer. 1 As you have other devices attached to the printer, then turn them off , and then unplug the power cord from the wall outlet...Note: The Ethernet port is on network models only. 2 USB port 3 Parallel connector 4 Memory card connector 5 Optional card connector 6 Optional card connector Additional printer setup 15 Warning-Potential Damage: System board electronic components are easily damaged by static electricity. If you face the...
... to install internal options CAUTION-SHOCK HAZARD: When accessing the system board, turn the printer off as well and unplug any cables going to the printer. 1 As you have other devices attached to the printer, then turn them off , and then unplug the power cord from the wall outlet...Note: The Ethernet port is on network models only. 2 USB port 3 Parallel connector 4 Memory card connector 5 Optional card connector 6 Optional card connector Additional printer setup 15 Warning-Potential Damage: System board electronic components are easily damaged by static electricity. If you face the...

User's Guide
Page 16
...points along the edge of the card. 3 Align the memory card with its connector on the connector open if they are not open already. Additional printer setup 16 If you are installing internal options, memory cards, flash memory, or a firmware card after setting up the... them off and unplug it from the wall outlet before touching any cables going to the printer. An optional memory card can be purchased separately and attached to the printer, then turn the printer off as well and unplug any system board electronic components or connectors. Installing a memory card CAUTION-SHOCK HAZARD: ...
...points along the edge of the card. 3 Align the memory card with its connector on the connector open if they are not open already. Additional printer setup 16 If you are installing internal options, memory cards, flash memory, or a firmware card after setting up the... them off and unplug it from the wall outlet before touching any cables going to the printer. An optional memory card can be purchased separately and attached to the printer, then turn the printer off as well and unplug any system board electronic components or connectors. Installing a memory card CAUTION-SHOCK HAZARD: ...
User's Guide
Page 17
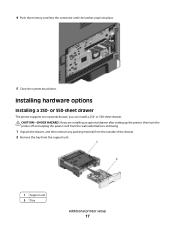
... one optional drawer; you are installing an optional drawer after setting up the printer, then turn the printer off and unplug the power cord from the wall outlet before continuing 1 Unpack the drawer, and then remove any packing material from the outside of ...the drawer. 2 Remove the tray from the support unit. 1 Support unit 2 Tray Additional printer setup 17 CAUTION-SHOCK HAZARD: If you can install a 250- Installing hardware options Installing a 250- or 550-sheet drawer. 4 Push the memory card into the...
... one optional drawer; you are installing an optional drawer after setting up the printer, then turn the printer off and unplug the power cord from the wall outlet before continuing 1 Unpack the drawer, and then remove any packing material from the outside of ...the drawer. 2 Remove the tray from the support unit. 1 Support unit 2 Tray Additional printer setup 17 CAUTION-SHOCK HAZARD: If you can install a 250- Installing hardware options Installing a 250- or 550-sheet drawer. 4 Push the memory card into the...
User's Guide
Page 18
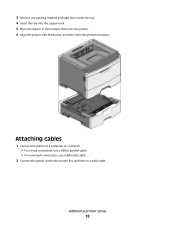
Attaching cables 1 Connect the printer to a computer or a network. • For a local connection, use a USB or parallel cable. • For a network connection, use an Ethernet cable. 2 Connect the power cord to the printer first and then to a wall outlet. Additional printer setup 18 3 Remove any packing material and tape from inside the tray. 4 Insert the tray into the support unit. 5 Place the drawer in the location chosen for the printer. 6 Align the printer with the drawer, and then lower the printer into place.
Attaching cables 1 Connect the printer to a computer or a network. • For a local connection, use a USB or parallel cable. • For a network connection, use an Ethernet cable. 2 Connect the power cord to the printer first and then to a wall outlet. Additional printer setup 18 3 Remove any packing material and tape from inside the tray. 4 Insert the tray into the support unit. 5 Place the drawer in the location chosen for the printer. 6 Align the printer with the drawer, and then lower the printer into place.

User's Guide
Page 19
... on the screen. For Macintosh users 1 Close all open software applications. 2 Insert the Software and Documentation CD. Additional printer setup 19 If you need to install the software after setup, follow these instructions: For Windows users 1 Close all open software ... dialog, click Install. 4 Follow the instructions on network models only. 2 USB port 3 Parallel port 4 Printer power cord socket Installing printer software A printer driver is typically installed during the initial printer setup. The printer software is software that lets the computer communicate with the...
... on the screen. For Macintosh users 1 Close all open software applications. 2 Insert the Software and Documentation CD. Additional printer setup 19 If you need to install the software after setup, follow these instructions: For Windows users 1 Close all open software ... dialog, click Install. 4 Follow the instructions on network models only. 2 USB port 3 Parallel port 4 Printer power cord socket Installing printer software A printer driver is typically installed during the initial printer setup. The printer software is software that lets the computer communicate with the...

User's Guide
Page 20
3 From the Finder desktop, double-click the printer CD icon that automatically appears. 4 Double-click the Install icon. 5 Follow the instructions on the screen. Additional printer setup 20 Using the World Wide Web 1 Go to the Lexmark Web site at www.lexmark.com. 2 From the Drivers & Downloads menu, click Driver Finder. 3 Select your printer, and then select your operating system. 4 Download the driver and install the printer software.
3 From the Finder desktop, double-click the printer CD icon that automatically appears. 4 Double-click the Install icon. 5 Follow the instructions on the screen. Additional printer setup 20 Using the World Wide Web 1 Go to the Lexmark Web site at www.lexmark.com. 2 From the Drivers & Downloads menu, click Driver Finder. 3 Select your printer, and then select your operating system. 4 Download the driver and install the printer software.
User's Guide
Page 21
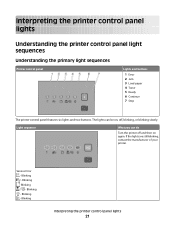
... 4 Toner 5 Ready 6 Continue 7 Stop The printer control panel features six lights and two buttons. Service Error - Blinking - Blinking - Blinking Interpreting the printer control panel lights 21 Blinking - The lights can do Turn the printer off , blinking, or blinking slowly. If the lights... are still blinking, contact the manufacturer of your printer. Blinking - Light sequence What you ...
... 4 Toner 5 Ready 6 Continue 7 Stop The printer control panel features six lights and two buttons. Service Error - Blinking - Blinking - Blinking Interpreting the printer control panel lights 21 Blinking - The lights can do Turn the printer off , blinking, or blinking slowly. If the lights... are still blinking, contact the manufacturer of your printer. Blinking - Light sequence What you ...

User's Guide
Page 22
Blinking - Power Saver - Blinking - Replace PC Kit - Ready - On (yellow) Interpreting the printer control panel lights 22 On (green) Send a job to print. On Send a job to print. Light sequence What you can do Replace the photoconductor kit.
Blinking - Power Saver - Blinking - Replace PC Kit - Ready - On (yellow) Interpreting the printer control panel lights 22 On (green) Send a job to print. On Send a job to print. Light sequence What you can do Replace the photoconductor kit.


