Quick Reference
Page 1
... cancel a fax, the control panel resets to copy mode. Press Stop/Clear when all the pages have already scanned into memory, press Menu > until you see Cancel fax, then press Select. Press Menu > again until you see your job name. Cancel a fax Press Stop/Clear to the fax number 3 Press Go/Send. c Press # and then enter the shortcut number assigned to enter the fax number of the person receiving the fax. When you want to use. (If duplexing is on next to the Duplex setting...
... cancel a fax, the control panel resets to copy mode. Press Stop/Clear when all the pages have already scanned into memory, press Menu > until you see Cancel fax, then press Select. Press Menu > again until you see your job name. Cancel a fax Press Stop/Clear to the fax number 3 Press Go/Send. c Press # and then enter the shortcut number assigned to enter the fax number of the person receiving the fax. When you want to use. (If duplexing is on next to the Duplex setting...
Quick Reference
Page 2
... the size of your printed copies (plain paper, transparencies, and so on the control panel display. Specifies the orientation of the network scan output file. Set duplex options for network scans. Fax Resolution specifies the resolution of the original documents. Clear number of the copies being scanned. Network scan modes must be configured to faxes. Menu > or < Menu moves you move through copy, fax, and network scan modes. This does not apply to be accessible. This does not apply to a previous menu choice when making copies or selecting network scans...
... the size of your printed copies (plain paper, transparencies, and so on the control panel display. Specifies the orientation of the network scan output file. Set duplex options for network scans. Fax Resolution specifies the resolution of the original documents. Clear number of the copies being scanned. Network scan modes must be configured to faxes. Menu > or < Menu moves you move through copy, fax, and network scan modes. This does not apply to be accessible. This does not apply to a previous menu choice when making copies or selecting network scans...

Setup Guide
Page 2
... copies of specific Lexmark components. Any reference to a product, program, or service is not responsible for damages resulting from the fax modem port of the print server. Lexmark is not intended to this equipment in any equipment into which it operates. Comments about this statement may be addressed to access the printer compartment where the option card is installed, you supply in wet locations. • Before attempting to Lexmark...
... copies of specific Lexmark components. Any reference to a product, program, or service is not responsible for damages resulting from the fax modem port of the print server. Lexmark is not intended to this equipment in any equipment into which it operates. Comments about this statement may be addressed to access the printer compartment where the option card is installed, you supply in wet locations. • Before attempting to Lexmark...
Setup Guide
Page 3
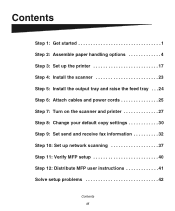
Contents Step 1: Get started 1 Step 2: Assemble paper handling options 4 Step 3: Set up the printer 17 Step 4: Install the scanner 23 Step 5: Install the output tray and raise the feed tray . . . 24 Step 6: Attach cables and power cords 25 Step 7: Turn on the scanner and printer 27 Step 8: Change your default copy settings 30 Step 9: Set send and receive fax information 32 Step 10: Set up network scanning 37 Step 11: Verify MFP setup 40 Step 12: Distribute MFP user instructions 41 Solve setup problems 42 Contents iii
Contents Step 1: Get started 1 Step 2: Assemble paper handling options 4 Step 3: Set up the printer 17 Step 4: Install the scanner 23 Step 5: Install the output tray and raise the feed tray . . . 24 Step 6: Attach cables and power cords 25 Step 7: Turn on the scanner and printer 27 Step 8: Change your default copy settings 30 Step 9: Set send and receive fax information 32 Step 10: Set up network scanning 37 Step 11: Verify MFP setup 40 Step 12: Distribute MFP user instructions 41 Solve setup problems 42 Contents iii
Setup Guide
Page 16
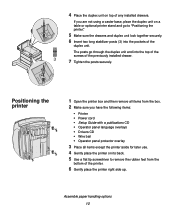
..., place the duplex unit on its back. 5 Use a flat tip screwdriver to "Positioning the printer." 5 Make sure the drawers and duplex unit lock together securely. 6 Insert two long stabilizer posts (3) into the top of the screws of any installed drawers. If you have the following items: • Printer • Power cord • Setup Guide with a publications CD • Operator panel language overlays • Drivers CD...
..., place the duplex unit on its back. 5 Use a flat tip screwdriver to "Positioning the printer." 5 Make sure the drawers and duplex unit lock together securely. 6 Insert two long stabilizer posts (3) into the top of the screws of any installed drawers. If you have the following items: • Printer • Power cord • Setup Guide with a publications CD • Operator panel language overlays • Drivers CD...
Setup Guide
Page 32
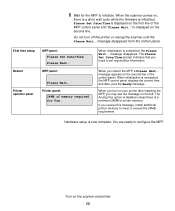
... MFP control panel displays the current time and date, plus the Ready message. MFP panel: Printer operator panel Please Wait... When initialization is a minimum 24MB of memory required for the MFP to configure the MFP. Do not turn on your printer after installing the MFP, you restart the MFP, a Please Wait... The Analog Fax option is disabled unless there is completed, the Please Wait... Please Set Date/Time is displayed on the second line of the MFP control panel and "Please Wait..." message...
... MFP control panel displays the current time and date, plus the Ready message. MFP panel: Printer operator panel Please Wait... When initialization is a minimum 24MB of memory required for the MFP to configure the MFP. Do not turn on your printer after installing the MFP, you restart the MFP, a Please Wait... The Analog Fax option is disabled unless there is completed, the Please Wait... Please Set Date/Time is displayed on the second line of the MFP control panel and "Please Wait..." message...
Setup Guide
Page 34
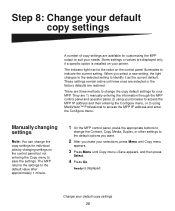
... default options you want. 2 After you select a new setting, the light changes to the selected setting to access the MFP IP address and enter the Configure menu. These settings remain active until Copy menu =Save appears, and then press Select. 4 Press Go. Change your MFP. The indicator light next to save the settings. There are three methods to change the copy settings for individual jobs by changing settings on the control panel but not entering the Copy menu to the value on your printer...
... default options you want. 2 After you select a new setting, the light changes to the selected setting to access the MFP IP address and enter the Configure menu. These settings remain active until Copy menu =Save appears, and then press Select. 4 Press Go. Change your MFP. The indicator light next to save the settings. There are three methods to change the copy settings for individual jobs by changing settings on the control panel but not entering the Copy menu to the value on your printer...
Setup Guide
Page 35
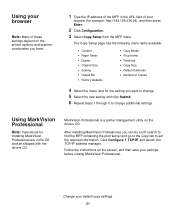
... instructions on the drivers CD. MarkVision Professional is a printer management utility on the screen, and then save your settings before closing MarkVision Professional. Change your default copy settings 31 Click Configure TCP/IP, and launch the TCP/IP address manager. Using your browser Note: Many of these settings depend on the printer, options, and scanner combination you can do an IP search to find the MFP containing the print server...
... instructions on the drivers CD. MarkVision Professional is a printer management utility on the screen, and then save your settings before closing MarkVision Professional. Change your default copy settings 31 Click Configure TCP/IP, and launch the TCP/IP address manager. Using your browser Note: Many of these settings depend on the printer, options, and scanner combination you can do an IP search to find the MFP containing the print server...
Setup Guide
Page 39
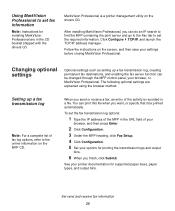
... printed automatically. Set send and receive fax information 35 The following optional settings are in a file. See your settings before closing MarkVision Professional. Changing optional settings Optional settings such as setting up a fax transmission log Note: For a complete list of fax log options, refer to the online information on the drivers CD. To set fax information Note: Instructions for printing the transmission logs and output bins. 6 When you want, or specify that it be changed through the MFP control panel...
... printed automatically. Set send and receive fax information 35 The following optional settings are in a file. See your settings before closing MarkVision Professional. Changing optional settings Optional settings such as setting up a fax transmission log Note: For a complete list of fax log options, refer to the online information on the drivers CD. To set fax information Note: Instructions for printing the transmission logs and output bins. 6 When you want, or specify that it be changed through the MFP control panel...
User's Reference
Page 6
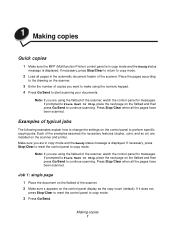
... Stop/Clear to reset the control panel to continue scanning. If necessary, press Stop/Clear to return to start scanning your documents. Each of the scanner, watch the control panel for messages. Note: If you are installed on the flatbed and then press Go/Send to copy mode. 3 Press Go/Send. Place the pages according to perform specific copying jobs. 1 Making copies Quick copies 1 Make sure the MFP (Multifunction Printer) control panel is in copy mode and the Ready status message is displayed. Note: If you want to make using...
... Stop/Clear to reset the control panel to continue scanning. If necessary, press Stop/Clear to return to start scanning your documents. Each of the scanner, watch the control panel for messages. Note: If you are installed on the flatbed and then press Go/Send to copy mode. 3 Press Go/Send. Place the pages according to perform specific copying jobs. 1 Making copies Quick copies 1 Make sure the MFP (Multifunction Printer) control panel is in copy mode and the Ready status message is displayed. Note: If you want to make using...
User's Reference
Page 25
... (letter, legal, A4, size of the fax being made. other ). Scan to copy mode. cancels the copy job being sent. Click the "Send faxes" link for the scanned file legal, A4, other). (letter, legal, A4, other). 8 Control panel displays a Manual fax: Control panel Ready status message displays an Enter Phone # indicating you back to to Return takes you are in prompt. of scanning a document and original and sending the sending it to a file, as an copy to a designated FTP server. 11 adjusts the adjusts adjusts the darkness...
... (letter, legal, A4, size of the fax being made. other ). Scan to copy mode. cancels the copy job being sent. Click the "Send faxes" link for the scanned file legal, A4, other). (letter, legal, A4, other). 8 Control panel displays a Manual fax: Control panel Ready status message displays an Enter Phone # indicating you back to to Return takes you are in prompt. of scanning a document and original and sending the sending it to a file, as an copy to a designated FTP server. 11 adjusts the adjusts adjusts the darkness...
User's Reference
Page 27
... SCAN → EMAIL, and then Menu > to appear on page 8 for more information. In Scan to FTP mode to see SCAN → Fax in the scanner and pressing Go/Send on the MFP control panel, you must define both your Scan to PC and Scan to e-mail job profiles using the MarkNet resident Web pages. Enter Phone # Scan to your profile names. See "Sending faxes" on the MFP control panel, you see a list of your configured FTP servers, you must set...
... SCAN → EMAIL, and then Menu > to appear on page 8 for more information. In Scan to FTP mode to see SCAN → Fax in the scanner and pressing Go/Send on the MFP control panel, you must define both your Scan to PC and Scan to e-mail job profiles using the MarkNet resident Web pages. Enter Phone # Scan to your profile names. See "Sending faxes" on the MFP control panel, you see a list of your configured FTP servers, you must set...
User's Reference
Page 32
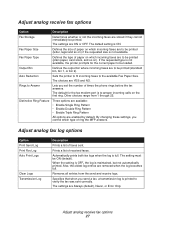
... options are Always (default), Never, or Error Only. By changing these settings, you control which incoming faxes are removed when the log becomes full. The settings are enabled by default. Adjust analog receive fax options 27 The setting must be printed (plain paper, card stock, and so on ) if the requested size is not available. When the setting is OFF, the log is ON. Specifies that when you set the number of times the phone...
... options are Always (default), Never, or Error Only. By changing these settings, you control which incoming faxes are removed when the log becomes full. The settings are enabled by default. Adjust analog receive fax options 27 The setting must be printed (plain paper, card stock, and so on ) if the requested size is not available. When the setting is OFF, the log is ON. Specifies that when you set the number of times the phone...
User's Reference
Page 34
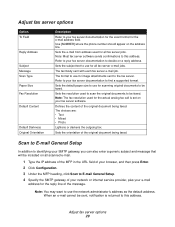
... default paper size to use for all fax server e-mail jobs. The choices are: • Text • Mixed • Photo Lightens or darkens the outgoing fax. Use [NUMBER] where the phone number should appear on your fax server software. Sets the orientation of the message. Scan to E-mail General Setup In addition to identifying your SMTP gateway, you can also enter a generic subject and message that will be faxed. Sets the subject text to use the network administrator's address...
... default paper size to use for all fax server e-mail jobs. The choices are: • Text • Mixed • Photo Lightens or darkens the outgoing fax. Use [NUMBER] where the phone number should appear on your fax server software. Sets the orientation of the message. Scan to E-mail General Setup In addition to identifying your SMTP gateway, you can also enter a generic subject and message that will be faxed. Sets the subject text to use the network administrator's address...
User's Reference
Page 43
Color page came out black and white 1 This happens if the scanner or printer (or both ) is not capable of duplex. Check to see if it has duplex capabilities. Problem Solution Copy printed on the printer. Warning displays on printer operator panel about collation area I pressed Continue on the printer operator panel, but my copies were not in the paper tray you power back on in control panel The control panel and the printer are not talking to see if...
Color page came out black and white 1 This happens if the scanner or printer (or both ) is not capable of duplex. Check to see if it has duplex capabilities. Problem Solution Copy printed on the printer. Warning displays on printer operator panel about collation area I pressed Continue on the printer operator panel, but my copies were not in the paper tray you power back on in control panel The control panel and the printer are not talking to see if...
User's Reference
Page 44
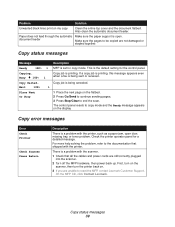
... the scanner. 1 Check that shipped with the printer, such as a paper jam, open . There is being sent or received. Also clean the automatic document feeder. document feeder Make sure the pages to reset the MFP, contact Lexmark Customer Support. Check the printer operator panel for copy mode. Copy status messages 39 This is printing. If a copy job is printing, this message appears even when a fax is open door, missing tray, or toner problem. First, turn on the scanner, then turn the printer back on the flatbed. 2 Press Go/Send to continue sending pages. 3 Press Stop/Clear...
... the scanner. 1 Check that shipped with the printer, such as a paper jam, open . There is being sent or received. Also clean the automatic document feeder. document feeder Make sure the pages to reset the MFP, contact Lexmark Customer Support. Check the printer operator panel for copy mode. Copy status messages 39 This is printing. If a copy job is printing, this message appears even when a fax is open door, missing tray, or toner problem. First, turn on the scanner, then turn the printer back on the flatbed. 2 Press Go/Send to continue sending pages. 3 Press Stop/Clear...
User's Reference
Page 46
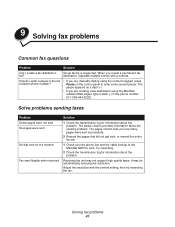
.... Adjust the resolution and the content setting, then try resending the fax. How do I create a fax distribution list? Solving fax problems 41 The pause appears as a dash (-). • If you are manually dialing using the MarkNet resident Web pages, type a dash (-) in the fax recipient phone number? • If you are creating a fax destination using the numeric keypad, press Pause on the control panel to the MarkNet N2501e card. Solve problems sending faxes Problem Some pages...
.... Adjust the resolution and the content setting, then try resending the fax. How do I create a fax distribution list? Solving fax problems 41 The pause appears as a dash (-). • If you are manually dialing using the MarkNet resident Web pages, type a dash (-) in the fax recipient phone number? • If you are creating a fax destination using the numeric keypad, press Pause on the control panel to the MarkNet N2501e card. Solve problems sending faxes Problem Some pages...
User's Reference
Page 49
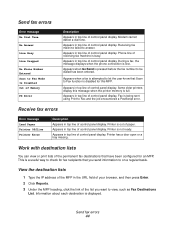
... phone connection is displayed. Receiving fax machine failed to Fax and the job encountered a PostScript error. Fax is being sent using Print to answer. Work with destination lists You can view or print lists of the permanent fax destinations that have been configured for fax recipients that Scan to Fax function is disabled for this message when the printer memory is out of control panel display. Information about each destination is lost. Appears when Go/Send is busy. Printer has a door open or a tray...
... phone connection is displayed. Receiving fax machine failed to Fax and the job encountered a PostScript error. Fax is being sent using Print to answer. Work with destination lists You can view or print lists of the permanent fax destinations that have been configured for fax recipients that Scan to Fax function is disabled for this message when the printer memory is out of control panel display. Information about each destination is lost. Appears when Go/Send is busy. Printer has a door open or a tray...
User's Reference
Page 55
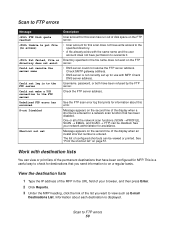
... can be disabled. Check SMTP gateway address. • DNS server is displayed. Check DNS server address. See "Print the shortcut list" on the second line of the display when an invalid shortcut number is entered for MFP. Directory specified in the URL field of your network administrator for this error. One or all of the network scan functions (SCAN →PROFILE, SCAN → EMAIL, and SCAN → FTP) can view or print lists of the list you send information to...
... can be disabled. Check SMTP gateway address. • DNS server is displayed. Check DNS server address. See "Print the shortcut list" on the second line of the display when an invalid shortcut number is entered for MFP. Directory specified in the URL field of your network administrator for this error. One or all of the network scan functions (SCAN →PROFILE, SCAN → EMAIL, and SCAN → FTP) can view or print lists of the list you send information to...
User's Reference
Page 59
... copying adjusting copy size 4 changing copy brightness 4 examples 2-up job 2 colored original job 3 duplex job 2 enlargement job 3 mixed content job 2 single copy job 1 N-up 6 problem solving collation area warning 38 color 38 control panel not responding 38 duplex lights 38 duplexing 38 Ready never appears 38 selecting content 5 selecting media 7 D destination lists 50 duplex option, setting 6 F factory defaults, restoring copy settings 23 Fax log menu Log Output Bin 28 Log Paper Size 28 Log Paper Type 28 Fax send menu Automatic Redial 26 Default Content 26 Default Darkness 26 Dialing Mode...
... copying adjusting copy size 4 changing copy brightness 4 examples 2-up job 2 colored original job 3 duplex job 2 enlargement job 3 mixed content job 2 single copy job 1 N-up 6 problem solving collation area warning 38 color 38 control panel not responding 38 duplex lights 38 duplexing 38 Ready never appears 38 selecting content 5 selecting media 7 D destination lists 50 duplex option, setting 6 F factory defaults, restoring copy settings 23 Fax log menu Log Output Bin 28 Log Paper Size 28 Log Paper Type 28 Fax send menu Automatic Redial 26 Default Content 26 Default Darkness 26 Dialing Mode...


