
Setup Guide
Page 2
...States and/or other than those expressly designated by calling 1-800-553-9727. Evaluation and verification of publications related to access the printer compartment where the option card is installed, you . CAUTION: Do not use this equipment in certain transactions; Do not set up this product by ...MUST be used instead. Some states do not imply that product, program, or service may not apply to make any time. Lexmark and Lexmark with diamond design and MarkVision are inconsistent with the use or distribute any country where such provisions are trademarks of express or ...
...States and/or other than those expressly designated by calling 1-800-553-9727. Evaluation and verification of publications related to access the printer compartment where the option card is installed, you . CAUTION: Do not use this equipment in certain transactions; Do not set up this product by ...MUST be used instead. Some states do not imply that product, program, or service may not apply to make any time. Lexmark and Lexmark with diamond design and MarkVision are inconsistent with the use or distribute any country where such provisions are trademarks of express or ...
Setup Guide
Page 3
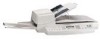
Contents Step 1: Get started 1 Step 2: Assemble paper handling options 4 Step 3: Set up the printer 17 Step 4: Install the scanner 23 Step 5: Install the output tray and raise the feed tray . . . 24 Step 6: Attach cables and power cords 25 Step 7: Turn on the scanner and printer 27 Step 8: Change your default copy settings 30 Step 9: Set send and receive fax information 32 Step 10: Set up network scanning 37 Step 11: Verify MFP setup 40 Step 12: Distribute MFP user instructions 41 Solve setup problems 42 Contents iii
Contents Step 1: Get started 1 Step 2: Assemble paper handling options 4 Step 3: Set up the printer 17 Step 4: Install the scanner 23 Step 5: Install the output tray and raise the feed tray . . . 24 Step 6: Attach cables and power cords 25 Step 7: Turn on the scanner and printer 27 Step 8: Change your default copy settings 30 Step 9: Set send and receive fax information 32 Step 10: Set up network scanning 37 Step 11: Verify MFP setup 40 Step 12: Distribute MFP user instructions 41 Solve setup problems 42 Contents iii
Setup Guide
Page 5
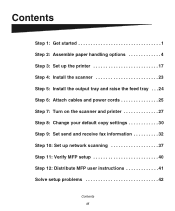
... then return to this book This book is intended to help you set up the printer, see the "Solve setup problems" on page 42 or visit our Web site at www.lexmark.com. Get started Using this guide and continue setup. If you do not have any other devices connected to... the printer, turn the printer off as well and unplug their power cords. If you have an option listed here, you can skip that came with the option or your printer and scanner (MFP option). Step...
... then return to this book This book is intended to help you set up the printer, see the "Solve setup problems" on page 42 or visit our Web site at www.lexmark.com. Get started Using this guide and continue setup. If you do not have any other devices connected to... the printer, turn the printer off as well and unplug their power cords. If you have an option listed here, you can skip that came with the option or your printer and scanner (MFP option). Step...
Setup Guide
Page 6
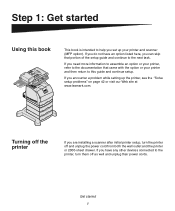
When selecting a location for your printer and MFP option, you are : • Width: 633.6 mm (25 in.) • Depth: 1039.0 mm (41 in.) • Height: 1216.4.8 mm (48 in the box until you must leave enough room to open the printer trays, covers, doors, and MFP option. It is also important to...: • Allow space around the printer for proper ventilation • Provide a firm, level, and stable surface • Keep the equipment ...
When selecting a location for your printer and MFP option, you are : • Width: 633.6 mm (25 in.) • Depth: 1039.0 mm (41 in.) • Height: 1216.4.8 mm (48 in the box until you must leave enough room to open the printer trays, covers, doors, and MFP option. It is also important to...: • Allow space around the printer for proper ventilation • Provide a firm, level, and stable surface • Keep the equipment ...
Setup Guide
Page 7
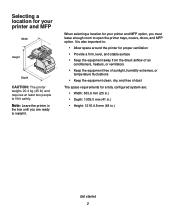
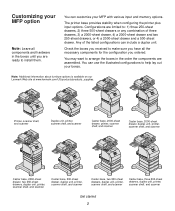
... the printer plus input options. Any of three drawers, 3) a 2000-sheet drawer, 4) a 2000-sheet drawer and two 250-sheet drawers, or 4) a 2000-sheet drawer and a 500-sheet drawer. Note: Additional information about furniture options is available on our Lexmark Web site at www.lexmark.com/US/products/products_supplies. Configurations are assembled. You can customize your MFP...
... the printer plus input options. Any of three drawers, 3) a 2000-sheet drawer, 4) a 2000-sheet drawer and two 250-sheet drawers, or 4) a 2000-sheet drawer and a 500-sheet drawer. Note: Additional information about furniture options is available on our Lexmark Web site at www.lexmark.com/US/products/products_supplies. Configurations are assembled. You can customize your MFP...
Setup Guide
Page 8
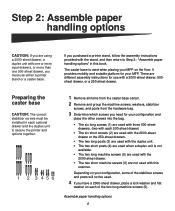
... one or more input drawers, or more than one 500-sheet drawer, you must be used. 4 If you need for use either a printer stand or a caster base. It provides mobility and a stable platform for your configuration and place the other screws into the bag. •...screws (1) are different assembly instructions for your MFP. If you purchased a printer stand, follow the assembly instructions provided with the stand, and then return to Step 2: "Assemble paper handling options" in each optional drawer and the duplex unit to secure the printer and options together. 1 Remove all items from the...
... one or more input drawers, or more than one 500-sheet drawer, you must be used. 4 If you need for use either a printer stand or a caster base. It provides mobility and a stable platform for your configuration and place the other screws into the bag. •...screws (1) are different assembly instructions for your MFP. If you purchased a printer stand, follow the assembly instructions provided with the stand, and then return to Step 2: "Assemble paper handling options" in each optional drawer and the duplex unit to secure the printer and options together. 1 Remove all items from the...
Setup Guide
Page 9
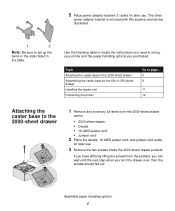
.... Note: Be sure to the 2000-sheet drawer 1 Remove and inventory all items from the pockets, you need to set up your printer and the paper handling options you turn the drawer over, then the screws should fall out. Topic Attaching the caster base to the 2000-sheet drawer Assembling the... caster base for the 500 or 250-sheet drawer Installing the duplex unit Positioning the printer Go to page... 5 8 11 12 Attaching the ...
.... Note: Be sure to the 2000-sheet drawer 1 Remove and inventory all items from the pockets, you need to set up your printer and the paper handling options you turn the drawer over, then the screws should fall out. Topic Attaching the caster base to the 2000-sheet drawer Assembling the... caster base for the 500 or 250-sheet drawer Installing the duplex unit Positioning the printer Go to page... 5 8 11 12 Attaching the ...
Setup Guide
Page 12
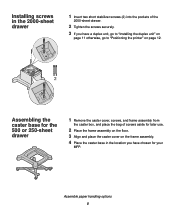
...Tighten the screws securely. 3 If you have a duplex unit, go to "Installing the duplex unit" on page 11 otherwise, go to "Positioning the printer" on the frame assembly. 4 Place the caster base in the 2000-sheet drawer 1 Insert two short stabilizer screws (2) into the pockets of screws aside... for your MFP. Assemble paper handling options 8 Installing screws in the location you have chosen for later use. 2 Place the frame assembly on the floor. 3 Align and place...
...Tighten the screws securely. 3 If you have a duplex unit, go to "Installing the duplex unit" on page 11 otherwise, go to "Positioning the printer" on the frame assembly. 4 Place the caster base in the 2000-sheet drawer 1 Insert two short stabilizer screws (2) into the pockets of screws aside... for your MFP. Assemble paper handling options 8 Installing screws in the location you have chosen for later use. 2 Place the frame assembly on the floor. 3 Align and place...
Setup Guide
Page 13
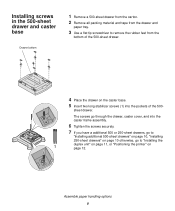
Assemble paper handling options 9 sheet drawer. The screws go through the drawer, caster cover, and into the caster frame assembly. 6 Tighten the screws securely. 7 If you have a additional 500 ... remove the rubber feet from the drawer and paper tray. 3 Use a flat tip screwdriver to "Installing the duplex unit" on page 11, or "Positioning the printer" on the caster base. 5 Insert two long stabilizer screws (1) into the pockets of the 500- Installing screws in the 500-sheet drawer and caster base...
Assemble paper handling options 9 sheet drawer. The screws go through the drawer, caster cover, and into the caster frame assembly. 6 Tighten the screws securely. 7 If you have a additional 500 ... remove the rubber feet from the drawer and paper tray. 3 Use a flat tip screwdriver to "Installing the duplex unit" on page 11, or "Positioning the printer" on the caster base. 5 Insert two long stabilizer screws (1) into the pockets of the 500- Installing screws in the 500-sheet drawer and caster base...
Setup Guide
Page 16
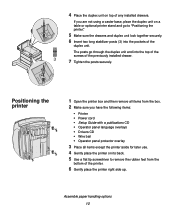
Assemble paper handling options 12 Positioning the printer 1 Open the printer box and then remove all items except the printer aside for later use. 4 Gently place the printer on its back. 5 Use a flat tip screwdriver to "Positioning the printer." 5 Make sure the drawers and duplex unit lock together securely. 6 Insert two ... the rubber feet from the box. 2 Make sure you are not using a caster base, place the duplex unit on a table or optional printer stand and go through the duplex unit and into the pockets of any installed drawers. 4 Place the duplex unit on top of the duplex...
Assemble paper handling options 12 Positioning the printer 1 Open the printer box and then remove all items except the printer aside for later use. 4 Gently place the printer on its back. 5 Use a flat tip screwdriver to "Positioning the printer." 5 Make sure the drawers and duplex unit lock together securely. 6 Insert two ... the rubber feet from the box. 2 Make sure you are not using a caster base, place the duplex unit on a table or optional printer stand and go through the duplex unit and into the pockets of any installed drawers. 4 Place the duplex unit on top of the duplex...
Setup Guide
Page 17
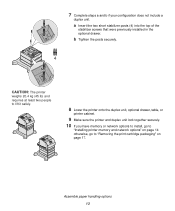
... does not include a duplex unit. CAUTION: The printer weighs 20.4 kg (45 lb) and requires at least two people to lift it safely. 8 Lower the printer onto the duplex unit, optional drawer, table, or printer cabinet. 9 Make sure the printer and duplex unit lock together securely. 10 If you... have memory or network options to install, go to "Installing printer memory and network options" on page 14 otherwise, go to...
... does not include a duplex unit. CAUTION: The printer weighs 20.4 kg (45 lb) and requires at least two people to lift it safely. 8 Lower the printer onto the duplex unit, optional drawer, table, or printer cabinet. 9 Make sure the printer and duplex unit lock together securely. 10 If you... have memory or network options to install, go to "Installing printer memory and network options" on page 14 otherwise, go to...
Setup Guide
Page 18
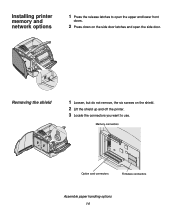
Removing the shield 1 Loosen, but do not remove, the six screws on the side door latches and open the upper and lower front doors. 2 Press down on the shield. 2 Lift the shield up and off the printer. 3 Locate the connectors you want to use. Memory connectors Option card connectors Firmware connectors Assemble paper handling options 14 Installing printer memory and network options 1 Press the release latches to open the side door.
Removing the shield 1 Loosen, but do not remove, the six screws on the side door latches and open the upper and lower front doors. 2 Press down on the shield. 2 Lift the shield up and off the printer. 3 Locate the connectors you want to use. Memory connectors Option card connectors Firmware connectors Assemble paper handling options 14 Installing printer memory and network options 1 Press the release latches to open the side door.
Setup Guide
Page 19
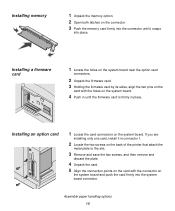
...are installing only one card, install it snaps into the system board connector. Installing a firmware card 1 Locate the holes on the system board near the option card connectors. 2 Unpack the firmware card. 3 Holding the firmware card by its sides, align the two pins on the card with the connector on .... 3 Push the memory card firmly into the connector until the firmware card is firmly in connector 1. 2 Locate the two screws on the back of the printer that attach the metal plate to the slot. 3 Remove and save the two screws, and then remove and discard the plate. 4 Unpack the card. 5 ...
...are installing only one card, install it snaps into the system board connector. Installing a firmware card 1 Locate the holes on the system board near the option card connectors. 2 Unpack the firmware card. 3 Holding the firmware card by its sides, align the two pins on the card with the connector on .... 3 Push the memory card firmly into the connector until the firmware card is firmly in connector 1. 2 Locate the two screws on the back of the printer that attach the metal plate to the slot. 3 Remove and save the two screws, and then remove and discard the plate. 4 Unpack the card. 5 ...

Setup Guide
Page 21
The print cartridge will drop down and snap into the printer. Set up and out. 3 Remove the tabs and packaging from the cartridge. 4 Reinsert the print cartridge into place. 5 Close the upper front door. Step 3: Set up the printer Removing the print cartridge packaging 1 Open the printer upper front door. 2 Pull the print cartridge up the printer 17
The print cartridge will drop down and snap into the printer. Set up and out. 3 Remove the tabs and packaging from the cartridge. 4 Reinsert the print cartridge into place. 5 Close the upper front door. Step 3: Set up the printer Removing the print cartridge packaging 1 Open the printer upper front door. 2 Pull the print cartridge up the printer 17
Setup Guide
Page 22
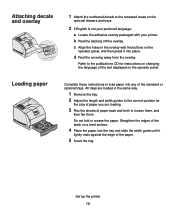
... them, and then fan them. Refer to the publications CD for the size of paper you are loaded in the overlay with your printer. Set up the printer 18 b Peel the backing off the overlay. d Peel the covering away from the overlay. Straighten the edges of the stack on ...the optional drawers and trays. 2 If English is not your preferred language: a Locate the adhesive overlay packaged with the buttons on the operator panel. Attaching ...
... them, and then fan them. Refer to the publications CD for the size of paper you are loaded in the overlay with your printer. Set up the printer 18 b Peel the backing off the overlay. d Peel the covering away from the overlay. Straighten the edges of the stack on ...the optional drawers and trays. 2 If English is not your preferred language: a Locate the adhesive overlay packaged with the buttons on the operator panel. Attaching ...
Setup Guide
Page 23
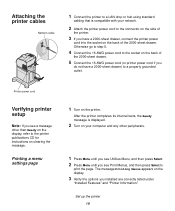
... then press Select to print the page. Set up the printer 19 Printing a menu settings page 1 Turn on the display. 3 Verify the options you installed are correctly listed under "Installed Features" and "Printer Information." The message Printing Menus appears on the printer. After the printer completes its internal tests, the Ready message is compatible with...
... then press Select to print the page. Set up the printer 19 Printing a menu settings page 1 Turn on the display. 3 Verify the options you installed are correctly listed under "Installed Features" and "Printer Information." The message Printing Menus appears on the printer. After the printer completes its internal tests, the Ready message is compatible with...
Setup Guide
Page 24
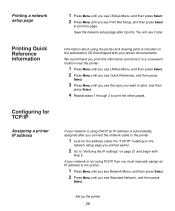
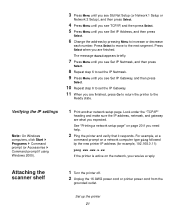
...press Select. 4 Repeat steps 1 through 3 to print the other pages. We recommend you print this information and store it in a convenient location near the printer. 1 Press Menu until you see Utilities Menu, and then press Select. 2 Press Menu until you see Quick Reference, and then press Select. 3 Press...Select to print the page. If your network is using DHCP, an IP address is not using the printer and clearing jams is included on page 21 and begin with your printer documentation. You will use it prints. Printing a network setup page Printing Quick Reference information Configuring for ...
...press Select. 4 Repeat steps 1 through 3 to print the other pages. We recommend you print this information and store it in a convenient location near the printer. 1 Press Menu until you see Utilities Menu, and then press Select. 2 Press Menu until you see Quick Reference, and then press Select. 3 Press...Select to print the page. If your network is using DHCP, an IP address is not using the printer and clearing jams is included on page 21 and begin with your printer documentation. You will use it prints. Printing a network setup page Printing Quick Reference information Configuring for ...
Setup Guide
Page 25
... Programs Command prompt (or Accessories Command prompt if using Windows 2000). 1 Print another network setup page. Attaching the scanner shelf 1 Turn the printer off. 2 Unplug the 16 AWG power cord or printer power cord from the grounded outlet. Press Select when you are finished, press Go to return the... address (for example, 192.168.0.11): ping xxx.xxx.x.xx If the printer is active on the network, you need help. 2 Ping the printer and verify that it responds. Set up the printer 21 See "Printing a network setup page" on a network computer type ping followed by pressing Menu to ...
... Programs Command prompt (or Accessories Command prompt if using Windows 2000). 1 Print another network setup page. Attaching the scanner shelf 1 Turn the printer off. 2 Unplug the 16 AWG power cord or printer power cord from the grounded outlet. Press Select when you are finished, press Go to return the... address (for example, 192.168.0.11): ping xxx.xxx.x.xx If the printer is active on the network, you need help. 2 Ping the printer and verify that it responds. Set up the printer 21 See "Printing a network setup page" on a network computer type ping followed by pressing Menu to ...
Setup Guide
Page 26
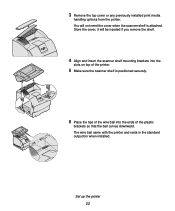
3 Remove the top cover or any previously installed print media handling options from the printer. Store the cover, it will not need the cover when the scanner shelf is positioned securely. 6 Place the tips of the wire bail into the slots on top of the printer. 5 Make sure the scanner shelf is attached. You will be needed if you remove the shelf. 4 Align and insert the scanner shelf mounting brackets into the ends of the plastic brackets so that the bail curves downward. Set up the printer 22 The wire bail came with the printer and rests in the standard output bin when installed.
3 Remove the top cover or any previously installed print media handling options from the printer. Store the cover, it will not need the cover when the scanner shelf is positioned securely. 6 Place the tips of the wire bail into the slots on top of the printer. 5 Make sure the scanner shelf is attached. You will be needed if you remove the shelf. 4 Align and insert the scanner shelf mounting brackets into the ends of the plastic brackets so that the bail curves downward. Set up the printer 22 The wire bail came with the printer and rests in the standard output bin when installed.
Setup Guide
Page 29
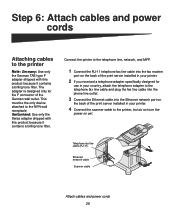
... do not turn the power on yet. Connect the printer to the telephone line, network, and MFP. 1 Connect the RJ-11 telephone fax line cable into the fax modem port on the back of the print server installed in your printer. 2 If you received a telephone adapter specifically designed for the ...F connector of the print server installed in your printer. 4 Connect the scanner...
... do not turn the power on yet. Connect the printer to the telephone line, network, and MFP. 1 Connect the RJ-11 telephone fax line cable into the fax modem port on the back of the print server installed in your printer. 2 If you received a telephone adapter specifically designed for the ...F connector of the print server installed in your printer. 4 Connect the scanner...


