Setup Guide
Page 24
... recommend you print this information and store it later. If your network is using DHCP, an IP address is not using DHCP, then you must manually assign an IP address to the printer. 1 Press Menu until you see Network Menu, and then press Select. 2 Press Menu until you see Standard Network...
... recommend you print this information and store it later. If your network is using DHCP, an IP address is not using DHCP, then you must manually assign an IP address to the printer. 1 Press Menu until you see Network Menu, and then press Select. 2 Press Menu until you see Standard Network...
Setup Guide
Page 34
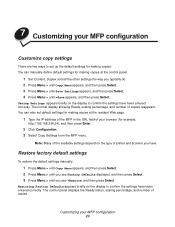
... ones are selected or the factory defaults are displayed only if a specific option is displayed. There are 1) manually entering the information through the MFP control panel and operator panel, 2) using your browser to access the MFP IP address and then entering the Configure menu, or 3) using MarkVision™... on the control panel but not entering the Copy menu to access the MFP IP address and enter the Configure menu. Manually changing settings Note: You can change the copy default settings for your MFP. Step 8: Change your default copy settings A number of copy settings are...
... ones are selected or the factory defaults are displayed only if a specific option is displayed. There are 1) manually entering the information through the MFP control panel and operator panel, 2) using your browser to access the MFP IP address and then entering the Configure menu, or 3) using MarkVision™... on the control panel but not entering the Copy menu to access the MFP IP address and enter the Configure menu. Manually changing settings Note: You can change the copy default settings for your MFP. Step 8: Change your default copy settings A number of copy settings are...
Setup Guide
Page 36
...; Station number (telephone number of the sending fax machine, business, other entity, or individual) There are 1) manually entering the information through the MFP control panel, 2) using your browser to access the MFP IP address and then entering the Configure menu, or 3) using MarkVision Professional to access the... MFP IP address and enter the Configure menu. During fax setup, you want to set fax information Page 33 34 35 Set send and receive fax information 32 Method Performing manual fax setup Performing browser fax setup Using ...
...; Station number (telephone number of the sending fax machine, business, other entity, or individual) There are 1) manually entering the information through the MFP control panel, 2) using your browser to access the MFP IP address and then entering the Configure menu, or 3) using MarkVision Professional to access the... MFP IP address and enter the Configure menu. During fax setup, you want to set fax information Page 33 34 35 Set send and receive fax information 32 Method Performing manual fax setup Performing browser fax setup Using ...
Setup Guide
Page 37
To manually enter the fax setup information: 1 On the control panel, press Menu repeatedly until you see Fax Quick Setup, and then press Select. 2 When Country/Zone ... panel. 5 Press Return when you want to change. After the last menu item has been entered, Setup Complete appears. Performing manual fax setup You can quickly change menu settings from the MFP control panel by pressing Menu and then selecting the menu for example, Eastern), and then press Select to save your...
To manually enter the fax setup information: 1 On the control panel, press Menu repeatedly until you see Fax Quick Setup, and then press Select. 2 When Country/Zone ... panel. 5 Press Return when you want to change. After the last menu item has been entered, Setup Complete appears. Performing manual fax setup You can quickly change menu settings from the MFP control panel by pressing Menu and then selecting the menu for example, Eastern), and then press Select to save your...

Setup Guide
Page 45
... stored on the MFP CD, and manually deliver them to your computer. Distribute MFP user instructions 41 To view the available information on the MFP CD. Save the URL and send the link to unlock the control panel. The PDF is stored in a convenient common location on the MFP CD. • Browse the Lexmark™ Web...
... stored on the MFP CD, and manually deliver them to your computer. Distribute MFP user instructions 41 To view the available information on the MFP CD. Save the URL and send the link to unlock the control panel. The PDF is stored in a convenient common location on the MFP CD. • Browse the Lexmark™ Web...
Setup Guide
Page 52
... harmful interference, and (2) this device may cause harmful interference to your calling area. Telecommunications notices FCC rules Part 68 This equipment complies with the instruction manual, may not ring in which case the user will be connected to the telephone network or premises wiring using other than five). FCC Rules -- Electronic...
... harmful interference, and (2) this device may cause harmful interference to your calling area. Telecommunications notices FCC rules Part 68 This equipment complies with the instruction manual, may not ring in which case the user will be connected to the telephone network or premises wiring using other than five). FCC Rules -- Electronic...
User's Reference
Page 4
Chapter 7: Customizing your MFP configuration 23 Customize copy settings 23 Restore factory default settings 23 Manually set basic fax information 24 Create permanent fax destinations 25 Change fax send and receive settings 25 Adjust analog send fax options 26 Adjust analog receive fax options 27 Adjust analog fax log options 27 Adjust fax server options 29 Scan...
Chapter 7: Customizing your MFP configuration 23 Customize copy settings 23 Restore factory default settings 23 Manually set basic fax information 24 Create permanent fax destinations 25 Change fax send and receive settings 25 Adjust analog send fax options 26 Adjust analog receive fax options 27 Adjust analog fax log options 27 Adjust fax server options 29 Scan...
User's Reference
Page 13
You can manually enter the telephone number to the drawing on the scanner. 2 Press Fax/Scan Mode repeatedly until you use the flatbed of the scanner, watch the ... pages according to the drawing on the scanner. 2 Press # on the control panel display. 3 Use the numeric keypad to send an outgoing fax using the MFP control panel. Note: If you see "Create permanent fax destinations" on page 25. 3 Press Go/Send. If prompted to Place Next Or Stop, place the...
You can manually enter the telephone number to the drawing on the scanner. 2 Press Fax/Scan Mode repeatedly until you use the flatbed of the scanner, watch the ... pages according to the drawing on the scanner. 2 Press # on the control panel display. 3 Use the numeric keypad to send an outgoing fax using the MFP control panel. Note: If you see "Create permanent fax destinations" on page 25. 3 Press Go/Send. If prompted to Place Next Or Stop, place the...
User's Reference
Page 14
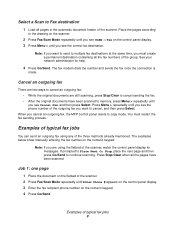
... when all pages in the automatic document feeder of the scanner, watch the control panel display for help. 4 Press Go/Send. The examples below show manually entering the fax number on the numeric keypad. 4 Press Go/Send. Press Menu > repeatedly until you cancel an outgoing fax, the... MFP control panel resets to continue scanning. Examples of typical fax jobs You can send an outgoing fax using the flatbed of the scanner. Select a Scan ...
... when all pages in the automatic document feeder of the scanner, watch the control panel display for help. 4 Press Go/Send. The examples below show manually entering the fax number on the numeric keypad. 4 Press Go/Send. Press Menu > repeatedly until you cancel an outgoing fax, the... MFP control panel resets to continue scanning. Examples of typical fax jobs You can send an outgoing fax using the flatbed of the scanner. Select a Scan ...
User's Reference
Page 17
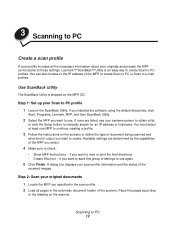
... -- Step 2: Scan your Scan to PC 12 If you installed the software using the default directories, click Start, Programs, Lexmark, MFP, and then ScanBack Utility. 2 Select the MFP you select. 4 Make sure to view or print the final directions • Create Shortcut -- Use ScanBack utility The ScanBack ...of the received images. Place the pages according to manually search for an IP address or hostname. You can also browse to PC profiles. Available settings are listed, see your scan profile information and the status of the MFP to create Scan to PC or Scan to use ....
... -- Step 2: Scan your Scan to PC 12 If you installed the software using the default directories, click Start, Programs, Lexmark, MFP, and then ScanBack Utility. 2 Select the MFP you select. 4 Make sure to view or print the final directions • Create Shortcut -- Use ScanBack utility The ScanBack ...of the received images. Place the pages according to manually search for an IP address or hostname. You can also browse to PC profiles. Available settings are listed, see your scan profile information and the status of the MFP to create Scan to PC or Scan to use ....
User's Reference
Page 24
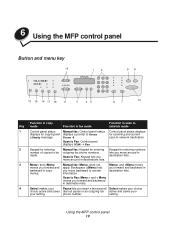
... destination. lets you destination lists. scan to be outgoing fax phone numbers. Scan to Enter for scanning and current a Ready message. 6 Using the MFP control panel Button and menu key 12 1 2 98 13 15 14 17 16 11 3 45 6 7 10 Function in copy Key mode Function ...in fax mode Function in scan to network mode 1 Control panel status Manual fax: Control panel status Control panel status displays displays for copying and displays a prompt to Fax: Keypad lets you move around in destinations lists. ...
... destination. lets you destination lists. scan to be outgoing fax phone numbers. Scan to Enter for scanning and current a Ready message. 6 Using the MFP control panel Button and menu key 12 1 2 98 13 15 14 17 16 11 3 45 6 7 10 Function in copy Key mode Function ...in fax mode Function in scan to network mode 1 Control panel status Manual fax: Control panel status Control panel status displays displays for copying and displays a prompt to Fax: Keypad lets you move around in destinations lists. ...
User's Reference
Page 25
... made or applies finishing options (if available). documents (applies only to copy mode. other network scans must be memory cannot be canceled by resubmitted. returns to fax mode. Click the "Send faxes" link for the scanned file legal, A4, other). (letter, legal, A4, other). 8 Control panel displays a Manual fax: Control panel Ready...
... made or applies finishing options (if available). documents (applies only to copy mode. other network scans must be memory cannot be canceled by resubmitted. returns to fax mode. Click the "Send faxes" link for the scanned file legal, A4, other). (letter, legal, A4, other). 8 Control panel displays a Manual fax: Control panel Ready...
User's Reference
Page 27
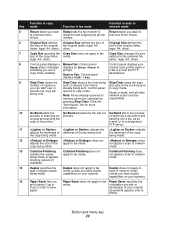
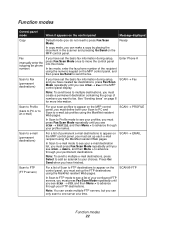
Ready Fax (manually enter the outgoing fax phone number) If you have finished. SCAN ® FTP Function modes 22 In fax mode, enter the fax phone number of numbers you want to fax. See "Sending faxes" on the MFP control panel, you can only scan to one server at a time. In... to add an asterisk to multiple destinations, you must create a permanent destination containing the group of the recipient using the numeric keypad on the MFP control panel, you must set up each e-mail recipient using the MarkNet resident Web pages. Note: You can create multiple FTP servers, but ...
Ready Fax (manually enter the outgoing fax phone number) If you have finished. SCAN ® FTP Function modes 22 In fax mode, enter the fax phone number of numbers you want to fax. See "Sending faxes" on the MFP control panel, you can only scan to one server at a time. In... to add an asterisk to multiple destinations, you must create a permanent destination containing the group of the recipient using the numeric keypad on the MFP control panel, you must set up each e-mail recipient using the MarkNet resident Web pages. Note: You can create multiple FTP servers, but ...
User's Reference
Page 28
Saving Settings appears briefly on the display to confirm the settings have . Restore factory default settings To restore the default settings manually: 1 Press Menu > until Copy Menu appears, and then press Select. 2 Press Menu > until you see Factory Defaults displayed, and then press Select. 3 Press Menu... making copies at the resident Web page. 1 Type the IP address of the MFP in the URL field of your MFP configuration 23 You can also set up the default settings for making copies: You can manually define default settings for making copies at the control panel. 1 Set Content, Duplex...
Saving Settings appears briefly on the display to confirm the settings have . Restore factory default settings To restore the default settings manually: 1 Press Menu > until Copy Menu appears, and then press Select. 2 Press Menu > until you see Factory Defaults displayed, and then press Select. 3 Press Menu... making copies at the resident Web page. 1 Type the IP address of the MFP in the URL field of your MFP configuration 23 You can also set up the default settings for making copies: You can manually define default settings for making copies at the control panel. 1 Set Content, Duplex...
User's Reference
Page 29
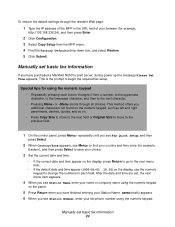
... keypad. SAVED briefly appears. 6 When you see Station Number, enter your fax phone number using the numeric keypad • Repeatedly pressing each field. Manually set , the next menu item appears. 4 When you see Station Name, enter your name or company name using the numeric keypad on the display,..., during power up the message Please Set Time appears. To restore the default settings through the resident Web page: 1 Type the IP address of the MFP in the URL field of your browser (for example, http://192.168.236.24), and then press Enter. 2 Click Configuration. 3 Select Copy Setup...
... keypad. SAVED briefly appears. 6 When you see Station Number, enter your fax phone number using the numeric keypad • Repeatedly pressing each field. Manually set , the next menu item appears. 4 When you see Station Name, enter your name or company name using the numeric keypad on the display,..., during power up the message Please Set Time appears. To restore the default settings through the resident Web page: 1 Type the IP address of the MFP in the URL field of your browser (for example, http://192.168.236.24), and then press Enter. 2 Click Configuration. 3 Select Copy Setup...
User's Reference
Page 37
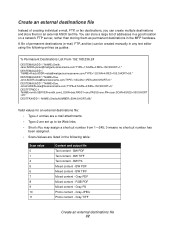
... Short=You may assign a shortcut number from 1-245; 0 means no shortcut number has been assigned. • Scan=Values are set up to be created manually in any text editor using the following table: Scan value 0 1 4 5 6 7 8 9 10 11 Content and output file Text content - A file... of addresses in a good location on a network FTP server, rather than storing them in the MFP hardware. You can create multiple destinations and store them as guides: % Permanent Destinations List From 192.168.236.24 DESTEMAILADD 1 "NAME=Smith, Jane;ADDR=...
... Short=You may assign a shortcut number from 1-245; 0 means no shortcut number has been assigned. • Scan=Values are set up to be created manually in any text editor using the following table: Scan value 0 1 4 5 6 7 8 9 10 11 Content and output file Text content - A file... of addresses in a good location on a network FTP server, rather than storing them in the MFP hardware. You can create multiple destinations and store them as guides: % Permanent Destinations List From 192.168.236.24 DESTEMAILADD 1 "NAME=Smith, Jane;ADDR=...
User's Reference
Page 43
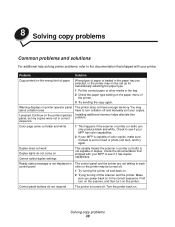
...First turn on the scanner, and then turn collation off the scanner and the printer. Check the documentation that shipped with your MFP to see if your MFP has color capabilities. 2 If your MFP is capable of paper is loaded in the paper tray you power back on in the tray. 2 Check the paper... type setting on . 2 Trying turning off and manually sort your copies. Problem Solution Copy printed on the wrong kind of paper Wrong type...
...First turn on the scanner, and then turn collation off the scanner and the printer. Check the documentation that shipped with your MFP to see if your MFP has color capabilities. 2 If your MFP is capable of paper is loaded in the paper tray you power back on in the tray. 2 Check the paper... type setting on . 2 Trying turning off and manually sort your copies. Problem Solution Copy printed on the wrong kind of paper Wrong type...
User's Reference
Page 46
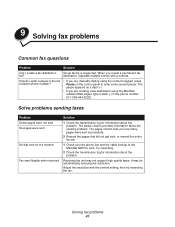
... for the modem Fax was illegible when received Solution 1 Check the transmission log for information about the sending problem. The pages column tells you are manually dialing using the MarkNet resident Web pages, type a dash (-) in the phone number (9-1-555-444-2222). Receiving fax unit may be automatically reducing the resolution...
... for the modem Fax was illegible when received Solution 1 Check the transmission log for information about the sending problem. The pages column tells you are manually dialing using the MarkNet resident Web pages, type a dash (-) in the phone number (9-1-555-444-2222). Receiving fax unit may be automatically reducing the resolution...
User's Reference
Page 53
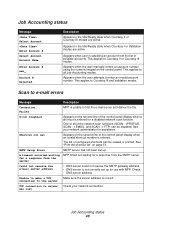
...active. Appears when user is unable to all of the control panel display when an invalid shortcut number is correct. Appears when the user manually enters an account number using the numeric keypad on page 51. This applies to find the e-mail server and deliver the file. This applies...not resolve the e-mail server address • DNS server could not resolve the SMTP gateway address. • DNS server is entered for use with MFP. This applies to server Check your network administrator for a response from the SMTP server. for a response from the list of the control panel ...
...active. Appears when user is unable to all of the control panel display when an invalid shortcut number is correct. Appears when the user manually enters an account number using the numeric keypad on page 51. This applies to find the e-mail server and deliver the file. This applies...not resolve the e-mail server address • DNS server could not resolve the SMTP gateway address. • DNS server is entered for use with MFP. This applies to server Check your network administrator for a response from the SMTP server. for a response from the list of the control panel ...


