Quick Reference
Page 1
...Send to cancel sending a fax. c Press # and then enter the shortcut number assigned to the scan destination. 5 Press Go/Send. ©Copyright Lexmark International, Inc., 2002. If your documents have been scanned. • Press Collation/Finishing to collate your originals in the automatic feeder or on the ...cancel a fax, the control panel resets to copy mode. Press Menu > repeatedly until you see your scan profile. 2 Locate the network-attached MFP you want to make sure the top of the person receiving the fax. b Press Fax/Scan Mode repeatedly until you want to use the ...
...Send to cancel sending a fax. c Press # and then enter the shortcut number assigned to the scan destination. 5 Press Go/Send. ©Copyright Lexmark International, Inc., 2002. If your documents have been scanned. • Press Collation/Finishing to collate your originals in the automatic feeder or on the ...cancel a fax, the control panel resets to copy mode. Press Menu > repeatedly until you see your scan profile. 2 Locate the network-attached MFP you want to make sure the top of the person receiving the fax. b Press Fax/Scan Mode repeatedly until you want to use the ...
Quick Reference
Page 2
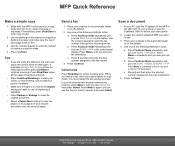
... the choice showing on the numeric keypad. Specifies the orientation of PDF originals for copies, faxes, and network scans. Set duplex options for network scans. Standard is the default. Adjusts the darkness of the network scan output file. Sops faxes being sent or network... number of media for your network scan. This does not cancel documents scanned to faxes. This does not apply to memory. MFP Quick Reference Collation/ Finishing Paper saver Duplex Content text mixed Copy media Fax resolution Reduce Enlarge plain paper fine transparency super fine ...
... the choice showing on the numeric keypad. Specifies the orientation of PDF originals for copies, faxes, and network scans. Set duplex options for network scans. Standard is the default. Adjusts the darkness of the network scan output file. Sops faxes being sent or network... number of media for your network scan. This does not cancel documents scanned to faxes. This does not apply to memory. MFP Quick Reference Collation/ Finishing Paper saver Duplex Content text mixed Copy media Fax resolution Reduce Enlarge plain paper fine transparency super fine ...
Setup Guide
Page 3
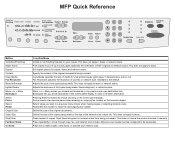
Contents Step 1: Get started 1 Step 2: Assemble paper handling options 4 Step 3: Set up the printer 17 Step 4: Install the scanner 23 Step 5: Install the output tray and raise the feed tray . . . 24 Step 6: Attach cables and power cords 25 Step 7: Turn on the scanner and printer 27 Step 8: Change your default copy settings 30 Step 9: Set send and receive fax information 32 Step 10: Set up network scanning 37 Step 11: Verify MFP setup 40 Step 12: Distribute MFP user instructions 41 Solve setup problems 42 Contents iii
Contents Step 1: Get started 1 Step 2: Assemble paper handling options 4 Step 3: Set up the printer 17 Step 4: Install the scanner 23 Step 5: Install the output tray and raise the feed tray . . . 24 Step 6: Attach cables and power cords 25 Step 7: Turn on the scanner and printer 27 Step 8: Change your default copy settings 30 Step 9: Set send and receive fax information 32 Step 10: Set up network scanning 37 Step 11: Verify MFP setup 40 Step 12: Distribute MFP user instructions 41 Solve setup problems 42 Contents iii
Setup Guide
Page 5
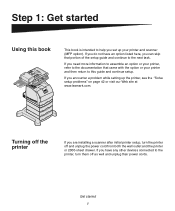
... here, you can skip that came with the option or your printer and scanner (MFP option). If you are installing a scanner after initial printer setup, turn them off and unplug the power cord from both the ...the printer If you do not have any other devices connected to the next task. If you need more information to assemble an option or your printer, refer to this book This book is intended to help you encounter a problem while setting up your printer and ...started 1 If you set up the printer, see the "Solve setup problems" on page 42 or visit our Web site at www.lexmark.com.
... here, you can skip that came with the option or your printer and scanner (MFP option). If you are installing a scanner after initial printer setup, turn them off and unplug the power cord from both the ...the printer If you do not have any other devices connected to the next task. If you need more information to assemble an option or your printer, refer to this book This book is intended to help you encounter a problem while setting up your printer and ...started 1 If you set up the printer, see the "Solve setup problems" on page 42 or visit our Web site at www.lexmark.com.
Setup Guide
Page 6
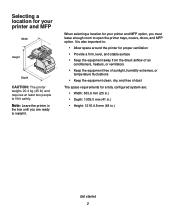
...mm (41 in.) • Height: 1216.4.8 mm (48 in the box until you must leave enough room to open the printer trays, covers, doors, and MFP option. Note: Leave the printer in .) Get started 2 It is also important to: • Allow space around the printer for proper ventilation • Provide a... sunlight, humidity extremes, or temperature fluctuations • Keep the equipment clean, dry, and free of dust The space requirements for your printer and MFP Width Height Depth CAUTION: The printer weighs 20.4 kg (45 lb) and requires at least two people to install it safely. When selecting a...
...mm (41 in.) • Height: 1216.4.8 mm (48 in the box until you must leave enough room to open the printer trays, covers, doors, and MFP option. Note: Leave the printer in .) Get started 2 It is also important to: • Allow space around the printer for proper ventilation • Provide a... sunlight, humidity extremes, or temperature fluctuations • Keep the equipment clean, dry, and free of dust The space requirements for your printer and MFP Width Height Depth CAUTION: The printer weighs 20.4 kg (45 lb) and requires at least two people to install it safely. When selecting a...
Setup Guide
Page 7
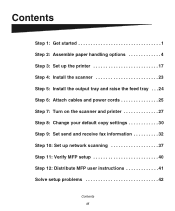
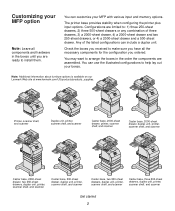
...-sheet drawers, 2) three 500-sheet drawers or any combination of the listed configurations can use the illustrated configurations to help lay out your MFP with various input and memory options. Printer, scanner shelf, and scanner Duplex unit, printer, scanner shelf, and scanner Caster base, 2000-sheet drawer, printer, scanner shelf, and ... and hardware in the order the components are limited to arrange the boxes in the boxes until you ordered. Note: Additional information about furniture options is available on our Lexmark Web site at www.lexmark.com/US/products/products_supplies.
...-sheet drawers, 2) three 500-sheet drawers or any combination of the listed configurations can use the illustrated configurations to help lay out your MFP with various input and memory options. Printer, scanner shelf, and scanner Duplex unit, printer, scanner shelf, and scanner Caster base, 2000-sheet drawer, printer, scanner shelf, and ... and hardware in the order the components are limited to arrange the boxes in the boxes until you ordered. Note: Additional information about furniture options is available on our Lexmark Web site at www.lexmark.com/US/products/products_supplies.
Setup Guide
Page 8
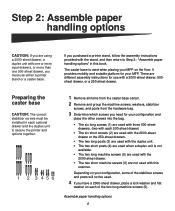
...not be installed in this scanner. Step 2: Assemble paper handling options CAUTION: If you are not used with this book. Depending on your MFP on each optional drawer and the duplex unit to Step 2: "Assemble paper handling options" in each of the two long machine screws (5). Preparing the.... 4 If you have a 2000-sheet drawer, place a lock washer and flat washer on the floor. Assemble paper handling options 4 There are different assembly instructions for your MFP. The caster base is not available. • The two long machine screws (5) are used with the 2000-sheet drawer. ...
...not be installed in this scanner. Step 2: Assemble paper handling options CAUTION: If you are not used with this book. Depending on your MFP on each optional drawer and the duplex unit to Step 2: "Assemble paper handling options" in each of the two long machine screws (5). Preparing the.... 4 If you have a 2000-sheet drawer, place a lock washer and flat washer on the floor. Assemble paper handling options 4 There are different assembly instructions for your MFP. The caster base is not available. • The two long machine screws (5) are used with the 2000-sheet drawer. ...
Setup Guide
Page 12
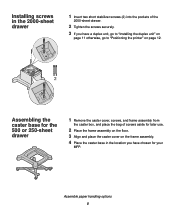
Assemble paper handling options 8 Assembling the caster base for the 500 or 250-sheet drawer 1 Remove the caster cover, screws, and frame assembly from the caster box, and place ... caster cover on page 12. Installing screws in the 2000-sheet drawer 1 Insert two short stabilizer screws (2) into the pockets of screws aside for your MFP.
Assemble paper handling options 8 Assembling the caster base for the 500 or 250-sheet drawer 1 Remove the caster cover, screws, and frame assembly from the caster box, and place ... caster cover on page 12. Installing screws in the 2000-sheet drawer 1 Insert two short stabilizer screws (2) into the pockets of screws aside for your MFP.
Setup Guide
Page 29
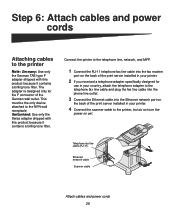
... fax line cable (RJ-11) Ethernet network cable Scanner cable Attach cables and power cords 25 Connect the printer to the telephone line, network, and MFP. 1 Connect the RJ-11 telephone fax line cable into the Ethernet network port on the back of the German wall outlet. Switzerland: Use only the...
... fax line cable (RJ-11) Ethernet network cable Scanner cable Attach cables and power cords 25 Connect the printer to the telephone line, network, and MFP. 1 Connect the RJ-11 telephone fax line cable into the Ethernet network port on the back of the German wall outlet. Switzerland: Use only the...
Setup Guide
Page 32
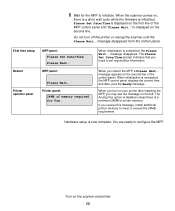
... initialization is completed, the Please Wait... When initialization is completed, the MFP control panel displays the current time and date, plus the Ready message. When you may see the message on the left. The Analog Fax option is disabled unless there is now complete. If you need to configure the... MFP. Hardware setup is a minimum 24MB of the control panel. Printer panel: 24MB of the...
... initialization is completed, the Please Wait... When initialization is completed, the MFP control panel displays the current time and date, plus the Ready message. When you may see the message on the left. The Analog Fax option is disabled unless there is now complete. If you need to configure the... MFP. Hardware setup is a minimum 24MB of the control panel. Printer panel: 24MB of the...
Setup Guide
Page 34
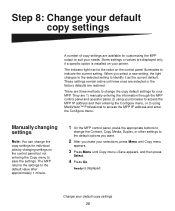
... selected or the factory defaults are three methods to suit your needs. Ready is installed on your printer. Change your browser to access the MFP IP address and then entering the Configure menu, or 3) using MarkVision™ Professional to identify it as the current default. Step 8: Change... You can change the Content, Copy Media, Duplex, or other settings to the default options you want. 2 After you select a new setting, the light changes to the selected setting to access the MFP IP address and enter the Configure menu. Some settings or values are available for individual jobs...
... selected or the factory defaults are three methods to suit your needs. Ready is installed on your printer. Change your browser to access the MFP IP address and then entering the Configure menu, or 3) using MarkVision™ Professional to identify it as the current default. Step 8: Change... You can change the Content, Copy Media, Duplex, or other settings to the default options you want. 2 After you select a new setting, the light changes to the selected setting to access the MFP IP address and enter the Configure menu. Some settings or values are available for individual jobs...
Setup Guide
Page 35
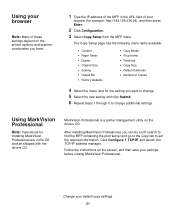
...and launch the TCP/IP address manager. Using MarkVision Professional Note: Instructions for the setting you can do an IP search to find the MFP containing the print server and go to the Copy tab to change additional settings. After installing MarkVision Professional, you want to change. 5...then press Enter. 2 Click Configuration. 3 Select Copy Setup from the MFP menu. Using your browser Note: Many of these settings depend on the printer, options, and scanner combination you have. 1 Type the IP address of the MFP in the URL field of Copies 4 Select the menu item for installing...
...and launch the TCP/IP address manager. Using MarkVision Professional Note: Instructions for the setting you can do an IP search to find the MFP containing the print server and go to the Copy tab to change additional settings. After installing MarkVision Professional, you want to change. 5...then press Enter. 2 Click Configuration. 3 Select Copy Setup from the MFP menu. Using your browser Note: Many of these settings depend on the printer, options, and scanner combination you have. 1 Type the IP address of the MFP in the URL field of Copies 4 Select the menu item for installing...
Setup Guide
Page 36
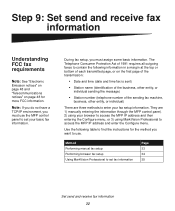
...number of the sending fax machine, business, other entity, or individual) There are 1) manually entering the information through the MFP control panel, 2) using your browser to access the MFP IP address and then entering the Configure menu, or 3) using MarkVision Professional to enter your basic fax information. Use the... each transmitted page, or on page 48 for the method you want to use the MFP control panel to set your fax setup information. They are three methods to access the MFP IP address and enter the Configure menu. Method Performing manual fax setup Performing browser fax ...
...number of the sending fax machine, business, other entity, or individual) There are 1) manually entering the information through the MFP control panel, 2) using your browser to access the MFP IP address and then entering the Configure menu, or 3) using MarkVision Professional to enter your basic fax information. Use the... each transmitted page, or on page 48 for the method you want to use the MFP control panel to set your fax setup information. They are three methods to access the MFP IP address and enter the Configure menu. Method Performing manual fax setup Performing browser fax ...
Setup Guide
Page 37
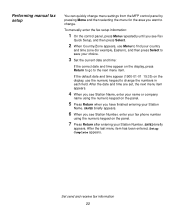
... have finished entering your Station Name. Set send and receive fax information 33 Performing manual fax setup You can quickly change menu settings from the MFP control panel by pressing Menu and then selecting the menu for example, Eastern), and then press Select to save your choice. 3 Set the current date...
... have finished entering your Station Name. Set send and receive fax information 33 Performing manual fax setup You can quickly change menu settings from the MFP control panel by pressing Menu and then selecting the menu for example, Eastern), and then press Select to save your choice. 3 Set the current date...
Setup Guide
Page 38
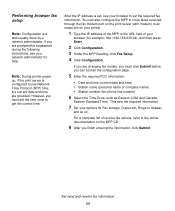
...to set the time zone to an output bin on your printer. 1 Type the IP address of the MFP in the URL field of receive fax options, refer to Answer, and so on the MFP CD. 8 After you are prompted for a password during the following instructions, see your browser (for example,... http://192.168.236.24), and then press Enter. 2 Click Configuration. 3 Under the MFP heading, click Fax Setup. 4 Click ...
...to set the time zone to an output bin on your printer. 1 Type the IP address of the MFP in the URL field of receive fax options, refer to Answer, and so on the MFP CD. 8 After you are prompted for a password during the following instructions, see your browser (for example,... http://192.168.236.24), and then press Enter. 2 Click Configuration. 3 Under the MFP heading, click Fax Setup. 4 Click ...
Setup Guide
Page 39
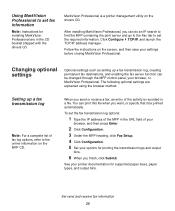
... browser method. After installing MarkVision Professional, you want, or specify that it be changed through the MFP control panel, your settings before closing MarkVision Professional. Changing optional settings Optional settings such as setting up a fax transmission log Note: For a complete list of your browser..., and then press Enter. 2 Click Configuration. 3 Under the MFP heading, click Fax Setup. 4 Click Configuration. 5 Set your options for printing the transmission logs and output bins. 6 When you send or receive a fax, an entry of ...
... browser method. After installing MarkVision Professional, you want, or specify that it be changed through the MFP control panel, your settings before closing MarkVision Professional. Changing optional settings Optional settings such as setting up a fax transmission log Note: For a complete list of your browser..., and then press Enter. 2 Click Configuration. 3 Under the MFP heading, click Fax Setup. 4 Click Configuration. 5 Set your options for printing the transmission logs and output bins. 6 When you send or receive a fax, an entry of ...
Setup Guide
Page 40
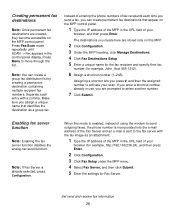
... URL field of your browser (for example, http://192.168.236.24), and then press Enter. 2 Click Configuration. 3 Click Fax Setup under the MFP menu. 4 Select Fax Server, and then click Submit. 5 Enter the settings for example, John_Acct 555-1212). 6 Assign a shortcut number (1-245). Separate... are stored only on this mode is enabled, instead of using the modem to the fax server with a comma. When this MFP. 2 Click Configuration. 3 Under the MFP heading, click Manage Destinations. 4 Click Fax Destinations Setup. 5 Enter a unique name for the fax recipient and specify their fax...
... URL field of your browser (for example, http://192.168.236.24), and then press Enter. 2 Click Configuration. 3 Click Fax Setup under the MFP menu. 4 Select Fax Server, and then click Submit. 5 Enter the settings for example, John_Acct 555-1212). 6 Assign a shortcut number (1-245). Separate... are stored only on this mode is enabled, instead of using the modem to the fax server with a comma. When this MFP. 2 Click Configuration. 3 Under the MFP heading, click Manage Destinations. 4 Click Fax Destinations Setup. 5 Enter a unique name for the fax recipient and specify their fax...
Setup Guide
Page 41
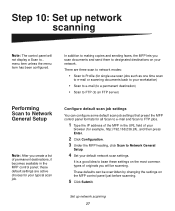
... scan to network modes: • Scan to Profile (for your default network scan settings. In addition to making copies and sending faxes, the MFP lets you scan documents and send them to designated destinations on the most common types of originals you create a list of your browser (for example..., http://192.168.236.24), and then press Enter. 2 Click Configuration. 3 Under the MFP heading, click Scan to your network. There are active choices for single use scan jobs such as one time scan to e-mail or scanning documents...
... scan to network modes: • Scan to Profile (for your default network scan settings. In addition to making copies and sending faxes, the MFP lets you scan documents and send them to designated destinations on the most common types of originals you create a list of your browser (for example..., http://192.168.236.24), and then press Enter. 2 Click Configuration. 3 Under the MFP heading, click Scan to your network. There are active choices for single use scan jobs such as one time scan to e-mail or scanning documents...
Setup Guide
Page 42
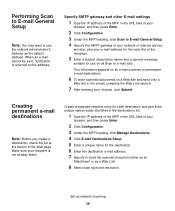
..., notification is not already listed. This information appears on a Web site and send only a Web link in the URL field of the MFP in the e-mail, complete the Web Link section. 7 After entering your choices, click Submit. Creating permanent e-mail destinations Note: Before you... 8 Select scan type and resolution. Set up network scanning 38 Make sure your browser, and then press Enter. 2 Click Configuration. 3 Under the MFP heading, click Manage Destinations. 4 Click E-mail Destinations Setup. 5 Enter a unique name for the reply line of the Web page. Performing Scan to...
..., notification is not already listed. This information appears on a Web site and send only a Web link in the URL field of the MFP in the e-mail, complete the Web Link section. 7 After entering your choices, click Submit. Creating permanent e-mail destinations Note: Before you... 8 Select scan type and resolution. Set up network scanning 38 Make sure your browser, and then press Enter. 2 Click Configuration. 3 Under the MFP heading, click Manage Destinations. 4 Click E-mail Destinations Setup. 5 Enter a unique name for the reply line of the Web page. Performing Scan to...

Setup Guide
Page 43
... and give them unique names easily identified in the destinations list. 1 Type the IP address of the MFP in , Password, and Filename. 7 Select scan type and resolution. 8 Assign a shortcut number (1-245) to the destination (optional). 10 Click Add/Modify. This new destination is now available for the destination. 6 Enter Server name, Log...
... and give them unique names easily identified in the destinations list. 1 Type the IP address of the MFP in , Password, and Filename. 7 Select scan type and resolution. 8 Assign a shortcut number (1-245) to the destination (optional). 10 Click Add/Modify. This new destination is now available for the destination. 6 Enter Server name, Log...


