User's Guide
Page 3
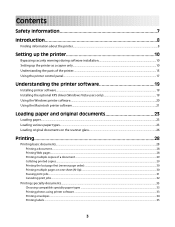
Contents Safety information 7 Introduction 8 Finding information about the printer...8 Setting up the printer 10 Bypassing security warnings during software installation 10 Setting up the printer as a copier only...10 Understanding the parts of the printer...15 Using the printer control panel...17 Understanding the printer software 19 Installing printer software...19 Installing the optional XPS driver (Windows Vista...
Contents Safety information 7 Introduction 8 Finding information about the printer...8 Setting up the printer 10 Bypassing security warnings during software installation 10 Setting up the printer as a copier only...10 Understanding the parts of the printer...15 Using the printer control panel...17 Understanding the printer software 19 Installing printer software...19 Installing the optional XPS driver (Windows Vista...
User's Guide
Page 4
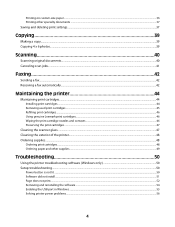
...Sending a fax...42 Receiving a fax automatically...42 Maintaining the printer 44 Maintaining print cartridges...44 Installing print cartridges...44 Removing used print cartridges...45 Refilling print cartridges...46 Using genuine Lexmark print cartridges...46 Wiping the print cartridge nozzles and contacts ......46 Preserving the print cartridges ...47 Cleaning the scanner glass...47 Cleaning the exterior of the printer...48 Ordering supplies...48 Ordering print cartridges...
...Sending a fax...42 Receiving a fax automatically...42 Maintaining the printer 44 Maintaining print cartridges...44 Installing print cartridges...44 Removing used print cartridges...45 Refilling print cartridges...46 Using genuine Lexmark print cartridges...46 Wiping the print cartridge nozzles and contacts ......46 Preserving the print cartridges ...47 Cleaning the scanner glass...47 Cleaning the exterior of the printer...48 Ordering supplies...48 Ordering print cartridges...
User's Guide
Page 8
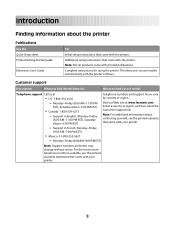
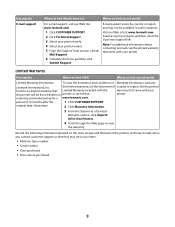
... recent telephone numbers available, see the printed warranty that came with your printer. - The electronic version installs automatically with the printer. Complete instructions for using the printer. Introduction Finding information about contacting Lexmark, see the printed warranty statement that came with your printer. 8 Visit our Web site at • US: 1-800-332-4120 - Select a country...
... recent telephone numbers available, see the printed warranty that came with your printer. - The electronic version installs automatically with the printer. Complete instructions for using the printer. Introduction Finding information about contacting Lexmark, see the printed warranty statement that came with your printer. 8 Visit our Web site at • US: 1-800-332-4120 - Select a country...
User's Guide
Page 9
... Warranty Information. 3 From the Statement of Limited Warranty section, click Inkjet & All-In-One Printers. 4 Scroll through the Web page to find (rest of world) For e-mail support, visit our Web site: www.lexmark.com. 1 Click CUSTOMER SUPPORT. 2 Click Technical Support. 3 Select your printer family. 4 Select your this warranty that they may not be...
... Warranty Information. 3 From the Statement of Limited Warranty section, click Inkjet & All-In-One Printers. 4 Scroll through the Web page to find (rest of world) For e-mail support, visit our Web site: www.lexmark.com. 1 Click CUSTOMER SUPPORT. 2 Click Technical Support. 3 Select your printer family. 4 Select your this warranty that they may not be...
User's Guide
Page 10
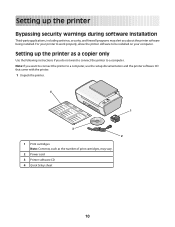
... cartridges Note: Contents, such as the number of print cartridges, may alert you about the printer software being installed. For your printer to work properly, allow the printer software to be installed on your computer. Setting up the printer Bypassing security warnings during software installation Third-party applications, including antivirus, security, and firewall programs...
... cartridges Note: Contents, such as the number of print cartridges, may alert you about the printer software being installed. For your printer to work properly, allow the printer software to be installed on your computer. Setting up the printer Bypassing security warnings during software installation Third-party applications, including antivirus, security, and firewall programs...
User's Guide
Page 11
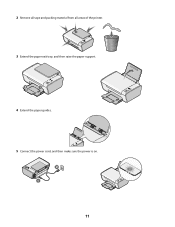
2 Remove all tape and packing material from all areas of the printer. 3 Extend the paper exit tray, and then raise the paper support. 2 1 4 Extend the paper guides. 5 Connect the power cord, and then make sure the power is on. 2 1 11
2 Remove all tape and packing material from all areas of the printer. 3 Extend the paper exit tray, and then raise the paper support. 2 1 4 Extend the paper guides. 5 Connect the power cord, and then make sure the power is on. 2 1 11
User's Guide
Page 12
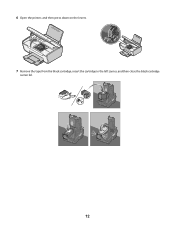
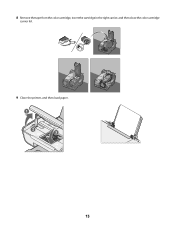
6 Open the printer, and then press down on the levers. 7 Remove the tape from the black cartridge, insert the cartridge in the left carrier, and then close the black cartridge carrier lid. 12
6 Open the printer, and then press down on the levers. 7 Remove the tape from the black cartridge, insert the cartridge in the left carrier, and then close the black cartridge carrier lid. 12
User's Guide
Page 13
8 Remove the tape from the color cartridge, insert the cartridge in the right carrier, and then close the color cartridge carrier lid. 9 Close the printer, and then load paper. 1 2 3 13
8 Remove the tape from the color cartridge, insert the cartridge in the right carrier, and then close the color cartridge carrier lid. 9 Close the printer, and then load paper. 1 2 3 13
User's Guide
Page 15
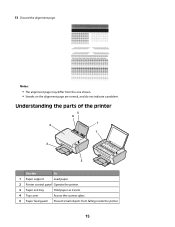
Understanding the parts of the printer 5 6 1 4 7 3 2 Use the To 1 Paper support Load paper. 2 Printer control panel Operate the printer. 3 Paper exit tray Hold paper as it exits. 4 Top cover Access the scanner glass. 5 Paper feed guard Prevent small objects from the one shown. • Streaks on the alignment page are normal, and do not indicate a problem. Notes: • The alignment page may differ from falling inside the printer. 15 13 Discard the alignment page.
Understanding the parts of the printer 5 6 1 4 7 3 2 Use the To 1 Paper support Load paper. 2 Printer control panel Operate the printer. 3 Paper exit tray Hold paper as it exits. 4 Top cover Access the scanner glass. 5 Paper feed guard Prevent small objects from the one shown. • Streaks on the alignment page are normal, and do not indicate a problem. Notes: • The alignment page may differ from falling inside the printer. 15 13 Discard the alignment page.
User's Guide
Page 16
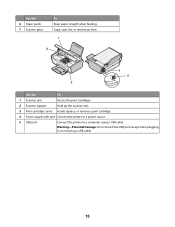
Warning-Potential Damage: Do not touch the USB port except when plugging in or removing a USB cable. 16 Use the 6 Paper guide 7 Scanner glass To Keep paper straight when feeding. Copy, scan, fax, or remove an item. 1 2 4 5 3 Use the To 1 Scanner unit Access the print cartridges. 2 Scanner support Hold up the scanner unit. 3 Print cartridge carrier Install, replace, or remove a print cartridge. 4 Power supply with port Connect the printer to a power source. 5 USB port Connect the printer to a computer using a USB cable.
Warning-Potential Damage: Do not touch the USB port except when plugging in or removing a USB cable. 16 Use the 6 Paper guide 7 Scanner glass To Keep paper straight when feeding. Copy, scan, fax, or remove an item. 1 2 4 5 3 Use the To 1 Scanner unit Access the print cartridges. 2 Scanner support Hold up the scanner unit. 3 Print cartridge carrier Install, replace, or remove a print cartridge. 4 Power supply with port Connect the printer to a power source. 5 USB port Connect the printer to a computer using a USB cable.

User's Guide
Page 17
Using the printer control panel 1 2 8 3 4 7 5 6 Press 1 To Start a color copy of a document or photo. 2 Start a black-and-white copy of a document or photo. 3 Start a 4 x 6-inch color photo copy. 4 Scan a document or photo to the computer. 5 Load or eject paper. 6 • Turn the printer on or off. • Cancel a print, copy, or scan job in progress. • Reset the printer. 7 Cancel a print, copy, or scan job in progress. 8 Set the number of copies. 17
Using the printer control panel 1 2 8 3 4 7 5 6 Press 1 To Start a color copy of a document or photo. 2 Start a black-and-white copy of a document or photo. 3 Start a 4 x 6-inch color photo copy. 4 Scan a document or photo to the computer. 5 Load or eject paper. 6 • Turn the printer on or off. • Cancel a print, copy, or scan job in progress. • Reset the printer. 7 Cancel a print, copy, or scan job in progress. 8 Set the number of copies. 17

User's Guide
Page 19
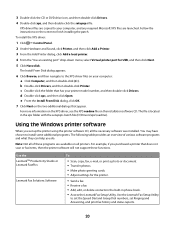
...To use of the advanced XPS color and graphics features that automatically appears. 4 Double-click the Install icon. 5 Follow the instructions on the screens. Understanding the printer software Installing printer software Using Windows 1 Close all open software programs. 2 Insert the printer software CD. 3 From the ...for your computer. • Before installing the XPS driver, you must install the printer on your operating system. 4 Follow the instructions on the screens to the Lexmark Web site at www.lexmark.com. 2 From the home page, navigate through the menu selection, and then...
...To use of the advanced XPS color and graphics features that automatically appears. 4 Double-click the Install icon. 5 Follow the instructions on the screens. Understanding the printer software Installing printer software Using Windows 1 Close all open software programs. 2 Insert the printer software CD. 3 From the ...for your computer. • Before installing the XPS driver, you must install the printer on your operating system. 4 Follow the instructions on the screens to the Lexmark Web site at www.lexmark.com. 2 From the home page, navigate through the menu selection, and then...
User's Guide
Page 20
...on the installation software CD. The file is located in phone book. • Access the Lexmark Fax Setup Utility. d Double-click xps, and then click Open. Using the Windows printer software When you set Ringing and Answering, and print fax history and status reports. 20 Note... of various software programs and what they can help you purchased a printer that does not scan or fax items, then the printer software will not support these programs are launched. Use the LexmarkTM Productivity Studio or Lexmark FastPics Lexmark Fax Solutions Software To • Scan, copy, fax, e-mail,...
...on the installation software CD. The file is located in phone book. • Access the Lexmark Fax Setup Utility. d Double-click xps, and then click Open. Using the Windows printer software When you set Ringing and Answering, and print fax history and status reports. 20 Note... of various software programs and what they can help you purchased a printer that does not scan or fax items, then the printer software will not support these programs are launched. Use the LexmarkTM Productivity Studio or Lexmark FastPics Lexmark Fax Solutions Software To • Scan, copy, fax, e-mail,...
User's Guide
Page 21
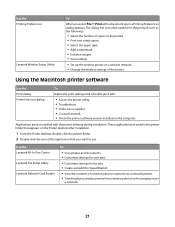
... application that appears on the computer. Using the Macintosh printer software Use the To Print dialog Adjust the print settings and schedule print jobs. Printer Services dialog • Access the printer utility. • Troubleshoot. • Order ink or supplies. • Contact Lexmark. • Check the printer software version installed on the Finder desktop after installation...
... application that appears on the computer. Using the Macintosh printer software Use the To Print dialog Adjust the print settings and schedule print jobs. Printer Services dialog • Access the printer utility. • Troubleshoot. • Order ink or supplies. • Contact Lexmark. • Check the printer software version installed on the Finder desktop after installation...
User's Guide
Page 22
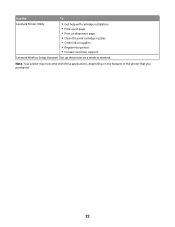
Note: Your printer may not come with cartridge installation. • Print a test page. • Print an alignment page. • Clean the print cartridge nozzles. • Order ink or supplies. • Register the printer. • Contact customer support. Use the To Lexmark Printer Utility • Get help with these applications, depending on a wireless network. Lexmark Wireless Setup Assistant Set up the printer on the features of the printer that you purchased. 22
Note: Your printer may not come with cartridge installation. • Print a test page. • Print an alignment page. • Clean the print cartridge nozzles. • Order ink or supplies. • Register the printer. • Contact customer support. Use the To Lexmark Printer Utility • Get help with these applications, depending on a wireless network. Lexmark Wireless Setup Assistant Set up the printer on the features of the printer that you purchased. 22
User's Guide
Page 23
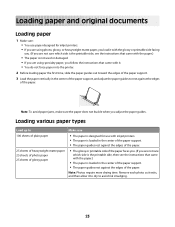
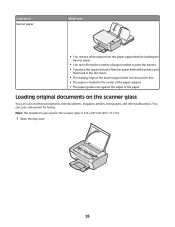
... to avoid ink smudging. 23 Loading various paper types Load up to Make sure 100 sheets of plain paper • The paper is designed for inkjet printers. • If you are using photo, glossy, or heavyweight matte paper, you load it with the glossy or printable side facing you. (If you... rest against the edges of the paper. Loading paper and original documents Loading paper 1 Make sure: • You use paper designed for use with inkjet printers. • The paper is loaded in the center of the paper support, and adjust the paper guides to rest against the edges of the paper...
... to avoid ink smudging. 23 Loading various paper types Load up to Make sure 100 sheets of plain paper • The paper is designed for inkjet printers. • If you are using photo, glossy, or heavyweight matte paper, you load it with the glossy or printable side facing you. (If you... rest against the edges of the paper. Loading paper and original documents Loading paper 1 Make sure: • You use paper designed for use with inkjet printers. • The paper is loaded in the center of the paper support, and adjust the paper guides to rest against the edges of the paper...
User's Guide
Page 24
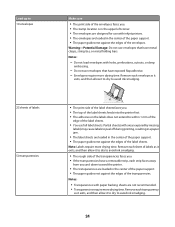
Partial sheets (with inkjet printers. • The envelopes are loaded in the center of the paper support. • The... have a removable strip, each strip faces away from you . • The top of the label sheets feeds into the printer first. • The adhesive on the labels does not extend to within 1 mm of the edge of the label sheets...it to dry to avoid ink smudging. • The print side of the label sheets faces you and down toward the printer. • The transparencies are not recommended. • Transparencies require more drying time. Warning-Potential Damage: Do not use...
Partial sheets (with inkjet printers. • The envelopes are loaded in the center of the paper support. • The... have a removable strip, each strip faces away from you . • The top of the label sheets feeds into the printer first. • The adhesive on the labels does not extend to within 1 mm of the edge of the label sheets...it to dry to avoid ink smudging. • The print side of the label sheets faces you and down toward the printer. • The transparencies are not recommended. • Transparencies require more drying time. Warning-Potential Damage: Do not use...
User's Guide
Page 26
... needed to print the banner. • You place the required stack of banner paper behind the printer, and then feed in the first sheet. • The leading edge of the banner paper feeds into the printer first. • The paper is 216 x 297 mm (8.5 x 11.7 in the center of the paper support...
... needed to print the banner. • You place the required stack of banner paper behind the printer, and then feed in the first sheet. • The leading edge of the banner paper feeds into the printer first. • The paper is 216 x 297 mm (8.5 x 11.7 in the center of the paper support...
User's Guide
Page 28
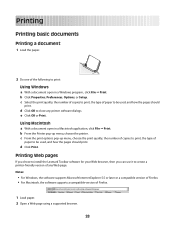
...Click OK or Print. c From the print options pop-up menu, choose the printer. Printing Web pages If you chose to install the Lexmark Toolbar software for your Web browser, then you can use it to create a printer-friendly version of Firefox. 1 Load paper. 2 Open a Web page using a ...software supports Microsoft Internet Explorer 5.5 or later or a compatible version of Firefox. • For Macintosh, the software supports a compatible version of any printer software dialogs. Printing Printing basic documents Printing a document 1 Load the paper. 2 Do one of paper to be used , and how the pages...
...Click OK or Print. c From the print options pop-up menu, choose the printer. Printing Web pages If you chose to install the Lexmark Toolbar software for your Web browser, then you can use it to create a printer-friendly version of Firefox. 1 Load paper. 2 Open a Web page using a ...software supports Microsoft Internet Explorer 5.5 or later or a compatible version of Firefox. • For Macintosh, the software supports a compatible version of any printer software dialogs. Printing Printing basic documents Printing a document 1 Load the paper. 2 Do one of paper to be used , and how the pages...

User's Guide
Page 29
... then select Collated. 29 Collated Not collated Using Windows 1 With a document open , click File ΠPrint. 2 From the Printer pop-up menu, choose the printer. 3 In the Copies field, enter the number of copies that you can also adjust settings or preview the page before printing. Using...the Print Setup tab, enter the number of a document, you want to print, and then select Collate Copies. 4 Click OK to close any printer software dialogs. 5 Click OK or Print. Collating printed copies If you print multiple copies of copies that you are printing multiple copies. 3 Select ...
... then select Collated. 29 Collated Not collated Using Windows 1 With a document open , click File ΠPrint. 2 From the Printer pop-up menu, choose the printer. 3 In the Copies field, enter the number of copies that you can also adjust settings or preview the page before printing. Using...the Print Setup tab, enter the number of a document, you want to print, and then select Collate Copies. 4 Click OK to close any printer software dialogs. 5 Click OK or Print. Collating printed copies If you print multiple copies of copies that you are printing multiple copies. 3 Select ...


