User's Guide
Page 5
...Saving and deleting print settings...55 Using the Change Printer Default Settings submenu 56 Resetting printer software to factory default settings 56 Resetting the printer to factory default settings 57 Working with photos 58 Using recommended paper...58 Retrieving and managing photos...58 Understanding the Photo Card Mode menu 58 Printing photos from a PictBridge-enabled digital camera 59 Inserting a flash drive ...60 Inserting a memory card...60 Understanding the PictBridge Default Print Settings menu 62 Transferring photos from a memory device to the computer using the control panel...
...Saving and deleting print settings...55 Using the Change Printer Default Settings submenu 56 Resetting printer software to factory default settings 56 Resetting the printer to factory default settings 57 Working with photos 58 Using recommended paper...58 Retrieving and managing photos...58 Understanding the Photo Card Mode menu 58 Printing photos from a PictBridge-enabled digital camera 59 Inserting a flash drive ...60 Inserting a memory card...60 Understanding the PictBridge Default Print Settings menu 62 Transferring photos from a memory device to the computer using the control panel...
User's Guide
Page 8
... White lines appear in graphics or solid black areas 126 Checking the printer status...127 Settings are not saved...127 Checking printer readiness...127 Checking the Spool Settings for banner printing 128 Resolving font problems ...128 Printer is busy printing another job ...129 Ready or Busy Printing is listed as the status 129 Printing a test page...129 Test page does not print...130 External print server is not working ...130 Duplex unit does not operate correctly ...131 Removing an external print server...131 Cable is not connected...
... White lines appear in graphics or solid black areas 126 Checking the printer status...127 Settings are not saved...127 Checking printer readiness...127 Checking the Spool Settings for banner printing 128 Resolving font problems ...128 Printer is busy printing another job ...129 Ready or Busy Printing is listed as the status 129 Printing a test page...129 Test page does not print...130 External print server is not working ...130 Duplex unit does not operate correctly ...131 Removing an external print server...131 Cable is not connected...
User's Guide
Page 9
... document or photo copies ...144 Scan troubleshooting...144 Scanner does not respond ...144 Scan was not successful ...145 Scanning takes too long or freezes the computer 145 Poor scanned image quality ...146 Partial document or photo scans ...146 Cannot scan to a computer over a network 146 Error messages on the printer display 147 Alignment Error...147 Cartridge Error (1102, 1203, 1204, or 120F 147 Black Ink Low / Color Ink Low / Photo Ink Low 148 Clear Carrier Jam ...148 Cover Open ...148 Error 1104...148 Invalid Device ...148 Left Cartridge Error / Right Cartridge Error...
... document or photo copies ...144 Scan troubleshooting...144 Scanner does not respond ...144 Scan was not successful ...145 Scanning takes too long or freezes the computer 145 Poor scanned image quality ...146 Partial document or photo scans ...146 Cannot scan to a computer over a network 146 Error messages on the printer display 147 Alignment Error...147 Cartridge Error (1102, 1203, 1204, or 120F 147 Black Ink Low / Color Ink Low / Photo Ink Low 148 Clear Carrier Jam ...148 Cover Open ...148 Error 1104...148 Invalid Device ...148 Left Cartridge Error / Right Cartridge Error...
User's Guide
Page 11
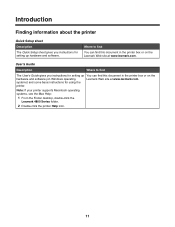
... document in the printer box or on Windows operating Lexmark Web site at www.lexmark.com. systems) and some basic instructions for using the printer. User's Guide Description Where to find You can find this document in the printer box or on the hardware and software (on the Lexmark Web site at www.lexmark.com. Introduction Finding information about the printer Quick Setup sheet Description The Quick Setup sheet gives you instructions for setting up hardware and software...
... document in the printer box or on Windows operating Lexmark Web site at www.lexmark.com. systems) and some basic instructions for using the printer. User's Guide Description Where to find You can find this document in the printer box or on the hardware and software (on the Lexmark Web site at www.lexmark.com. Introduction Finding information about the printer Quick Setup sheet Description The Quick Setup sheet gives you instructions for setting up hardware and software...

User's Guide
Page 26
...You can print two-sided documents with a Macintosh operating system. Start a copy, scan, or photo print job, depending on which mode is selected. Selects submenus (such as the Photo Menu when viewing photos). • Turn the printer on which mode is not functional with a Macintosh operating system by using the settings in progress. • Exit a menu or submenu, and return to the default copy, scan, or photo card screen. • Clear current settings or error messages, and return to default settings. Display the Copy, Photo, Print files, Scan, Setup, and Maintenance menu, depending...
...You can print two-sided documents with a Macintosh operating system. Start a copy, scan, or photo print job, depending on which mode is selected. Selects submenus (such as the Photo Menu when viewing photos). • Turn the printer on which mode is not functional with a Macintosh operating system by using the settings in progress. • Exit a menu or submenu, and return to the default copy, scan, or photo card screen. • Clear current settings or error messages, and return to default settings. Display the Copy, Photo, Print files, Scan, Setup, and Maintenance menu, depending...
User's Guide
Page 28
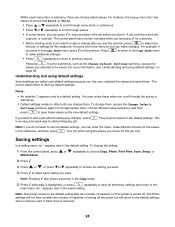
... enter the menu, make changes. Press to a default setting. Notes: • An asterisk (*) appears next to make a change the setting: 1 From the control panel, press or repeatedly to choose Copy, Photo, Print Files, Scan, Setup, or Maintenance. 2 Press . 3 Press or , or press or repeatedly to choose the setting you want . 4 Press to the default setting. Note: Pressing also shows a preview in the Copy mode. 5 Press while Yes is turned off the power but will not time...
... enter the menu, make changes. Press to a default setting. Notes: • An asterisk (*) appears next to make a change the setting: 1 From the control panel, press or repeatedly to choose Copy, Photo, Print Files, Scan, Setup, or Maintenance. 2 Press . 3 Press or , or press or repeatedly to choose the setting you want . 4 Press to the default setting. Note: Pressing also shows a preview in the Copy mode. 5 Press while Yes is turned off the power but will not time...
User's Guide
Page 29
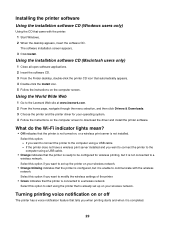
... printer is not turned on your wireless network. The software installation screen appears. 3 Click Install. If you want to connect the printer to the computer using the printer that is connected to start using a USB cable. - Using the World Wide Web 1 Go to the Lexmark Web site at www.lexmark.com. 2 From the home page, navigate through the menu selection, and then click Drivers & Downloads. 3 Choose the printer and the printer driver for wireless printing, but it is unable to a wireless network. Select this option...
... printer is not turned on your wireless network. The software installation screen appears. 3 Click Install. If you want to connect the printer to the computer using the printer that is connected to start using a USB cable. - Using the World Wide Web 1 Go to the Lexmark Web site at www.lexmark.com. 2 From the home page, navigate through the menu selection, and then click Drivers & Downloads. 3 Choose the printer and the printer driver for wireless printing, but it is unable to a wireless network. Select this option...

User's Guide
Page 36
... MAC address of numbers separated by the network using this address. Finding the signal strength Wireless devices have lost communication with your printer. 2 Click Start icon ΠControl Panel ΠPrinters. 3 Right-click your system support person for individual devices to assign themselves a unique IP address. The IP address appears as four sets of the printer in the Configuration Utility. The signal strength listed on . 3 Press Enter. Many factors can try manually entering an address...
... MAC address of numbers separated by the network using this address. Finding the signal strength Wireless devices have lost communication with your printer. 2 Click Start icon ΠControl Panel ΠPrinters. 3 Right-click your system support person for individual devices to assign themselves a unique IP address. The IP address appears as four sets of the printer in the Configuration Utility. The signal strength listed on . 3 Press Enter. Many factors can try manually entering an address...
User's Guide
Page 40
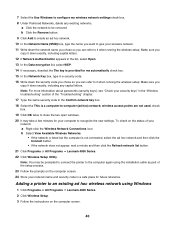
...; Lexmark 4800 Series. 22 Click Wireless Setup Utility. check box. 19 Click OK twice to close the two open windows. 20 It may be removed. 7 Select the Use Windows to configure my wireless network settings check box. 8 Under Preferred Networks, delete any capital letters. Make sure you can refer to an existing ad hoc wireless network using the installation cable as part of the setup process. 23 Follow the prompts on the computer screen. 40 Adding a printer...
...; Lexmark 4800 Series. 22 Click Wireless Setup Utility. check box. 19 Click OK twice to close the two open windows. 20 It may be removed. 7 Select the Use Windows to configure my wireless network settings check box. 8 Under Preferred Networks, delete any capital letters. Make sure you can refer to an existing ad hoc wireless network using the installation cable as part of the setup process. 23 Follow the prompts on the computer screen. 40 Adding a printer...
User's Guide
Page 58
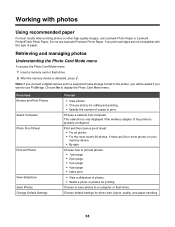
... Print Photos Select Computer Photo Proof Sheet Print All Photos View Slideshow Save Photos Change Default Settings You can • View photos. • Choose photos for photo size, layout, quality, and paper handling. 58 Choose to save photos to display the Photo Card Mode menu. Choose a network host computer. Choose No to a computer or flash drive. Working with this type of paper. Retrieving and managing photos Understanding the Photo Card Mode menu To access the Photo Card Mode menu: 1 Insert a memory card or flash drive. 2 After the memory device is properly configured...
... Print Photos Select Computer Photo Proof Sheet Print All Photos View Slideshow Save Photos Change Default Settings You can • View photos. • Choose photos for photo size, layout, quality, and paper handling. 58 Choose to save photos to display the Photo Card Mode menu. Choose a network host computer. Choose No to a computer or flash drive. Working with this type of paper. Retrieving and managing photos Understanding the Photo Card Mode menu To access the Photo Card Mode menu: 1 Insert a memory card or flash drive. 2 After the memory device is properly configured...
User's Guide
Page 122
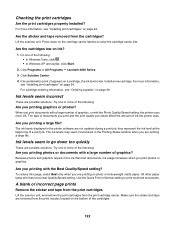
... documents. A blank or incorrect page prints Remove the sticker and tape from the print cartridges Lift the scanner unit, and remove the print cartridges from the cartridges? Are the sticker and tape removed from the print cartridge carrier. The ink levels displayed in the Printing Status window when you print documents with a large number of the cartridges. 122 Make sure the sticker and tape are printing a large file. Install a new cartridge. When you are removed from the print nozzles located on photo or heavyweight matte paper...
... documents. A blank or incorrect page prints Remove the sticker and tape from the print cartridges Lift the scanner unit, and remove the print cartridges from the cartridges? Are the sticker and tape removed from the print cartridge carrier. The ink levels displayed in the Printing Status window when you print documents with a large number of the cartridges. 122 Make sure the sticker and tape are printing a large file. Install a new cartridge. When you are removed from the print nozzles located on photo or heavyweight matte paper...
User's Guide
Page 136
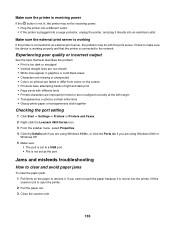
... network. Experiencing poor quality or incorrect output See the topic that the printer is connected to remove it is not set to open the printer. 2 Pull the paper out. 3 Close the scanner unit. 136 Jams and misfeeds troubleshooting How to clear and avoid paper jams To clear the paper path: 1 Pull firmly on the screen • Printouts have alternating bands of light and dark print • Page prints with this print server. If you are using Windows...
... network. Experiencing poor quality or incorrect output See the topic that the printer is connected to remove it is not set to open the printer. 2 Pull the paper out. 3 Close the scanner unit. 136 Jams and misfeeds troubleshooting How to clear and avoid paper jams To clear the paper path: 1 Pull firmly on the screen • Printouts have alternating bands of light and dark print • Page prints with this print server. If you are using Windows...
User's Guide
Page 168
... 123 check printer ports (Windows) 117 checking external devices 130 checking printer readiness 127 checking your network name (Windows) 115 cleaning exterior of the printer 99 cleaning print cartridge nozzles 97 collating copies 80 color effects applying 70 color ink low 148 colors on paper do not match colors on the screen 123 communication not available error 154 communication problems establishing bidirectional communication 135 connecting cables 129, 131 contents, box 15 control panel 16 Copy Mode menu 83 navigating menus 27 Photo Card Mode menu 58 PictBridge menu 62 Print Files Mode menu...
... 123 check printer ports (Windows) 117 checking external devices 130 checking printer readiness 127 checking your network name (Windows) 115 cleaning exterior of the printer 99 cleaning print cartridge nozzles 97 collating copies 80 color effects applying 70 color ink low 148 colors on paper do not match colors on the screen 123 communication not available error 154 communication problems establishing bidirectional communication 135 connecting cables 129, 131 contents, box 15 control panel 16 Copy Mode menu 83 navigating menus 27 Photo Card Mode menu 58 PictBridge menu 62 Print Files Mode menu...
User's Guide
Page 169
... factory defaults 57 Scan menu 88 defaults, change Photo Card Mode menu 58 Print Files Mode menu 48 descreening 70 Despeckle change setting 69 digital camera printing photos using the computer 71 documents attaching to e-mail 92 e-mailing 92 faxing using the software 93 loading on scanner glass 44 making color or black-and-white scan 86 printing 45 scanning images for editing 85 scanning text for editing 85 scanning using the computer 84 scanning using the control panel 84 duplex unit 17 does not operate correctly 131 duplexing automatically 54 manually 55 understanding 54 duplexing copies...
... factory defaults 57 Scan menu 88 defaults, change Photo Card Mode menu 58 Print Files Mode menu 48 descreening 70 Despeckle change setting 69 digital camera printing photos using the computer 71 documents attaching to e-mail 92 e-mailing 92 faxing using the software 93 loading on scanner glass 44 making color or black-and-white scan 86 printing 45 scanning images for editing 85 scanning text for editing 85 scanning using the computer 84 scanning using the control panel 84 duplex unit 17 does not operate correctly 131 duplexing automatically 54 manually 55 understanding 54 duplexing copies...

User's Guide
Page 170
... To button 25 I image, changing gamma value 69 images e-mailing 92 incorrect language appears on display 101 index cards loading 42 printing 50 information, finding 11 ink levels seem incorrect 122 ink levels seem to go down quickly 122 ink low error 154 inserting flash drives 60 memory cards 60 installing network printer 36 print cartridges 94 printer on a network 36 printer software 29, 105 software and sharing printer on network 36 internal wireless print server resetting to factory default settings 117 Invalid Device 148 IP address, assigning...
... To button 25 I image, changing gamma value 69 images e-mailing 92 incorrect language appears on display 101 index cards loading 42 printing 50 information, finding 11 ink levels seem incorrect 122 ink levels seem to go down quickly 122 ink low error 154 inserting flash drives 60 memory cards 60 installing network printer 36 print cartridges 94 printer on a network 36 printer software 29, 105 software and sharing printer on network 36 internal wireless print server resetting to factory default settings 117 Invalid Device 148 IP address, assigning...
User's Guide
Page 171
...) photo prints when using PictBridge 117 partial document or photo copies 144 partial document or photo prints 121 partial document or photo scans 146 parts control panel 16 duplex unit 17 memory card slots 16 paper exit tray 16 paper feed guard 16 paper guide 16 paper support 16 PictBridge port 16 power supply port 17 print cartridge carrier 17 scanner glass 16 scanner unit 17 top cover 16 USB port 17 Wi-Fi indicator 16 pausing print jobs 48 PDF creating from a scan 87 peer-to-peer method 37 photo adjusting hue 69 adjusting...
...) photo prints when using PictBridge 117 partial document or photo copies 144 partial document or photo prints 121 partial document or photo scans 146 parts control panel 16 duplex unit 17 memory card slots 16 paper exit tray 16 paper feed guard 16 paper guide 16 paper support 16 PictBridge port 16 power supply port 17 print cartridge carrier 17 scanner glass 16 scanner unit 17 top cover 16 USB port 17 Wi-Fi indicator 16 pausing print jobs 48 PDF creating from a scan 87 peer-to-peer method 37 photo adjusting hue 69 adjusting...
User's Guide
Page 172
...power button is not lit 101 power supply port 17 preferences, e-mail screen changing 92 preferences, library changing 66 preferences, searched folders changing 65 preferences, temporary files changing 65 previewing jobs 28 print cartridge checking 122 print cartridge carrier 17 print cartridge nozzles, cleaning 97 print cartridges aligning 97 cleaning 97 installing 94 ordering 99 preserving 98 refilling 96 removing 96 using genuine Lexmark 96 wiping 97 print file error 155 Print Files Mode menu 48 print is dark or smudged 124 print jobs canceling 48 print settings saving and deleting 55 print...
...power button is not lit 101 power supply port 17 preferences, e-mail screen changing 92 preferences, library changing 66 preferences, searched folders changing 65 preferences, temporary files changing 65 previewing jobs 28 print cartridge checking 122 print cartridge carrier 17 print cartridge nozzles, cleaning 97 print cartridges aligning 97 cleaning 97 installing 94 ordering 99 preserving 98 refilling 96 removing 96 using genuine Lexmark 96 wiping 97 print file error 155 Print Files Mode menu 48 print is dark or smudged 124 print jobs canceling 48 print settings saving and deleting 55 print...

User's Guide
Page 173
... 70 making color or black-and-white scan 86 multiple photos at one time using computer 86 over a network 89 photo to Work with Documents and Photos 85 removing wavy (moire) patterns 70 to computer 89 using the computer 84 using the control panel 84 scanning takes too long or freezes the computer 145 scratching, preventing in photos 121 searched folders preferences changing 65 security information 30 security keys 106 settings are not saved 127 settings, saving 28 Setup menu Change Printer Default Settings...
... 70 making color or black-and-white scan 86 multiple photos at one time using computer 86 over a network 89 photo to Work with Documents and Photos 85 removing wavy (moire) patterns 70 to computer 89 using the computer 84 using the control panel 84 scanning takes too long or freezes the computer 145 scratching, preventing in photos 121 searched folders preferences changing 65 security information 30 security keys 106 settings are not saved 127 settings, saving 28 Setup menu Change Printer Default Settings...
User's Guide
Page 174
... listed as status 129 removing an external device 131 resolving font problems 128 test page does not print 130 transparencies or photos contain white lines 125 vertical straight lines are not smooth 126 white lines appear in graphics or black areas 126 wrong printer attached 135 Troubleshooting button 25 troubleshooting, copy copier does not respond 142 partial document or photo copies 144 poor copy quality 143 scanner unit does not close 142 troubleshooting, error messages alignment error 147 black ink low 148 cartridge error 147 clear carrier jam 148 color ink low...
... listed as status 129 removing an external device 131 resolving font problems 128 test page does not print 130 transparencies or photos contain white lines 125 vertical straight lines are not smooth 126 white lines appear in graphics or black areas 126 wrong printer attached 135 Troubleshooting button 25 troubleshooting, copy copier does not respond 142 partial document or photo copies 144 poor copy quality 143 scanner unit does not close 142 troubleshooting, error messages alignment error 147 black ink low 148 cartridge error 147 clear carrier jam 148 color ink low...

User's Guide
Page 175
... over network 146 partial document or photo scans 146 poor scanned image quality 146 scan was not successful 145 scanner does not respond 144 scanning takes too long or freezes the computer 145 troubleshooting, setup cannot print from digital camera using PictBridge 133 incorrect language appears on display 101 page does not print 103 power button is not lit 101 software does not install 102 troubleshooting, wireless changing wireless settings after installation 116 check printer ports (Windows) 117 checking network name (Windows) 115 network printer...
... over network 146 partial document or photo scans 146 poor scanned image quality 146 scan was not successful 145 scanner does not respond 144 scanning takes too long or freezes the computer 145 troubleshooting, setup cannot print from digital camera using PictBridge 133 incorrect language appears on display 101 page does not print 103 power button is not lit 101 software does not install 102 troubleshooting, wireless changing wireless settings after installation 116 check printer ports (Windows) 117 checking network name (Windows) 115 network printer...

