User's Guide
Page 7
... Sending a fax using the software...93 Maintaining the printer 94 Installing print cartridges...94 Removing a used print cartridge...96 Refilling print cartridges...96 Using genuine Lexmark print cartridges 96 Aligning print cartridges...97 Cleaning the print cartridge nozzles 97 Wiping the print cartridge nozzles and contacts 97 Preserving the print cartridges...98 Cleaning the scanner glass...99 Cleaning the exterior...
... Sending a fax using the software...93 Maintaining the printer 94 Installing print cartridges...94 Removing a used print cartridge...96 Refilling print cartridges...96 Using genuine Lexmark print cartridges 96 Aligning print cartridges...97 Cleaning the print cartridge nozzles 97 Wiping the print cartridge nozzles and contacts 97 Preserving the print cartridges...98 Cleaning the scanner glass...99 Cleaning the exterior...
User's Guide
Page 8
... wireless settings after installation 116 Resetting an internal wireless print server to factory default settings 117 Check printer ports (Windows users only 117 Print troubleshooting...117 Partial 4 x 6 in. (10 x 15...121 Partial document or photo prints...121 Photo smudges or scratches ...121 Checking the print cartridges...122 Ink levels seem incorrect ...122 Ink levels seem to go down too quickly ... page prints...122 Characters on printout are missing or unexpected 123 Colors on printout are faded or differ from colors on the screen 123 Glossy photo paper or transparencies stick together...
... wireless settings after installation 116 Resetting an internal wireless print server to factory default settings 117 Check printer ports (Windows users only 117 Print troubleshooting...117 Partial 4 x 6 in. (10 x 15...121 Partial document or photo prints...121 Photo smudges or scratches ...121 Checking the print cartridges...122 Ink levels seem incorrect ...122 Ink levels seem to go down too quickly ... page prints...122 Characters on printout are missing or unexpected 123 Colors on printout are faded or differ from colors on the screen 123 Glossy photo paper or transparencies stick together...
User's Guide
Page 9
... Jams and misfeeds troubleshooting 136 How to clear and avoid paper jams ...136 Paper jam in the printer ...137 Paper jam in the paper support ...137 Paper or specialty media misfeeds...137 Printer does not feed paper, envelopes, or specialty media 138 Banner paper jams ...138 Paper continues to...document or photo scans ...146 Cannot scan to a computer over a network 146 Error messages on the printer display 147 Alignment Error...147 Cartridge Error (1102, 1203, 1204, or 120F 147 Black Ink Low / Color Ink Low / Photo Ink Low 148 Clear Carrier Jam ...148 Cover Open ...148 Error 1104...148 ...
... Jams and misfeeds troubleshooting 136 How to clear and avoid paper jams ...136 Paper jam in the printer ...137 Paper jam in the paper support ...137 Paper or specialty media misfeeds...137 Printer does not feed paper, envelopes, or specialty media 138 Banner paper jams ...138 Paper continues to...document or photo scans ...146 Cannot scan to a computer over a network 146 Error messages on the printer display 147 Alignment Error...147 Cartridge Error (1102, 1203, 1204, or 120F 147 Black Ink Low / Color Ink Low / Photo Ink Low 148 Clear Carrier Jam ...148 Cover Open ...148 Error 1104...148 ...
User's Guide
Page 10
...Size/Type error ...151 Photo size error. Photo must fit on page 151 PictBridge Communication Error ...152 Please remove the camera card...152 Printer Carrier Stall ...152 Proof Sheet Error...152 Some photos removed from card by host 152 Problems reading the memory card ...152 Two-sided ...Two-sided printing is not supported on the current paper type 153 Error messages on the computer screen 153 Clearing error messages ...153 Left/Right Cartridge Missing ...154 Communication not available ...154 General Printing Problem ...154 Ink Low ...154 Out of Memory...154 Out of Paper ...155 Fixing a ...
...Size/Type error ...151 Photo size error. Photo must fit on page 151 PictBridge Communication Error ...152 Please remove the camera card...152 Printer Carrier Stall ...152 Proof Sheet Error...152 Some photos removed from card by host 152 Problems reading the memory card ...152 Two-sided ...Two-sided printing is not supported on the current paper type 153 Error messages on the computer screen 153 Clearing error messages ...153 Left/Right Cartridge Missing ...154 Communication not available ...154 General Printing Problem ...154 Ink Low ...154 Out of Memory...154 Out of Paper ...155 Fixing a ...

User's Guide
Page 15
Note: Complete user information (User's Guide or Mac Help) can be installed into the printer. Setting up the printer Checking the box contents 7 1 2 3 6 5 4 Name 1 Black print cartridge 2 Color print cartridge 3 Power cord 4 Installation software CD for the printer • Windows Help • User's Guide in electronic format • Mac Help Printed booklet that serves as a guide. Note...
Note: Complete user information (User's Guide or Mac Help) can be installed into the printer. Setting up the printer Checking the box contents 7 1 2 3 6 5 4 Name 1 Black print cartridge 2 Color print cartridge 3 Power cord 4 Installation software CD for the printer • Windows Help • User's Guide in electronic format • Mac Help Printed booklet that serves as a guide. Note...

User's Guide
Page 17
... in the duplex unit" on page 139. 6 Power supply with port Connect the printer to a computer using a USB cable. server) 4 USB port Connect the printer to a power source. 2 1 17 1 2 WI F I PRINTING 3 4 5 6 Use the To 1 Scanner unit Access the print cartridges. 2 Print cartridge carrier Install, replace, or remove a print cartridge. 3 Lexmark N2050 (internal wireless print Connect the...
... in the duplex unit" on page 139. 6 Power supply with port Connect the printer to a computer using a USB cable. server) 4 USB port Connect the printer to a power source. 2 1 17 1 2 WI F I PRINTING 3 4 5 6 Use the To 1 Scanner unit Access the print cartridges. 2 Print cartridge carrier Install, replace, or remove a print cartridge. 3 Lexmark N2050 (internal wireless print Connect the...
User's Guide
Page 21
12 Open the printer. 13 Press down on the levers. WI F I PRINTING 14 Remove the tape from the black cartridge, and insert the cartridge in the left carrier. 15 Close the black cartridge carrier lid. 21
12 Open the printer. 13 Press down on the levers. WI F I PRINTING 14 Remove the tape from the black cartridge, and insert the cartridge in the left carrier. 15 Close the black cartridge carrier lid. 21
User's Guide
Page 22
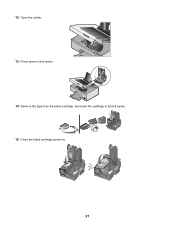
An alignment page prints. 22 16 Remove the tape from the color cartridge, and insert the cartridge in the right carrier. 17 Close the color cartridge carrier lid. 18 Close the printer. 19 Press .
An alignment page prints. 22 16 Remove the tape from the color cartridge, and insert the cartridge in the right carrier. 17 Close the color cartridge carrier lid. 18 Close the printer. 19 Press .
User's Guide
Page 24
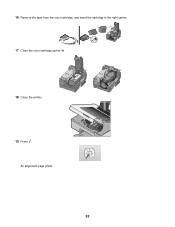
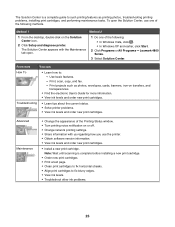
...At the bottom left corner of the Welcome Screen, there are two Settings choices: Click To Printer Status and Maintenance • Open the Solution Center. • Check ink levels. • Order print cartridges. • Find maintenance information. • Select other Solution Center tabs for : •...Print a photo as a multiple-page poster. Photo Packages Print multiple photos in various sizes. Fax History and Settings Select printer fax settings for more information, including how to the Library. Click To Transfer Photos Photo Greeting Cards Details Download photos from ...
...At the bottom left corner of the Welcome Screen, there are two Settings choices: Click To Printer Status and Maintenance • Open the Solution Center. • Check ink levels. • Order print cartridges. • Find maintenance information. • Select other Solution Center tabs for : •...Print a photo as a multiple-page poster. Photo Packages Print multiple photos in various sizes. Fax History and Settings Select printer fax settings for more information, including how to the Library. Click To Transfer Photos Photo Greeting Cards Details Download photos from ...
User's Guide
Page 25
...• Share information with the Maintenance tab open the Solution Center, use the printer. • Obtain software version information. • View ink levels and order new print cartridges. • Install a new print cartridge. Method 1 Method 2 1 From the desktop, double-click on the Solution...click . • In Windows XP and earlier, click Start. 2 Click Programs or All Programs Œ Lexmark 4800 Series. 3 Select Solution Center. Troubleshooting • Learn tips about the current status. • Solve printer problems. • View ink levels and order new print cartridges.
...• Share information with the Maintenance tab open the Solution Center, use the printer. • Obtain software version information. • View ink levels and order new print cartridges. • Install a new print cartridge. Method 1 Method 2 1 From the desktop, double-click on the Solution...click . • In Windows XP and earlier, click Start. 2 Click Programs or All Programs Œ Lexmark 4800 Series. 3 Select Solution Center. Troubleshooting • Learn tips about the current status. • Solve printer problems. • View ink levels and order new print cartridges.

User's Guide
Page 26
... Setup, and Maintenance menu, depending on which mode is selected. Selects submenus (such as the Photo Menu when viewing photos). • Turn the printer on the display. • Decrease a number. 26 Select for duplex (two-sided) printing. You can print two-sided documents with a Macintosh operating... control panel Using the control panel The display shows: • Mode indicators • Main menu art messages • Icons • Ink cartridge levels Mode 1 2 3 4 5 6 7 8 9 10 11 A Main Menu Area Message • Scroll through submenus. • Increase the numbers of copies...
... Setup, and Maintenance menu, depending on which mode is selected. Selects submenus (such as the Photo Menu when viewing photos). • Turn the printer on the display. • Decrease a number. 26 Select for duplex (two-sided) printing. You can print two-sided documents with a Macintosh operating... control panel Using the control panel The display shows: • Mode indicators • Main menu art messages • Icons • Ink cartridge levels Mode 1 2 3 4 5 6 7 8 9 10 11 A Main Menu Area Message • Scroll through submenus. • Increase the numbers of copies...
User's Guide
Page 58
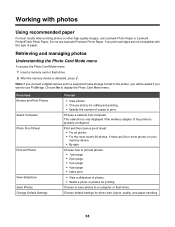
Note: If you connect a digital camera set to a supported mass storage format to the printer, you will be asked if you want to use Lexmark Premium Photo Paper. Retrieving and managing photos Understanding the Photo Card Mode menu To access the Photo Card Mode menu: 1 Insert a memory card or flash...host computer. Choose to save photos to display the Photo Card Mode menu. Working with this type of paper. Do not use PictBridge. Your print cartridges are 20 or more photos on your memory device. • By date Choose how to print. From here Browse and Print Photos Select Computer ...
Note: If you connect a digital camera set to a supported mass storage format to the printer, you will be asked if you want to use Lexmark Premium Photo Paper. Retrieving and managing photos Understanding the Photo Card Mode menu To access the Photo Card Mode menu: 1 Insert a memory card or flash...host computer. Choose to save photos to display the Photo Card Mode menu. Working with this type of paper. Do not use PictBridge. Your print cartridges are 20 or more photos on your memory device. • By date Choose how to print. From here Browse and Print Photos Select Computer ...
User's Guide
Page 94
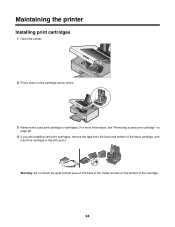
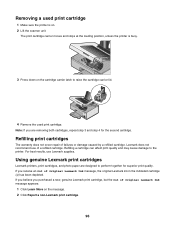
WI F I PRINTING 3 Remove the used print cartridge" on page 96. 4 If you are installing new print cartridges, remove the tape from the back and bottom of the cartridge. 94 For more information, see "Removing a used print cartridge or cartridges. Warning: Do not touch the gold contact area on the back or the metal nozzles on the cartridge carrier levers. Maintaining the printer Installing print cartridges 1 Open the printer. 2 Press down on the bottom of the black cartridge, and insert the cartridge in the left carrier.
WI F I PRINTING 3 Remove the used print cartridge" on page 96. 4 If you are installing new print cartridges, remove the tape from the back and bottom of the cartridge. 94 For more information, see "Removing a used print cartridge or cartridges. Warning: Do not touch the gold contact area on the back or the metal nozzles on the cartridge carrier levers. Maintaining the printer Installing print cartridges 1 Open the printer. 2 Press down on the bottom of the black cartridge, and insert the cartridge in the left carrier.
User's Guide
Page 95
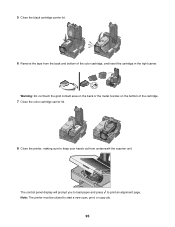
5 Close the black cartridge carrier lid. 6 Remove the tape from underneath the scanner unit. Note: The printer must be closed to print an alignment page. The control panel display will prompt you to load paper and press to start a new scan, print, or copy job. 95 Warning: Do not touch the gold contact area on the back or the metal nozzles on the bottom of the cartridge. 7 Close the color cartridge carrier lid. 8 Close the printer, making sure to keep your hands out from the back and bottom of the color cartridge, and insert the cartridge in the right carrier.
5 Close the black cartridge carrier lid. 6 Remove the tape from underneath the scanner unit. Note: The printer must be closed to print an alignment page. The control panel display will prompt you to load paper and press to start a new scan, print, or copy job. 95 Warning: Do not touch the gold contact area on the back or the metal nozzles on the bottom of the cartridge. 7 Close the color cartridge carrier lid. 8 Close the printer, making sure to keep your hands out from the back and bottom of the color cartridge, and insert the cartridge in the right carrier.
User's Guide
Page 96
... may cause damage to perform together for the second cartridge. If you believe you receive an Out of a refilled cartridge. Using genuine Lexmark print cartridges Lexmark printers, print cartridges, and photo paper are removing both cartridges, repeat step 3 and step 4 for superior print quality. If you purchased a new, genuine Lexmark print cartridge, but the Out of failures or damage caused...
... may cause damage to perform together for the second cartridge. If you believe you receive an Out of a refilled cartridge. Using genuine Lexmark print cartridges Lexmark printers, print cartridges, and photo paper are removing both cartridges, repeat step 3 and step 4 for superior print quality. If you purchased a new, genuine Lexmark print cartridge, but the Out of failures or damage caused...

User's Guide
Page 97
... not improved, try cleaning the nozzles up to improve print quality, print your cartridge(s) with new Lexmark print cartridge(s). • If you are using the printer without a computer, press Cancel. If print quality has not improved, clean the print cartridge nozzles. Aligning print cartridges 1 Load plain paper. 2 Press repeatedly until Maintenance is highlighted. 3 Press . 4 Press repeatedly...
... not improved, try cleaning the nozzles up to improve print quality, print your cartridge(s) with new Lexmark print cartridge(s). • If you are using the printer without a computer, press Cancel. If print quality has not improved, clean the print cartridge nozzles. Aligning print cartridges 1 Load plain paper. 2 Press repeatedly until Maintenance is highlighted. 3 Press . 4 Press repeatedly...
User's Guide
Page 98
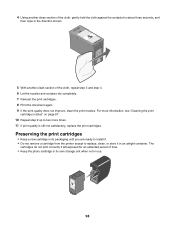
... step 3 and step 4. 6 Let the nozzles and contacts dry completely. 7 Reinsert the print cartridges. 8 Print the document again. 9 If the print quality does not improve, clean the print nozzles. The cartridges do not print correctly if left exposed for about three seconds, and then wipe in the direction...when not in an airtight container. For more information, see "Cleaning the print cartridge nozzles" on page 97. 10 Repeat step 9 up to replace, clean, or store it . • Do not remove a cartridge from the printer except to two more times. 11 If print quality is still not satisfactory, ...
... step 3 and step 4. 6 Let the nozzles and contacts dry completely. 7 Reinsert the print cartridges. 8 Print the document again. 9 If the print quality does not improve, clean the print nozzles. The cartridges do not print correctly if left exposed for about three seconds, and then wipe in the direction...when not in an airtight container. For more information, see "Cleaning the print cartridge nozzles" on page 97. 10 Repeat step 9 up to replace, clean, or store it . • Do not remove a cartridge from the printer except to two more times. 11 If print quality is still not satisfactory, ...
User's Guide
Page 99
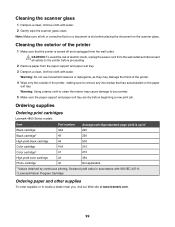
... our Web site at www.lexmark.com. 99 CAUTION: To avoid the risk of the printer 1 Make sure that has accumulated on the scanner glass. Ordering supplies Ordering print cartridges Lexmark 4800 Series models Item Part number Average cartridge standard page yield is turned ...damage to remove any ink residue that the printer is up to1 Black cartridge 42A 220 Black cartridge2 42 220 High yield black cartridge 44 500 Color cartridge 41A 210 Color cartridge2 41 210 High yield color cartridge 43 350 Photo cartridge 40 Not applicable 1 Values obtained by continuous...
... our Web site at www.lexmark.com. 99 CAUTION: To avoid the risk of the printer 1 Make sure that has accumulated on the scanner glass. Ordering supplies Ordering print cartridges Lexmark 4800 Series models Item Part number Average cartridge standard page yield is turned ...damage to remove any ink residue that the printer is up to1 Black cartridge 42A 220 Black cartridge2 42 220 High yield black cartridge 44 500 Color cartridge 41A 210 Color cartridge2 41 210 High yield color cartridge 43 350 Photo cartridge 40 Not applicable 1 Values obtained by continuous...
User's Guide
Page 103
...2 Disconnect the power cord from the wall outlet. 3 Gently remove the power supply from the printer. 4 Reconnect the power supply to the printer. 5 Plug the power cord into a properly grounded outlet. For more of the following: Check...setup.exe. 6 Follow the instructions on , make sure the printer is displayed, resolve the error before trying to turn the printer on page 105. Uninstall and reinstall software Uninstall the printer software, and then reinstall it. Check power If the light ... then load paper. Check ink Check the ink levels, and install new print cartridges if necessary. 103
...2 Disconnect the power cord from the wall outlet. 3 Gently remove the power supply from the printer. 4 Reconnect the power supply to the printer. 5 Plug the power cord into a properly grounded outlet. For more of the following: Check...setup.exe. 6 Follow the instructions on , make sure the printer is displayed, resolve the error before trying to turn the printer on page 105. Uninstall and reinstall software Uninstall the printer software, and then reinstall it. Check power If the light ... then load paper. Check ink Check the ink levels, and install new print cartridges if necessary. 103
User's Guide
Page 104
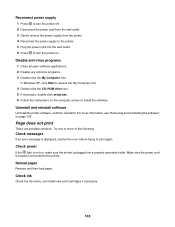
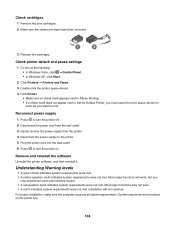
... mark indicates system requirements were not met. Check cartridges 1 Remove the print cartridges. 2 Make sure the sticker and tape have been removed. 1 2 3 Reinsert the cartridges. Installation will work . • A red X indicates system requirements were not met. Reconnect power supply 1 Press to turn the printer on the printer box. 104 Remove and reinstall the software Uninstall...
... mark indicates system requirements were not met. Check cartridges 1 Remove the print cartridges. 2 Make sure the sticker and tape have been removed. 1 2 3 Reinsert the cartridges. Installation will work . • A red X indicates system requirements were not met. Reconnect power supply 1 Press to turn the printer on the printer box. 104 Remove and reinstall the software Uninstall...


