User's Guide
Page 9
... Jams and misfeeds troubleshooting 136 How to clear and avoid paper jams ...136 Paper jam in the printer ...137 Paper jam in the paper support ...137 Paper or specialty media misfeeds...137 Printer does not feed paper, envelopes, or specialty media 138 Banner paper jams ...138 Paper continues...over a network 146 Error messages on the printer display 147 Alignment Error...147 Cartridge Error (1102, 1203, 1204, or 120F 147 Black Ink Low / Color Ink Low / Photo Ink Low 148 Clear Carrier Jam ...148 Cover Open ...148 Error 1104...148 Invalid Device ...148 Left Cartridge Error / Right Cartridge ...
... Jams and misfeeds troubleshooting 136 How to clear and avoid paper jams ...136 Paper jam in the printer ...137 Paper jam in the paper support ...137 Paper or specialty media misfeeds...137 Printer does not feed paper, envelopes, or specialty media 138 Banner paper jams ...138 Paper continues...over a network 146 Error messages on the printer display 147 Alignment Error...147 Cartridge Error (1102, 1203, 1204, or 120F 147 Black Ink Low / Color Ink Low / Photo Ink Low 148 Clear Carrier Jam ...148 Cover Open ...148 Error 1104...148 Invalid Device ...148 Left Cartridge Error / Right Cartridge ...
User's Guide
Page 10
... host 152 Problems reading the memory card ...152 Two-sided paper type error ...153 Two-sided printing is not supported on the current paper size 153 Two-sided printing is not supported on the current paper type 153 Error messages on the computer screen 153 Clearing error messages ...153 Left/Right Cartridge...
... host 152 Problems reading the memory card ...152 Two-sided paper type error ...153 Two-sided printing is not supported on the current paper size 153 Two-sided printing is not supported on the current paper type 153 Error messages on the computer screen 153 Clearing error messages ...153 Left/Right Cartridge...
User's Guide
Page 11
systems) and some basic instructions for setting up hardware and software. Note: If your printer supports Macintosh operating systems, see the Mac Help: 1 From the Finder desktop, double-click the Lexmark 4800 Series folder. 2 Double-click the printer Help icon. 11 Introduction Finding information about the ...printer. User's Guide Description Where to find You can find this document in the printer box or on Windows operating Lexmark Web site at www.lexmark.com. Where to find The User's Guide gives you instructions for setting up You can find this document in ...
systems) and some basic instructions for setting up hardware and software. Note: If your printer supports Macintosh operating systems, see the Mac Help: 1 From the Finder desktop, double-click the Lexmark 4800 Series folder. 2 Double-click the printer Help icon. 11 Introduction Finding information about the ...printer. User's Guide Description Where to find You can find this document in the printer box or on Windows operating Lexmark Web site at www.lexmark.com. Where to find The User's Guide gives you instructions for setting up You can find this document in ...
User's Guide
Page 12
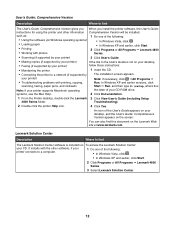
... click Start. • Printing 2 Click Programs or All Programs Œ Lexmark 4800 • Working with photos Series. • Scanning (if supported by your printer) 3 Click User's Guide. • Making copies (if supported by The installation screen appears. You can also find this document on your ... printer 1 Insert the CD. • Connecting the printer to a network (if supported by your printer) If the link to the User's Guide is not on the Lexmark Web site at www.lexmark.com. User's Guide: Comprehensive Version Description Where to find The User's Guide: Comprehensive...
... click Start. • Printing 2 Click Programs or All Programs Œ Lexmark 4800 • Working with photos Series. • Scanning (if supported by your printer) 3 Click User's Guide. • Making copies (if supported by The installation screen appears. You can also find this document on your ... printer 1 Insert the CD. • Connecting the printer to a network (if supported by your printer) If the link to the User's Guide is not on the Lexmark Web site at www.lexmark.com. User's Guide: Comprehensive Version Description Where to find The User's Guide: Comprehensive...

User's Guide
Page 13
... be free of defects in some instances. 1 Click CUSTOMER SUPPORT. 2 Click Technical Support. 3 Select your printer family. 4 Select your printer. E-mail support varies by country or region, and may change without notice. materials and workmanship for a www.lexmark.com. period of Limited Warranty section, click Inkjet & All-In-One Printers. 4 Scroll through the Web page...
... be free of defects in some instances. 1 Click CUSTOMER SUPPORT. 2 Click Technical Support. 3 Select your printer family. 4 Select your printer. E-mail support varies by country or region, and may change without notice. materials and workmanship for a www.lexmark.com. period of Limited Warranty section, click Inkjet & All-In-One Printers. 4 Scroll through the Web page...
User's Guide
Page 16
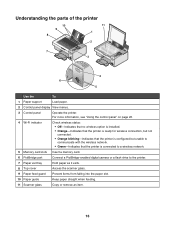
.... 11 Scanner glass Copy or remove an item. 16 Understanding the parts of the printer 10 9 8 11 1 2 7 WI F I PRINTING 3 WI F I PRINTING 4 6 5 Use the To 1 Paper support Load paper. 2 Control panel display View menus. 3 Control panel Operate the printer.
.... 11 Scanner glass Copy or remove an item. 16 Understanding the parts of the printer 10 9 8 11 1 2 7 WI F I PRINTING 3 WI F I PRINTING 4 6 5 Use the To 1 Paper support Load paper. 2 Control panel display View menus. 3 Control panel Operate the printer.
User's Guide
Page 19
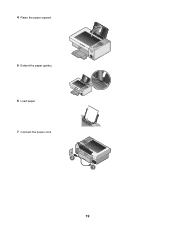
WI F I PRINTING WI F I PRINTING 7 Connect the power cord. 2 1 19 4 Raise the paper support. 5 Extend the paper guides. 6 Load paper.
WI F I PRINTING WI F I PRINTING 7 Connect the power cord. 2 1 19 4 Raise the paper support. 5 Extend the paper guides. 6 Load paper.

User's Guide
Page 36
... signal strength. Auto-IP is being assigned. The signal strength listed on the host computer) Windows Vista users only: 1 For more information, see your system support person for individual devices to automatically assign an IP address. Sharing the printer on a network Sharing the printer on the network (on the printer network...
... signal strength. Auto-IP is being assigned. The signal strength listed on the host computer) Windows Vista users only: 1 For more information, see your system support person for individual devices to automatically assign an IP address. Sharing the printer on a network Sharing the printer on the network (on the printer network...
User's Guide
Page 37
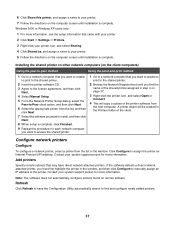
... added printers. 37 Click Configure to your printer. 7 Follow the directions on the computer screen until installation is complete. Contact your system support person for more information. Contact your system support person for more information. If the software detects a direct network attached printer, you must first highlight the printer in step 4 on...
... added printers. 37 Click Configure to your printer. 7 Follow the directions on the computer screen until installation is complete. Contact your system support person for more information. Contact your system support person for more information. If the software detects a direct network attached printer, you must first highlight the printer in step 4 on...
User's Guide
Page 41
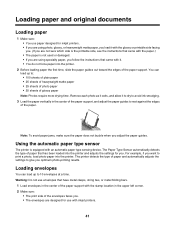
... do not force paper into the printer. 2 Before loading paper the first time, slide the paper guides out toward the edges of the paper support. Note: To avoid paper jams, make sure the paper does not buckle when you adjust the paper guides. Warning: Do not use envelopes that... the stamp location in the center of the paper support, and adjust the paper guides to give you optimum photo-printing results. Loading paper and original documents Loading paper 1 Make sure: • You use paper designed for inkjet printers. • If you are using specialty paper, you follow the instructions...
... do not force paper into the printer. 2 Before loading paper the first time, slide the paper guides out toward the edges of the paper support. Note: To avoid paper jams, make sure the paper does not buckle when you adjust the paper guides. Warning: Do not use envelopes that... the stamp location in the center of the paper support, and adjust the paper guides to give you optimum photo-printing results. Loading paper and original documents Loading paper 1 Make sure: • You use paper designed for inkjet printers. • If you are using specialty paper, you follow the instructions...
User's Guide
Page 42
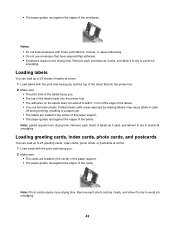
... first. 2 Make sure: • The print side of the labels faces you . 2 Make sure: • The cards are loaded in the center of the paper support. • The paper guides rest against the edges of the sheet fed into the printer first. • The adhesive on the labels does not extend... labels You can load up to peel off during printing, resulting in a paper jam. • The labels are loaded in the center of the paper support. • The paper guides rest against the edges of the envelopes. Notes: • Do not load envelopes with the print side facing you and the...
... first. 2 Make sure: • The print side of the labels faces you . 2 Make sure: • The cards are loaded in the center of the paper support. • The paper guides rest against the edges of the sheet fed into the printer first. • The adhesive on the labels does not extend... labels You can load up to peel off during printing, resulting in a paper jam. • The labels are loaded in the center of the paper support. • The paper guides rest against the edges of the envelopes. Notes: • Do not load envelopes with the print side facing you and the...
User's Guide
Page 43
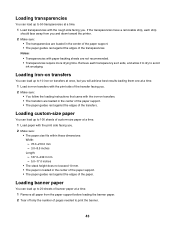
....0-432.0 mm - 5.0-17.0 inches • The stack height does not exceed 10 mm. • The paper is loaded in the center of the paper support. • The paper guides rest against the edges of the transfers. Notes: • Transparencies with the rough side facing you. Remove each strip should face... away from the paper support before loading the banner paper. 2 Tear off only the number of the transparencies. Loading banner paper You can load up to 20 sheets of...
....0-432.0 mm - 5.0-17.0 inches • The stack height does not exceed 10 mm. • The paper is loaded in the center of the paper support. • The paper guides rest against the edges of the transfers. Notes: • Transparencies with the rough side facing you. Remove each strip should face... away from the paper support before loading the banner paper. 2 Tear off only the number of the transparencies. Loading banner paper You can load up to 20 sheets of...
User's Guide
Page 44
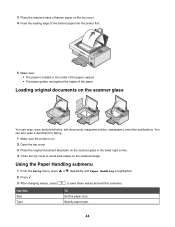
... this submenu. Using the Paper Handling submenu 1 From the Setup menu, press or repeatedly until Paper Handling is loaded in the center of the paper support. • The paper guides rest against the edges of the banner paper into the printer first. 3 Place the required stack of banner paper on the...
... this submenu. Using the Paper Handling submenu 1 From the Setup menu, press or repeatedly until Paper Handling is loaded in the center of the paper support. • The paper guides rest against the edges of the banner paper into the printer first. 3 Place the required stack of banner paper on the...
User's Guide
Page 48
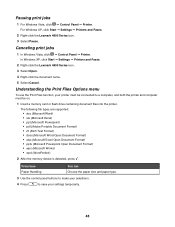
...drive containing document files into the printer. In Windows XP, click Start Œ Settings Œ Printers and Faxes. 2 Right-click the Lexmark 4800 Series icon. 3 Select Open. 4 Right-click the document name. 5 Select Cancel. Understanding the Print Files Options menu To use ...; Control Panel Œ Printer. For Windows XP, click Start Œ Settings Œ Printers and Faxes. 2 Right-click the Lexmark 4800 Series icon. 3 Select Pause. The following file types are supported: • .doc (Microsoft Word) • .xls (Microsoft Excel) • .ppt (Microsoft Powerpoint) • .pdf (...
...drive containing document files into the printer. In Windows XP, click Start Œ Settings Œ Printers and Faxes. 2 Right-click the Lexmark 4800 Series icon. 3 Select Open. 4 Right-click the document name. 5 Select Cancel. Understanding the Print Files Options menu To use ...; Control Panel Œ Printer. For Windows XP, click Start Œ Settings Œ Printers and Faxes. 2 Right-click the Lexmark 4800 Series icon. 3 Select Pause. The following file types are supported: • .doc (Microsoft Word) • .xls (Microsoft Excel) • .ppt (Microsoft Powerpoint) • .pdf (...
User's Guide
Page 49
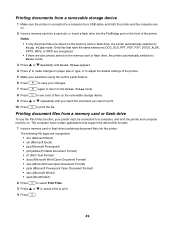
... on the memory card or flash drive, the printer automatically switches to a computer, and both the printer and the computer are on . Only files that support the desired file formats. 1 Insert a memory card or flash drive containing document files into the PictBridge port on the front of files on the memory...
... on the memory card or flash drive, the printer automatically switches to a computer, and both the printer and the computer are on . Only files that support the desired file formats. 1 Insert a memory card or flash drive containing document files into the PictBridge port on the front of files on the memory...

User's Guide
Page 56
... speaker during a call. In Windows 2000 and Windows XP, click Start ΠSettings ΠPrinters or Printers and Faxes. 2 Right-click the Lexmark 4800 Series icon. 3 Click Printing Preferences. 4 Click the Save Settings menu. 5 From the Restore section, select Factory Settings (Defaults). 56 Notes:...default. On is highlighted. 2 Press . 3 After changing values, press to save your settings, then type a name for your system support person to block to either On or Off. Note: The first location contains Factory Default Settings, which cannot be changed or deleted. 7 Click...
... speaker during a call. In Windows 2000 and Windows XP, click Start ΠSettings ΠPrinters or Printers and Faxes. 2 Right-click the Lexmark 4800 Series icon. 3 Click Printing Preferences. 4 Click the Save Settings menu. 5 From the Restore section, select Factory Settings (Defaults). 56 Notes:...default. On is highlighted. 2 Press . 3 After changing values, press to save your settings, then type a name for your system support person to block to either On or Off. Note: The first location contains Factory Default Settings, which cannot be changed or deleted. 7 Click...
User's Guide
Page 58
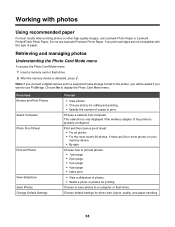
...per page • 4 per page • Index print • View a slideshow of copies to a computer or flash drive. Do not use Lexmark Photo Paper or Lexmark PerfectFinish Photo Paper. Retrieving and managing photos Understanding the Photo Card Mode menu To access the Photo Card Mode menu: 1 Insert a memory card or... default settings for printing. Working with this type of the printer is properly configured. Note: If you connect a digital camera set to a supported mass storage format to the printer, you will be asked if you want to print all photos • For the most recent 20 photos,...
...per page • 4 per page • Index print • View a slideshow of copies to a computer or flash drive. Do not use Lexmark Photo Paper or Lexmark PerfectFinish Photo Paper. Retrieving and managing photos Understanding the Photo Card Mode menu To access the Photo Card Mode menu: 1 Insert a memory card or... default settings for printing. Working with this type of the printer is properly configured. Note: If you connect a digital camera set to a supported mass storage format to the printer, you will be asked if you want to print all photos • For the most recent 20 photos,...

User's Guide
Page 62
... computer using the control panel If the printer is connected directly to a computer, or connected to a computer through an external network adapter that does not support memory device connection. • The printer may require that you select a computer (and a PIN if required by that computer). 1 Insert a memory card or a flash drive...
... computer using the control panel If the printer is connected directly to a computer, or connected to a computer through an external network adapter that does not support memory device connection. • The printer may require that you select a computer (and a PIN if required by that computer). 1 Insert a memory card or a flash drive...
User's Guide
Page 72
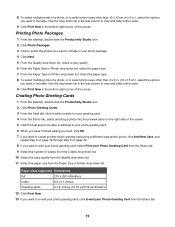
Paper sizes supported Dimensions A4 210 x 297 millimeters Letter 8.5 x 11 inches Greeting cards 4 x 8 inches (10.16 x 20.32 centimeters) 12 Click Print Now. 13 If you want to ...
Paper sizes supported Dimensions A4 210 x 297 millimeters Letter 8.5 x 11 inches Greeting cards 4 x 8 inches (10.16 x 20.32 centimeters) 12 Click Print Now. 13 If you want to ...
User's Guide
Page 75
... the printed surface with the paper.) Note: Make sure the paper matches the size you can also modify the setting that came with your camera supports DPOF, you selected on some digital cameras. Thumbnails of time between each photo in the order you are not sure which side is the printable...
... the printed surface with the paper.) Note: Make sure the paper matches the size you can also modify the setting that came with your camera supports DPOF, you selected on some digital cameras. Thumbnails of time between each photo in the order you are not sure which side is the printable...


