
Operation Guide
Page 1
Zenith and the lightning Z logo are registered trademarks of contents 5 page © Copyright 2006, LG Electronics U.S.A., Inc. Installation and Operating Guide | Warranty Model Numbers | L26W56S • L26W56B • L26W56W | LCD TV/Monitors table of Zenith Electronics Corporation
Zenith and the lightning Z logo are registered trademarks of contents 5 page © Copyright 2006, LG Electronics U.S.A., Inc. Installation and Operating Guide | Warranty Model Numbers | L26W56S • L26W56B • L26W56W | LCD TV/Monitors table of Zenith Electronics Corporation
Operation Guide
Page 2
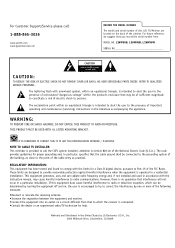
...equilateral triangle is connected. •Consult the dealer or an experienced radio/TV technician for help. WA R N I N G : TO PREVENT FIRE...alert the user to the presence of the cabinet. L26W56S, L26W56B, L26W56W SERIAL NO CAUTION RISK OF ELECTRIC ... NOT REMOVE COVER (OR BACK). NOTE TO CABLE TV INSTALLER: This reminder is provided to call : 1-...accompanying the appliance. IT IS FORBIDDEN TO CONNECT THIS TV TO ANY TELECOMMUNICATION NETWORK / TELEPHONE. THIS PRODUCT MUST... serial number here: MODEL NO. If this LCD TV/Monitor are designed to provide reasonable protection against harmful...
...equilateral triangle is connected. •Consult the dealer or an experienced radio/TV technician for help. WA R N I N G : TO PREVENT FIRE...alert the user to the presence of the cabinet. L26W56S, L26W56B, L26W56W SERIAL NO CAUTION RISK OF ELECTRIC ... NOT REMOVE COVER (OR BACK). NOTE TO CABLE TV INSTALLER: This reminder is provided to call : 1-...accompanying the appliance. IT IS FORBIDDEN TO CONNECT THIS TV TO ANY TELECOMMUNICATION NETWORK / TELEPHONE. THIS PRODUCT MUST... serial number here: MODEL NO. If this LCD TV/Monitor are designed to provide reasonable protection against harmful...
Operation Guide
Page 3
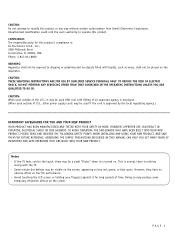
... or holding your finger(s) against it for this product's compliance is nothing wrong with the TV. - CAUTION: When used outside of the U.S., it is employed. (When used outside of time. If the TV feels cold to the touch, there may be a small "flicker" when it may be...OPERATING INSTRUCTIONS UNLESS YOU ARE QUALIFIED TO DO SO. Notes - This is normal, there is : LG Electronics U.S.A., Inc., 2000 Millbrook Drive Lincolnshire, IL 60069, USA. Doing so may be visible on the TVs performance. - COMPLIANCE: The responsible party for long periods of U.S., other power supply cords may ...
... or holding your finger(s) against it for this product's compliance is nothing wrong with the TV. - CAUTION: When used outside of the U.S., it is employed. (When used outside of time. If the TV feels cold to the touch, there may be a small "flicker" when it may be...OPERATING INSTRUCTIONS UNLESS YOU ARE QUALIFIED TO DO SO. Notes - This is normal, there is : LG Electronics U.S.A., Inc., 2000 Millbrook Drive Lincolnshire, IL 60069, USA. Doing so may be visible on the TVs performance. - COMPLIANCE: The responsible party for long periods of U.S., other power supply cords may ...
Operation Guide
Page 5
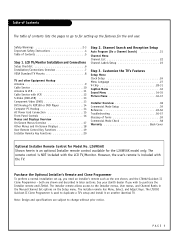
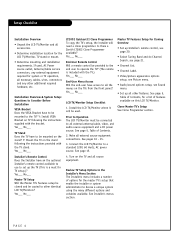
... the LT2002 Quickset II Clone Programmer - Note: Design and specifications are shown and described in the Manual Channel Set options on another identical TV. Purchase the Optional Installer's Remote and Clone Programmer To perform a normal installation set up, you wish to for setting up the features for...to change without prior notice. The LT2002 Quickset II Clone Programmer is an optional Installer remote control available for Model No. Customize the TV's Features Setup Menu Clock Setup 24 Menu Language 27 V-Chip 28-31 Caption Menu 32 Sound Menu 34-35 Picture Menu 36-37...
... the LT2002 Quickset II Clone Programmer - Note: Design and specifications are shown and described in the Manual Channel Set options on another identical TV. Purchase the Optional Installer's Remote and Clone Programmer To perform a normal installation set up, you wish to for setting up the features for...to change without prior notice. The LT2002 Quickset II Clone Programmer is an optional Installer remote control available for Model No. Customize the TV's Features Setup Menu Clock Setup 24 Menu Language 27 V-Chip 28-31 Caption Menu 32 Sound Menu 34-35 Picture Menu 36-37...
Operation Guide
Page 6
...the instructions provided with the bracket. Is there a Zenith LT2002 Clone Programmer available? Clone Master TV's Setup See Clone Programmer section. Yes___ No___ TV Stand Does the TV have to be connected to operate the TV? (The remote is a must be mounted to devise a unique system using the many .../picture appearance options setup, see Picture menu. • Audio/sound options setup, see Sound menu. • Set up the TV (This is included with the TV.) Yes___ No___ End-User Menu Access Will the end-user have an the optional Installer's remote control available to use to other ...
...the instructions provided with the bracket. Is there a Zenith LT2002 Clone Programmer available? Clone Master TV's Setup See Clone Programmer section. Yes___ No___ TV Stand Does the TV have to be connected to operate the TV? (The remote is a must be mounted to devise a unique system using the many .../picture appearance options setup, see Picture menu. • Audio/sound options setup, see Sound menu. • Set up the TV (This is included with the TV.) Yes___ No___ End-User Menu Access Will the end-user have an the optional Installer's remote control available to use to other ...
Operation Guide
Page 8
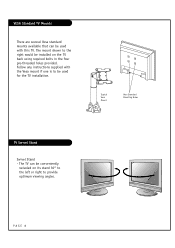
VESA Standard TV Mounts There are several Vesa standard mounts available that can be used for the TV installation. Follow any instructions supplied with this TV. The mount shown to the right would be installed on its stand 30° to the left or right to be used with the Vesa mount if one is to provide optimum viewing angles. Typical Vesa Mount Vesa Standard Mounting Holes TV Swivel Stand Swivel Stand - PAGE 8 The TV can be conveniently swiveled on the TV back using required bolts in the four pre-threaded holes provided.
VESA Standard TV Mounts There are several Vesa standard mounts available that can be used for the TV installation. Follow any instructions supplied with this TV. The mount shown to the right would be installed on its stand 30° to the left or right to be used with the Vesa mount if one is to provide optimum viewing angles. Typical Vesa Mount Vesa Standard Mounting Holes TV Swivel Stand Swivel Stand - PAGE 8 The TV can be conveniently swiveled on the TV back using required bolts in the four pre-threaded holes provided.

Operation Guide
Page 9
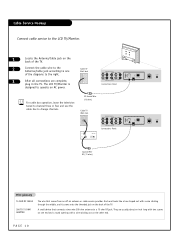
... VIDEO IN COMPONENT(DVD/DTV)2 Connections Panel If the antenna is not included with the Zenith LCD TV/Monitor. 300/75 ohm Adapter COMPONENT(DVD/DTV)1 AUDIO IN VIDEO IN AUDIO IN VIDEO IN COMPONENT...connects a two-wire 300 ohm antenna to the right. 3 After all connections are complete, plug in the TV. A small device that comes from the wall to this jack, according to one end and a round opening... the middle, and it screws onto the threaded jack on AC power. They are required. The LCD TV/Monitor is designed to 75 ohm adapter is a 75 ohm RF cable, then no adapters are usually...
... VIDEO IN COMPONENT(DVD/DTV)2 Connections Panel If the antenna is not included with the Zenith LCD TV/Monitor. 300/75 ohm Adapter COMPONENT(DVD/DTV)1 AUDIO IN VIDEO IN AUDIO IN VIDEO IN COMPONENT...connects a two-wire 300 ohm antenna to the right. 3 After all connections are complete, plug in the TV. A small device that comes from the wall to this jack, according to one end and a round opening... the middle, and it screws onto the threaded jack on AC power. They are required. The LCD TV/Monitor is designed to 75 ohm adapter is a 75 ohm RF cable, then no adapters are usually...
Operation Guide
Page 10
... all connections are usually about an inch long with two screws on one of the diagrams to the right. RF Coaxial Wire (75 ohm) Cable TV Wall Jack COMPONENT(DVD/DTV)1 AUDIO IN VIDEO IN AUDIO IN VIDEO IN COMPONENT(DVD/DTV)2 Connections Panel Coaxial Wire RF (75 ohm) ANTENNA CABLE... and use the cable box to change channels. The LCD TV/Monitor is designed to operate on the back of the TV. Cable Service Hookup Connect cable service to the LCD TV/Monitor. 1 Locate the Antenna/Cable jack on the back of the TV. 2 Connect the cable wire to the Antenna/Cable jack according...
... all connections are usually about an inch long with two screws on one of the diagrams to the right. RF Coaxial Wire (75 ohm) Cable TV Wall Jack COMPONENT(DVD/DTV)1 AUDIO IN VIDEO IN AUDIO IN VIDEO IN COMPONENT(DVD/DTV)2 Connections Panel Coaxial Wire RF (75 ohm) ANTENNA CABLE... and use the cable box to change channels. The LCD TV/Monitor is designed to operate on the back of the TV. Cable Service Hookup Connect cable service to the LCD TV/Monitor. 1 Locate the Antenna/Cable jack on the back of the TV. 2 Connect the cable wire to the Antenna/Cable jack according...
Operation Guide
Page 11
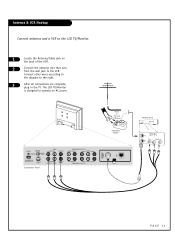
Connect other wires according to the diagram to the right. 3 After all connections are complete, plug in the TV. UPDATE RS-232C SELECT CONTROL NORMAL (DTV) VIDEO 1 AUDIO IN VIDEO IN DIGTAL AUDIO OUT(OPTICAL) S-VIDEO IN Connections Panel AUDIO IN VIDEO 3/ S-VIDEO VIDEO ... VIDEO IN COMPONENT(DVD/DTV)2 ANTENNA CABLE M.P.I Round or Flat wire (300 ohm) 300/75ohm Adapter VCR Back Panel VCR Back PAGE 11 The LCD TV/Monitor is designed to operate on the back of the VCR. 2 Connect the antenna wire that runs from the wall jack to the VCR. Antenna...
Connect other wires according to the diagram to the right. 3 After all connections are complete, plug in the TV. UPDATE RS-232C SELECT CONTROL NORMAL (DTV) VIDEO 1 AUDIO IN VIDEO IN DIGTAL AUDIO OUT(OPTICAL) S-VIDEO IN Connections Panel AUDIO IN VIDEO 3/ S-VIDEO VIDEO ... VIDEO IN COMPONENT(DVD/DTV)2 ANTENNA CABLE M.P.I Round or Flat wire (300 ohm) 300/75ohm Adapter VCR Back Panel VCR Back PAGE 11 The LCD TV/Monitor is designed to operate on the back of the VCR. 2 Connect the antenna wire that runs from the wall jack to the VCR. Antenna...
Operation Guide
Page 12
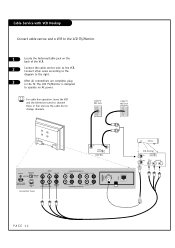
... the television tuned to channel three or four and use the cable box to the right. 3 After all connections are complete, plug in the TV. The LCD TV/Monitor is designed to operate on the back of the VCR. 2 Connect the cable service wire to the VCR. Cable Service with VCR Hookup... Connect cable service and a VCR to the LCD TV/Monitor. 1 Locate the Antenna/Cable jack on AC power. Cable TV Wall Jack Cable TV Wall Jack Cable Box UPDATE RS-232C SELECT CONTROL NORMAL (DTV) VIDEO 1 AUDIO IN VIDEO IN DIGTAL AUDIO...
... the television tuned to channel three or four and use the cable box to the right. 3 After all connections are complete, plug in the TV. The LCD TV/Monitor is designed to operate on the back of the VCR. 2 Connect the cable service wire to the VCR. Cable Service with VCR Hookup... Connect cable service and a VCR to the LCD TV/Monitor. 1 Locate the Antenna/Cable jack on AC power. Cable TV Wall Jack Cable TV Wall Jack Cable Box UPDATE RS-232C SELECT CONTROL NORMAL (DTV) VIDEO 1 AUDIO IN VIDEO IN DIGTAL AUDIO...
Operation Guide
Page 13
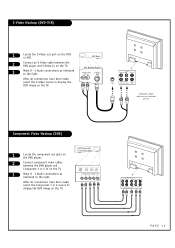
...) 1 Locate the S-Video out port on the DVD or VCR. 2 Connect an S-Video cable between the DVD player and Component 1 or 2 In on the TV. L Audio connections as indicated to the right. S-VIDEO OUT VIDEO R-AUDIO L-/MONO 3 Make R - COMPONENT VIDEO OUT Y PB PR L R After all connections... have been made , select the S-Video source to display the DVD image on the TV. COMPONENT(DVD/DTV)1 AUDIO IN VIDEO IN R L Pr Pb Y AUDIO IN VIDEO IN COMPONENT(DVD/DTV)2 PAGE 13 VIDEO 1 AUDIO IN VIDEO IN ...
...) 1 Locate the S-Video out port on the DVD or VCR. 2 Connect an S-Video cable between the DVD player and Component 1 or 2 In on the TV. L Audio connections as indicated to the right. S-VIDEO OUT VIDEO R-AUDIO L-/MONO 3 Make R - COMPONENT VIDEO OUT Y PB PR L R After all connections... have been made , select the S-Video source to display the DVD image on the TV. COMPONENT(DVD/DTV)1 AUDIO IN VIDEO IN R L Pr Pb Y AUDIO IN VIDEO IN COMPONENT(DVD/DTV)2 PAGE 13 VIDEO 1 AUDIO IN VIDEO IN ...

Operation Guide
Page 14
... PAGE 14 DVI in port on the RJP100M or DVI device. 2 Connect a DVI cable between the computer and PC In on the TV. DVI Hookup To RJP100 or DVD Player 1 Locate the DVI out port on the TV. 3 If required, make Audio connections as indicated to display the DVI image on the... TV. Computer PC Hookup DVI/PC AUDIO HDMI/DVI IN IN 1 Locate the computer out port on the computer. 2 Connect a computer cable between the...
... PAGE 14 DVI in port on the RJP100M or DVI device. 2 Connect a DVI cable between the computer and PC In on the TV. DVI Hookup To RJP100 or DVD Player 1 Locate the DVI out port on the TV. 3 If required, make Audio connections as indicated to display the DVI image on the... TV. Computer PC Hookup DVI/PC AUDIO HDMI/DVI IN IN 1 Locate the computer out port on the computer. 2 Connect a computer cable between the...
Operation Guide
Page 15
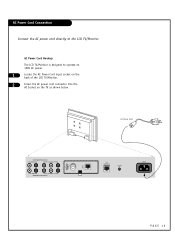
AC Power Cord Hookup The LCD TV/Monitor is designed to the LCD TV/Monitor. AC Power Cord COMPONENT(DVD/DTV)1 AUDIO IN VIDEO IN AUDIO IN VIDEO IN COMPONENT(DVD/DTV)2 ANTENNA CABLE M.P.I RJP INTERFACE FUTURE USE AC IN PAGE 15 AC Power Cord Connection Connect the AC power cord directly to operate on 120V AC power. 1 Locate the AC Power Cord input socket on the back of the LCD TV/Monitor. 2 Insert the AC power cord connector into the AC Socket on the TV as shown below.
AC Power Cord Hookup The LCD TV/Monitor is designed to the LCD TV/Monitor. AC Power Cord COMPONENT(DVD/DTV)1 AUDIO IN VIDEO IN AUDIO IN VIDEO IN COMPONENT(DVD/DTV)2 ANTENNA CABLE M.P.I RJP INTERFACE FUTURE USE AC IN PAGE 15 AC Power Cord Connection Connect the AC power cord directly to operate on 120V AC power. 1 Locate the AC Power Cord input socket on the back of the LCD TV/Monitor. 2 Insert the AC power cord connector into the AC Socket on the TV as shown below.
Operation Guide
Page 16
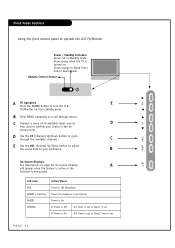
...If Power is On Off Timer is set or Sleep Timer is turned on page 18. Glows green when the TV is set PAGE 16 / I B Press MENU repeatedly to turn the LCD TV/Monitor on - B On-Screen Displays See descriptions on . C Displays a menu of all available input sources.... Remote Control Sensor A TV Operation E Press the POWER button to scroll through the available channels. D Use the CH (Channel) Up/Down button to operate the LCD TV/Monitor. Front Panel Controls Using the front control panel to cycle through menus. D...
...If Power is On Off Timer is set or Sleep Timer is turned on page 18. Glows green when the TV is set PAGE 16 / I B Press MENU repeatedly to turn the LCD TV/Monitor on - B On-Screen Displays See descriptions on . C Displays a menu of all available input sources.... Remote Control Sensor A TV Operation E Press the POWER button to scroll through the available channels. D Use the CH (Channel) Up/Down button to operate the LCD TV/Monitor. Front Panel Controls Using the front control panel to cycle through menus. D...

Operation Guide
Page 17
...chooses which active channels will turn itself on. Change the audio language in analog mode. Channel Preview -> V-Chip Displays the available TV channels and guest's Parental Control menu. Menu Name Page Description CHANNEL MENU Auto Program Channel List Channel Label Fine Tune Signal Strength SETUP... are : Mode, Balance, Digital Output, Auto Volume, Multi-Track, Internal Speaker. 36 Sets up the sound. PAGE 17 Specifies the TVs identity 32 Chooses analog and digital captioning options. 34 Sets up the picture appearance. Guide View DTV program information. On-Screen Menus Overview ...
...chooses which active channels will turn itself on. Change the audio language in analog mode. Channel Preview -> V-Chip Displays the available TV channels and guest's Parental Control menu. Menu Name Page Description CHANNEL MENU Auto Program Channel List Channel Label Fine Tune Signal Strength SETUP... are : Mode, Balance, Digital Output, Auto Volume, Multi-Track, Internal Speaker. 36 Sets up the sound. PAGE 17 Specifies the TVs identity 32 Chooses analog and digital captioning options. 34 Sets up the picture appearance. Guide View DTV program information. On-Screen Menus Overview ...
Operation Guide
Page 18
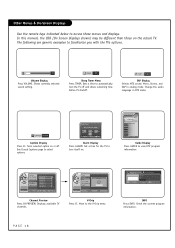
... Shows currently selected sound setting. 12 9 3 TIMER Off 6 Sleep Timer Menu Press TIMER. Set a time for the TV to turn the TV off . Displays available TV channels. Move to view DTV program information. Check the current program information. The following are generic examples to access these menus... Time 11:17 AM Move Hr. Other Menus & On-Screen Displays Use the remote keys indicated below to familiarize you with the TVs options. 19 Volume Display Press VOLUME. Change the audio language in analog mode. DIGITAL 84-1 1920*1080@60Hz No Time Information No...
... Shows currently selected sound setting. 12 9 3 TIMER Off 6 Sleep Timer Menu Press TIMER. Set a time for the TV to turn the TV off . Displays available TV channels. Move to view DTV program information. Check the current program information. The following are generic examples to access these menus... Time 11:17 AM Move Hr. Other Menus & On-Screen Displays Use the remote keys indicated below to familiarize you with the TVs options. 19 Volume Display Press VOLUME. Change the audio language in analog mode. DIGITAL 84-1 1920*1080@60Hz No Time Information No...
Operation Guide
Page 19
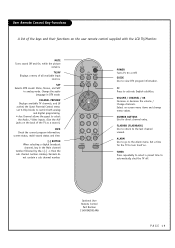
...Analog channels do not contain a sub channel number. TIMER Press repeatedly to select a preset time to turn itself on the back of the TV as a source). MUTE POWER CH TV/AV PREVIEW GUIDE SAP INFO CC CH OK VOL VOL CH 123 456 789 FLASHBK -0 TIMER ALARM POWER Turns... volume / Change channels. MUTE Turns sound Off and On, while the picture remains. Change the audio language in DTV mode. CHANNEL PREVIEW Displays available TV channels, and (if active) the Guest Parental Control menu: set V-Chip blocks to restrict both analog and digital programming. • Aux Channel allows ...
...Analog channels do not contain a sub channel number. TIMER Press repeatedly to select a preset time to turn itself on the back of the TV as a source). MUTE POWER CH TV/AV PREVIEW GUIDE SAP INFO CC CH OK VOL VOL CH 123 456 789 FLASHBK -0 TIMER ALARM POWER Turns... volume / Change channels. MUTE Turns sound Off and On, while the picture remains. Change the audio language in DTV mode. CHANNEL PREVIEW Displays available TV channels, and (if active) the Guest Parental Control menu: set V-Chip blocks to restrict both analog and digital programming. • Aux Channel allows ...
Operation Guide
Page 20
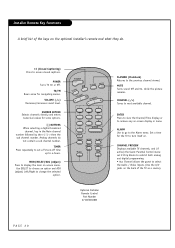
...the-> [-] -> then the sub channel number. CHANNEL PREVIEW Displays available TV channels, and (if active) the Guest Parental Control menu: set a TV turn itself on. NUMBER KEYPAD Selects channels directly and enters numerical values for the TV to turn -off time up to change the selected option. POWER ...SELECT/ADJ (Adjust) Press to remove any on-screen display or menu. MUTE Turns sound Off and On, while the picture remains. TV/FM Down arrow for navigating menus. Optional Installer Remote Control Part Number 6710V00108M PAGE 20 ENTER Press to view the Channel/Time display or ...
...the-> [-] -> then the sub channel number. CHANNEL PREVIEW Displays available TV channels, and (if active) the Guest Parental Control menu: set a TV turn itself on. NUMBER KEYPAD Selects channels directly and enters numerical values for the TV to turn -off time up to change the selected option. POWER ...SELECT/ADJ (Adjust) Press to remove any on-screen display or menu. MUTE Turns sound Off and On, while the picture remains. TV/FM Down arrow for navigating menus. Optional Installer Remote Control Part Number 6710V00108M PAGE 20 ENTER Press to view the Channel/Time display or ...

Operation Guide
Page 21
... are automatically removed. 1 With the optional Installer remote control in the selected Tuning Band. Auto Program finds channels being received by the TV's analog and digital tuners. Channel Antenna Auto Program Channel Label Channel List Fine Tune Signal Strength Searching ... Cable34 added 30 PAGE 21... and store all available channels, a display appears showing the number of the channels available in hand, press the POWER key to turn the TV on. 2 Press the MENU button and then use SELECT button to select the Channel menu. 3 Press the ENTER button. 4 Use the...
... are automatically removed. 1 With the optional Installer remote control in the selected Tuning Band. Auto Program finds channels being received by the TV's analog and digital tuners. Channel Antenna Auto Program Channel Label Channel List Fine Tune Signal Strength Searching ... Cable34 added 30 PAGE 21... and store all available channels, a display appears showing the number of the channels available in hand, press the POWER key to turn the TV on. 2 Press the MENU button and then use SELECT button to select the Channel menu. 3 Press the ENTER button. 4 Use the...

Operation Guide
Page 23
..., ESPN, HBO, etc. Channel Labels Setup Note: If you can choose the more common networks. Use any of preset labels from which --:-- -- channels in the TV's memory. If done, press MENU repeatedly to existing channels, then re-run Auto Program, the labels will all be deleted.
..., ESPN, HBO, etc. Channel Labels Setup Note: If you can choose the more common networks. Use any of preset labels from which --:-- -- channels in the TV's memory. If done, press MENU repeatedly to existing channels, then re-run Auto Program, the labels will all be deleted.


