Operation Guide
Page 2
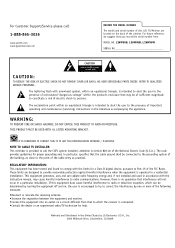
... harmful interference to radio communications. REGULATORY INFORMATION: This equipment has been tested and found to comply with the instruction manual, may be of sufficient magnitude to constitute a risk of electric shock to persons. L26W56S, L26W56B, L26W56W SERIAL NO CAUTION RISK OF ELECTRIC SHOCK DO NOT OPEN CAUTION: TO REDUCE THE RISK OF... user to the presence of uninsulated "dangerous voltage" within an equilateral triangle is operated in particular, specifies that the cable ground shall be determined by LG Electronics U.S.A., Inc. 2000 Millbrook Drive, Lincolnshire, IL 60069.
... harmful interference to radio communications. REGULATORY INFORMATION: This equipment has been tested and found to comply with the instruction manual, may be of sufficient magnitude to constitute a risk of electric shock to persons. L26W56S, L26W56B, L26W56W SERIAL NO CAUTION RISK OF ELECTRIC SHOCK DO NOT OPEN CAUTION: TO REDUCE THE RISK OF... user to the presence of uninsulated "dangerous voltage" within an equilateral triangle is operated in particular, specifies that the cable ground shall be determined by LG Electronics U.S.A., Inc. 2000 Millbrook Drive, Lincolnshire, IL 60069.
Operation Guide
Page 3
CAUTION: Do not attempt to modify this product's compliance is: LG Electronics U.S.A., Inc., 2000 Millbrook Drive Lincolnshire, IL 60069, USA. COMPLIANCE: The responsible party for long periods of U.S., other power supply cords may be used if ... holding your finger(s) against it for this product in any way without written authorization from Zenith Electronics Corporation. OBSERVING THE SIMPLE PRECAUTIONS DISCUSSED IN THIS MANUAL CAN HELP YOU GET MANY YEARS OF ENJOYMENT AND SAFE OPERATION THAT ARE BUILT INTO YOUR NEW PRODUCT. This is normal, there is turned on...
CAUTION: Do not attempt to modify this product's compliance is: LG Electronics U.S.A., Inc., 2000 Millbrook Drive Lincolnshire, IL 60069, USA. COMPLIANCE: The responsible party for long periods of U.S., other power supply cords may be used if ... holding your finger(s) against it for this product in any way without written authorization from Zenith Electronics Corporation. OBSERVING THE SIMPLE PRECAUTIONS DISCUSSED IN THIS MANUAL CAN HELP YOU GET MANY YEARS OF ENJOYMENT AND SAFE OPERATION THAT ARE BUILT INTO YOUR NEW PRODUCT. This is normal, there is turned on...
Operation Guide
Page 5
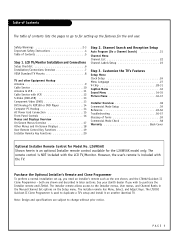
... and Clone Programmer To perform a normal installation set up the features for the end user. Note: Design and specifications are shown and described in the Manual Channel Set options on another identical TV. Table of Contents The table of contents lists the pages to go to for setting up , you wish...
... and Clone Programmer To perform a normal installation set up the features for the end user. Note: Design and specifications are shown and described in the Manual Channel Set options on another identical TV. Table of Contents The table of contents lists the pages to go to for setting up , you wish...

Operation Guide
Page 17
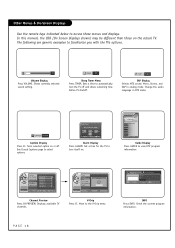
... OTHER MENUS AND ON-SCREEN DISPLAYS Volume Shows current sound level. Sleep Timer Sets a time the TV will appear when using Channel Up/Down. 22 Manually picks and chooses which active channels will turn itself on -screen displays. Captions Selects Caption/Text options. SAP Selects MTS sound: Mono, Stereo, and SAP...
... OTHER MENUS AND ON-SCREEN DISPLAYS Volume Shows current sound level. Sleep Timer Sets a time the TV will appear when using Channel Up/Down. 22 Manually picks and chooses which active channels will turn itself on -screen displays. Captions Selects Caption/Text options. SAP Selects MTS sound: Mono, Stereo, and SAP...
Operation Guide
Page 18
... option on the actual TV. Shows currently selected sound setting. 12 9 3 TIMER Off 6 Sleep Timer Menu Press TIMER. Check the current program information. In this manual, the OSD (On Screen Displays shown) may be different than those on or off and shows remaining time before TV shutoff. Alarm Timer Current Time...
... option on the actual TV. Shows currently selected sound setting. 12 9 3 TIMER Off 6 Sleep Timer Menu Press TIMER. Check the current program information. In this manual, the OSD (On Screen Displays shown) may be different than those on or off and shows remaining time before TV shutoff. Alarm Timer Current Time...
Operation Guide
Page 24
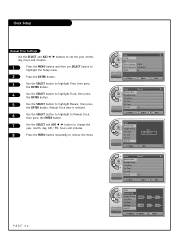
...ADJ F / G button to change the year, month, day, AM / PM, hours and minutes. 8 Press the MENU button repeatedly to highlight Manual, then press the ENTER button. Clock Setup Manual Time Settings - Use the SELECT and ADJ F / G buttons to set the year, month, day, hours and minutes. 1 Press the MENU ... button. 4 Use the SELECT button to highlight Clock, then press the ENTER button. 5 Use the SELECT button to remove the menu. Setup Clock Manual Clock Daylight Saving Time Zone On Timer Off Timer Auto Off Adjust 2006 Yr. 9 Mon. 11 Day PM 11 Hr. 20 Min. PAGE 24...
...ADJ F / G button to change the year, month, day, AM / PM, hours and minutes. 8 Press the MENU button repeatedly to highlight Manual, then press the ENTER button. Clock Setup Manual Time Settings - Use the SELECT and ADJ F / G buttons to set the year, month, day, hours and minutes. 1 Press the MENU ... button. 4 Use the SELECT button to highlight Clock, then press the ENTER button. 5 Use the SELECT button to remove the menu. Setup Clock Manual Clock Daylight Saving Time Zone On Timer Off Timer Auto Off Adjust 2006 Yr. 9 Mon. 11 Day PM 11 Hr. 20 Min. PAGE 24...
Operation Guide
Page 25
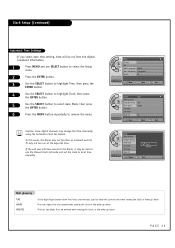
...access to the Alarm, it may be set the clock to remove the menu. If the end user will be best to use the Manual Clock Set mode and set from the digital broadcast information. 1 Press MENU and use SELECT button to select the Setup menu. 2 ...Auto Mode, then press the ENTER button. 6 Press the MENU button repeatedly to local time manually. Time G V-Chip Setup PC Menu Language English Menu Transparency Transparent Set ID 96 --:-- -- --. -- ---- Clock Auto G Manual Clock Setup Daylight Saving Yes Time Zone Pacific On Timer Off Timer --:-- -- Caution: Some digital...
...access to the Alarm, it may be set the clock to remove the menu. If the end user will be best to use the Manual Clock Set mode and set from the digital broadcast information. 1 Press MENU and use SELECT button to select the Setup menu. 2 ...Auto Mode, then press the ENTER button. 6 Press the MENU button repeatedly to local time manually. Time G V-Chip Setup PC Menu Language English Menu Transparency Transparent Set ID 96 --:-- -- --. -- ---- Clock Auto G Manual Clock Setup Daylight Saving Yes Time Zone Pacific On Timer Off Timer --:-- -- Caution: Some digital...

Operation Guide
Page 26
... Setup PC Menu Language English Menu Transparency Transparent Set ID 96 11:20 PM Sep.11, 2006 Setup 11:20 PM Sep.11, 2006 Clock Manual Clock Daylight Saving Time Zone On Timer Off Timer Auto Off Select Pacific Back PAGE 26 Time G V-Chip Setup PC Menu Language English Menu Transparency... Transparent Set ID 96 11:20 PM Sep.11, 2006 Clock Manual Clock Daylight Saving Setup No Time Zone Yes On Timer 11:20 PM Off Timer Auto Off Sep.11, 2006 Time Zone Settings Installer can...
... Setup PC Menu Language English Menu Transparency Transparent Set ID 96 11:20 PM Sep.11, 2006 Setup 11:20 PM Sep.11, 2006 Clock Manual Clock Daylight Saving Time Zone On Timer Off Timer Auto Off Select Pacific Back PAGE 26 Time G V-Chip Setup PC Menu Language English Menu Transparency... Transparent Set ID 96 11:20 PM Sep.11, 2006 Clock Manual Clock Daylight Saving Setup No Time Zone Yes On Timer 11:20 PM Off Timer Auto Off Sep.11, 2006 Time Zone Settings Installer can...

Operation Guide
Page 36
... G button to select a preset picture mode. 5 Press the MENU button several times to remove the menu. To make custom picture settings, set the Mode to Manual on the menu. 1 Press the ENTER button. 2 Use the SELECT button to select an option, then press the ENTER button. 3 Use the ADJ F / G button to...
... G button to select a preset picture mode. 5 Press the MENU button several times to remove the menu. To make custom picture settings, set the Mode to Manual on the menu. 1 Press the ENTER button. 2 Use the SELECT button to select an option, then press the ENTER button. 3 Use the ADJ F / G button to...
Operation Guide
Page 38
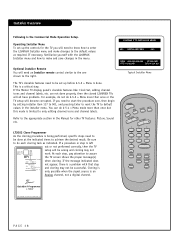
... start the procedure over, then begin by setting installer item 117 to 001, and pressing Enter to reset the TV to default values in the Manual for the TV you need an Installer remote control similar to the one shown to achieve the desired result. Cloning is only possible when the...
... start the procedure over, then begin by setting installer item 117 to 001, and pressing Enter to reset the TV to default values in the Manual for the TV you need an Installer remote control similar to the one shown to achieve the desired result. Cloning is only possible when the...
Operation Guide
Page 51
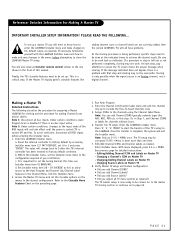
... exit the Installer menu. PLEASE READ THE FOLLOWING... Finally, the TV's clonable features need an Installer remote control similar to the configuration required of this manual. Changing Source Labels on Master TV - To set up a master TV you adjust all have problems. As the cloning procedure is complete, the system will...
... exit the Installer menu. PLEASE READ THE FOLLOWING... Finally, the TV's clonable features need an Installer remote control similar to the configuration required of this manual. Changing Source Labels on Master TV - To set up a master TV you adjust all have problems. As the cloning procedure is complete, the system will...


