Specification (English)
Page 2
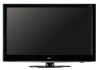
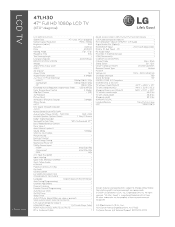
LCD TV 47LH30 47" Full HD 1080p LCD TV (47.0" diagonal) LGusa.com LCD SPECIFICATION Screen Size 47" Class (47.0" diagonal) Native Display Resolution 1920 x 1080p Brightness (cd/m2) 500 Dynamic Contrast Ratio 50,000:1 Viewing...(Average) TBD Stand-by Mode >1W ENERGY STAR 3.0 Compliant • DIMENSIONS & WEIGHT TV without stand (WxHxD) 44.9" x 28.5" x 3.9" TV with stand (WxHxD) 44.9" x 30.9" x 13.3" Shipping Dimensions (WxHxD) 58.5" x 10.0" x 33.9" TV without notice. Non-metric weights and messurements are the property of LG Corp. RF 1080i...
LCD TV 47LH30 47" Full HD 1080p LCD TV (47.0" diagonal) LGusa.com LCD SPECIFICATION Screen Size 47" Class (47.0" diagonal) Native Display Resolution 1920 x 1080p Brightness (cd/m2) 500 Dynamic Contrast Ratio 50,000:1 Viewing...(Average) TBD Stand-by Mode >1W ENERGY STAR 3.0 Compliant • DIMENSIONS & WEIGHT TV without stand (WxHxD) 44.9" x 28.5" x 3.9" TV with stand (WxHxD) 44.9" x 30.9" x 13.3" Shipping Dimensions (WxHxD) 58.5" x 10.0" x 33.9" TV without notice. Non-metric weights and messurements are the property of LG Corp. RF 1080i...
Owner's Manual (English)
Page 6
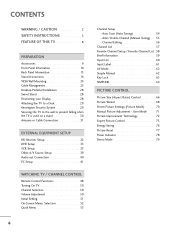
...Picture Settings (Picture Mode 70 Manual Picture Adjustment - CONTENTS WARNING / CAUTION 2 SAFETY INSTRUCTIONS 3 FEATURE OF THIS TV 8 PREPARATION Accessories 9 Front Panel Information 10 Back Panel Information 13 Stand Instructions 16 VESA Wall Mounting 24 Cable Management 25 Desktop Pedestal Installation 28 Swivel... Stand 28 Positioning your Display 28 Attaching the TV to a Desk 29 Kensington Security System 29 Securing the TV to the wall to prevent falling when the TV is used on a stand 30 Antenna or Cable Connection 31 ...
...Picture Settings (Picture Mode 70 Manual Picture Adjustment - CONTENTS WARNING / CAUTION 2 SAFETY INSTRUCTIONS 3 FEATURE OF THIS TV 8 PREPARATION Accessories 9 Front Panel Information 10 Back Panel Information 13 Stand Instructions 16 VESA Wall Mounting 24 Cable Management 25 Desktop Pedestal Installation 28 Swivel... Stand 28 Positioning your Display 28 Attaching the TV to a Desk 29 Kensington Security System 29 Securing the TV to the wall to prevent falling when the TV is used on a stand 30 Antenna or Cable Connection 31 ...
Owner's Manual (English)
Page 9
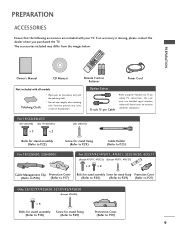
...Refer to P.17) (Refer to P.20) (Refer to P.29) (Refer to P.21) Only 26/32/37/42LH20, 32/37/42/47LH30 (Except 47LH30) x 4 Bolts for stand assembly Screw for stand fixing (Refer to P.18) (Refer to P.29) Protection Cover (Refer to maintain standards compliance. LIST 0 9 VOL MUTE FLASHBK ENTER CH ...Remote Control, Batteries Power Cord Not included with all models Polishing Cloth * Wipe spots on the exterior only with your TV. PREPARATION PREPARATION ACCESSORIES Ensure that the following accessories are included with the polishing cloth. * Do not wipe roughly when removing...
...Refer to P.17) (Refer to P.20) (Refer to P.29) (Refer to P.21) Only 26/32/37/42LH20, 32/37/42/47LH30 (Except 47LH30) x 4 Bolts for stand assembly Screw for stand fixing (Refer to P.18) (Refer to P.29) Protection Cover (Refer to maintain standards compliance. LIST 0 9 VOL MUTE FLASHBK ENTER CH ...Remote Control, Batteries Power Cord Not included with all models Polishing Cloth * Wipe spots on the exterior only with your TV. PREPARATION PREPARATION ACCESSORIES Ensure that the following accessories are included with the polishing cloth. * Do not wipe roughly when removing...
Owner's Manual (English)
Page 16
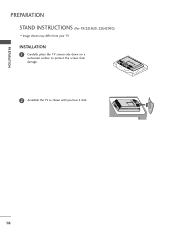
INSTALLATION 1 Carefully place the TV screen side down on a cushioned surface to protect the screen from your TV. PREPARATION PREPARATION STAND INSTRUCTIONS (For 19/22LH20, 22LH200C) I Image shown may differ from damage. 2 Assemble the TV as shown until you hear it click. 16
INSTALLATION 1 Carefully place the TV screen side down on a cushioned surface to protect the screen from your TV. PREPARATION PREPARATION STAND INSTRUCTIONS (For 19/22LH20, 22LH200C) I Image shown may differ from damage. 2 Assemble the TV as shown until you hear it click. 16
Owner's Manual (English)
Page 17
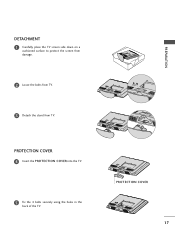
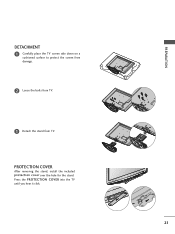
PROTECTION COVER 17 PREPARATION PROTECTION COVER 4 Insert the PROTECTION COVER into the TV. 5 Fix the 4 bolts securely using the holes in the back of the TV. DETACHMENT 1 Carefully place the TV screen side down on a cushioned surface to protect the screen from damage. 2 Loose the bolts from TV. 3 Detach the stand from TV.
PROTECTION COVER 17 PREPARATION PROTECTION COVER 4 Insert the PROTECTION COVER into the TV. 5 Fix the 4 bolts securely using the holes in the back of the TV. DETACHMENT 1 Carefully place the TV screen side down on a cushioned surface to protect the screen from damage. 2 Loose the bolts from TV. 3 Detach the stand from TV.
Owner's Manual (English)
Page 18
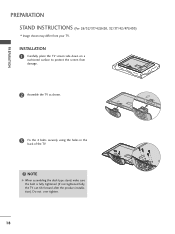
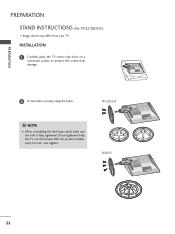
INSTALLATION 1 Carefully place the TV screen side down on a cushioned surface to protect the screen from your TV. Do not over tighten. 18 PREPARATION PREPARATION STAND INSTRUCTIONS (For 26/32/37/42LH20, 32/37/42/47LH30) I Image shown may differ from damage. 2 Assemble the TV as shown. 3 Fix the 4 bolts securely using the holes in the back of the TV. ! NOTE G When assembling the desk type stand, make sure the bolt is fully tightened (If not tightened fully, the TV can tilt forward after the product installation).
INSTALLATION 1 Carefully place the TV screen side down on a cushioned surface to protect the screen from your TV. Do not over tighten. 18 PREPARATION PREPARATION STAND INSTRUCTIONS (For 26/32/37/42LH20, 32/37/42/47LH30) I Image shown may differ from damage. 2 Assemble the TV as shown. 3 Fix the 4 bolts securely using the holes in the back of the TV. ! NOTE G When assembling the desk type stand, make sure the bolt is fully tightened (If not tightened fully, the TV can tilt forward after the product installation).
Owner's Manual (English)
Page 19
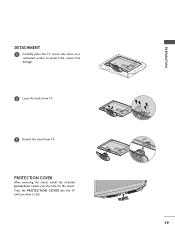
PREPARATION DETACHMENT 1 Carefully place the TV screen side down on a cushioned surface to protect the screen from damage. 2 Loose the bolts from TV. 3 Detach the stand from TV. Press the PROTECTION COVER into the TV until you hear it click. 19 PROTECTION COVER After removing the stand, install the included protection cover over the hole for the stand.
PREPARATION DETACHMENT 1 Carefully place the TV screen side down on a cushioned surface to protect the screen from damage. 2 Loose the bolts from TV. 3 Detach the stand from TV. Press the PROTECTION COVER into the TV until you hear it click. 19 PROTECTION COVER After removing the stand, install the included protection cover over the hole for the stand.

Owner's Manual (English)
Page 20
...fully tightened (If not tightened fully, the TV can tilt forward after the product installation). And carefully place the TV screen side down on a cushioned surface to protect the screen from your TV has a protection tape attached, remove the tape. PREPARATION PREPARATION STAND INSTRUCTIONS (For 32/37/42/47LF11, ...differ from damage. 2 Assemble the parts of the STAND BODY with COVER BASE of the TV by using the holes in the back of the TV. ! INSTALLATION (For 32/37/42LF11, 32CL10, 32CL20, 42CL11) 1 If your TV. Do not over tighten. 20 STAND BODY COVER BASE 4 Fix the 4 bolts securely ...
...fully tightened (If not tightened fully, the TV can tilt forward after the product installation). And carefully place the TV screen side down on a cushioned surface to protect the screen from your TV has a protection tape attached, remove the tape. PREPARATION PREPARATION STAND INSTRUCTIONS (For 32/37/42/47LF11, ...differ from damage. 2 Assemble the parts of the STAND BODY with COVER BASE of the TV by using the holes in the back of the TV. ! INSTALLATION (For 32/37/42LF11, 32CL10, 32CL20, 42CL11) 1 If your TV. Do not over tighten. 20 STAND BODY COVER BASE 4 Fix the 4 bolts securely ...
Owner's Manual (English)
Page 21
PREPARATION DETACHMENT 1 Carefully place the TV screen side down on a cushioned surface to protect the screen from damage. 2 Loose the bolts from TV. 3 Detach the stand from TV. PROTECTION COVER After removing the stand, install the included protection cover over the hole for the stand. Press the PROTECTION COVER into the TV until you hear it click. 21
PREPARATION DETACHMENT 1 Carefully place the TV screen side down on a cushioned surface to protect the screen from damage. 2 Loose the bolts from TV. 3 Detach the stand from TV. PROTECTION COVER After removing the stand, install the included protection cover over the hole for the stand. Press the PROTECTION COVER into the TV until you hear it click. 21
Owner's Manual (English)
Page 22
NOTE G When assembling the desk type stand, make sure the bolt is fully tightened (If not tightened fully, the TV can tilt forward after the product installation). INSTALLATION 1 Carefully place the TV screen side down on a cushioned surface to protect the screen from your TV. Do not over tighten. 19" 22" 19/22LU55 19" 22" 26LU55 26" 22 PREPARATION PREPARATION STAND INSTRUCTIONS (For 19/22/26LU55) I Image shown may differ from damage. 2 Fix the bolts securely using the holes. !
NOTE G When assembling the desk type stand, make sure the bolt is fully tightened (If not tightened fully, the TV can tilt forward after the product installation). INSTALLATION 1 Carefully place the TV screen side down on a cushioned surface to protect the screen from your TV. Do not over tighten. 19" 22" 19/22LU55 19" 22" 26LU55 26" 22 PREPARATION PREPARATION STAND INSTRUCTIONS (For 19/22/26LU55) I Image shown may differ from damage. 2 Fix the bolts securely using the holes. !

Owner's Manual (English)
Page 23
COVER BASE 4 Detach the STAND BODY from TV. PREPARATION DETACHMENT 1 Carefully place the TV screen side down on a cushioned surface to protect the screen from damage. 2 Loose the bolts and then detach the stand from TV. 19" 19/22LU55 19" 22" 22" 26LU55 26" 26" 3 Loose the bolts from TV. 19/22LU55 26LU55 STAND BODY 23 And detach the COVER BASE from TV.
COVER BASE 4 Detach the STAND BODY from TV. PREPARATION DETACHMENT 1 Carefully place the TV screen side down on a cushioned surface to protect the screen from damage. 2 Loose the bolts and then detach the stand from TV. 19" 19/22LU55 19" 22" 22" 26LU55 26" 26" 3 Loose the bolts from TV. 19/22LU55 26LU55 STAND BODY 23 And detach the COVER BASE from TV.
Owner's Manual (English)
Page 28
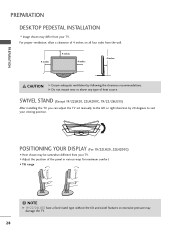
POSITIONING YOUR DISPLAY (For 19/22LH20, 22LH200C) I Image shown may differ from your TV. SWIVEL STAND (Except 19/22LH20, 22LH200C, 19/22/26LU55) After installing the TV, you can adjust the TV set manually to suit your viewing position. G Do not mount near or above any type of the panel ...in various ways for maximum comfort. • Tilt range 12 0 03 ! NOTE G 19/22/26LU55 have a fixed stand type without the tilt and swivel features so excessive pressure may damage the TV. 28 For proper ventilation, allow a clearance of 4 inches on all four sides from the wall. 4 inches 4 inches...
POSITIONING YOUR DISPLAY (For 19/22LH20, 22LH200C) I Image shown may differ from your TV. SWIVEL STAND (Except 19/22LH20, 22LH200C, 19/22/26LU55) After installing the TV, you can adjust the TV set manually to suit your viewing position. G Do not mount near or above any type of the panel ...in various ways for maximum comfort. • Tilt range 12 0 03 ! NOTE G 19/22/26LU55 have a fixed stand type without the tilt and swivel features so excessive pressure may damage the TV. 28 For proper ventilation, allow a clearance of 4 inches on all four sides from the wall. 4 inches 4 inches...
Owner's Manual (English)
Page 29
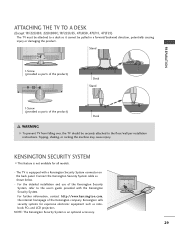
... (Except 19/22LH20, 22LH200C,19/22LU55, 47LH30, 47LF11, 47LF21) The TV must be attached to the user's guide provided with a Kensington Security System connector on the back panel. NOTE: The Kensington Security System is not available for expensive electronic equipment such as notebook PCs and LCD projectors. Stand PREPARATION 1-Screw (provided as parts of...
... (Except 19/22LH20, 22LH200C,19/22LU55, 47LH30, 47LF11, 47LF21) The TV must be attached to the user's guide provided with a Kensington Security System connector on the back panel. NOTE: The Kensington Security System is not available for expensive electronic equipment such as notebook PCs and LCD projectors. Stand PREPARATION 1-Screw (provided as parts of...
Owner's Manual (English)
Page 30
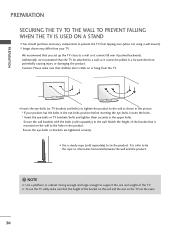
... to a wall so it becomes horizontal between the wall and the product. ! We recommend that is safer to the wall. Match the height of the TV. Additionally, we recommend that children don't climb on the wall to tie the product. I Use a sturdy rope (sold separately) to tie the rope... as shown in the upper holes. I Insert the eye-bolts (or TV brackets and bolts) to tighten the product to prevent the TV from tipping over if pushed backwards. PREPARATION PREPARATION SECURING THE TV TO THE WALL TO PREVENT FALLING WHEN THE TV IS USED ON A STAND I Image shown may differ from the...
... to a wall so it becomes horizontal between the wall and the product. ! We recommend that is safer to the wall. Match the height of the TV. Additionally, we recommend that children don't climb on the wall to tie the product. I Use a sturdy rope (sold separately) to tie the rope... as shown in the upper holes. I Insert the eye-bolts (or TV brackets and bolts) to tighten the product to prevent the TV from tipping over if pushed backwards. PREPARATION PREPARATION SECURING THE TV TO THE WALL TO PREVENT FALLING WHEN THE TV IS USED ON A STAND I Image shown may differ from the...


