
Owners Manual
Page 3
.... Follow all warnings. instructions This information in an instruction shall be given in a separate for installation for long periods of the obsolete outlet. At the a picture placed immediately to the country "Important where the apparatus Safety Instructions". Do not block any operating This information The important following illustrates the intent of...
.... Follow all warnings. instructions This information in an instruction shall be given in a separate for installation for long periods of the obsolete outlet. At the a picture placed immediately to the country "Important where the apparatus Safety Instructions". Do not block any operating This information The important following illustrates the intent of...
Owners Manual
Page 5
... Color Tone - Analog Broadcasting System Captions ...59 - EZ Picture - Add / Delete Channel (Manual Scan) ...35 4 Preset ...- Preset...44 44 45 46 47 ...2 ...6 6 Feature of this TV ... _i+++i+++ ++_iii iiii iiii iiii iiii iiii iiii iiii...12 Attaching the TV to a Wall ...Stand Installation ...VESA Wall Mounting ...13 14 15 Manual Picture Adjustment ...- User Mode ...46 XD - CONTENTS WARNING / CAUTION SAFETY INSTRUCTIONS INTRODUCTION ...1 Picture Size (Aspect Ratio) Control ...42 Preset Picture Settings ...- EZ Picture - Color Tone - Picture Improvement Technology ...48...
... Color Tone - Analog Broadcasting System Captions ...59 - EZ Picture - Add / Delete Channel (Manual Scan) ...35 4 Preset ...- Preset...44 44 45 46 47 ...2 ...6 6 Feature of this TV ... _i+++i+++ ++_iii iiii iiii iiii iiii iiii iiii iiii...12 Attaching the TV to a Wall ...Stand Installation ...VESA Wall Mounting ...13 14 15 Manual Picture Adjustment ...- User Mode ...46 XD - CONTENTS WARNING / CAUTION SAFETY INSTRUCTIONS INTRODUCTION ...1 Picture Size (Aspect Ratio) Control ...42 Preset Picture Settings ...- EZ Picture - Color Tone - Picture Improvement Technology ...48...
Owners Manual
Page 7
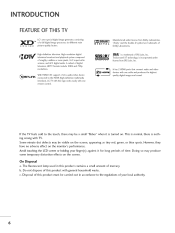
... not dispose of a full digital image processor, six different picture quality factors. With HDMI CEC support of time. Doing so may be a small "flicker"... quality digital images and sound. If the TV feels cold to the HDMI (high-definition multimedia interface), LG TV with this logo works easily with TV. However, they have no adverse effect on... and playback system composed $R$(O) _ _ G i T A L is noth- [ DU FEATURE OF THIS TV LG's own special digital image generator, consisting of this product c. symbol are trademarks of SRS Labs, Inc. is turned...
... not dispose of a full digital image processor, six different picture quality factors. With HDMI CEC support of time. Doing so may be a small "flicker"... quality digital images and sound. If the TV feels cold to the HDMI (high-definition multimedia interface), LG TV with this logo works easily with TV. However, they have no adverse effect on... and playback system composed $R$(O) _ _ G i T A L is noth- [ DU FEATURE OF THIS TV LG's own special digital image generator, consisting of this product c. symbol are trademarks of SRS Labs, Inc. is turned...

Owners Manual
Page 9
use it). ""_ NOTE: If your TV. blinks green and is turned then illuminates on, the indicator green before the picture 8 PREPARATION FRONT PANELINFORMATION Here shown may be somewhat different from your product has a protection tape attached, remove the tape. When the TV is displayed. And then wipe the product with a cloth (If a polishing cloth is included with your product, _D m _D Front Panel Controls (26 inches) © z (A,¥)Bu_ons (41,I_) Buttons Bu_on Bu_on Remote Control Sensor Power/Sta Illuminates nd by Indicator red in standby mode.
use it). ""_ NOTE: If your TV. blinks green and is turned then illuminates on, the indicator green before the picture 8 PREPARATION FRONT PANELINFORMATION Here shown may be somewhat different from your product has a protection tape attached, remove the tape. When the TV is displayed. And then wipe the product with a cloth (If a polishing cloth is included with your product, _D m _D Front Panel Controls (26 inches) © z (A,¥)Bu_ons (41,I_) Buttons Bu_on Bu_on Remote Control Sensor Power/Sta Illuminates nd by Indicator red in standby mode.

Owners Manual
Page 10
When the TV is turned on, the indicator then illuminates blinks green and green before the picture is displayed. 9 -0 _o m Front Panel Controls (32/42 inches) _o © 7 (A,V)Buttons (_I,I_) Buttons Button Button Button Button Remote Control Sensor Power/Sta nd by Indicator llluminates red in standby mode.
When the TV is turned on, the indicator then illuminates blinks green and green before the picture is displayed. 9 -0 _o m Front Panel Controls (32/42 inches) _o © 7 (A,V)Buttons (_I,I_) Buttons Button Button Button Button Remote Control Sensor Power/Sta nd by Indicator llluminates red in standby mode.
Owners Manual
Page 14
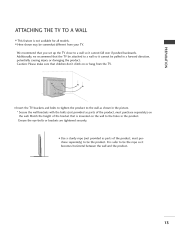
... on the wall to the holes in the product. It is not available for all models. on or hang from your TV. _D rT1 ,,,iHere shown may be pulled in the picture. that children don't climb on Secure the wall brackets with the bolts (not provided as parts of the product, must... purchase separately) the wall. Ensure the eye-bolts or brackets are tightened securely. 0,_ Use a sturdy rope (not provided as parts of the bracket that you set up the TV close...
... on the wall to the holes in the product. It is not available for all models. on or hang from your TV. _D rT1 ,,,iHere shown may be pulled in the picture. that children don't climb on Secure the wall brackets with the bolts (not provided as parts of the product, must... purchase separately) the wall. Ensure the eye-bolts or brackets are tightened securely. 0,_ Use a sturdy rope (not provided as parts of the bracket that you set up the TV close...

Owners Manual
Page 17
...Coaxial Wire (75 ohm) i iiiiiiiiiiiiiii_i_i!iiiiiiiiiiiiiiiiiiiiiiiiiiiiii_i!_!!_!!i_ n enna 01_ If the antenna 01_ If the antenna _L UHF VHF To improve the picture quality in a poor signal area, please purchase a signal amplifier and install properly. Antenna m (Analog or Digital) Antenna without a Cable... Box Wall Antenna Socket or Outdoor Connections. Cable Cable TV Wall Jack I Single-family Dwellings/Houses • / (Connect to wall jack for outdoor __ _ ._..._S Copper Wire Be careful ...
...Coaxial Wire (75 ohm) i iiiiiiiiiiiiiii_i_i!iiiiiiiiiiiiiiiiiiiiiiiiiiiiii_i!_!!_!!i_ n enna 01_ If the antenna 01_ If the antenna _L UHF VHF To improve the picture quality in a poor signal area, please purchase a signal amplifier and install properly. Antenna m (Analog or Digital) Antenna without a Cable... Box Wall Antenna Socket or Outdoor Connections. Cable Cable TV Wall Jack I Single-family Dwellings/Houses • / (Connect to wall jack for outdoor __ _ ._..._S Copper Wire Be careful ...
Owners Manual
Page 18
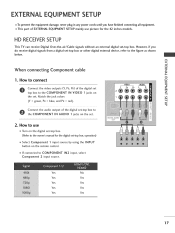
... mainly use Turn on the set -top box. IN2 input, select Yes Yes Yes Yes Yes No Yes Yes Yes Yes 17 How to use picture for the digital set . If connected Component to the figure as shown r_ x m When connecting I input source by using the INPUT button on z m (Y = green, PB...
... mainly use Turn on the set -top box. IN2 input, select Yes Yes Yes Yes Yes No Yes Yes Yes Yes 17 How to use picture for the digital set . If connected Component to the figure as shown r_ x m When connecting I input source by using the INPUT button on z m (Y = green, PB...
Owners Manual
Page 21
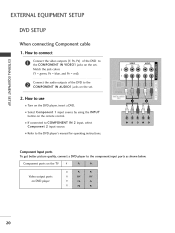
... m AUDIO1 z m 2. IN 2 inpuL select c -0 01_ Refer to the DVD player's manual for operating Component Input ports To get better picture quality, connect a DVD player to COMPONENT 2 input source. Component ports on the TV Video output ports on the set . XD c Connect the audio outputs IN of the DVD jacks on the remote...
... m AUDIO1 z m 2. IN 2 inpuL select c -0 01_ Refer to the DVD player's manual for operating Component Input ports To get better picture quality, connect a DVD player to COMPONENT 2 input source. Component ports on the TV Video output ports on the set . XD c Connect the audio outputs IN of the DVD jacks on the remote...

Owners Manual
Page 23
...in socket of the VCR to all manufactures this phenomenon. How to use 01_ Set VCR output switch to 3 or 4 and then tune TV to the same channel number. 01_ Insert a video tape into the VCR and press PLAY on the VCR. (Refer to the RF antenna... with an antenna z m JC) c m z .-t m c Wall Jack Antenna 1. cable to the VCR owner's manual.) 22 EXTERNALEQUIPMENT SETUP VCR SETUP To avoid picture If the 4:5 picture noise (interference), format leave an adequate distance between the VCR and TV. How to connect Connect Connect the RF antenna the antenna out socket of the VCR.
...in socket of the VCR to all manufactures this phenomenon. How to use 01_ Set VCR output switch to 3 or 4 and then tune TV to the same channel number. 01_ Insert a video tape into the VCR and press PLAY on the VCR. (Refer to the RF antenna... with an antenna z m JC) c m z .-t m c Wall Jack Antenna 1. cable to the VCR owner's manual.) 22 EXTERNALEQUIPMENT SETUP VCR SETUP To avoid picture If the 4:5 picture noise (interference), format leave an adequate distance between the VCR and TV. How to connect Connect Connect the RF antenna the antenna out socket of the VCR.
Owners Manual
Page 28
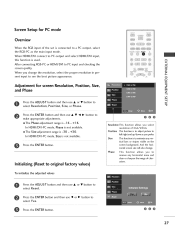
... output, select input, m the RGB-PC as you select resolution of characters. This function is -16 ~ +16. • _1 • button to see the best picture appearance. Phase This function allows you change . Initializing (Reset to • The Phase adjustment In HDMI/DVI-PC mode, Phase is to adjust... picture to Press the ENTER button and then use _1 or • select Yes. Press the ENTER button and then use • or • button to ...
... output, select input, m the RGB-PC as you select resolution of characters. This function is -16 ~ +16. • _1 • button to see the best picture appearance. Phase This function allows you change . Initializing (Reset to • The Phase adjustment In HDMI/DVI-PC mode, Phase is to adjust... picture to Press the ENTER button and then use _1 or • select Yes. Press the ENTER button and then use • or • button to ...

Owners Manual
Page 32
... © Z © TIMER Select the amount of AV devices connected appears at the screen. _ p.40 PICTURE Selects the factory preset picture depend on -screen displays and returns to TV. select RGB-PC input. When you toggle this button, the SimpLink menu SIMPLINK See a list of time before... your TV turns off automatically. _ p.65 31 to TV viewing from any menu. SAP _ Analog mode: Selects MTS sound...
... © Z © TIMER Select the amount of AV devices connected appears at the screen. _ p.40 PICTURE Selects the factory preset picture depend on -screen displays and returns to TV. select RGB-PC input. When you toggle this button, the SimpLink menu SIMPLINK See a list of time before... your TV turns off automatically. _ p.65 31 to TV viewing from any menu. SAP _ Analog mode: Selects MTS sound...
Owners Manual
Page 37
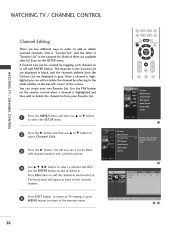
Once a channel is highlighted your on the remote own Favorite List. You will appear in front of that channel Press EXIT button to return to TV viewing or press MENU button to return to the previous menu. @@ 36 or • button @ Press the • button and then use &#... corner of them are available after EZ Scan on or off with channel numbers and a preview picture. @ @ Use • • _1 • button to select a channel and then to the Favorite List. WATCHING TV / CHANNEL CONTROL Channel Editing There are two different ways in order to Press the • ...
Once a channel is highlighted your on the remote own Favorite List. You will appear in front of that channel Press EXIT button to return to TV viewing or press MENU button to return to the previous menu. @@ 36 or • button @ Press the • button and then use &#... corner of them are available after EZ Scan on or off with channel numbers and a preview picture. @ @ Use • • _1 • button to select a channel and then to the Favorite List. WATCHING TV / CHANNEL CONTROL Channel Editing There are two different ways in order to Press the • ...
Owners Manual
Page 38
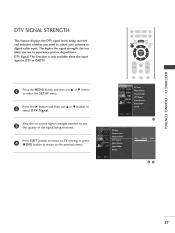
... to select the SETUP menu. Press the • button and then use • or • button < N I > z z fT1 to adjust your picture degradation. button to @ View the on-screen signal strength monitor to see the quality of the signal being received you are to the previous menu. @@ ...37 N © Z © Press EXIT button to return to TV viewing or press MENU button to return to experience DTV Signal: This function signal is only available N -r" z Press the MENU button and then use &#...
... to select the SETUP menu. Press the • button and then use • or • button < N I > z z fT1 to adjust your picture degradation. button to @ View the on-screen signal strength monitor to see the quality of the signal being received you are to the previous menu. @@ ...37 N © Z © Press EXIT button to return to TV viewing or press MENU button to return to experience DTV Signal: This function signal is only available N -r" z Press the MENU button and then use &#...
Owners Manual
Page 39
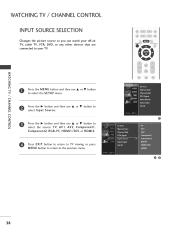
devices that N "lz Press the MENU < N I /DVI, or HDMI2. © Press EXIT MENU button to return to TV viewing or press button to return to select the SETUP Press the • select Input button Source. and then use • or • button to N &#...169; Z @ Press the • button and then use • or • button to select the source: TV, AVI, AV2, Componentl, Component2, RGB-PC, HDMI I > z z fT1 button and then use • menu. or • button to the previous menu. @0 38 WATCHING...
devices that N "lz Press the MENU < N I /DVI, or HDMI2. © Press EXIT MENU button to return to TV viewing or press button to return to select the SETUP Press the • select Input button Source. and then use • or • button to N &#...169; Z @ Press the • button and then use • or • button to select the source: TV, AVI, AV2, Componentl, Component2, RGB-PC, HDMI I > z z fT1 button and then use • menu. or • button to the previous menu. @0 38 WATCHING...
Owners Manual
Page 43
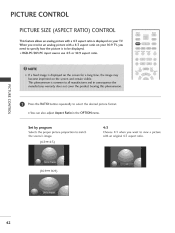
.... with an original Selects the proper picture proportion the source's image. (4:3"* 4:3) (16:9"* 16:9) 42 ratio. PICTURE CONT PICTURE SIZE (ASPECT RATIO) CONTROL This feature allows an analog picture with a 4:3 aspect ratio is to be displayed. You can also adjust Aspect Ratio in the OPTION menu. on your TV. 16:9 TV, you RGB-PC/DVI-PC input...
.... with an original Selects the proper picture proportion the source's image. (4:3"* 4:3) (16:9"* 16:9) 42 ratio. PICTURE CONT PICTURE SIZE (ASPECT RATIO) CONTROL This feature allows an analog picture with a 4:3 aspect ratio is to be displayed. You can also adjust Aspect Ratio in the OPTION menu. on your TV. 16:9 TV, you RGB-PC/DVI-PC input...

Owners Manual
Page 44
portions However, the of the picture will be 2 both sides, to altered, cropped. Choose picture cropped. The picture taking a halfway trade off and screen coverage. © z _o © between alteration r l | i. | ,J 43 in a Jinear pro- Zoom 1 7oom without 1 when you want to fill the entire screen. c _o m Zoom be 16:9 Adjust the picture horizontally, portion to view the any alteration. top and bottom -O I ...i Horizon The screen size is, more enlarged at both vertically extended and Choose Zoom 2 when you want the picture to create a spectacular view.
portions However, the of the picture will be 2 both sides, to altered, cropped. Choose picture cropped. The picture taking a halfway trade off and screen coverage. © z _o © between alteration r l | i. | ,J 43 in a Jinear pro- Zoom 1 7oom without 1 when you want to fill the entire screen. c _o m Zoom be 16:9 Adjust the picture horizontally, portion to view the any alteration. top and bottom -O I ...i Horizon The screen size is, more enlarged at both vertically extended and Choose Zoom 2 when you want the picture to create a spectacular view.
Owners Manual
Page 45
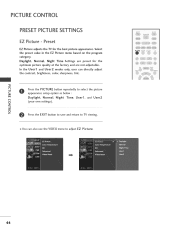
... on the program quality at the factory modes and are preset for the adjusts the TV for the best picture value in the EZ Picture appearance. color, sharpness, "0 N C _o r_ Press the PICTURE appearance Daylight, button repeatedly to select the picture setup option Normal, as below : Time, User1, and User2 N 0 Z _o Night (your own settings...
... on the program quality at the factory modes and are preset for the adjusts the TV for the best picture value in the EZ Picture appearance. color, sharpness, "0 N C _o r_ Press the PICTURE appearance Daylight, button repeatedly to select the picture setup option Normal, as below : Time, User1, and User2 N 0 Z _o Night (your own settings...

Owners Manual
Page 47
or • button to the previous menu. 46 @ Sharpness, @0 Back Light-This is the function for some LCD TV models. PICTURECONTROL MANUAL PICTURE ADJUSTMENT EZ Picture - User Mode Adjust viewing the picture situations. of LCD panel. appearance to select Brightness, (Contrast, Light). or • button to Press the • the desired Color, button and then use •...
or • button to the previous menu. 46 @ Sharpness, @0 Back Light-This is the function for some LCD TV models. PICTURECONTROL MANUAL PICTURE ADJUSTMENT EZ Picture - User Mode Adjust viewing the picture situations. of LCD panel. appearance to select Brightness, (Contrast, Light). or • button to Press the • the desired Color, button and then use •...

Owners Manual
Page 49
...• or • button to display nal processing When Night selecting time), unique picture improving an advanced technology digital siga real HD source through algorithm. EZ Picture options (Daylight, Normal and XD is LG Electronic's to @ Press the • select Auto button and then use • ...menu. When selecting EZ Picture options can adjust the XD -O N C _o m Press the MENU button and then use • or • button to or Manual. @@ Press EXIT MENU button to return to TV...
...• or • button to display nal processing When Night selecting time), unique picture improving an advanced technology digital siga real HD source through algorithm. EZ Picture options (Daylight, Normal and XD is LG Electronic's to @ Press the • select Auto button and then use • ...menu. When selecting EZ Picture options can adjust the XD -O N C _o m Press the MENU button and then use • or • button to or Manual. @@ Press EXIT MENU button to return to TV...

