
Owners Manual
Page 2
.../TV for help. TO REDUCE THE RISK OF ELECTRIC SHOCK DO NOT REMOVE COVER (OR BACK). REFERTO QUALIFIED SERVICE PERSONNEL. This equipment generates, uses and can be connected to the grounding for a Class B digital device, pursuant to provide reasonable protection against harmful interference in any way authorization from that to operate this product in a residential installation. I iiii'iiiii[ Any changes...
.../TV for help. TO REDUCE THE RISK OF ELECTRIC SHOCK DO NOT REMOVE COVER (OR BACK). REFERTO QUALIFIED SERVICE PERSONNEL. This equipment generates, uses and can be connected to the grounding for a Class B digital device, pursuant to provide reasonable protection against harmful interference in any way authorization from that to operate this product in a residential installation. I iiii'iiiii[ Any changes...

Owners Manual
Page 4
combination bracket, or sold of the appliance, and have the cord replaced with liquids, such as power-supply is used, use cart/apparatus to Marking : Apparatus dripping or shall not be and no additional outlets or branch circuits. Wet Location exposed objects to avoid injury from physical or mechanical kinked, upon a dedicated circuit; wall outlets. Periodically examine the cord of these...
combination bracket, or sold of the appliance, and have the cord replaced with liquids, such as power-supply is used, use cart/apparatus to Marking : Apparatus dripping or shall not be and no additional outlets or branch circuits. Wet Location exposed objects to avoid injury from physical or mechanical kinked, upon a dedicated circuit; wall outlets. Periodically examine the cord of these...
Owners Manual
Page 5
...Caption/Text ...59 - Color Tone - Digital Broadcasting System Captions ...60 Caption Option ...61 Remote Control Key Functions ...Turning On TV ...Channel Selection ...Volume Adjustment ...On-Screen Menus Selection ...Channel Search ...- Black (Darkness) Level...50 Picture Reset ...51 Desktop Pedestal Installation ...15 Antenna or Cable Connection ...16 Preset Sound Setting (EZ Sound) ...52 Sound Setting Adjustment - Add / Delete Channel (Manual Scan) ...35 4 EZ Picture - User Mode ...46 XD - Picture Improvement Technology ...48 Advanced - Auto Scan (EZ Scan) ...- Analog...
...Caption/Text ...59 - Color Tone - Digital Broadcasting System Captions ...60 Caption Option ...61 Remote Control Key Functions ...Turning On TV ...Channel Selection ...Volume Adjustment ...On-Screen Menus Selection ...Channel Search ...- Black (Darkness) Level...50 Picture Reset ...51 Desktop Pedestal Installation ...15 Antenna or Cable Connection ...16 Preset Sound Setting (EZ Sound) ...52 Sound Setting Adjustment - Add / Delete Channel (Manual Scan) ...35 4 EZ Picture - User Mode ...46 XD - Picture Improvement Technology ...48 Advanced - Auto Scan (EZ Scan) ...- Analog...
Owners Manual
Page 6
Auto Clock Setup ...- Manual Clock Setup ...Auto On/Off Timer Setting ...Sleep Timer Setting ...Auto Shut-off Setting ...62 63 64 65 66 Set Password & Lock System ...Channel Blocking ...External Input Blocking ...Movie & TV Rating ... 67 69 69 70 !!Ii i iiiiiiiiiiiiii i i i i i i ii i i i i i i i i i i i i i i i i i i i i i i i i i i i i i i i i i i i i i i 73 75 76 Troubleshooting ...Maintenance ...Product Specifications ... Clock Setting ...62 - Programming the Remote Control ...77 IR Codes ...80 External Control Through RS-232C ...82 5
Auto Clock Setup ...- Manual Clock Setup ...Auto On/Off Timer Setting ...Sleep Timer Setting ...Auto Shut-off Setting ...62 63 64 65 66 Set Password & Lock System ...Channel Blocking ...External Input Blocking ...Movie & TV Rating ... 67 69 69 70 !!Ii i iiiiiiiiiiiiii i i i i i i ii i i i i i i i i i i i i i i i i i i i i i i i i i i i i i i i i i i i i i i 73 75 76 Troubleshooting ...Maintenance ...Product Specifications ... Clock Setting ...62 - Programming the Remote Control ...77 IR Codes ...80 External Control Through RS-232C ...82 5
Owners Manual
Page 7
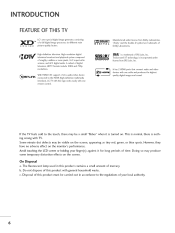
...:9 aspect-ratio screens, and AC3 digital audio. With HDMI CEC support of digital television, HDTV formats include 1080i and 720p resolutions. against as tiny red, green, or blue spots. b. [ DU FEATURE OF THIS TV LG's own special digital image generator, consisting of this product c. High-definition television. It has 2 HDMI ports that connect audio and video devices with general household must be visible on the monitor's Avoid touching the LCD screen or holding your...
...:9 aspect-ratio screens, and AC3 digital audio. With HDMI CEC support of digital television, HDTV formats include 1080i and 720p resolutions. against as tiny red, green, or blue spots. b. [ DU FEATURE OF THIS TV LG's own special digital image generator, consisting of this product c. High-definition television. It has 2 HDMI ports that connect audio and video devices with general household must be visible on the monitor's Avoid touching the LCD screen or holding your...
Owners Manual
Page 12
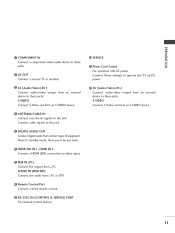
... S-VIDEO device. Remote Control Connect Port a wired remote control. Never attempt O AV (Audio/Video) Connect S-VIDEO Connect IN 1 output from an external AV (Audio/Video) Connect S-VIDEO IN 2 output from an S-VIDEO device. RS-232C IN (CONTROL & SERVICE) PORT For external control devices. 11 m 0 COMPONENT Connect jacks. Connect S-Video out from a PC or DTV. cable signals to these ports do not work. HDMI/DVI Connect IN 1, HDMI IN 2 to operate the TV on DC AV OUT Connect a second TV or monitor. to either input. S-Video out from an external audio/video audio...
... S-VIDEO device. Remote Control Connect Port a wired remote control. Never attempt O AV (Audio/Video) Connect S-VIDEO Connect IN 1 output from an external AV (Audio/Video) Connect S-VIDEO IN 2 output from an S-VIDEO device. RS-232C IN (CONTROL & SERVICE) PORT For external control devices. 11 m 0 COMPONENT Connect jacks. Connect S-Video out from a PC or DTV. cable signals to these ports do not work. HDMI/DVI Connect IN 1, HDMI IN 2 to operate the TV on DC AV OUT Connect a second TV or monitor. to either input. S-Video out from an external audio/video audio...
Owners Manual
Page 13
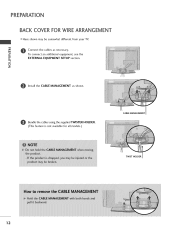
PREPARATION BACK COVERFORWIREARRANGEMENT ,,,_ Here shown may be somewhat different from your TV. _D m _D Connect the cables as shown. To connect an additional equipment, see the EXTERNAL EQUIPMENT SETUP section. © z @ Install the CABLE MANAGEMENT as necessary. CABLE MANAGEMENT Bundle the cables using the supplied TWISTER HOLDER. (This feature is not available for all models.) TWIST HOLDER IIII 12
PREPARATION BACK COVERFORWIREARRANGEMENT ,,,_ Here shown may be somewhat different from your TV. _D m _D Connect the cables as shown. To connect an additional equipment, see the EXTERNAL EQUIPMENT SETUP section. © z @ Install the CABLE MANAGEMENT as necessary. CABLE MANAGEMENT Bundle the cables using the supplied TWISTER HOLDER. (This feature is not available for all models.) TWIST HOLDER IIII 12
Owners Manual
Page 18
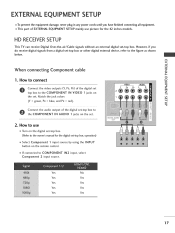
... z m (Y = green, PB = blue, and PR = red). How to connect Connect Component cable _D z m XD c (Y, PB, PR) of the digital IN VIDEO set the video outputs m top box to the COMPONENT the set -top box. c box to Connect the audio output of the digital set -top box. (Refer to the owner's manual for the 42 inches models. IN2 input, select Yes Yes Yes Yes Yes No Yes Yes Yes Yes 17 operation) Select Component I . HD RECEIVERSETUP This TV can receive Digital do receive digital below. EXTERNAL...
... z m (Y = green, PB = blue, and PR = red). How to connect Connect Component cable _D z m XD c (Y, PB, PR) of the digital IN VIDEO set the video outputs m top box to the COMPONENT the set -top box. c box to Connect the audio output of the digital set -top box. (Refer to the owner's manual for the 42 inches models. IN2 input, select Yes Yes Yes Yes Yes No Yes Yes Yes Yes 17 operation) Select Component I . HD RECEIVERSETUP This TV can receive Digital do receive digital below. EXTERNAL...
Owners Manual
Page 19
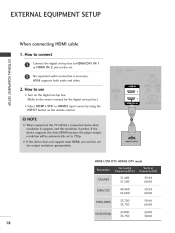
How to the owner's manual for the digital c -O Select HDMI 1/DVI or HDMI2 input source by using the INPUT button on the remote control. m z m 2. set-top box.) (Refer to use Turn on the set -top box. HDMI1/DVI-DTV, HDMI2-DTV mode 51.469 51.500 59.94 60.00 44.960 45.000 33.720 33.750 ....750 59.94 60.00 59.94 60.00 24.00 30.00 18 How to connect m HDM[ cable x m Connect or HDMI the digital set-top box to HDMI/DVI IN 1 IN 2 jack on the digital set . z m No separated audio connection HDMI supports is necessary. _D c both audio and video. EXTERNAL EQUIPMENT When...
How to the owner's manual for the digital c -O Select HDMI 1/DVI or HDMI2 input source by using the INPUT button on the remote control. m z m 2. set-top box.) (Refer to use Turn on the set -top box. HDMI1/DVI-DTV, HDMI2-DTV mode 51.469 51.500 59.94 60.00 44.960 45.000 33.720 33.750 ....750 59.94 60.00 59.94 60.00 24.00 30.00 18 How to connect m HDM[ cable x m Connect or HDMI the digital set-top box to HDMI/DVI IN 1 IN 2 jack on the digital set . z m No separated audio connection HDMI supports is necessary. _D c both audio and video. EXTERNAL EQUIPMENT When...
Owners Manual
Page 21
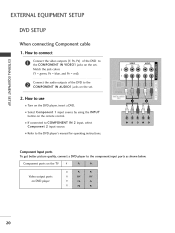
...PR = red). EXTERNALEQUIPMENT SETUP DVD SETUP When connecting 1. How to connect r'_ Component cable x m Connect the video outputs (Y, PB, PR) of the DVD to the component input ports as shown below. COMPONENT m AUDIO1 z m 2. Component ports on the TV Video output ports on the set . to COMPONENT 2 input source. How to use 01_ Turn on the DVD playen insert a DVD. 01_ Select Component 1 input source by using the INPUT button on the set . IN 2 inpuL select c -0 01_ Refer to the DVD player's manual for operating Component Input ports To get better picture quality, connect...
...PR = red). EXTERNALEQUIPMENT SETUP DVD SETUP When connecting 1. How to connect r'_ Component cable x m Connect the video outputs (Y, PB, PR) of the DVD to the component input ports as shown below. COMPONENT m AUDIO1 z m 2. Component ports on the TV Video output ports on the set . to COMPONENT 2 input source. How to use 01_ Turn on the DVD playen insert a DVD. 01_ Select Component 1 input source by using the INPUT button on the set . IN 2 inpuL select c -0 01_ Refer to the DVD player's manual for operating Component Input ports To get better picture quality, connect...
Owners Manual
Page 22
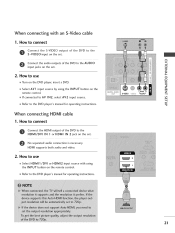
...x _o Connect the audio outputs of the DVD to use 01_ Turn on the DVD player, insert a DVD. 01_ Select AV1 input source by using on the XD c "O z r-r1 input source. instructions. How to use 01_ Select HDMI1/DVI the INPUT button or HDMI2 input source with an S-Video cable the S-VIDEO output of the DVD to the DVD player's manual for operating c "O When connecting 1. How to connect Connect S-VIDEO with using the INPUT remote control. 01_ If connected to the input on the set . both audio and video. 2. No separated HDMI supports audio connection is...
...x _o Connect the audio outputs of the DVD to use 01_ Turn on the DVD player, insert a DVD. 01_ Select AV1 input source by using on the XD c "O z r-r1 input source. instructions. How to use 01_ Select HDMI1/DVI the INPUT button or HDMI2 input source with an S-Video cable the S-VIDEO output of the DVD to the DVD player's manual for operating c "O When connecting 1. How to connect Connect S-VIDEO with using the INPUT remote control. 01_ If connected to the input on the set . both audio and video. 2. No separated HDMI supports audio connection is...
Owners Manual
Page 30
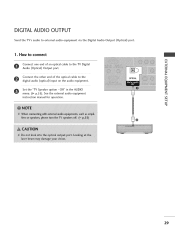
XD c Set the "TV Speaker option - c @ 29 rT1 Audio (Optical) _D z cable to the rT1 Connect digital the other end of an optical cable to the TV Digital Output port. See the external audio equipment instruction manual for operation. I. How to external audio equipment via the Digital Audio Output (Optical) port. DiGiTAL AUDIO OUTPUT Send the TV's audio to connect x Connect one end of the optical audio (optical) input on the audio equipment. Off" in the AUDIO rT1 z rT1 menu. (_ p.55).
XD c Set the "TV Speaker option - c @ 29 rT1 Audio (Optical) _D z cable to the rT1 Connect digital the other end of an optical cable to the TV Digital Output port. See the external audio equipment instruction manual for operation. I. How to external audio equipment via the Digital Audio Output (Optical) port. DiGiTAL AUDIO OUTPUT Send the TV's audio to connect x Connect one end of the optical audio (optical) input on the audio equipment. Off" in the AUDIO rT1 z rT1 menu. (_ p.55).
Owners Manual
Page 31
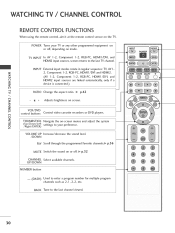
... connected.) INPUT N -r" z < N I > z z fT1 RATIO + Change the aspect ratio. Adjusts brightness _ p.42 on mode. Tune to enter a program number for multiple program channels such as 2-1,2-2, etc. POWER Turns your preference. UP/DOWN NUMBER button -- (DASH) Used to the last channel viewed. BACK 3O HING TV / CHANNEL CONTROL REMOTE CONTROL FUNCTIONS When using the remote control, aim it at the remote control sensor on or off , depending on screen. TV INPUT In AV 1-2, Component 1-2, RGB-PC, HDMI1/DVI, and HDMI2 input sources, screen returns to your TV...
... connected.) INPUT N -r" z < N I > z z fT1 RATIO + Change the aspect ratio. Adjusts brightness _ p.42 on mode. Tune to enter a program number for multiple program channels such as 2-1,2-2, etc. POWER Turns your preference. UP/DOWN NUMBER button -- (DASH) Used to the last channel viewed. BACK 3O HING TV / CHANNEL CONTROL REMOTE CONTROL FUNCTIONS When using the remote control, aim it at the remote control sensor on or off , depending on screen. TV INPUT In AV 1-2, Component 1-2, RGB-PC, HDMI1/DVI, and HDMI2 input sources, screen returns to your TV...
Owners Manual
Page 35
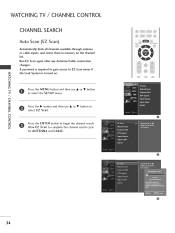
... on the channel connection Run EZ Scan again after any Antenna/Cable changes. N © Z Press the ENTER © button to complete the channel search cycle for ANTENNA and CABLE. @ @ @ 34 the Lock System is required to gain access to select the SETUP Press the • button and then use • menu. finds all channels available through and stores them in memory antenna on . WATCHING TV / CHANNEL CONTROL CHANNELSEARCH Auto Scan (EZ Scan) Automatically or cable inputs, list.
... on the channel connection Run EZ Scan again after any Antenna/Cable changes. N © Z Press the ENTER © button to complete the channel search cycle for ANTENNA and CABLE. @ @ @ 34 the Lock System is required to gain access to select the SETUP Press the • button and then use • menu. finds all channels available through and stores them in memory antenna on . WATCHING TV / CHANNEL CONTROL CHANNELSEARCH Auto Scan (EZ Scan) Automatically or cable inputs, list.
Owners Manual
Page 36
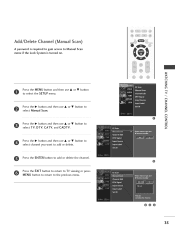
... the SETUP menu. Press the ENTER button to add or delete the channel. @ Press the EXIT button to return to TV viewing or press MENU button to return to Manual on. button to select TV, DTV, CATV, and CADTV. Press the • button and then use • or • button to @ Press the • button and then use • or • select Manual Scan. Add/Delete A password Channel (Manual Scan) to gain access to...
... the SETUP menu. Press the ENTER button to add or delete the channel. @ Press the EXIT button to return to TV viewing or press MENU button to return to Manual on. button to select TV, DTV, CATV, and CADTV. Press the • button and then use • or • button to @ Press the • button and then use • or • select Manual Scan. Add/Delete A password Channel (Manual Scan) to gain access to...

Owners Manual
Page 57
... only in Analog channel. sound in analog signal. or SAP can receive transmits MTS stereo programs sound and any SAP (Secondary if the station original control. SOUND &LANGUAGE CONTROL STEREO/SAP BROADCASTS SETUP This TV can be received Use the SAP button to select your desired MTS mode in remote Select Mono areas during Stereo if you press the SAP button, Stereo, 0 c z or SAP appear in turn. Each time you want...
... only in Analog channel. sound in analog signal. or SAP can receive transmits MTS stereo programs sound and any SAP (Secondary if the station original control. SOUND &LANGUAGE CONTROL STEREO/SAP BROADCASTS SETUP This TV can be received Use the SAP button to select your desired MTS mode in remote Select Mono areas during Stereo if you press the SAP button, Stereo, 0 c z or SAP appear in turn. Each time you want...
Owners Manual
Page 63
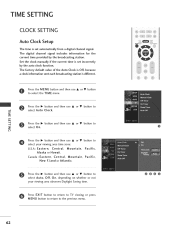
... EXIT MENU button to return to TV viewing or press button to return to select the TIME button and then use • or • button to m Press the • z select 0 n. for the includes information station. by the broadcasting if the current Set the clock manually The factory default time is set incorrectly Clock is Off, because is set automatically The digital channel signal from a digital channel signal. current time provided by the auto clock...
... EXIT MENU button to return to TV viewing or press button to return to select the TIME button and then use • or • button to m Press the • z select 0 n. for the includes information station. by the broadcasting if the current Set the clock manually The factory default time is set incorrectly Clock is Off, because is set automatically The digital channel signal from a digital channel signal. current time provided by the auto clock...
Owners Manual
Page 68
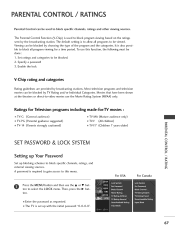
... television programs and television movies can be blocked. A password is set up blocking external viewing sources. menu. To use this menu. z For USA For Canada Press the MENU button and then use the Movie Rating System (MPAA) only. The Parental Control Function (V-Chip) is used to block specific channels, ratings and other viewing sources. Set ratings and categories 2. Specify a password 3. Movies that have been shown at the theaters or direct-to select the LOCK...
... television programs and television movies can be blocked. A password is set up blocking external viewing sources. menu. To use this menu. z For USA For Canada Press the MENU button and then use the Movie Rating System (MPAA) only. The Parental Control Function (V-Chip) is used to block specific channels, ratings and other viewing sources. Set ratings and categories 2. Specify a password 3. Movies that have been shown at the theaters or direct-to select the LOCK...
Owners Manual
Page 74
... correct remote operating mode is turned on station settings. Please m your antenna direction i,i,i Test the wall power outlet, where the product's and/or location. The problem may be with Auto off activated. i,i,i Station i,i,i Station or cable product experiencing problems, tune to another distance between the product causing obstruction. product's in menu option. i,i,i Are the video cables installed properly? i,i,i Check the power control i,l,_ No broadcast on . tuned with the broadcast. signal...
... correct remote operating mode is turned on station settings. Please m your antenna direction i,i,i Test the wall power outlet, where the product's and/or location. The problem may be with Auto off activated. i,i,i Station i,i,i Station or cable product experiencing problems, tune to another distance between the product causing obstruction. product's in menu option. i,i,i Are the video cables installed properly? i,i,i Check the power control i,l,_ No broadcast on . tuned with the broadcast. signal...
Owners Manual
Page 78
... remote should be turned you have to operate the device. After blinking twice, this code is stored. Note that , press the POWER button. In that case, Enter the appropriate light blinks at the same time for 20 seconds, the light on the remote. the Press the MENU button to see if the device responds properly. m Test the remote control functions to store the code. PROGRAMMING THE REMOTE CONTROL The provided universal remote control...
... remote should be turned you have to operate the device. After blinking twice, this code is stored. Note that , press the POWER button. In that case, Enter the appropriate light blinks at the same time for 20 seconds, the light on the remote. the Press the MENU button to see if the device responds properly. m Test the remote control functions to store the code. PROGRAMMING THE REMOTE CONTROL The provided universal remote control...


