Owner's Manual (English)
Page 3
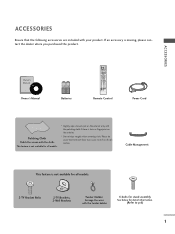
... when removing stain. Please be aware that the following accessories are included with the cloth. REVEAL INDEX I/II TIME Remote Control Power Cord Polishing Cloth Polish the screen with your product. Owner's Manual 1.5V 1.5V Batteries INPUT D/A INPUT POWER SIMPLINK BRIGHT MODE... TV VCR DVD RATIO TEXT INFO i GUIDE i SUBTITLE MENU LIST EXIT FAV OK VOL Q.VIEW PR PAGE MUTE 1 2 3 4 5 6 7 8 9 APM 0 SLEEP...
... when removing stain. Please be aware that the following accessories are included with the cloth. REVEAL INDEX I/II TIME Remote Control Power Cord Polishing Cloth Polish the screen with your product. Owner's Manual 1.5V 1.5V Batteries INPUT D/A INPUT POWER SIMPLINK BRIGHT MODE... TV VCR DVD RATIO TEXT INFO i GUIDE i SUBTITLE MENU LIST EXIT FAV OK VOL Q.VIEW PR PAGE MUTE 1 2 3 4 5 6 7 8 9 APM 0 SLEEP...
Owner's Manual (English)
Page 4
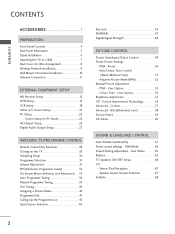
...ACCESSORIES 1 PREPARATION Front Panel Controls 4 Back Panel Information 5 Stand Installation 6 Attaching the TV to a Wall 7 Back Cover for PC Mode 25 AV Output Setup 26 ...Digital Audio Output Setup 27 WATCHING TV/PROGRAMME CONTROL Remote Control Key Functions 28 Turning on the TV 30 Initializing Setup 30 ... 44 Key Lock 45 ...SIMPLINK 47 ...Digital Signal Strength 48 PICTURE CONTROL Picture Size(Aspect Ratio) Control 49 Preset Picture Settings - Stereo/Dual Reception 67 - Preset 50 Auto Colour Tone Control (Warm/Medium/Cool) 51 Adaptive Picture Mode(APM 52 Manual Picture...
...ACCESSORIES 1 PREPARATION Front Panel Controls 4 Back Panel Information 5 Stand Installation 6 Attaching the TV to a Wall 7 Back Cover for PC Mode 25 AV Output Setup 26 ...Digital Audio Output Setup 27 WATCHING TV/PROGRAMME CONTROL Remote Control Key Functions 28 Turning on the TV 30 Initializing Setup 30 ... 44 Key Lock 45 ...SIMPLINK 47 ...Digital Signal Strength 48 PICTURE CONTROL Picture Size(Aspect Ratio) Control 49 Preset Picture Settings - Stereo/Dual Reception 67 - Preset 50 Auto Colour Tone Control (Warm/Medium/Cool) 51 Adaptive Picture Mode(APM 52 Manual Picture...
Owner's Manual (English)
Page 6
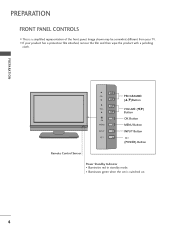
I This is switched on. 4 PREPARATION PR VOL OK MENU R INPUT PROGRAMME (D,E)Button VOLUME (F,G) Button OK Button MENU Button INPUT Button (POWER) Button Remote Control Sensor Power Standby Indicator • Illuminates red in standby mode. • Illuminates green when the set is a simplified representation of the front panel. Image shown may be somewhat different from your product has a protection film attached, remove the film and then wipe the product with a polishing cloth. PREPARATION FRONT PANEL CONTROLS I If your TV.
I This is switched on. 4 PREPARATION PR VOL OK MENU R INPUT PROGRAMME (D,E)Button VOLUME (F,G) Button OK Button MENU Button INPUT Button (POWER) Button Remote Control Sensor Power Standby Indicator • Illuminates red in standby mode. • Illuminates green when the set is a simplified representation of the front panel. Image shown may be somewhat different from your product has a protection film attached, remove the film and then wipe the product with a polishing cloth. PREPARATION FRONT PANEL CONTROLS I If your TV.
Owner's Manual (English)
Page 7
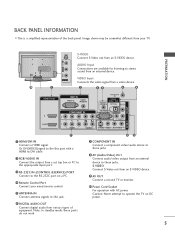
.... Caution: Never attempt to stereo sound from various types of the back panel. AUDIO Input Connections are available for listening to operate the TV on a PC. 4 Remote Control Port Connect your TV. MI/DVI IN 6 DIGITAL AUDIO OUT Connect digital audio from an external device. Image shown may be somewhat different from an S-VIDEO...
.... Caution: Never attempt to stereo sound from various types of the back panel. AUDIO Input Connections are available for listening to operate the TV on a PC. 4 Remote Control Port Connect your TV. MI/DVI IN 6 DIGITAL AUDIO OUT Connect digital audio from an external device. Image shown may be somewhat different from an S-VIDEO...
Owner's Manual (English)
Page 14
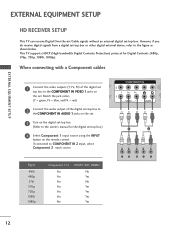
...if you do receive digital signals from a digital set -top box.) 4 Select Component 1 input source using the INPUT button on the remote control. This TV supports HDCP (High-bandwidth Digital Contents Protection) protocol for the digital set -top box or other digital external device, refer to the ... R 12 HDMI/DVI IN 2 RGB IN RGB (PC) AUDIO (RGB/DVI) COMPONENT IN DIGITAL AUDIO OUT EXTERNAL EQUIPMENT SETUP HD RECEIVER SETUP This TV can receive Digital Over-the-air/Cable signals without an external digital set . RGB IN When connecting with a Component caHDbMlI/eDsVI IN RGB (PC)...
...if you do receive digital signals from a digital set -top box.) 4 Select Component 1 input source using the INPUT button on the remote control. This TV supports HDCP (High-bandwidth Digital Contents Protection) protocol for the digital set -top box or other digital external device, refer to the ... R 12 HDMI/DVI IN 2 RGB IN RGB (PC) AUDIO (RGB/DVI) COMPONENT IN DIGITAL AUDIO OUT EXTERNAL EQUIPMENT SETUP HD RECEIVER SETUP This TV can receive Digital Over-the-air/Cable signals without an external digital set . RGB IN When connecting with a Component caHDbMlI/eDsVI IN RGB (PC)...
Owner's Manual (English)
Page 17
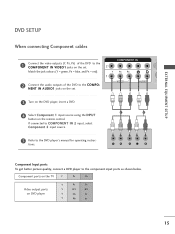
tions. Component ports on the TV Y PB PR Video output ports on the remote control. If connected to COMPONENT IN 2 input, select Component 2 input source. 5 Refer to the component input ports as shown below. EXTERNAL EQUIPMENT SETUP 1 2 Y PB PR L R Component ...
tions. Component ports on the TV Y PB PR Video output ports on the remote control. If connected to COMPONENT IN 2 input, select Component 2 input source. 5 Refer to the component input ports as shown below. EXTERNAL EQUIPMENT SETUP 1 2 Y PB PR L R Component ...
Owner's Manual (English)
Page 20
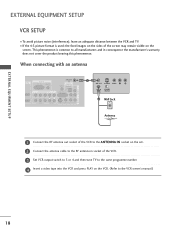
...18 When connecting with an antenna HDMI/DVI IN 2 1 (DVI) RGB IN RGB (PC) AUDIO (RGB/DVI) COMPONENT IN ANTENNA IN REMOTE CONTROL IN DIGITAL AUDIO OUT OPTICAL VIDEO RS-232C IN (CONTROL & SERVICE) AUDIO VIDEO AUDIO S-VIDEO VIDEO (MONO) AUDIO AV IN 1 AV OUT 1 ANT OUT S-VIDEO VIDEO L R ANT IN... OUTPUT SWITCH 2 Wall Jack HDMI/DVI IN 2 1 (DVI) Antenna 1 Connect the RF antenna out socket of the VCR. 3 Set VCR output switch to 3 or 4 and then tune TV to...
...18 When connecting with an antenna HDMI/DVI IN 2 1 (DVI) RGB IN RGB (PC) AUDIO (RGB/DVI) COMPONENT IN ANTENNA IN REMOTE CONTROL IN DIGITAL AUDIO OUT OPTICAL VIDEO RS-232C IN (CONTROL & SERVICE) AUDIO VIDEO AUDIO S-VIDEO VIDEO (MONO) AUDIO AV IN 1 AV OUT 1 ANT OUT S-VIDEO VIDEO L R ANT IN... OUTPUT SWITCH 2 Wall Jack HDMI/DVI IN 2 1 (DVI) Antenna 1 Connect the RF antenna out socket of the VCR. 3 Set VCR output switch to 3 or 4 and then tune TV to...
Owner's Manual (English)
Page 21
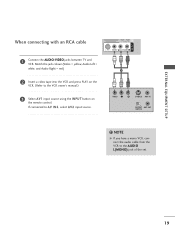
... (MONO) AUDIO 1 Connect the AUDIO/VIDEO jacks between TV and VCR. Match the jack colours(Video = yellow, Audio Left = white, and Audio Right = red) 1 2 Insert a video tape into the VCR and press PLAY on the VCR. (Refer to the VCR owner's manual.) 3 Select A V 1 input source using the INPUT button on the remote control.
... (MONO) AUDIO 1 Connect the AUDIO/VIDEO jacks between TV and VCR. Match the jack colours(Video = yellow, Audio Left = white, and Audio Right = red) 1 2 Insert a video tape into the VCR and press PLAY on the VCR. (Refer to the VCR owner's manual.) 3 Select A V 1 input source using the INPUT button on the remote control.
Owner's Manual (English)
Page 23
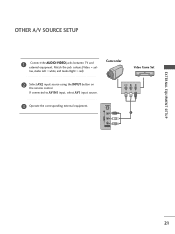
VIDEO L R 3 Operate the corresponding external equipment. S-VIDEO 1 VIDEO L/MONO AUDIO R AV IN 2 21 If connected to AV IN1 input, select AV1 input source. EXTERNAL EQUIPMENT SETUP OTHER A/V SOURCE SETUP 1 Connect the AUDIO/VIDEO jacks between TV and external equipment. Match the jack colours.(Video = yel- low, Audio Left = white, and Audio Right = red) Camcorder Video Game Set 2 Select AV2 input source using the INPUT button on the remote control.
VIDEO L R 3 Operate the corresponding external equipment. S-VIDEO 1 VIDEO L/MONO AUDIO R AV IN 2 21 If connected to AV IN1 input, select AV1 input source. EXTERNAL EQUIPMENT SETUP OTHER A/V SOURCE SETUP 1 Connect the AUDIO/VIDEO jacks between TV and external equipment. Match the jack colours.(Video = yel- low, Audio Left = white, and Audio Right = red) Camcorder Video Game Set 2 Select AV2 input source using the INPUT button on the remote control.
Owner's Manual (English)
Page 24
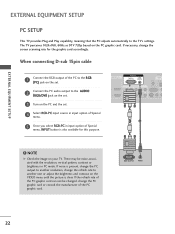
... your TV. NOTE G Check the image on the PC and the set. 4 Select RGB-PC input source in input option of Special menu. 5 Once you select RGB-PC in PC mode. HDMI/DVI IN 2 (DVI) RGB IN RGB (PC) AUDIO (RGB/DVI) COMPONENT IN ANTEN IN REMOTE CONTROL IN ...DIGITAL AUDIO OUT OPTICA RS-232C IN (CONTROL & SERVICE) VIDEO AUDIO S-VIDEO VIDEO (MON 1 2 ! EXTERNAL EQUIPMENT SETUP EXTERNAL EQUIPMENT SETUP PC SETUP This TV provides Plug and Play capability, meaning that the PC adjusts automatically to the RGB...
... your TV. NOTE G Check the image on the PC and the set. 4 Select RGB-PC input source in input option of Special menu. 5 Once you select RGB-PC in PC mode. HDMI/DVI IN 2 (DVI) RGB IN RGB (PC) AUDIO (RGB/DVI) COMPONENT IN ANTEN IN REMOTE CONTROL IN ...DIGITAL AUDIO OUT OPTICA RS-232C IN (CONTROL & SERVICE) VIDEO AUDIO S-VIDEO VIDEO (MON 1 2 ! EXTERNAL EQUIPMENT SETUP EXTERNAL EQUIPMENT SETUP PC SETUP This TV provides Plug and Play capability, meaning that the PC adjusts automatically to the RGB...
Owner's Manual (English)
Page 29
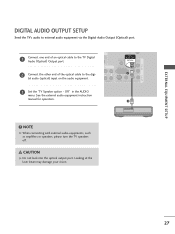
NOTE G When connecting with external audio equipments, such as amplifiers or speakers, please turn the TV speakers off. O DVI) COMPONENT IN 2 2 Connect the other end of an optical cable to the digi- CAUTION G Do not look into the optical output port....AV OUT AV IN 1 EXTERNAL EQUIPMENT SETUP DIGITAL AUDIO OUTPUT SETUP Send the TV's audio to external audio equipment via the Digital Audio Output (Optical) port. Off" in the AUDIO menu. VIDEO AUDIO IN REMOTE CONTROL IN DIGITAL AUDIO OUT OPTICAL VIDEO RS-232C IN (CONTROL & SERVICE) 1 AUDIO S-VIDEO VIDEO (MONO) AUDIO 3 Set the...
NOTE G When connecting with external audio equipments, such as amplifiers or speakers, please turn the TV speakers off. O DVI) COMPONENT IN 2 2 Connect the other end of an optical cable to the digi- CAUTION G Do not look into the optical output port....AV OUT AV IN 1 EXTERNAL EQUIPMENT SETUP DIGITAL AUDIO OUTPUT SETUP Send the TV's audio to external audio equipment via the Digital Audio Output (Optical) port. Off" in the AUDIO menu. VIDEO AUDIO IN REMOTE CONTROL IN DIGITAL AUDIO OUT OPTICAL VIDEO RS-232C IN (CONTROL & SERVICE) 1 AUDIO S-VIDEO VIDEO (MONO) AUDIO 3 Set the...

Owner's Manual (English)
Page 30
... and STANDBY. I /II TIME 28 SLEEP Sets the sleep timer. WATCHING TV/PROGRAMME CONTROL WATCHING TV/PROGRAMME CONTROL REMOTE CONTROL KEY FUNCTIONS When using the remote control, aim it at the screen G p. 46-47 BRIGHT Adjusts brightness on the TV. D/A INPUT Selects digital or analogue mode. (Digital TV / Analogue TV) INPUT External input modes rotate in a menu. When you toggle this...
... and STANDBY. I /II TIME 28 SLEEP Sets the sleep timer. WATCHING TV/PROGRAMME CONTROL WATCHING TV/PROGRAMME CONTROL REMOTE CONTROL KEY FUNCTIONS When using the remote control, aim it at the screen G p. 46-47 BRIGHT Adjusts brightness on the TV. D/A INPUT Selects digital or analogue mode. (Digital TV / Analogue TV) INPUT External input modes rotate in a menu. When you toggle this...
Owner's Manual (English)
Page 31
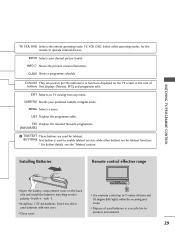
...subtitle in the case of used batteries with -). I Use a remote control up to 7 meters distance and 30 degree (left/right) within the receiving unit scope. INPUT D/A INPUT POWER SIMPLINK BRIGHT MODE TV VCR DVD RATIO TEXT INFO GUIDE I Install two 1.5V AA batteries...batteries in a recycle bin to operate external devices. SUBTITLE Recalls your desired picture format. Installing Batteries Remote control effective range R I Open the battery compartment cover on the TV screen in digital mode. I Dispose of buttons Text displays (Teletext, EPG) and programme edit. ...
...subtitle in the case of used batteries with -). I Use a remote control up to 7 meters distance and 30 degree (left/right) within the receiving unit scope. INPUT D/A INPUT POWER SIMPLINK BRIGHT MODE TV VCR DVD RATIO TEXT INFO GUIDE I Install two 1.5V AA batteries...batteries in a recycle bin to operate external devices. SUBTITLE Recalls your desired picture format. Installing Batteries Remote control effective range R I Open the battery compartment cover on the TV screen in digital mode. I Dispose of buttons Text displays (Teletext, EPG) and programme edit. ...
Owner's Manual (English)
Page 32
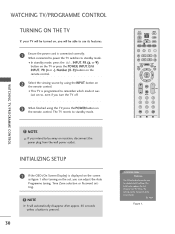
... pressed. 30 Installation Guide Welcome The Following process guides you to be away on the remote control. NOTE G If you turn the TV off. 3 When finished using the INPUT button on the remote control. This initial setup appears the first time you intend to complete initial settings. Next Figure... In standby mode, press the , INPUT, PR (D or E) button on the TV or press the POWER, INPUT, D/A INPUT, PR (+ or -), Number (0~9) button on the remote control. 2 Select the viewing source by using the TV, press the POWER button on vacation, disconnect the power plug from the wall power ...
... pressed. 30 Installation Guide Welcome The Following process guides you to be away on the remote control. NOTE G If you turn the TV off. 3 When finished using the INPUT button on the remote control. This initial setup appears the first time you intend to complete initial settings. Next Figure... In standby mode, press the , INPUT, PR (D or E) button on the TV or press the POWER, INPUT, D/A INPUT, PR (+ or -), Number (0~9) button on the remote control. 2 Select the viewing source by using the TV, press the POWER button on vacation, disconnect the power plug from the wall power ...
Owner's Manual (English)
Page 35
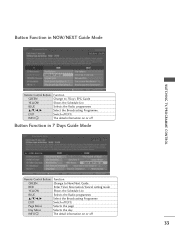
... NOW/NEXT Guide Mode WATCHING TV/PROGRAMME CONTROL Remote Control Buttons Function GREEN Change to 7Day's EPG Guide YELLOW Shows the Schedule List BLUE Selects the Radio programmes D/E/F/G Select the Broadcasting Programme EXIT Switch off EPG INFO i The detail information on or off Button Function in 7 Days Guide Mode Remote Control Buttons Function GREEN Change to...
... NOW/NEXT Guide Mode WATCHING TV/PROGRAMME CONTROL Remote Control Buttons Function GREEN Change to 7Day's EPG Guide YELLOW Shows the Schedule List BLUE Selects the Radio programmes D/E/F/G Select the Broadcasting Programme EXIT Switch off EPG INFO i The detail information on or off Button Function in 7 Days Guide Mode Remote Control Buttons Function GREEN Change to...
Owner's Manual (English)
Page 36
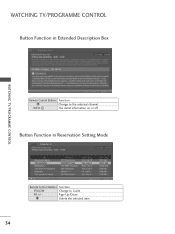
WATCHING TV/PROGRAMME CONTROL Button Function in Extended Description Box Digital Remote Control Buttons Function Change to the selected channel INFO i The detail information on or off Button Function in Reservation Setting Mode Schedule List WATCHING TV/PROGRAMME CONTROL Remote Control Buttons Function YELLOW Change to Guide PR +/ - Page Up/Down Delete the selected item 34
WATCHING TV/PROGRAMME CONTROL Button Function in Extended Description Box Digital Remote Control Buttons Function Change to the selected channel INFO i The detail information on or off Button Function in Reservation Setting Mode Schedule List WATCHING TV/PROGRAMME CONTROL Remote Control Buttons Function YELLOW Change to Guide PR +/ - Page Up/Down Delete the selected item 34
Owner's Manual (English)
Page 38
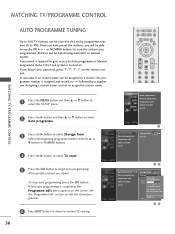
... ID Storage from . Once you have preset the stations, you will be updated. 26 % 5 channels found Press (OK) to start G Processing Auto programme... WATCHING TV/PROGRAMME CONTROL 1 Press the MENU button and then D or E button to select the SETUP ...TV stations can be stored in this set by a number see 'Assigning a station name' section to assign the station name. A password is required to gain access to scan the stations you forgot your password, press '7', '7', '7', '7' on the screen. When auto programming is completed, the Programme edit menu appears on the remote control...
... ID Storage from . Once you have preset the stations, you will be updated. 26 % 5 channels found Press (OK) to start G Processing Auto programme... WATCHING TV/PROGRAMME CONTROL 1 Press the MENU button and then D or E button to select the SETUP ...TV stations can be stored in this set by a number see 'Assigning a station name' section to assign the station name. A password is required to gain access to scan the stations you forgot your password, press '7', '7', '7', '7' on the screen. When auto programming is completed, the Programme edit menu appears on the remote control...
Owner's Manual (English)
Page 47
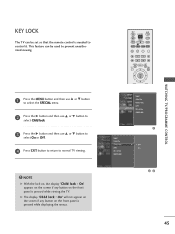
... on, the display 'Child lock : On' appears on the screen if any button on the front panel is needed to normal TV viewing. ! WATCHING TV/PROGRAMME CONTROL INPUT D/A INPUT POWER SIMPLINK BRIGHT MODE TV VCR DVD ! G The display 'Child lock : On' will not appear on the screen if any button on the front panel... use D or E button to select Child lock. 3 Press the G button and then use D or E button to select On or O f f. 4 Press EXIT button to return to control it. KEY LOCK POWER The TV can be set so that the remote control is pressed while viewing the...
... on, the display 'Child lock : On' appears on the screen if any button on the front panel is needed to normal TV viewing. ! WATCHING TV/PROGRAMME CONTROL INPUT D/A INPUT POWER SIMPLINK BRIGHT MODE TV VCR DVD ! G The display 'Child lock : On' will not appear on the screen if any button on the front panel... use D or E button to select Child lock. 3 Press the G button and then use D or E button to select On or O f f. 4 Press EXIT button to return to control it. KEY LOCK POWER The TV can be set so that the remote control is pressed while viewing the...
Owner's Manual (English)
Page 49
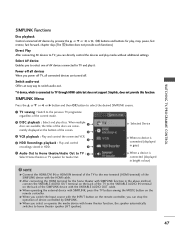
... the VARIABLE AUDIO OUT cable. When multiple 1 discs are available, the titles of the SIMPLINK device with SIMPLINK, press the TV button among the MODE button on the remote controller. G When a device is connected to the rear terminal (HDMI terminal) of the discs are turned off. G When operating... method, connect the VARIABLE AUDIO OUT terminal on the back of the TV to the VARIABLE AUDIO IN terminal on the remote controller, you can directly control the devices and play it. G When you power off TV, all connected devices are conveniently displayed at the bottom of the SIMPLINK ...
... the VARIABLE AUDIO OUT cable. When multiple 1 discs are available, the titles of the SIMPLINK device with SIMPLINK, press the TV button among the MODE button on the remote controller. G When a device is connected to the rear terminal (HDMI terminal) of the discs are turned off. G When operating... method, connect the VARIABLE AUDIO OUT terminal on the back of the TV to the VARIABLE AUDIO IN terminal on the remote controller, you can directly control the devices and play it. G When you power off TV, all connected devices are conveniently displayed at the bottom of the SIMPLINK ...
Owner's Manual (English)
Page 54
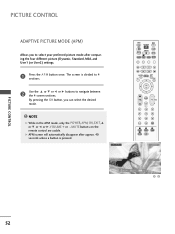
NOTE G While in the APM mode, only the POWER, APM, OK, EXIT, D or E or F or G, VOLUME + or -, MUTE buttons on the remote control are usable. RATIO TEXT INFO GUIDE SUBTITLE MENU LIST EXIT FAV OK VOL Q.VIEW PR PAGE MUTE 1 2 3 4 5 6 7 8 9 APM 0 SLEEP SIZE ? G APM screen will automatically ... 4 sections. 2 Use the D or E or F or G buttons to navigate between the 4 screen sections. The screen is pressed. Dynamic INPUT D/A INPUT POWER SIMPLINK BRIGHT MODE TV VCR DVD ! PICTURE CONTROL ADAPTIVE PICTURE MODE (APM) Allows you can select the desired mode. !
NOTE G While in the APM mode, only the POWER, APM, OK, EXIT, D or E or F or G, VOLUME + or -, MUTE buttons on the remote control are usable. RATIO TEXT INFO GUIDE SUBTITLE MENU LIST EXIT FAV OK VOL Q.VIEW PR PAGE MUTE 1 2 3 4 5 6 7 8 9 APM 0 SLEEP SIZE ? G APM screen will automatically ... 4 sections. 2 Use the D or E or F or G buttons to navigate between the 4 screen sections. The screen is pressed. Dynamic INPUT D/A INPUT POWER SIMPLINK BRIGHT MODE TV VCR DVD ! PICTURE CONTROL ADAPTIVE PICTURE MODE (APM) Allows you can select the desired mode. !


