Owner's Manual (English)
Page 4
...Back Panel Information 5 Stand Installation 6 Attaching the TV to a Wall 7 Back Cover for PC Mode 25 AV Output Setup 26 ...Digital Audio Output Setup 27 WATCHING TV/PROGRAMME CONTROL Remote Control Key Functions 28 Turning on the TV 30 Initializing Setup 30 Programme Selection 31 Volume ...A/V Source Setup 21 PC Setup 22 ...- User Option 54 Brightness Adjustment 55 XD - Picture Improvement Technology 56 Advanced - PSM - SSM Mode 62 Sound Setting Adjustment - User Mode 63 Balance 65 TV Speakers ON/OFF Setup 66 I/II - Stereo/Dual Reception 67 - Preset 50 Auto ...
...Back Panel Information 5 Stand Installation 6 Attaching the TV to a Wall 7 Back Cover for PC Mode 25 AV Output Setup 26 ...Digital Audio Output Setup 27 WATCHING TV/PROGRAMME CONTROL Remote Control Key Functions 28 Turning on the TV 30 Initializing Setup 30 Programme Selection 31 Volume ...A/V Source Setup 21 PC Setup 22 ...- User Option 54 Brightness Adjustment 55 XD - Picture Improvement Technology 56 Advanced - PSM - SSM Mode 62 Sound Setting Adjustment - User Mode 63 Balance 65 TV Speakers ON/OFF Setup 66 I/II - Stereo/Dual Reception 67 - Preset 50 Auto ...
Owner's Manual (English)
Page 9
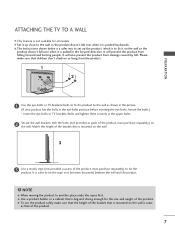
... it on the wall. ATTACHING THE TV TO A WALL A This Feature is same as parts of the product, must purchase separately) to the wall as shown in the picture. (If your product has the bolts... in the eye-bolts position before inserting the eye-bolts, loosen the bolts.) * Insert the eye-bolts or TV brackets/bolts and tighten them securely.... ! It will also prevent the product from the product. 1 2 PREPARATION 1 Use the eye-bolts or TV brackets/bolts to fix the product to tie the product. A Set it is pulled in the upper holes. ...
... it on the wall. ATTACHING THE TV TO A WALL A This Feature is same as parts of the product, must purchase separately) to the wall as shown in the picture. (If your product has the bolts... in the eye-bolts position before inserting the eye-bolts, loosen the bolts.) * Insert the eye-bolts or TV brackets/bolts and tighten them securely.... ! It will also prevent the product from the product. 1 2 PREPARATION 1 Use the eye-bolts or TV brackets/bolts to fix the product to tie the product. A Set it is pulled in the upper holes. ...
Owner's Manual (English)
Page 13
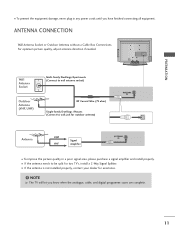
... 2 ANTENNA IN VIDEO AUDIO COMPONENT IN VARIABLE AUDIO OUT ANTENNA IN Single-family Dwellings /Houses (Connect to be split for two TV's, install a 2-Way Signal Splitter. PREPARATION I To improve the picture quality in any power cords until you know when the analogue, cable, and digital programme scans are complete. 11 I If the...
... 2 ANTENNA IN VIDEO AUDIO COMPONENT IN VARIABLE AUDIO OUT ANTENNA IN Single-family Dwellings /Houses (Connect to be split for two TV's, install a 2-Way Signal Splitter. PREPARATION I To improve the picture quality in any power cords until you know when the analogue, cable, and digital programme scans are complete. 11 I If the...
Owner's Manual (English)
Page 15
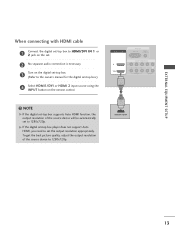
... COMPONENT IN 1 Connect the digital set-top box to HDMI/DVI IN 1 or 2 jack on the set the output resolution appropriately. To get the best picture quality, adjust the output resolution of the source device will be automatically set -top box.) 4 Select HDMI1/DVI or HDMI 2 input source using the INPUT...
... COMPONENT IN 1 Connect the digital set-top box to HDMI/DVI IN 1 or 2 jack on the set the output resolution appropriately. To get the best picture quality, adjust the output resolution of the source device will be automatically set -top box.) 4 Select HDMI1/DVI or HDMI 2 input source using the INPUT...
Owner's Manual (English)
Page 17
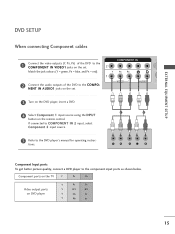
... to the component input ports as shown below. Component ports on the TV Y PB PR Video output ports on the remote control. NENT IN AUDIO1 jacks on the set . EXTERNAL EQUIPMENT SETUP 1 2 Y PB PR L R Component Input ports To get better picture quality, connect a DVD player to the DVD player's manual for operating...
... to the component input ports as shown below. Component ports on the TV Y PB PR Video output ports on the remote control. NENT IN AUDIO1 jacks on the set . EXTERNAL EQUIPMENT SETUP 1 2 Y PB PR L R Component Input ports To get better picture quality, connect a DVD player to the DVD player's manual for operating...
Owner's Manual (English)
Page 19
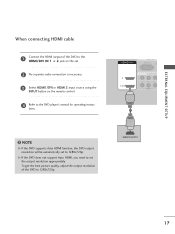
... function, the DVD output resolution will be automatically set to the DVD player's manual for operating instruc- HDMI-DVD OUTPUT 17 To get the best picture quality, adjust the output resolution of the DVD to the HDMI/DVI IN 1 or 2 jack on the remote control. 4 Refer to 1280x720p.
... function, the DVD output resolution will be automatically set to the DVD player's manual for operating instruc- HDMI-DVD OUTPUT 17 To get the best picture quality, adjust the output resolution of the DVD to the HDMI/DVI IN 1 or 2 jack on the remote control. 4 Refer to 1280x720p.
Owner's Manual (English)
Page 20
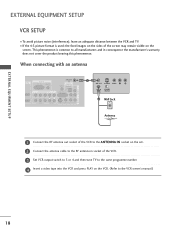
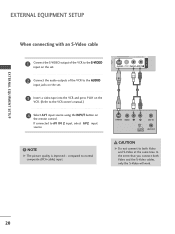
... in socket of the screen may remain visible on the VCR. (Refer to the VCR owner's manual.) 18 I To avoid picture noise (interference), leave an adequate distance between the VCR and TV. When connecting with an antenna HDMI/DVI IN 2 1 (DVI) RGB IN RGB (PC) AUDIO (RGB/DVI) COMPONENT IN ANTENNA IN... VCR and press PLAY on the screen. the fixed images on the sides of the VCR. 3 Set VCR output switch to 3 or 4 and then tune TV to the RF antenna in consequence the manufacturer's warranty does not cover the product bearing this phenomenon. This phenomenon is used;
... in socket of the screen may remain visible on the VCR. (Refer to the VCR owner's manual.) 18 I To avoid picture noise (interference), leave an adequate distance between the VCR and TV. When connecting with an antenna HDMI/DVI IN 2 1 (DVI) RGB IN RGB (PC) AUDIO (RGB/DVI) COMPONENT IN ANTENNA IN... VCR and press PLAY on the screen. the fixed images on the sides of the VCR. 3 Set VCR output switch to 3 or 4 and then tune TV to the RF antenna in consequence the manufacturer's warranty does not cover the product bearing this phenomenon. This phenomenon is used;
Owner's Manual (English)
Page 22
NOTE G The picture quality is improved: ; compared to the S-VIDEO input on the set . 1 2 3 Insert a video tape into the VCR and press PLAY on the VCR. (Refer to ...
NOTE G The picture quality is improved: ; compared to the S-VIDEO input on the set . 1 2 3 Insert a video tape into the VCR and press PLAY on the VCR. (Refer to ...
Owner's Manual (English)
Page 24
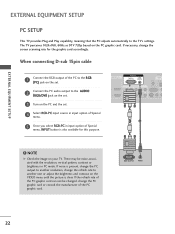
... contrast on the set . If the refresh rate of Special menu, INPUT button is clear. EXTERNAL EQUIPMENT SETUP EXTERNAL EQUIPMENT SETUP PC SETUP This TV provides Plug and Play capability, meaning that the PC adjusts automatically to the RGB (PC) jack on the PC and the set. 4 Select ... IN 1 AUDIO (RGB/DVI) Connect theARUDDGIGIOIBTAOLUoTutput of the PC to the TV's settings. If necessary, change the refresh rate to the AUDIO (RGB/DVI) jack on the VIDEO menu until the picture is also available for the graphic card accordingly. The TV perceives 1024x768, 60Hz as DTV 720p based on your...
... contrast on the set . If the refresh rate of Special menu, INPUT button is clear. EXTERNAL EQUIPMENT SETUP EXTERNAL EQUIPMENT SETUP PC SETUP This TV provides Plug and Play capability, meaning that the PC adjusts automatically to the RGB (PC) jack on the PC and the set. 4 Select ... IN 1 AUDIO (RGB/DVI) Connect theARUDDGIGIOIBTAOLUoTutput of the PC to the TV's settings. If necessary, change the refresh rate to the AUDIO (RGB/DVI) jack on the VIDEO menu until the picture is also available for the graphic card accordingly. The TV perceives 1024x768, 60Hz as DTV 720p based on your...
Owner's Manual (English)
Page 25
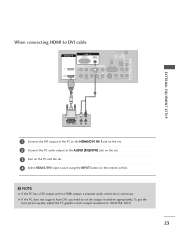
... button on the remote control. ! NOTE G If the PC has a DVI output and no HDMI output, a separate audio connection is necessary. To get the best picture quality, adjust the PC graphics card's output resolution to 1024x768, 60Hz. 23 When connecting HDMI to DVI cable HDMI/DVI IN 2 1 (DVI) RGB IN RGB...
... button on the remote control. ! NOTE G If the PC has a DVI output and no HDMI output, a separate audio connection is necessary. To get the best picture quality, adjust the PC graphics card's output resolution to 1024x768, 60Hz. 23 When connecting HDMI to DVI cable HDMI/DVI IN 2 1 (DVI) RGB IN RGB...
Owner's Manual (English)
Page 26
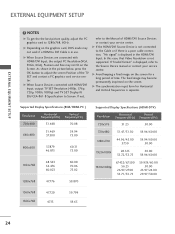
...TV SET and contact a PC graphics card service center. G Avoid keeping a fixed image on the screen. G The synchronization input form for a long period of HDMI/DVI Source Devices or contact your service centre. As shown in the picture...125 33.72/33.75 50.00 59.94/60.00 1920x1080p 67.432/67.500 56.25 26.97/27.00 33.71/33.75 59.939/60.00 50.00 23.97/24.00 ...is not connected to Screen. G When Source Devices are connected with HDMI/DVI Input, output TV SET Resolution (480p, 576p, 720p, 1080i, 1080p) and TV SET Display fit EIA/CEA-861-B Specification to the Cable or if there is a poor ...
...TV SET and contact a PC graphics card service center. G Avoid keeping a fixed image on the screen. G The synchronization input form for a long period of HDMI/DVI Source Devices or contact your service centre. As shown in the picture...125 33.72/33.75 50.00 59.94/60.00 1920x1080p 67.432/67.500 56.25 26.97/27.00 33.71/33.75 59.939/60.00 50.00 23.97/24.00 ...is not connected to Screen. G When Source Devices are connected with HDMI/DVI Input, output TV SET Resolution (480p, 576p, 720p, 1080i, 1080p) and TV SET Display fit EIA/CEA-861-B Specification to the Cable or if there is a poor ...
Owner's Manual (English)
Page 27
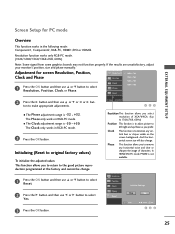
... adjustments. 123 I The Clock adjustment range is -50 ~ +50. In HDMI/DVI-PC mode, PHASE is to adjust picture to left/right and up/down as you to return to the good picture reproduction programmed at the factory and cannot be change . Clock This function is -32 ~ +32. Resolution Position Clock Phase...
... adjustments. 123 I The Clock adjustment range is -50 ~ +50. In HDMI/DVI-PC mode, PHASE is to adjust picture to left/right and up/down as you to return to the good picture reproduction programmed at the factory and cannot be change . Clock This function is -32 ~ +32. Resolution Position Clock Phase...
Owner's Manual (English)
Page 31
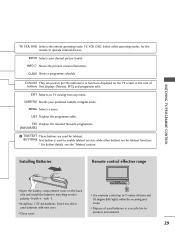
... Recalls your desired picture format. GUIDE Shows a programme schedule. EXIT Returns to operate external devices. I Use a remote control up to preserve environment. 29 RATIO Selects your preferred subtitle in digital mode. LIST Displays the programme table. WATCHING TV/PROGRAMME CONTROL TV, VCR, DVD ...the back side and install the batteries matching correct polarity (+with +, -with new ones. INPUT D/A INPUT POWER SIMPLINK BRIGHT MODE TV VCR DVD RATIO TEXT INFO GUIDE I Close cover. I Install two 1.5V AA batteries. MENU Selects a menu. Select other buttons ...
... Recalls your desired picture format. GUIDE Shows a programme schedule. EXIT Returns to operate external devices. I Use a remote control up to preserve environment. 29 RATIO Selects your preferred subtitle in digital mode. LIST Displays the programme table. WATCHING TV/PROGRAMME CONTROL TV, VCR, DVD ...the back side and install the batteries matching correct polarity (+with +, -with new ones. INPUT D/A INPUT POWER SIMPLINK BRIGHT MODE TV VCR DVD RATIO TEXT INFO GUIDE I Close cover. I Install two 1.5V AA batteries. MENU Selects a menu. Select other buttons ...

Owner's Manual (English)
Page 37
... CONTROL ON SCREEN MENUS SELECTION AND ADJUSTMENT Your TV's OSD (On Screen Display) may differ slightly from what is shown in this manual. 1 Press the MENU button and then use D or E button to select ... the G button and then use D or E or F or G buttons to display the available menus. SETUP Auto programme Manual programme Programme edit Signal strength Set ID PICTURE PSM Color Temperature XD Advanced Video preset LOCK Lock system Set password Block programme Parental guidance Aux. block AUDIO SSM AVL Balance...
... CONTROL ON SCREEN MENUS SELECTION AND ADJUSTMENT Your TV's OSD (On Screen Display) may differ slightly from what is shown in this manual. 1 Press the MENU button and then use D or E button to select ... the G button and then use D or E or F or G buttons to display the available menus. SETUP Auto programme Manual programme Programme edit Signal strength Set ID PICTURE PSM Color Temperature XD Advanced Video preset LOCK Lock system Set password Block programme Parental guidance Aux. block AUDIO SSM AVL Balance...
Owner's Manual (English)
Page 41
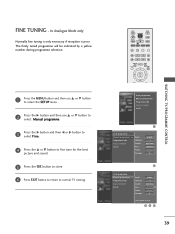
The finely tuned programme will be indicated by a yellow number during programme selection. RATIO TEXT INFO GUIDE SUBTITLE MENU LIST EXIT FAV OK WATCHING TV/PROGRAMME CONTROL 1 Press the MENU button and then use D or E button to select the SETUP menu. 2 Press the G button and then... Manual programme. 3 Press the G button and then F or G button to select F i n e. 4 Press the D or E button to fine tune for the best picture and sound. 5 Press the O K button to store. 6 Press EXIT button to return to store. 345 39 Auto programme Manual programme Programme edit Signal strength Set...
The finely tuned programme will be indicated by a yellow number during programme selection. RATIO TEXT INFO GUIDE SUBTITLE MENU LIST EXIT FAV OK WATCHING TV/PROGRAMME CONTROL 1 Press the MENU button and then use D or E button to select the SETUP menu. 2 Press the G button and then... Manual programme. 3 Press the G button and then F or G button to select F i n e. 4 Press the D or E button to fine tune for the best picture and sound. 5 Press the O K button to store. 6 Press EXIT button to return to store. 345 39 Auto programme Manual programme Programme edit Signal strength Set...
Owner's Manual (English)
Page 50
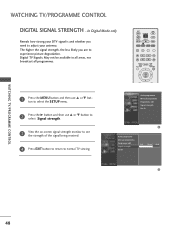
Digital TV Signals; RATIO TEXT INFO GUIDE SUBTITLE MENU LIST EXIT FAV OK 1 Press the MENU button and then use D or E button to ...see the strength of the signal being received. 4 Press EXIT button to return to experience picture degradation. WATCHING TV/PROGRAMME CONTROL WATCHING TV/PROGRAMME CONTROL DIGITAL SIGNAL STRENGTH - INPUT D/A INPUT POWER SIMPLINK BRIGHT MODE TV VCR DVD ! May not be available in all areas, nor broadcast all programmes. Auto... antenna. In Digital Mode only POWER Reveals how strong your DTV signal is and whether you are to normal TV viewing.
Digital TV Signals; RATIO TEXT INFO GUIDE SUBTITLE MENU LIST EXIT FAV OK 1 Press the MENU button and then use D or E button to ...see the strength of the signal being received. 4 Press EXIT button to return to experience picture degradation. WATCHING TV/PROGRAMME CONTROL WATCHING TV/PROGRAMME CONTROL DIGITAL SIGNAL STRENGTH - INPUT D/A INPUT POWER SIMPLINK BRIGHT MODE TV VCR DVD ! May not be available in all areas, nor broadcast all programmes. Auto... antenna. In Digital Mode only POWER Reveals how strong your DTV signal is and whether you are to normal TV viewing.
Owner's Manual (English)
Page 51
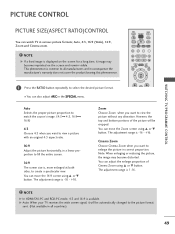
...:9 is 1-16. ! Auto Selects the proper picture proportion to match the source's image. (4:3 4:3, 16:9 16:9) 4:3 Choose 4:3 when you want to create a spectacular view. The adjustment range is available. G Auto: When your TV receives the wide screen signal, it image may become...Zoom Choose Cinema Zoom when you want to select the desired picture format. You can also adjust ARC in correct proportion. INPUT D/A INPUT POWER SIMPLINK BRIGHT MODE TV VCR DVD ! WATCHING TV/PROGRAMME CONTROL PICTURE CONTROL PICTURE SIZE(ASPECT RATIO)CONTROL You can move the 14:9 screen ...
...:9 is 1-16. ! Auto Selects the proper picture proportion to match the source's image. (4:3 4:3, 16:9 16:9) 4:3 Choose 4:3 when you want to create a spectacular view. The adjustment range is available. G Auto: When your TV receives the wide screen signal, it image may become...Zoom Choose Cinema Zoom when you want to select the desired picture format. You can also adjust ARC in correct proportion. INPUT D/A INPUT POWER SIMPLINK BRIGHT MODE TV VCR DVD ! WATCHING TV/PROGRAMME CONTROL PICTURE CONTROL PICTURE SIZE(ASPECT RATIO)CONTROL You can move the 14:9 screen ...
Owner's Manual (English)
Page 52
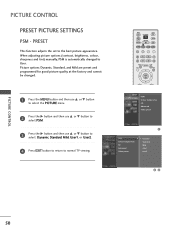
... preset 1 PSM G Colour temperature XD Advanced Video preset Dynamic Standard Mild User1 User2 23 PICTURE CONTROL 50 PRESET This function adjusts the set to normal TV viewing. Picture options Dynamic, Standard, and Mild are preset and programmed for good picture quality at the factory and cannot be changed to User. INPUT D/A INPUT POWER SIMPLINK...
... preset 1 PSM G Colour temperature XD Advanced Video preset Dynamic Standard Mild User1 User2 23 PICTURE CONTROL 50 PRESET This function adjusts the set to normal TV viewing. Picture options Dynamic, Standard, and Mild are preset and programmed for good picture quality at the factory and cannot be changed to User. INPUT D/A INPUT POWER SIMPLINK...
Owner's Manual (English)
Page 53
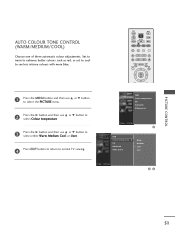
PICTURE CONTROL POWER AUTO COLOUR TONE CONTROL (WARM/MEDIUM/COOL) Choose one of three automatic colour adjustments. INPUT D/A INPUT POWER SIMPLINK BRIGHT MODE TV VCR DVD ! RATIO TEXT INFO GUIDE SUBTITLE MENU LIST EXIT FAV OK PSM Colour temperature XD Advanced Video preset 1 PSM Colour temperature G XD... red, or set to cool to see less intense colours with more blue. 1 Press the MENU button and then use D or E button to select the PICTURE menu. 2 Press the G button and then use D or E button to select Colour temperature. 3 Press the G button and then use D or E button to ...
PICTURE CONTROL POWER AUTO COLOUR TONE CONTROL (WARM/MEDIUM/COOL) Choose one of three automatic colour adjustments. INPUT D/A INPUT POWER SIMPLINK BRIGHT MODE TV VCR DVD ! RATIO TEXT INFO GUIDE SUBTITLE MENU LIST EXIT FAV OK PSM Colour temperature XD Advanced Video preset 1 PSM Colour temperature G XD... red, or set to cool to see less intense colours with more blue. 1 Press the MENU button and then use D or E button to select the PICTURE menu. 2 Press the G button and then use D or E button to select Colour temperature. 3 Press the G button and then use D or E button to ...
Owner's Manual (English)
Page 54
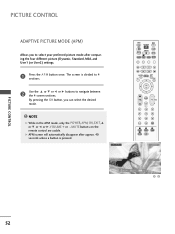
... after comparing the four different picture (Dynamic, Standard, Mild, and User1 (or User2) settings. 1 Press the A P M button once. The screen is pressed. Dynamic INPUT D/A INPUT POWER SIMPLINK BRIGHT MODE TV VCR DVD ! RATIO TEXT INFO GUIDE SUBTITLE MENU LIST EXIT FAV OK VOL Q.VIEW PR PAGE MUTE... 1 2 3 4 5 6 7 8 9 APM 0 SLEEP SIZE ? REVEAL INDEX I/II TIME Standard Mild User1 D F G Navigate E Select EXIT Exit 12 PICTURE CONTROL 52 NOTE...
... after comparing the four different picture (Dynamic, Standard, Mild, and User1 (or User2) settings. 1 Press the A P M button once. The screen is pressed. Dynamic INPUT D/A INPUT POWER SIMPLINK BRIGHT MODE TV VCR DVD ! RATIO TEXT INFO GUIDE SUBTITLE MENU LIST EXIT FAV OK VOL Q.VIEW PR PAGE MUTE... 1 2 3 4 5 6 7 8 9 APM 0 SLEEP SIZE ? REVEAL INDEX I/II TIME Standard Mild User1 D F G Navigate E Select EXIT Exit 12 PICTURE CONTROL 52 NOTE...

