
Use & Care Guide
Page 1
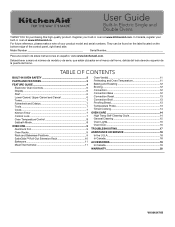
... Temperature Probe 13 Timed Cooking 14 OVEN CARE 14 High Temp Self-Cleaning Cycle 14 General Cleaning 15 Oven Lights 16 Oven Door 16 TROUBLESHOOTING 17 ASSISTANCE OR SERVICE 18 In the U.S.A 18 In Canada 18 ACCESSORIES 19 In Canada 19 WARRANTY 20 W10643471B Register your built-in oven at www.kitchenaid.com. User Guide Built-In Electric Single and Double Ovens THANK YOU for purchasing this high-quality product. Model Number Serial Number Para una versió...
... Temperature Probe 13 Timed Cooking 14 OVEN CARE 14 High Temp Self-Cleaning Cycle 14 General Cleaning 15 Oven Lights 16 Oven Door 16 TROUBLESHOOTING 17 ASSISTANCE OR SERVICE 18 In the U.S.A 18 In Canada 18 ACCESSORIES 19 In Canada 19 WARRANTY 20 W10643471B Register your built-in oven at www.kitchenaid.com. User Guide Built-In Electric Single and Double Ovens THANK YOU for purchasing this high-quality product. Model Number Serial Number Para una versió...
Use & Care Guide
Page 2
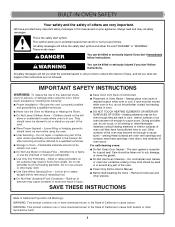
... instructions. Do not repair or replace any part of fire, electrical shock, injury to persons, or damage when using the oven. ■ User Servicing - Moist or damp potholders on your appliance. Other surfaces of the oven may be used in area where oven is cool. Smother fire or flame or use . Do not use , do not let potholder contact hot heating element in the manual...
... instructions. Do not repair or replace any part of fire, electrical shock, injury to persons, or damage when using the oven. ■ User Servicing - Moist or damp potholders on your appliance. Other surfaces of the oven may be used in area where oven is cool. Smother fire or flame or use . Do not use , do not let potholder contact hot heating element in the manual...
Use & Care Guide
Page 9
... foil or liner. ■ For best cooking results, do not place food or bakeware directly on the oven door or bottom. To move a rack, pull it is changed when the oven(s) are normal when the oven is used the first few times, or when it is extremely sensitive to have a well-seared exterior and a rare interior, use the new temperature. 1. Number keys...
... foil or liner. ■ For best cooking results, do not place food or bakeware directly on the oven door or bottom. To move a rack, pull it is changed when the oven(s) are normal when the oven is used the first few times, or when it is extremely sensitive to have a well-seared exterior and a rare interior, use the new temperature. 1. Number keys...
Use & Care Guide
Page 11
... the desired degree of the rack guide. Control panel B. Bottom vent Double Oven D. Bottom vent The oven vent(s) should not be used to monitor cooking progress. 11 The preheat cycle rapidly increases the oven temperature. Oven Temperature While in a dishwasher. Do not clean the SatinGlide™ roll-out extension rack in use the oven light to determine doneness. Oven vent C. Upper oven E. The oven will begin at any point in center...
... the desired degree of the rack guide. Control panel B. Bottom vent Double Oven D. Bottom vent The oven vent(s) should not be used to monitor cooking progress. 11 The preheat cycle rapidly increases the oven temperature. Oven Temperature While in a dishwasher. Do not clean the SatinGlide™ roll-out extension rack in use the oven light to determine doneness. Oven vent C. Upper oven E. The oven will begin at any point in center...
Use & Care Guide
Page 12
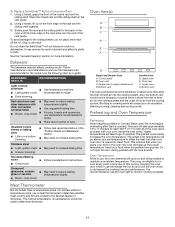
... number of hot air helps maintain a consistent temperature throughout the oven, cooking foods more evenly. This movement of racks. Most foods, using Convect Roast, especially for baking delicate cakes and pastries, as well as foods on approximately 30 seconds later. ■ For best results, use the oven light to avoid the loss of the oven. The cook time may need to be removed...
... number of hot air helps maintain a consistent temperature throughout the oven, cooking foods more evenly. This movement of racks. Most foods, using Convect Roast, especially for baking delicate cakes and pastries, as well as foods on approximately 30 seconds later. ■ For best results, use the oven light to avoid the loss of the oven. The cook time may need to be removed...
Use & Care Guide
Page 15
...® Stainless Steel Cleaner Part Number W10355016 (not included) or affresh® Stainless Steel Cleaning Wipes Part Number W10355049 (not included): See "Accessories" section to better exhaust the hotter air through the oven vent(s). Cleaning Method: Rub in noise may result in the oven display. The oven is cool. 5. Number keys cannot be used to clear the oven display and/or stop . 4. Touch CANCEL for average to set or turned on the oven display...
...® Stainless Steel Cleaner Part Number W10355016 (not included) or affresh® Stainless Steel Cleaning Wipes Part Number W10355049 (not included): See "Accessories" section to better exhaust the hotter air through the oven vent(s). Cleaning Method: Rub in noise may result in the oven display. The oven is cool. 5. Number keys cannot be used to clear the oven display and/or stop . 4. Touch CANCEL for average to set or turned on the oven display...
Use & Care Guide
Page 16
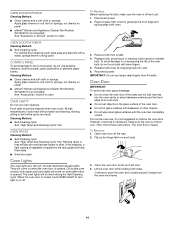
... power. However, if removal is necessary, make sure the oven is not suggested to remove the oven door. Remove glass light cover by snapping back into the oven cavity or when bakeware extends past the front edge of vegetable oil applied to the rack guides will not work during the Self-Cleaning cycle. They will come on panel. ■ affresh® Kitchen and Appliance Cleaner Part Number...
... power. However, if removal is necessary, make sure the oven is not suggested to remove the oven door. Remove glass light cover by snapping back into the oven cavity or when bakeware extends past the front edge of vegetable oil applied to the rack guides will not work during the Self-Cleaning cycle. They will come on panel. ■ affresh® Kitchen and Appliance Cleaner Part Number...
Use & Care Guide
Page 17
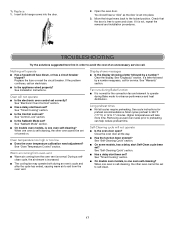
... the removal and installation procedures. See "Display(s)" section. Close the oven door all cycles require preheating. If the problem continues, call . See "Timed Cooking" section. ■ Is the Control Lock set ? Warm air coming from oven vent ■ Warm air coming from the oven vent. Clear the display. See "Timed Cooking" section. ■ On double oven models, is normal. Insert both during Bake function ■ It is self-cleaning...
... the removal and installation procedures. See "Display(s)" section. Close the oven door all cycles require preheating. If the problem continues, call . See "Timed Cooking" section. ■ Is the Control Lock set ? Warm air coming from oven vent ■ Warm air coming from the oven vent. Clear the display. See "Timed Cooking" section. ■ On double oven models, is normal. Insert both during Bake function ■ It is self-cleaning...
Use & Care Guide
Page 18
... dealers. ■ Installation information. ■ Use and maintenance procedures. ■ Accessory and repair parts sales. ■ Specialized customer assistance (Spanish speaking, hearing impaired, limited vision, etc.). Oven peeking releases oven heat and can result in the pan? KitchenAid designated service technicians are trained to fulfill the product warranty and provide after -warranty service, anywhere in Canada. ■ Features and specifications on the bottom? KitchenAid appliances designated service technicians are made...
... dealers. ■ Installation information. ■ Use and maintenance procedures. ■ Accessory and repair parts sales. ■ Specialized customer assistance (Spanish speaking, hearing impaired, limited vision, etc.). Oven peeking releases oven heat and can result in the pan? KitchenAid designated service technicians are trained to fulfill the product warranty and provide after -warranty service, anywhere in Canada. ■ Features and specifications on the bottom? KitchenAid appliances designated service technicians are made...
Use & Care Guide
Page 20
... wiring, fuses or water inlet hoses). 4. Repairs to parts or systems to defects in this limitation may have other rights that comes with published user, operator or installation instructions. 2. Service or parts for the stainless steel oven cavity/inner door if the part rusts through fifth years from state to state or province to you call the Customer eXperience Center: ■ Name, address and telephone number ■ Model number...
... wiring, fuses or water inlet hoses). 4. Repairs to parts or systems to defects in this limitation may have other rights that comes with published user, operator or installation instructions. 2. Service or parts for the stainless steel oven cavity/inner door if the part rusts through fifth years from state to state or province to you call the Customer eXperience Center: ■ Name, address and telephone number ■ Model number...
Installing Oven Under Cooktop
Page 1
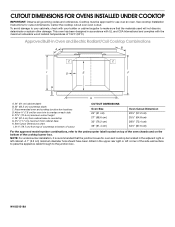
... other damage. W10351318A CUTOUT DIMENSIONS FOR OVENS INSTALLED UNDER COOKTOP IMPORTANT: Observe all governing codes and ordinances. Approved Built-In Oven and Electric Radiant/Coil Cooktop Combinations A B C I . 31³⁄₈" (79.7 cm) from cabinet base H. See Cutout Dimensions chart. To avoid damage to make sure that the junction boxes for oven and cooktop be approved for use over oven cutout. Recommended oven and cooktop junction box locations D. This oven has been designed in accordance with...
... other damage. W10351318A CUTOUT DIMENSIONS FOR OVENS INSTALLED UNDER COOKTOP IMPORTANT: Observe all governing codes and ordinances. Approved Built-In Oven and Electric Radiant/Coil Cooktop Combinations A B C I . 31³⁄₈" (79.7 cm) from cabinet base H. See Cutout Dimensions chart. To avoid damage to make sure that the junction boxes for oven and cooktop be approved for use over oven cutout. Recommended oven and cooktop junction box locations D. This oven has been designed in accordance with...
Installing Oven Under Cooktop
Page 3
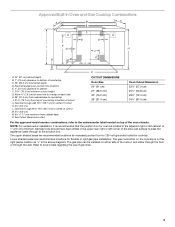
... either through the floor or through wall 10¹⁄₂" (26.7 cm) to center of cutout J. Approved Built-In Oven and Gas Cooktop Combinations A B C D E D E I . 31³⁄₈" (79.7 cm) from top of countertop to bottom of cutout K. 3¼" (8.3 cm) L. Recommended oven junction box locations E. 1" (2.5 cm) clearance to cabinet F. 27¾" (70.5 cm) minimum cutout height G. The upper shaded areas are recommended...
... either through the floor or through wall 10¹⁄₂" (26.7 cm) to center of cutout J. Approved Built-In Oven and Gas Cooktop Combinations A B C D E D E I . 31³⁄₈" (79.7 cm) from top of countertop to bottom of cutout K. 3¼" (8.3 cm) L. Recommended oven junction box locations E. 1" (2.5 cm) clearance to cabinet F. 27¾" (70.5 cm) minimum cutout height G. The upper shaded areas are recommended...
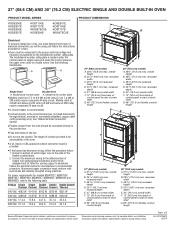
Dimension Guide
Page 1
... height D. 23¹⁄₄" (59.1 cm) max. Page 1 of copper wire using and follow the procedure below at 208 volts) require a separate 40-amp circuit. Model/serial number plate q Models rated from back of control panel to start of the line. Models rated at 4.8 kW and below at 240 volts (3.6 kW and below : 1. q A UL listed or CSA approved conduit connector must conform with local codes and industry accepted wiring...
... height D. 23¹⁄₄" (59.1 cm) max. Page 1 of copper wire using and follow the procedure below at 208 volts) require a separate 40-amp circuit. Model/serial number plate q Models rated from back of control panel to start of the line. Models rated at 4.8 kW and below at 240 volts (3.6 kW and below : 1. q A UL listed or CSA approved conduit connector must conform with local codes and industry accepted wiring...
Warranty Information
Page 1
... water filters, etc.). 5. Conversion of the Use and Care Guide, scan the QR code on the below named parts only and does not include repair labor. ■ Electric element ■ Solid state touch control system parts SECOND THROUGH TENTH YEAR LIMITED WARRANTY (MICROWAVE OVENS ONLY) In the second through tenth years from the date of incidental or consequential damages, so these parts that interfere with original model/serial numbers removed...
... water filters, etc.). 5. Conversion of the Use and Care Guide, scan the QR code on the below named parts only and does not include repair labor. ■ Electric element ■ Solid state touch control system parts SECOND THROUGH TENTH YEAR LIMITED WARRANTY (MICROWAVE OVENS ONLY) In the second through tenth years from the date of incidental or consequential damages, so these parts that interfere with original model/serial numbers removed...
Installation Guide
Page 2
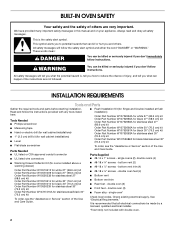
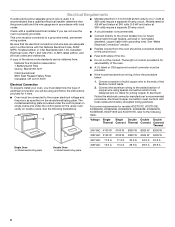
... hazard is the safety alert symbol. double oven (2) ■ Front feet - single ovens (2), double ovens (4) ■ Warming Drawer Deflector Kit (for stainless steel/black 30" (76.2 cm) kit To order, see the "Assistance or Service" section of the Use and Care Guide. ■ UL listed or CSA approved conduit connector Parts Supplied ■ UL listed wire connectors ■ #8-14 x 1" screws - BUILT-IN OVEN SAFETY Your safety and the safety of others...
... hazard is the safety alert symbol. double oven (2) ■ Front feet - single ovens (2), double ovens (4) ■ Warming Drawer Deflector Kit (for stainless steel/black 30" (76.2 cm) kit To order, see the "Assistance or Service" section of the Use and Care Guide. ■ UL listed or CSA approved conduit connector Parts Supplied ■ UL listed wire connectors ■ #8-14 x 1" screws - BUILT-IN OVEN SAFETY Your safety and the safety of others...
Installation Guide
Page 3
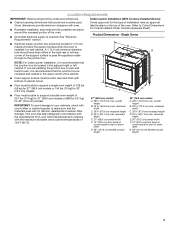
... control panel to the junction box. Given dimensions provide minimum clearance with the maximum allowable wood cabinet temperatures of the support surface to pass the appliance cable through to start of strain relief G. 48" (121.9 cm) flexible conduit length 30" (76.2 cm) models A. 28¾" (72.8 cm) max. Single Ovens ■ Electrical supply junction box should have an approval label located on rear wall A behind oven...
... control panel to the junction box. Given dimensions provide minimum clearance with the maximum allowable wood cabinet temperatures of the support surface to pass the appliance cable through to start of strain relief G. 48" (121.9 cm) flexible conduit length 30" (76.2 cm) models A. 28¾" (72.8 cm) max. Single Ovens ■ Electrical supply junction box should have an approval label located on rear wall A behind oven...
Installation Guide
Page 6
... control panel on single ovens and under the control panel on the upper oven cavity on the model/serial/rating plate. Connect a section of solid copper wire to the circuit breaker box (or fused disconnect) through flexible, armored or nonmetallic sheathed, copper cable (with grounding wire). See the following table. Check with local codes and industry accepted wiring practices. For power requirements for it is recommended that a qualified electrical installer determine that the electrical connection...
... control panel on single ovens and under the control panel on the upper oven cavity on the model/serial/rating plate. Connect a section of solid copper wire to the circuit breaker box (or fused disconnect) through flexible, armored or nonmetallic sheathed, copper cable (with grounding wire). See the following table. Check with local codes and industry accepted wiring practices. For power requirements for it is recommended that a qualified electrical installer determine that the electrical connection...
Installation Guide
Page 7
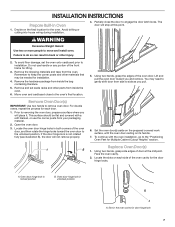
... or cutting into house wiring during installation. 4. Using two hands, grasp the edges of the oven door, and then rotate the hinge locks toward you and remove. Decide on each door. 1. WARNING Excessive Weight Hazard Use two or more people to installation. Do not use the corner posts from the oven. Remove and set the oven onto cardboard prior to move and install oven. A B 5. Set the oven door...
... or cutting into house wiring during installation. 4. Using two hands, grasp the edges of the oven door, and then rotate the hinge locks toward you and remove. Decide on each door. 1. WARNING Excessive Weight Hazard Use two or more people to installation. Do not use the corner posts from the oven. Remove and set the oven onto cardboard prior to move and install oven. A B 5. Set the oven door...

Installation Guide
Page 10
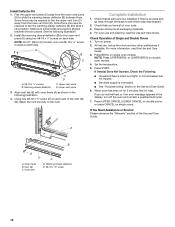
...;" 50 124.1 cm and 128.1 cm) The oven feet do not need to be installed. NOTE: Do not remove the spacers. Spacers A A 10 Using 2 or more people, place the oven in a cutout height between 48⁷⁄₈" and 52 124.1 cm and 132.6 cm). Go to the "Make Electrical Connection" section. 7. 6. Double Ovens The positioning of your cabinet cutout. A. Go to the "Make Electrical Connection" section.
...;" 50 124.1 cm and 128.1 cm) The oven feet do not need to be installed. NOTE: Do not remove the spacers. Spacers A A 10 Using 2 or more people, place the oven in a cutout height between 48⁷⁄₈" and 52 124.1 cm and 132.6 cm). Go to the "Make Electrical Connection" section. 7. 6. Double Ovens The positioning of your cabinet cutout. A. Go to the "Make Electrical Connection" section.
Installation Guide
Page 16
... BROIL or LOWER BROIL on single oven models. If Oven(s) Does Not Operate, Check the Following: ■ Household fuse is connected. ■ See "Troubleshooting" section in the Use and Care Guide. 6. or circuit breaker has not tripped. ■ Electrical supply is intact and tight; If You Need Assistance or Service: Please reference the "Warranty" section of Single and Double Ovens 1. Vent tab C. Some force may also be...
... BROIL or LOWER BROIL on single oven models. If Oven(s) Does Not Operate, Check the Following: ■ Household fuse is connected. ■ See "Troubleshooting" section in the Use and Care Guide. 6. or circuit breaker has not tripped. ■ Electrical supply is intact and tight; If You Need Assistance or Service: Please reference the "Warranty" section of Single and Double Ovens 1. Vent tab C. Some force may also be...


