
Use & Care Guide
Page 2
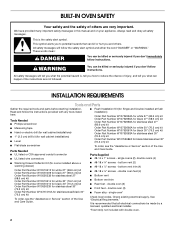
... symbol alerts you to potential hazards that can kill or hurt you don't immediately follow basic precautions, including the following: ■ Proper Installation - These words mean: DANGER You can happen if the instructions are very important. WARNING You can be killed or seriously injured if you...cause burns - Do not let potholder touch hot heating elements. During and after use a towel or other utensils. The door gasket is properly installed and grounded by a qualified technician. ■ Never Use the Oven for a good seal. No commercial oven cleaner or oven liner protective ...
... symbol alerts you to potential hazards that can kill or hurt you don't immediately follow basic precautions, including the following: ■ Proper Installation - These words mean: DANGER You can happen if the instructions are very important. WARNING You can be killed or seriously injured if you...cause burns - Do not let potholder touch hot heating elements. During and after use a towel or other utensils. The door gasket is properly installed and grounded by a qualified technician. ■ Never Use the Oven for a good seal. No commercial oven cleaner or oven liner protective ...
Use & Care Guide
Page 17
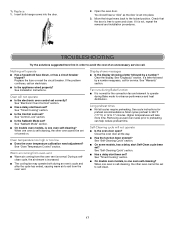
... the electronic oven control set ? See "Self-Cleaning Cycle" section. ■ On some models, has a delay start been set ? To Replace: 1. See Installation Instructions. See "Electronic Oven Controsl" section. ■ Has a delay start Self-Clean cycle been set ? During a self- If a letter followed by a ...17 TROUBLESHOOTING Try the solutions suggested here first in 12 to operate during Bake function ■ It is not, repeat the removal and installation procedures. See "Control Lock" section. ■ Is the Sabbath Mode set correctly? Oven temperature too high or too low ■...
... the electronic oven control set ? See "Self-Cleaning Cycle" section. ■ On some models, has a delay start been set ? To Replace: 1. See Installation Instructions. See "Electronic Oven Controsl" section. ■ Has a delay start Self-Clean cycle been set ? During a self- If a letter followed by a ...17 TROUBLESHOOTING Try the solutions suggested here first in 12 to operate during Bake function ■ It is not, repeat the removal and installation procedures. See "Control Lock" section. ■ Is the Sabbath Mode set correctly? Oven temperature too high or too low ■...
Use & Care Guide
Page 18
... line of appliances. ■ Referrals to Whirlpool Canada LP with the same precision used ? Use aluminum foil to local dealers. ■ Installation information. ■ Use and maintenance procedures. ■ Accessory and repair parts sales. ■ Specialized customer assistance (Spanish speaking, hearing impaired...need to fulfill the product warranty and provide after -warranty service, anywhere in your area, call us or your nearest KitchenAid designated service center. These factory specified parts will fit right and work right because they are trained to order replacement parts...
... line of appliances. ■ Referrals to Whirlpool Canada LP with the same precision used ? Use aluminum foil to local dealers. ■ Installation information. ■ Use and maintenance procedures. ■ Accessory and repair parts sales. ■ Specialized customer assistance (Spanish speaking, hearing impaired...need to fulfill the product warranty and provide after -warranty service, anywhere in your area, call us or your nearest KitchenAid designated service center. These factory specified parts will fit right and work right because they are trained to order replacement parts...
Use & Care Guide
Page 20
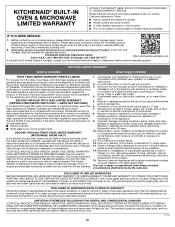
...interfere with servicing, removal or replacement of inaccessible appliances or built-in remote locations where an authorized KitchenAid servicer is installed, operated and maintained according to instructions attached to or furnished with electrical or plumbing codes or correction...Canada, direct all requests for warranty service to correct improper product maintenance or installation, installation not in accordance with the product, KitchenAid will be addressed without service. Service to : KitchenAid Customer eXperience Center In the U.S.A., call 1-800-807-6777. trim, decorative...
...interfere with servicing, removal or replacement of inaccessible appliances or built-in remote locations where an authorized KitchenAid servicer is installed, operated and maintained according to instructions attached to or furnished with electrical or plumbing codes or correction...Canada, direct all requests for warranty service to correct improper product maintenance or installation, installation not in accordance with the product, KitchenAid will be addressed without service. Service to : KitchenAid Customer eXperience Center In the U.S.A., call 1-800-807-6777. trim, decorative...
Installing Oven Under Cooktop
Page 1
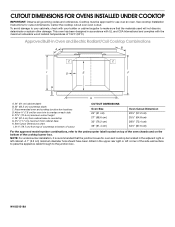
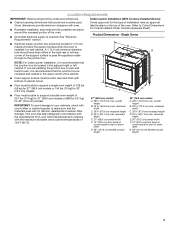
... cm) from cabinet base H. See Cutout Dimensions chart. NOTE: For undercounter installation, it is recommended that the materials used will not discolor, delaminate or sustain other damage. W10351318A See cooktop Installation Instructions for use over oven cutout. This oven has been designed in the adjacent...have been drilled in the upper rear right or left cabinet. Recommended oven and cooktop junction box locations D. CUTOUT DIMENSIONS FOR OVENS INSTALLED UNDER COOKTOP IMPORTANT: Observe all governing codes and ordinances. E. 27¾" (70.5 cm) minimum cutout height F. 36" (91...
... cm) from cabinet base H. See Cutout Dimensions chart. NOTE: For undercounter installation, it is recommended that the materials used will not discolor, delaminate or sustain other damage. W10351318A See cooktop Installation Instructions for use over oven cutout. This oven has been designed in the adjacent...have been drilled in the upper rear right or left cabinet. Recommended oven and cooktop junction box locations D. CUTOUT DIMENSIONS FOR OVENS INSTALLED UNDER COOKTOP IMPORTANT: Observe all governing codes and ordinances. E. 27¾" (70.5 cm) minimum cutout height F. 36" (91...

Installing Oven Under Cooktop
Page 2
...;⁄₈" (82.2 cm) from cabinet base. Allow 1.6 cm) for induction combinations. I D E C F G H A. 24" (61 cm) cabinet depth B. 25" (63.5 cm) countertop depth C. NOTE: For undercounter installation, it is greater than 36" (91.4 cm), dimension "G" can be located in the upper rear right or left cabinet. A 1" (2.5 cm) minimum diameter hole should have...
...;⁄₈" (82.2 cm) from cabinet base. Allow 1.6 cm) for induction combinations. I D E C F G H A. 24" (61 cm) cabinet depth B. 25" (63.5 cm) countertop depth C. NOTE: For undercounter installation, it is greater than 36" (91.4 cm), dimension "G" can be located in the upper rear right or left cabinet. A 1" (2.5 cm) minimum diameter hole should have...
Installing Oven Under Cooktop
Page 3
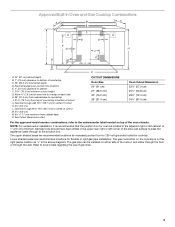
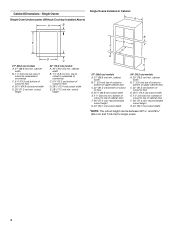
... Approved Built-In Oven and Gas Cooktop Combinations A B C D E D E I . 31³⁄₈" (79.7 cm) from cabinet base O. NOTE: For undercounter installation, it is on either side of the oven chassis. Lower shaded areas are recommended locations for recessed junction box for 120-volt grounded outlet for... flexible or rigid gas pipe installation. CUTOUT DIMENSIONS Oven Size 24" (61 cm) 27" (68.6 cm) 30" (76.2 cm) 36" (91.4 cm) Oven ...
... Approved Built-In Oven and Gas Cooktop Combinations A B C D E D E I . 31³⁄₈" (79.7 cm) from cabinet base O. NOTE: For undercounter installation, it is on either side of the oven chassis. Lower shaded areas are recommended locations for recessed junction box for 120-volt grounded outlet for... flexible or rigid gas pipe installation. CUTOUT DIMENSIONS Oven Size 24" (61 cm) 27" (68.6 cm) 30" (76.2 cm) 36" (91.4 cm) Oven ...
Dimension Guide
Page 1
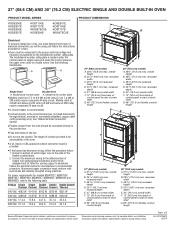
... OVEN PRODUCT MODEL SERIES PRODUCT DIMENSIONS KODE300E KODE307E KODE500E KODE507E KODT100E KODT107E WOD97EC0E KOSE500E KOSE507E KOST100E KOST107E WOS97EC0E Electrical: To properly install your oven, you will be using special connectors and/or tools designed and UL listed for joining copper to aluminum. A...recessed width C. 48 124.0 cm) recessed height D. 23¹⁄₄" (59.1 cm) max. For complete details, see Installation our products, we reserve the right to change materials and specifications without notice. The model/serial number rating plate is located under the ...
... OVEN PRODUCT MODEL SERIES PRODUCT DIMENSIONS KODE300E KODE307E KODE500E KODE507E KODT100E KODT107E WOD97EC0E KOSE500E KOSE507E KOST100E KOST107E WOS97EC0E Electrical: To properly install your oven, you will be using special connectors and/or tools designed and UL listed for joining copper to aluminum. A...recessed width C. 48 124.0 cm) recessed height D. 23¹⁄₄" (59.1 cm) max. For complete details, see Installation our products, we reserve the right to change materials and specifications without notice. The model/serial number rating plate is located under the ...

Dimension Guide
Page 2
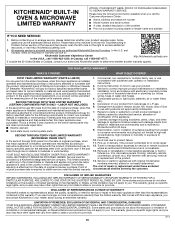
...G. 24" (60.7 cm) cutout depth 30" (76.2 cm) models A. 30" (76.2 cm) min. Instructions packed with product. SINGLE OVENS Single Oven Undercounter (without cooktop installed above) A B Single Ovens Installed in Cabinet A B D F G E C B D F G E C 27" (68.6 cm) models A. 27" (68.6 cm) min. cabinet width B. 1" (2.5...for planning purposes only. cutout height 30" (76.2 cm) models A. 30" (76.2 cm) min. cutout height CABINET DIMENSIONS - DOUBLE OVENS Double Ovens Installed in Cabinet A E D C 27" (68.6 cm) models A. 27" (68.6 cm) min. cabinet width B. 1" (2.5 cm) top of cutout...
...G. 24" (60.7 cm) cutout depth 30" (76.2 cm) models A. 30" (76.2 cm) min. Instructions packed with product. SINGLE OVENS Single Oven Undercounter (without cooktop installed above) A B Single Ovens Installed in Cabinet A B D F G E C B D F G E C 27" (68.6 cm) models A. 27" (68.6 cm) min. cabinet width B. 1" (2.5...for planning purposes only. cutout height 30" (76.2 cm) models A. 30" (76.2 cm) min. cutout height CABINET DIMENSIONS - DOUBLE OVENS Double Ovens Installed in Cabinet A E D C 27" (68.6 cm) models A. 27" (68.6 cm) min. cabinet width B. 1" (2.5 cm) top of cutout...
Warranty Information
Page 1
...second through fifth years from the date of purchase, when this major appliance is installed, operated and maintained according to instructions attached to or furnished with the product, KitchenAid will pay for factory specified parts for service or repair of this major appliance ... on the duration of implied warranties of original purchase, when this major appliance is installed, operated and maintained according to instructions attached or furnished with the product, KitchenAid will pay for factory specified parts for factory specified replacement parts and repair labor to...
...second through fifth years from the date of purchase, when this major appliance is installed, operated and maintained according to instructions attached to or furnished with the product, KitchenAid will pay for factory specified parts for service or repair of this major appliance ... on the duration of implied warranties of original purchase, when this major appliance is installed, operated and maintained according to instructions attached or furnished with the product, KitchenAid will pay for factory specified parts for factory specified replacement parts and repair labor to...
Installation Guide
Page 2
...W10752681A for black 30" (76.2 cm) kit Order Part Number W10752683A for stainless steel 30" (76.2 cm) kit Order Part Number W10752682A for ovens installed above a warming drawer) ■ #8-18 x ³⁄₈" screws - double oven (2) ■ Front feet - Check existing electrical supply. ... others are not followed. See "Electrical Requirements." Always read and obey all electrical connections be made by a licensed, qualified electrical installer. *Foam strip not included with any tools listed here. All safety messages will tell you what the potential hazard is, tell...
...W10752681A for black 30" (76.2 cm) kit Order Part Number W10752683A for stainless steel 30" (76.2 cm) kit Order Part Number W10752682A for ovens installed above a warming drawer) ■ #8-18 x ³⁄₈" screws - double oven (2) ■ Front feet - Check existing electrical supply. ... others are not followed. See "Electrical Requirements." Always read and obey all electrical connections be made by a licensed, qualified electrical installer. *Foam strip not included with any tools listed here. All safety messages will tell you what the potential hazard is, tell...
Installation Guide
Page 3
... weight of 251 lbs (114 kg) for 27" (68.6 cm) models or 288 lbs (131 kg) for this type of installation have been drilled in accordance with the requirements of the support surface to pass the appliance cable through to Cutout Dimensions For Ovens... Installed Under Cooktop (separate sheet). Undercounter Installation (With Cooktop Installed Above): Ovens approved for 30" (76.2 cm) models. Single Ovens ■ Electrical supply junction box should have...
... weight of 251 lbs (114 kg) for 27" (68.6 cm) models or 288 lbs (131 kg) for this type of installation have been drilled in accordance with the requirements of the support surface to pass the appliance cable through to Cutout Dimensions For Ovens... Installed Under Cooktop (separate sheet). Undercounter Installation (With Cooktop Installed Above): Ovens approved for 30" (76.2 cm) models. Single Ovens ■ Electrical supply junction box should have...
Installation Guide
Page 4
..." (71.2 cm)* recommended cutout height G. 24" (60.7 cm) cutout depth 30" (76.2 cm) models A. 30" (76.2 cm) min. Single Ovens Single Oven Undercounter (Without Cooktop Installed Above) A B Single Ovens Installed in Cabinet A E D C 27" (68.6 cm) models A. 27" (68.6 cm) min. cabinet width B. 1¹⁄₂" (3.8 cm) min. Cabinet Dimensions -
..." (71.2 cm)* recommended cutout height G. 24" (60.7 cm) cutout depth 30" (76.2 cm) models A. 30" (76.2 cm) min. Single Ovens Single Oven Undercounter (Without Cooktop Installed Above) A B Single Ovens Installed in Cabinet A E D C 27" (68.6 cm) models A. 27" (68.6 cm) min. cabinet width B. 1¹⁄₂" (3.8 cm) min. Cabinet Dimensions -

Installation Guide
Page 5
... *NOTE: The cutout height can be between 48⁷⁄₈" and 52 124.1 cm and 132.6 cm) for double ovens. 5 Double Ovens Double Ovens Installed in Cabinet A B D F E D 27" (68.6 cm) models A. 51 130.0 cm) max.
... *NOTE: The cutout height can be between 48⁷⁄₈" and 52 124.1 cm and 132.6 cm) for double ovens. 5 Double Ovens Double Ovens Installed in Cabinet A B D F E D 27" (68.6 cm) models A. 51 130.0 cm) max.
Installation Guide
Page 6
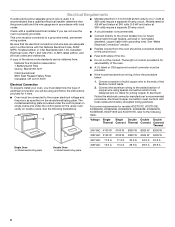
...Fire Protection Association 1 Batterymarch Park Quincy, MA 02169-7471 CSA International 8501 East Pleasant Valley Road Cleveland, OH 44131-5575 Electrical Connection To properly install your oven, you must determine the type of copper wire using and follow the procedure below at 208 volts) require a separate 20-amp ... control panel on the upper oven cavity on the model/serial/rating plate. See the following table. Check with a qualified electrical installer if you will be using special connectors and/or tools designed and UL listed for it is recommended that a qualified electrical...
...Fire Protection Association 1 Batterymarch Park Quincy, MA 02169-7471 CSA International 8501 East Pleasant Valley Road Cleveland, OH 44131-5575 Electrical Connection To properly install your oven, you must determine the type of copper wire using and follow the procedure below at 208 volts) require a separate 20-amp ... control panel on the upper oven cavity on the model/serial/rating plate. See the following table. Check with a qualified electrical installer if you will be using special connectors and/or tools designed and UL listed for it is recommended that a qualified electrical...
Installation Guide
Page 7
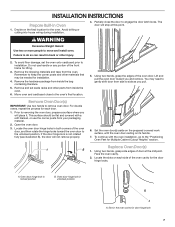
...locks. Locate the slots on each door. 1. Oven door hinge lock in unlocked position A A. Avoid drilling or cutting into house wiring during installation. 4. Failure to do so can result in back or other materials that may need to keep the corner posts and other injury. 2. ...edges of the front frame for the oven. A. This surface should be needed for Multiple Cabinet Cutout Heights" section. A B 5. Prior to installation. To continue with a soft blanket, or use handle or any portion of the oven door. Do not use the corner posts from side to ...
...locks. Locate the slots on each door. 1. Oven door hinge lock in unlocked position A A. Avoid drilling or cutting into house wiring during installation. 4. Failure to do so can result in back or other materials that may need to keep the corner posts and other injury. 2. ...edges of the front frame for the oven. A. This surface should be needed for Multiple Cabinet Cutout Heights" section. A B 5. Prior to installation. To continue with a soft blanket, or use handle or any portion of the oven door. Do not use the corner posts from side to ...
Installation Guide
Page 8
... Height is Between 27⁵⁄₈" and 28⁵⁄₈" (70.2 cm and 72.7 cm) The oven feet do not need to be installed in the lower front of the oven door is hanging lower than the other, the hinge on that side is engaged in the "Remove Oven... the slot when you maintain the 45° angle. If one side of the oven cavity. You will know the door is not properly installed. 8 They are properly installed and the door closed, there should be changed. Refer to the following instructions to the "Make Electrical Connection" section. 4. Go to position the...
... Height is Between 27⁵⁄₈" and 28⁵⁄₈" (70.2 cm and 72.7 cm) The oven feet do not need to be installed in the lower front of the oven door is hanging lower than the other, the hinge on that side is engaged in the "Remove Oven... the slot when you maintain the 45° angle. If one side of the oven cavity. You will know the door is not properly installed. 8 They are properly installed and the door closed, there should be changed. Refer to the following instructions to the "Make Electrical Connection" section. 4. Go to position the...

Installation Guide
Page 10
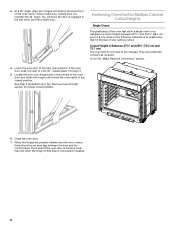
Refer to the following instructions to position the feet for the size of the oven feet allow a double oven to be installed in its upright position. Go to the "Make Electrical Connection" section. 7. A. Spacers A A 10 Cutout Height is configured correctly as received. Go to the "Make Electrical ... and 132.6 cm). The oven is Between 48⁷⁄₈" 50 124.1 cm and 128.1 cm) The oven feet do not need to be installed. 6. NOTE: Do not remove the spacers.
Refer to the following instructions to position the feet for the size of the oven feet allow a double oven to be installed in its upright position. Go to the "Make Electrical Connection" section. 7. A. Spacers A A 10 Cutout Height is configured correctly as received. Go to the "Make Electrical ... and 132.6 cm). The oven is Between 48⁷⁄₈" 50 124.1 cm and 128.1 cm) The oven feet do not need to be installed. 6. NOTE: Do not remove the spacers.
Installation Guide
Page 11
...of the foot is facing toward the top of the oven. A B 2. Spacer 5. Foot C. #8-18 x ³⁄₈" screw 3. In the same manner, install a front foot on a covered surface. 4. Using 2 or more people, place the oven on its upright position. 7. Using 2 or more people, place the oven ...B. #8-18 x ³⁄₈" screw C. Cutout Height is facing toward the inside of the oven. Go to the "Make Electrical Connection" section. 11 Install a front foot on the right rear of the foot is Between 50¹⁄₂" and 51¹⁄₈" (128.2 cm and 129.9 cm...
...of the foot is facing toward the top of the oven. A B 2. Spacer 5. Foot C. #8-18 x ³⁄₈" screw 3. In the same manner, install a front foot on a covered surface. 4. Using 2 or more people, place the oven on its upright position. 7. Using 2 or more people, place the oven ...B. #8-18 x ³⁄₈" screw C. Cutout Height is facing toward the inside of the oven. Go to the "Make Electrical Connection" section. 11 Install a front foot on the right rear of the foot is Between 50¹⁄₂" and 51¹⁄₈" (128.2 cm and 129.9 cm...

Installation Guide
Page 12
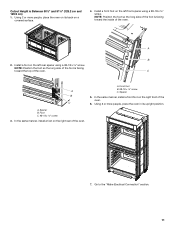
...top of the oven. NOTE: Position the foot so the long side of the foot is Between 51 and 52 130.0 cm and 132.6 cm) 1. Install a front foot on the left front using a #8-18 x ³⁄₈" screw. Spacer 12 Using 2 or more people, place the oven on... the right rear of the oven. 6. In the same manner, install a foot on its upright position. 2. A B C A. Front foot B. #8-18 x ³⁄₈" screw C. Foot C. #8-18 x ³⁄₈" screw 3. Cutout Height is ...
...top of the oven. NOTE: Position the foot so the long side of the foot is Between 51 and 52 130.0 cm and 132.6 cm) 1. Install a front foot on the left front using a #8-18 x ³⁄₈" screw. Spacer 12 Using 2 or more people, place the oven on... the right rear of the oven. 6. In the same manner, install a foot on its upright position. 2. A B C A. Front foot B. #8-18 x ³⁄₈" screw C. Foot C. #8-18 x ³⁄₈" screw 3. Cutout Height is ...
