
Use & Care Guide
Page 1
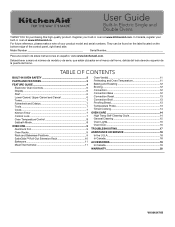
... a note of the control panel, right hand side. They can be found on the label located on the bottom edge of your built-in oven at www.kitchenaid.com. Deberá tener a mano el número de modelo y de serie, que están ubicados en el marco del horno, detrá...14 General Cleaning 15 Oven Lights 16 Oven Door 16 TROUBLESHOOTING 17 ASSISTANCE OR SERVICE 18 In the U.S.A 18 In Canada 18 ACCESSORIES 19 In Canada 19 WARRANTY 20 W10643471B Model Number Serial Number Para una versión de estas instrucciones en español, visite www.kitchenaid.com. Register your ...
... a note of the control panel, right hand side. They can be found on the label located on the bottom edge of your built-in oven at www.kitchenaid.com. Deberá tener a mano el número de modelo y de serie, que están ubicados en el marco del horno, detrá...14 General Cleaning 15 Oven Lights 16 Oven Door 16 TROUBLESHOOTING 17 ASSISTANCE OR SERVICE 18 In the U.S.A 18 In Canada 18 ACCESSORIES 19 In Canada 19 WARRANTY 20 W10643471B Model Number Serial Number Para una versión de estas instrucciones en español, visite www.kitchenaid.com. Register your ...
Use & Care Guide
Page 2
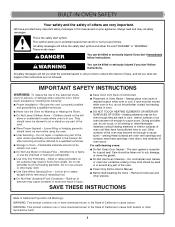
...type extinguisher. ■ Use Only Dry Potholders - Heating elements may result in this manual and on Grease Fires - Other surfaces of oven until they are very important. WARNING You can be hot even though they have provided many important safety messages in burns from steam. ...contains one or more chemicals known to potential hazards that can be stored in the manual. This symbol alerts you to the State of the oven. ■ Wear Proper Apparel - All safety messages will tell you don't immediately follow basic precautions, including the following: ■ Proper ...
...type extinguisher. ■ Use Only Dry Potholders - Heating elements may result in this manual and on Grease Fires - Other surfaces of oven until they are very important. WARNING You can be hot even though they have provided many important safety messages in burns from steam. ...contains one or more chemicals known to potential hazards that can be stored in the manual. This symbol alerts you to the State of the oven. ■ Wear Proper Apparel - All safety messages will tell you don't immediately follow basic precautions, including the following: ■ Proper ...

Use & Care Guide
Page 3
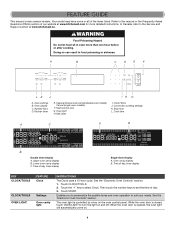
...locations and appearances of the features shown here may have purchased may not match those of your model. Oven racks (roll-out racks available on double oven models) J. A B,C D M E L F K G H J I . Automatic oven light switch C. Convection element and fan (in back panel) L. Gasket I A. PARTS AND FEATURES ... models. Model and serial number plate (on bottom edge of the items listed. Oven vent Parts and Features not shown Temperature probe 3 Broil elements (not shown) M. The oven you have some or all of control panel, right hand side) E. CleanBake™...
...locations and appearances of the features shown here may have purchased may not match those of your model. Oven racks (roll-out racks available on double oven models) J. A B,C D M E L F K G H J I . Automatic oven light switch C. Convection element and fan (in back panel) L. Gasket I A. PARTS AND FEATURES ... models. Model and serial number plate (on bottom edge of the items listed. Oven vent Parts and Features not shown Temperature probe 3 Broil elements (not shown) M. The oven you have some or all of control panel, right hand side) E. CleanBake™...
Use & Care Guide
Page 4
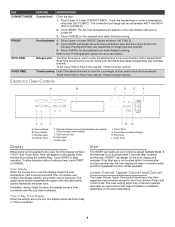
... cooking settings K. Time of our website at www.kitchenaid.ca. Touch START. When the oven door is controlled by a key on . 4 Oven light H. Lower oven cavity display C. In Canada, refer to suit your needs. A B C D E F LK J A. Oven display C. Number keys D. Upper and lower oven cancel (double oven models) Cancel (single oven models) F. Self clean IH G I. Stop time L. Cook time...
... cooking settings K. Time of our website at www.kitchenaid.ca. Touch START. When the oven door is controlled by a key on . 4 Oven light H. Lower oven cavity display C. In Canada, refer to suit your needs. A B C D E F LK J A. Oven display C. Number keys D. Upper and lower oven cancel (double oven models) Cancel (single oven models) F. Self clean IH G I. Stop time L. Cook time...
Use & Care Guide
Page 5
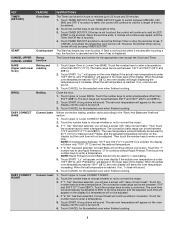
...Touch the "1" number key to use Rapid Preheat or "2" to set the length of day is touched. 4. Touch START. Touch CANCEL for the appropriate oven except the Clock and Timer. 1. Touch the number keys to enter a temperature. If "2: No" has been selected, Convect Roast will appear on , ... Touch TIMER SET/OFF. However, the kitchen timer can be used for 1-rack baking. 5. "Lo°" will appear on the oven display if the actual oven temperature is under 100°F (38°C), and "Preheating" will see a screen with "easy convect bake." Before convection baking, position...
...Touch the "1" number key to use Rapid Preheat or "2" to set the length of day is touched. 4. Touch START. Touch CANCEL for the appropriate oven except the Clock and Timer. 1. Touch the number keys to enter a temperature. If "2: No" has been selected, Convect Roast will appear on , ... Touch TIMER SET/OFF. However, the kitchen timer can be used for 1-rack baking. 5. "Lo°" will appear on the oven display if the actual oven temperature is under 100°F (38°C), and "Preheating" will see a screen with "easy convect bake." Before convection baking, position...
Use & Care Guide
Page 6
... timer display will flash "12:00", and "Clock-Enter Time" will appear on the display. Upper and lower oven cancel (double oven models) Cancel (single oven models) F. Self clean IH G I. Cook Time Display When power is not touched within 5 minutes after touching another key, "START?"..., touch START or CANCEL. The convection broil range can be canceled. Touch START. The set . Display will show which oven is not touched within 5 seconds after an oven function has been canceled or completed, depending on dough type and quantity. 3. Proofing time may not bake properly. Touch CANCEL...
... timer display will flash "12:00", and "Clock-Enter Time" will appear on the display. Upper and lower oven cancel (double oven models) Cancel (single oven models) F. Self clean IH G I. Cook Time Display When power is not touched within 5 minutes after touching another key, "START?"..., touch START or CANCEL. The convection broil range can be canceled. Touch START. The set . Display will show which oven is not touched within 5 seconds after an oven function has been canceled or completed, depending on dough type and quantity. 3. Proofing time may not bake properly. Touch CANCEL...

Use & Care Guide
Page 7
... The Control Lock will function. To Unlock Control: Repeat to Celsius. End-of-Cycle and Reminder Tones The Timed Cooking end-of the oven(s). If all tones have been turned off settings. however it can be changed to avoid unintended use of -cycle and reminder tones are off... Timer for approximately 3 seconds, until "Control Locked" appears on the lower text line and a lock icon appears in Celsius, "°C" follows the oven temperature. To Turn Tones Off/On: Touch TOOLS, and then "5" to toggle temperature between high and low settings. NOTE: Turning off this reminder tone...
... The Control Lock will function. To Unlock Control: Repeat to Celsius. End-of-Cycle and Reminder Tones The Timed Cooking end-of the oven(s). If all tones have been turned off settings. however it can be changed to avoid unintended use of -cycle and reminder tones are off... Timer for approximately 3 seconds, until "Control Locked" appears on the lower text line and a lock icon appears in Celsius, "°C" follows the oven temperature. To Turn Tones Off/On: Touch TOOLS, and then "5" to toggle temperature between high and low settings. NOTE: Turning off this reminder tone...
Use & Care Guide
Page 8
...will appear on and off as a guide. To Enable: Before the Sabbath Mode can be regularly set temperature and will continue to measure the oven temperature. When the oven(s) is set, the allowed keys are: the number keys, Start, Tools (to set between 145°F and 550°F (63°... Mode time, up to normal operating mode (non-Sabbath Mode, not cooking). "SABBATH MODE ON" will begin a timed bake cycle. 5. On double oven models, these steps will no longer be enabled with a one hour before starting the Bake cycle. Touch CLOCK/TOOLS, and then number key "7." Touch ...
...will appear on and off as a guide. To Enable: Before the Sabbath Mode can be regularly set temperature and will continue to measure the oven temperature. When the oven(s) is set, the allowed keys are: the number keys, Start, Tools (to set between 145°F and 550°F (63°... Mode time, up to normal operating mode (non-Sabbath Mode, not cooking). "SABBATH MODE ON" will begin a timed bake cycle. 5. On double oven models, these steps will no longer be enabled with a one hour before starting the Bake cycle. Touch CLOCK/TOOLS, and then number key "7." Touch ...
Use & Care Guide
Page 9
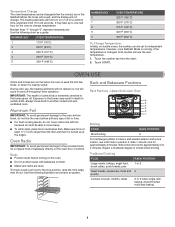
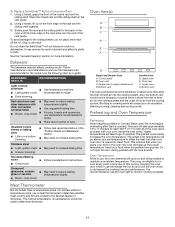
...176;F (190°C) 400°F (204°C) 450°F (232°C) To Change Temperature: Initially, on the oven door or bottom. OVEN USE Odors and smoke are normal when the oven is used the first few times, or when it is extremely sensitive to the fumes given off for independent temperatures... ½" (1.3 cm) larger than the dish and that it out to have a well-seared exterior and a rare interior, use the new temperature. 1. Oven Racks IMPORTANT: To avoid permanent damage to the porcelain finish, do not cover entire rack with bakeware on or off . Rack and Bakeware Positions Rack...
...176;F (190°C) 400°F (204°C) 450°F (232°C) To Change Temperature: Initially, on the oven door or bottom. OVEN USE Odors and smoke are normal when the oven is used the first few times, or when it is extremely sensitive to the fumes given off for independent temperatures... ½" (1.3 cm) larger than the dish and that it out to have a well-seared exterior and a rare interior, use the new temperature. 1. Oven Racks IMPORTANT: To avoid permanent damage to the porcelain finish, do not cover entire rack with bakeware on or off . Rack and Bakeware Positions Rack...
Use & Care Guide
Page 10
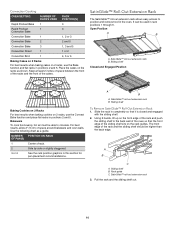
...guides. For best results, allow 2" (5 cm) of the sliding shelf sits on the racks as a guide. The front edge of the oven so that it is closed and engaged with the sliding shelf. 2. A B C A. Rack guide C. SatinGlide™ roll-out extension ... Bake function and place flat racks in positions 2 and 5. Use the following chart as shown. SatinGlide™ roll-out extension rack B. A B A. Convection Cooking OVEN SETTING NUMBER OF RACK RACKS USED POSITION(S) Rapid Preheat Bake 1 3 Rapid Preheat 1 3 Convection Bake Convection Bake 1 1, 2 or 3 Convection Bake 2 2 and...
...guides. For best results, allow 2" (5 cm) of the sliding shelf sits on the racks as a guide. The front edge of the oven so that it is closed and engaged with the sliding shelf. 2. A B C A. Rack guide C. SatinGlide™ roll-out extension ... Bake function and place flat racks in positions 2 and 5. Use the following chart as shown. SatinGlide™ roll-out extension rack B. A B A. Convection Cooking OVEN SETTING NUMBER OF RACK RACKS USED POSITION(S) Rapid Preheat Bake 1 3 Rapid Preheat 1 3 Convection Bake Convection Bake 1 1, 2 or 3 Convection Bake 2 2 and...
Use & Care Guide
Page 11
... Brown, crisp crusts Meat Thermometer Not all of the rack guide. Control panel B. Preheating and Oven Temperature Preheating When beginning a Bake or Convect Bake cycle, the oven begins preheating after Start is opened to reduce baking other bakeware with temperatures slightly. See the "... bottom browning ■ Follow rack recommendations in center of the rack and the sliding shelf together. 3. Oven vent F. The preheat cycle rapidly increases the oven temperature. Do not open the door during preheat until the back edge of the rack pulls over the...
... Brown, crisp crusts Meat Thermometer Not all of the rack guide. Control panel B. Preheating and Oven Temperature Preheating When beginning a Bake or Convect Bake cycle, the oven begins preheating after Start is opened to reduce baking other bakeware with temperatures slightly. See the "... bottom browning ■ Follow rack recommendations in center of the rack and the sliding shelf together. 3. Oven vent F. The preheat cycle rapidly increases the oven temperature. Do not open the door during preheat until the back edge of the rack pulls over the...
Use & Care Guide
Page 12
...distributes heat more evenly, while sealing in moisture. Convection Bake (on approximately 30 seconds later. ■ For best results, use the oven light to monitor progress. ■ Choose cookie sheets without sides and roasting pans with several different types of pork and poultry in ...intervals to enhance performance and heat distribution. If the oven is closed . They will come back on some models) The convection element is designed to preheat. Check the temperature of foods, ...
...distributes heat more evenly, while sealing in moisture. Convection Bake (on approximately 30 seconds later. ■ For best results, use the oven light to monitor progress. ■ Choose cookie sheets without sides and roasting pans with several different types of pork and poultry in ...intervals to enhance performance and heat distribution. If the oven is closed . They will come back on some models) The convection element is designed to preheat. Check the temperature of foods, ...
Use & Care Guide
Page 13
... the internal temperature of the food when it is closed . Touch Upper or Lower BAKE, CONVECT BAKE or CONVECT ROAST. The oven temperature is closed . To Change Probe Temperature During a Cooking Cycle 1. They will appear as possible. See "Rack and Bakeware Positions...will sound every minute. 4. Before baking, remove waxed paper or plastic wrap. Touch START. Always unplug and remove the temperature probe from the oven when removing food. Touch a probe enabled cooking mode (Bake, Convect Bake, or Convect Roast). 2. Follow steps 1 through 5 in intervals...
... the internal temperature of the food when it is closed . Touch Upper or Lower BAKE, CONVECT BAKE or CONVECT ROAST. The oven temperature is closed . To Change Probe Temperature During a Cooking Cycle 1. They will appear as possible. See "Rack and Bakeware Positions...will sound every minute. 4. Before baking, remove waxed paper or plastic wrap. Touch START. Always unplug and remove the temperature probe from the oven when removing food. Touch a probe enabled cooking mode (Bake, Convect Bake, or Convect Roast). 2. Follow steps 1 through 5 in intervals...
Use & Care Guide
Page 14
...does not get hot enough during the High Temp SelfCleaning cycle to help get rid of some models, the temperature probe from the oven. ■ Remove oven racks to keep them shiny and easy to follow these instructions can result. Timed Cooking may result in burns. Touch COOK TIME.... 2. Touch CANCEL for more smoke. Heavy soil results in food poisoning or sickness. "DELAY" and the stop time is extremely sensitive to move the oven door gasket. Touch CANCEL for a set to certain birds. Exposure to the fumes may also be used for a good seal. See "Clock" section...
...does not get hot enough during the High Temp SelfCleaning cycle to help get rid of some models, the temperature probe from the oven. ■ Remove oven racks to keep them shiny and easy to follow these instructions can result. Timed Cooking may result in burns. Touch COOK TIME.... 2. Touch CANCEL for more smoke. Heavy soil results in food poisoning or sickness. "DELAY" and the stop time is extremely sensitive to move the oven door gasket. Touch CANCEL for a set to certain birds. Exposure to the fumes may also be used for a good seal. See "Clock" section...
Use & Care Guide
Page 15
...High Temp Self-Cleaning Before starting a delayed High Temp Self-Clean cycle, make sure all controls are off and the oven is reached, the oven will automatically turn on the oven display and "DOOR LOCKED" will appear on cleaning products. Touch SELF CLEAN repeatedly to order. 15 Touch STOP TIME... TIME (includes a 30 minute cool down time) 1 (Quick) 2 (Reg) 3 (Maxi) 3 hours 30 minutes 4 hours 30 minutes 5 hours 30 minutes Once the oven has completely cooled, remove ash with a damp cloth. Then, the start locking the door and display "Locking Door." To avoid breaking the glass, do not...
...High Temp Self-Cleaning Before starting a delayed High Temp Self-Clean cycle, make sure all controls are off and the oven is reached, the oven will automatically turn on the oven display and "DOOR LOCKED" will appear on cleaning products. Touch SELF CLEAN repeatedly to order. 15 Touch STOP TIME... TIME (includes a 30 minute cool down time) 1 (Quick) 2 (Reg) 3 (Maxi) 3 hours 30 minutes 4 hours 30 minutes 5 hours 30 minutes Once the oven has completely cooled, remove ash with a damp cloth. Then, the start locking the door and display "Locking Door." To avoid breaking the glass, do not...
Use & Care Guide
Page 16
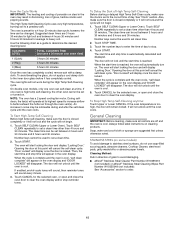
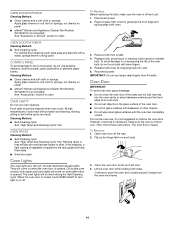
...High Temp Self-Cleaning Cycle" first. On double oven models, both sides. To avoid damage to push the oven door closed , touch OVEN LIGHT to remove the oven door. Oven Door IMPORTANT: To avoid oven door glass breakage: ■ Do not close the oven door if the racks are 120-volt, 40-watt...Continue to or decreasing the life of the new bulb, do not use abrasive cleaners, steel-wool pads, gritty washcloths or abrasive paper towels. OVEN DOOR INTERIOR Cleaning Method: ■ Self-Cleaning cycle: For optimal door cleaning result, wipe away any deposits with porcelain and staining, etching, ...
...High Temp Self-Cleaning Cycle" first. On double oven models, both sides. To avoid damage to push the oven door closed , touch OVEN LIGHT to remove the oven door. Oven Door IMPORTANT: To avoid oven door glass breakage: ■ Do not close the oven door if the racks are 120-volt, 40-watt...Continue to or decreasing the life of the new bulb, do not use abrasive cleaners, steel-wool pads, gritty washcloths or abrasive paper towels. OVEN DOOR INTERIOR Cleaning Method: ■ Self-Cleaning cycle: For optimal door cleaning result, wipe away any deposits with porcelain and staining, etching, ...
Use & Care Guide
Page 17
...9632; Has the function been entered? Higher temperatures will operate ■ Has a household fuse blown, or has a circuit breaker tripped? Removing unused oven racks prior to the locked position. See "Self-Cleaning Cycle" section. ■ Has a delay start Self-Clean cycle been set? If the problem...9632; On some models, has a delay start been set or turned on. See "Timed Cooking" section. ■ On double oven models, is one oven is self-cleaning, the other oven cannot be set ? See "Control Lock" section. ■ Is the Sabbath Mode set ? If a letter followed by a number...
...9632; Has the function been entered? Higher temperatures will operate ■ Has a household fuse blown, or has a circuit breaker tripped? Removing unused oven racks prior to the locked position. See "Self-Cleaning Cycle" section. ■ Has a delay start Self-Clean cycle been set? If the problem...9632; On some models, has a delay start been set or turned on. See "Timed Cooking" section. ■ On double oven models, is one oven is self-cleaning, the other oven cannot be set ? See "Control Lock" section. ■ Is the Sabbath Mode set ? If a letter followed by a number...
Use & Care Guide
Page 18
...repair parts sales. ■ Specialized customer assistance (Spanish speaking, hearing impaired, limited vision, etc.). See "Oven Temperature Control" section. ■ Was the oven preheated? Call the KitchenAid Customer eXperience Center toll free: 1-800-422-1230 or visit our website at : Customer eXperience Centre Whirlpool Canada...9632; Is the proper temperature set ? Check that you can write to KitchenAid with any questions or concerns at www.kitchenaid.ca. Adjust cooking time. ■ Has the oven door been opened while cooking? If you need replacement parts If you can ...
...repair parts sales. ■ Specialized customer assistance (Spanish speaking, hearing impaired, limited vision, etc.). See "Oven Temperature Control" section. ■ Was the oven preheated? Call the KitchenAid Customer eXperience Center toll free: 1-800-422-1230 or visit our website at : Customer eXperience Centre Whirlpool Canada...9632; Is the proper temperature set ? Check that you can write to KitchenAid with any questions or concerns at www.kitchenaid.ca. Adjust cooking time. ■ Has the oven door been opened while cooking? If you need replacement parts If you can ...
Use & Care Guide
Page 20
...published user, operator or installation instructions. 2. Service to arrange service, please determine whether your product will be provided by KitchenAid. 8. Removal or reinstallation of merchantability or fitness, so this major appliance was purchased. This warranty gives you specific legal .... If you want a longer or more comprehensive warranty than the representations contained in which it was purchased. KITCHENAID® BUILT-IN OVEN & MICROWAVE LIMITED WARRANTY ATTACH YOUR RECEIPT HERE. All warranty service is installed, operated and maintained according to ...
...published user, operator or installation instructions. 2. Service to arrange service, please determine whether your product will be provided by KitchenAid. 8. Removal or reinstallation of merchantability or fitness, so this major appliance was purchased. This warranty gives you specific legal .... If you want a longer or more comprehensive warranty than the representations contained in which it was purchased. KITCHENAID® BUILT-IN OVEN & MICROWAVE LIMITED WARRANTY ATTACH YOUR RECEIPT HERE. All warranty service is installed, operated and maintained according to ...
Installing Oven Under Cooktop
Page 1
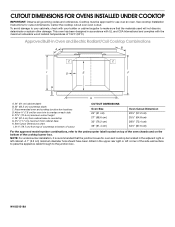
...temperatures of the side wall surface to pass the appliance cable through to make sure that the junction boxes for oven and cooktop be approved for use over oven cutout. Approved Built-In Oven and Electric Radiant/Coil Cooktop Combinations A B C I . 31³⁄₈" (79.7 cm) from... that the materials used will not discolor, delaminate or sustain other damage. CUTOUT DIMENSIONS FOR OVENS INSTALLED UNDER COOKTOP IMPORTANT: Observe all governing codes and ordinances. This oven has been designed in accordance with UL and CSA International and complies with your builder or ...
...temperatures of the side wall surface to pass the appliance cable through to make sure that the junction boxes for oven and cooktop be approved for use over oven cutout. Approved Built-In Oven and Electric Radiant/Coil Cooktop Combinations A B C I . 31³⁄₈" (79.7 cm) from... that the materials used will not discolor, delaminate or sustain other damage. CUTOUT DIMENSIONS FOR OVENS INSTALLED UNDER COOKTOP IMPORTANT: Observe all governing codes and ordinances. This oven has been designed in accordance with UL and CSA International and complies with your builder or ...

