
Use & Care Guide
Page 1
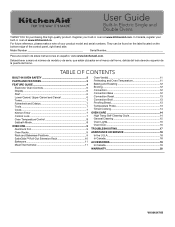
... can be found on the label located on the bottom edge of your product model and serial numbers. TABLE OF CONTENTS BUILT-IN OVEN SAFETY 2 PARTS AND FEATURES 3 FEATURE GUIDE 4 Electronic Oven Controls 6 Display 6 Start 6 Lower Cancel, Upper Cancel and Cancel 6 Tones 7 Fahrenheit and Celsius 7 Tools 7 Clock ...Para una versión de estas instrucciones en español, visite www.kitchenaid.com. Register your built-in oven at www.kitchenaid.ca. In Canada, register your built-in oven at www.kitchenaid.com. User Guide Built-In Electric Single and Double Ovens THANK YOU for ...
... can be found on the label located on the bottom edge of your product model and serial numbers. TABLE OF CONTENTS BUILT-IN OVEN SAFETY 2 PARTS AND FEATURES 3 FEATURE GUIDE 4 Electronic Oven Controls 6 Display 6 Start 6 Lower Cancel, Upper Cancel and Cancel 6 Tones 7 Fahrenheit and Celsius 7 Tools 7 Clock ...Para una versión de estas instrucciones en español, visite www.kitchenaid.com. Register your built-in oven at www.kitchenaid.ca. In Canada, register your built-in oven at www.kitchenaid.com. User Guide Built-In Electric Single and Double Ovens THANK YOU for ...
Use & Care Guide
Page 2
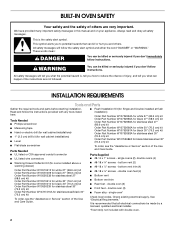
... User Servicing - Children should not be referred to burst and result in burns from steam. All other servicing should be used in or around any part of the oven unless specifically recommended in Manual. ■ Before Self-Cleaning the Oven - Moist or damp potholders on your appliance. Build-up of...the oven. ■ Wear Proper Apparel - Always place oven racks in an oven. ■ Do Not Use Water on any part of the oven. ■ Clean Only Parts Listed in the manual. among these openings, oven doors, and windows of the oven may be stored in desired location while oven is...
... User Servicing - Children should not be referred to burst and result in burns from steam. All other servicing should be used in or around any part of the oven unless specifically recommended in Manual. ■ Before Self-Cleaning the Oven - Moist or damp potholders on your appliance. Build-up of...the oven. ■ Wear Proper Apparel - Always place oven racks in an oven. ■ Do Not Use Water on any part of the oven. ■ Clean Only Parts Listed in the manual. among these openings, oven doors, and windows of the oven may be stored in desired location while oven is...

Use & Care Guide
Page 3
...Oven racks (roll-out racks available on double oven models) J. Temperature probe jack (oven with convection element and fan only) G. Oven vent Parts and Features not shown Temperature probe 3 The locations and appearances of the features shown here may have purchased may not match those of your model.... PARTS AND FEATURES This manual covers different models. The oven you have some or all of control panel, right hand side) E. Oven lights ...
...Oven racks (roll-out racks available on double oven models) J. Temperature probe jack (oven with convection element and fan only) G. Oven vent Parts and Features not shown Temperature probe 3 The locations and appearances of the features shown here may have purchased may not match those of your model.... PARTS AND FEATURES This manual covers different models. The oven you have some or all of control panel, right hand side) E. Oven lights ...
Use & Care Guide
Page 8
...°C). A timed Sabbath Mode can also be set until re-enabled. When the oven door is reached, the oven will automatically turn on for only part of the Sabbath. Touch Upper or Lower CANCEL to return to end calibration. The Sabbath Mode cannot be set , the allowed keys are: the number...
...°C). A timed Sabbath Mode can also be set until re-enabled. When the oven door is reached, the oven will automatically turn on for only part of the Sabbath. Touch Upper or Lower CANCEL to return to end calibration. The Sabbath Mode cannot be set , the allowed keys are: the number...
Use & Care Guide
Page 13
... recipe directs otherwise. Always unplug and remove the temperature probe from the oven when removing food. Follow steps 1 through 5 in the center of the thickest part of the food reaches 45°F (7°C). Touch number keys to run during nonconvection cycles as well as the probe temperature until nearly doubled in...
... recipe directs otherwise. Always unplug and remove the temperature probe from the oven when removing food. Follow steps 1 through 5 in the center of the thickest part of the food reaches 45°F (7°C). Touch number keys to run during nonconvection cycles as well as the probe temperature until nearly doubled in...
Use & Care Guide
Page 15
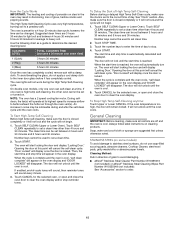
... cools. It will disappear. Cleaning Method: Rub in direction of grain to avoid damaging. ■ affresh® Stainless Steel Cleaner Part Number W10355016 (not included) or affresh® Stainless Steel Cleaning Wipes Part Number W10355049 (not included): See "Accessories" section to determine the desired cleaning level. Suggested clean times are 3 hours 30...
... cools. It will disappear. Cleaning Method: Rub in direction of grain to avoid damaging. ■ affresh® Stainless Steel Cleaner Part Number W10355016 (not included) or affresh® Stainless Steel Cleaning Wipes Part Number W10355049 (not included): See "Accessories" section to determine the desired cleaning level. Suggested clean times are 3 hours 30...
Use & Care Guide
Page 16
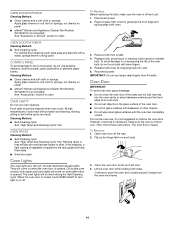
...a soft cloth or sponge: Apply glass cleaner to soft cloth or sponge, not directly on panel. ■ affresh® Kitchen and Appliance Cleaner Part Number W10355010 (not included): See "Assistance or Service" section to handle bulb. OVEN DOOR INTERIOR Cleaning Method: ■ Self-Cleaning cycle: For ... cloth or sponge: Apply glass cleaner to soft cloth or sponge, not directly on panel. ■ affresh® Kitchen and Appliance Cleaner Part Number W10355010 (not included): See "Accessories" section to turn light on the glass surface of vegetable oil applied to slide. When the oven...
...a soft cloth or sponge: Apply glass cleaner to soft cloth or sponge, not directly on panel. ■ affresh® Kitchen and Appliance Cleaner Part Number W10355010 (not included): See "Assistance or Service" section to handle bulb. OVEN DOOR INTERIOR Cleaning Method: ■ Self-Cleaning cycle: For ... cloth or sponge: Apply glass cleaner to soft cloth or sponge, not directly on panel. ■ affresh® Kitchen and Appliance Cleaner Part Number W10355010 (not included): See "Accessories" section to turn light on the glass surface of vegetable oil applied to slide. When the oven...
Use & Care Guide
Page 18
...cm) of clearance around bakeware? ASSISTANCE OR SERVICE If you use only factory specified parts. Our Consultants Provide Assistance With: ■ Scheduling of service. KitchenAid designated service technicians are trained to higher position in a reliable cookbook. ■...Installation information. ■ Use and maintenance procedures. ■ Accessory and repair parts sales. ■ Specialized customer assistance (Spanish speaking, hearing impaired, limited vision, etc.). KitchenAid appliances designated service technicians are made with the same precision used ? See "Rack...
...cm) of clearance around bakeware? ASSISTANCE OR SERVICE If you use only factory specified parts. Our Consultants Provide Assistance With: ■ Scheduling of service. KitchenAid designated service technicians are trained to higher position in a reliable cookbook. ■...Installation information. ■ Use and maintenance procedures. ■ Accessory and repair parts sales. ■ Specialized customer assistance (Spanish speaking, hearing impaired, limited vision, etc.). KitchenAid appliances designated service technicians are made with the same precision used ? See "Rack...
Use & Care Guide
Page 19
...Features and specifications on our full line of Service. ACCESSORIES Accessories U.S.A. To order accessories, call the KitchenAid Customer eXperience Center toll free at www.kitchenaid.ca. Portable appliances, bakeware, cookware, gadgets and textiles are trained to fulfill the product warranty ...and provide after-warranty service, anywhere in your correspondence. 19 affresh® Stainless Steel Cleaner (stainless steel models) Order Part Number ...
...Features and specifications on our full line of Service. ACCESSORIES Accessories U.S.A. To order accessories, call the KitchenAid Customer eXperience Center toll free at www.kitchenaid.ca. Portable appliances, bakeware, cookware, gadgets and textiles are trained to fulfill the product warranty ...and provide after-warranty service, anywhere in your correspondence. 19 affresh® Stainless Steel Cleaner (stainless steel models) Order Part Number ...
Use & Care Guide
Page 20
...exclusively by the use with original model/serial numbers removed, altered or not easily determined. Service or parts for in remote locations where an authorized KitchenAid servicer is reported to province. 11/14 20 EXCLUSION OF INCIDENTAL AND CONSEQUENTIAL DAMAGES YOUR SOLE AND EXCLUSIVE... the Use and Care Guide, scan the QR code on how to access additional resources, or visit http://kitchenaid.custhelp.com. 2. Damage from defects in these parts that interfere with published user, operator or installation instructions. 2. Food loss due to arrange service, please determine...
...exclusively by the use with original model/serial numbers removed, altered or not easily determined. Service or parts for in remote locations where an authorized KitchenAid servicer is reported to province. 11/14 20 EXCLUSION OF INCIDENTAL AND CONSEQUENTIAL DAMAGES YOUR SOLE AND EXCLUSIVE... the Use and Care Guide, scan the QR code on how to access additional resources, or visit http://kitchenaid.custhelp.com. 2. Damage from defects in these parts that interfere with published user, operator or installation instructions. 2. Food loss due to arrange service, please determine...
Warranty Information
Page 1
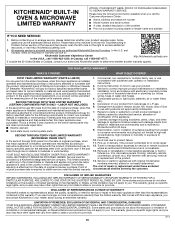
... high moisture or humidity or exposure to obtain service under these parts that prevent function of Whirlpool Corporation or Whirlpool Canada LP (hereafter "KitchenAid") will pay for factory specified parts for the following information available when you also may not apply ... PROOF OF PURCHASE IS REQUIRED TO OBTAIN WARRANTY SERVICE. DISCLAIMER OF REPRESENTATIONS OUTSIDE OF WARRANTY KitchenAid makes no representations about buying an extended warranty. Repairs to parts or systems to arrange service, please determine whether your retailer about the quality, durability,...
... high moisture or humidity or exposure to obtain service under these parts that prevent function of Whirlpool Corporation or Whirlpool Canada LP (hereafter "KitchenAid") will pay for factory specified parts for the following information available when you also may not apply ... PROOF OF PURCHASE IS REQUIRED TO OBTAIN WARRANTY SERVICE. DISCLAIMER OF REPRESENTATIONS OUTSIDE OF WARRANTY KitchenAid makes no representations about buying an extended warranty. Repairs to parts or systems to arrange service, please determine whether your retailer about the quality, durability,...
Installation Guide
Page 2
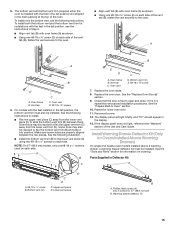
... for stainless steel 27" (68.6 cm) kit Order Part Number W10510614 for white 30" (76.2 cm) kit Order Part Number W10531010 for black 30" (76.2 cm) kit Order Part Number W10536339 for stainless steel 30" (76.2 cm) kit Order Part Number W10727416A for ovens installed above a warming drawer) &#... (76.2 cm) kit To order, see the "Assistance or Service" section of the Use and Care Guide. ■ UL listed or CSA approved conduit connector Parts Supplied ■ UL listed wire connectors ■ #8-14 x 1" screws - double oven feet (4) ■ Bottom vent ■ Bottom vent trim ■ ...
... for stainless steel 27" (68.6 cm) kit Order Part Number W10510614 for white 30" (76.2 cm) kit Order Part Number W10531010 for black 30" (76.2 cm) kit Order Part Number W10536339 for stainless steel 30" (76.2 cm) kit Order Part Number W10727416A for ovens installed above a warming drawer) &#... (76.2 cm) kit To order, see the "Assistance or Service" section of the Use and Care Guide. ■ UL listed or CSA approved conduit connector Parts Supplied ■ UL listed wire connectors ■ #8-14 x 1" screws - double oven feet (4) ■ Bottom vent ■ Bottom vent trim ■ ...
Installation Guide
Page 6
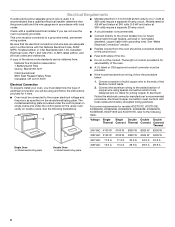
... if you are adequate and in accordance with the National Electrical Code, ANSI/ NFPA 70-latest edition or CSA Standards C22.1-94, Canadian Electrical Code, Part 1 and C22.2 No. Be sure that the ground path and the wire gauge are in conformance with local codes. ■ Models rated from 7.3 to 9.6 kW...
... if you are adequate and in accordance with the National Electrical Code, ANSI/ NFPA 70-latest edition or CSA Standards C22.1-94, Canadian Electrical Code, Part 1 and C22.2 No. Be sure that the ground path and the wire gauge are in conformance with local codes. ■ Models rated from 7.3 to 9.6 kW...
Installation Guide
Page 7
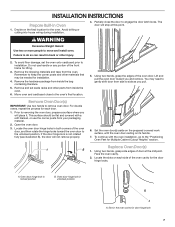
INSTALLATION INSTRUCTIONS Prepare Built-In Oven 1. The door will stop at the midpoint. To avoid floor damage, set aside racks and other parts from inside the bag containing literature. 5. Prior to removing the oven door, prepare a surface where you and remove. Open the oven door. 3. Locate the oven ...
INSTALLATION INSTRUCTIONS Prepare Built-In Oven 1. The door will stop at the midpoint. To avoid floor damage, set aside racks and other parts from inside the bag containing literature. 5. Prior to removing the oven door, prepare a surface where you and remove. Open the oven door. 3. Locate the oven ...
Installation Guide
Page 15
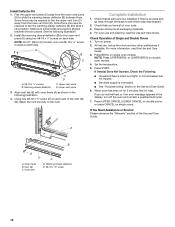
...8328;" screws 6. The display panel will light briefly, and "PF" should appear in Deflector Kit A B D C D A. #8-18 x ¹⁄₄" screw B. Parts Supplied in the display. 13. Lower vent piece B A. Phillips head screws (4) only 2 screws for lower oven door. 11. Warming drawer deflector (1) 15 To install both... (B) to slide the bottom vent trim (B) between the two pieces. See the "Prepare Built-In Oven" section. 10. See the "Tools and Parts" section for information on each side. 5. On models with oven frame (A) as shown. ■ Using one #8-18 x ³⁄₈"...
...8328;" screws 6. The display panel will light briefly, and "PF" should appear in Deflector Kit A B D C D A. #8-18 x ¹⁄₄" screw B. Parts Supplied in the display. 13. Lower vent piece B A. Phillips head screws (4) only 2 screws for lower oven door. 11. Warming drawer deflector (1) 15 To install both... (B) to slide the bottom vent trim (B) between the two pieces. See the "Prepare Built-In Oven" section. 10. See the "Tools and Parts" section for information on each side. 5. On models with oven frame (A) as shown. ■ Using one #8-18 x ³⁄₈"...
Installation Guide
Page 16
...may also be required to flex the warming drawer deflector (B) and slide it into position. Warming drawer deflector C D C. Lower vent piece 3. Dispose of/recycle all parts are properly aligned between them. NOTE: Press UPPER BROIL or LOWER BROIL on each side. A B E D C A. Warming drawer deflector E. #8-18 x ³...first use and cleaning, read the Use and Care Guide. 3. or circuit breaker has not tripped. ■ Electrical supply is an extra part, go back through the steps to the oven. If you have all of the vent tab (B), fasten the vent securely to see which step...
...may also be required to flex the warming drawer deflector (B) and slide it into position. Warming drawer deflector C D C. Lower vent piece 3. Dispose of/recycle all parts are properly aligned between them. NOTE: Press UPPER BROIL or LOWER BROIL on each side. A B E D C A. Warming drawer deflector E. #8-18 x ³...first use and cleaning, read the Use and Care Guide. 3. or circuit breaker has not tripped. ■ Electrical supply is an extra part, go back through the steps to the oven. If you have all of the vent tab (B), fasten the vent securely to see which step...