KitchenAid KVIB606DSS Support and Manuals
Get Help and Manuals for this KitchenAid item
View All Support Options Below
Free KitchenAid KVIB606DSS manuals!
Problems with KitchenAid KVIB606DSS?
Ask a Question
Free KitchenAid KVIB606DSS manuals!
Problems with KitchenAid KVIB606DSS?
Ask a Question
Popular KitchenAid KVIB606DSS Manual Pages
Warranty Information - Page 1

... a remote area where service by KitchenAid.
5. You will pay for Factory Specified Parts and repair labor to correct defects in materials or workmanship and is reported to KitchenAid within 30 days from the date of purchase.
6.
Service calls to correct the installation of your major appliance, to instruct you ever need service, first see the "Troubleshooting" section of your authorized...
Use & Care Guide - Page 2
... in this manual and on your appliance. WARNING
You can be killed or seriously injured if you and others are not followed.
2 TABLE OF CONTENTS
RANGE HOOD SAFETY 2
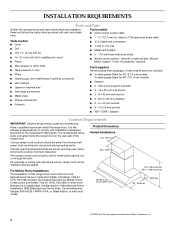
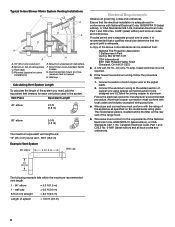
INSTALLATION REQUIREMENTS 4 Tools and Parts 4 Location Requirements 4 Venting Requirements 5 Electrical Requirements 6
INSTALLATION INSTRUCTIONS 7 Prepare Location 7 Install Range Hood 8 Install Range Hood Internal Blower...
Use & Care Guide - Page 3
...for examination and/or repair.
■ Sufficient ...tray, then turn hood ON when cooking at...INSTRUCTIONS
3 Crepes Suzette, Cherries Jubilee, Peppercorn Beef Flambé).
■ Clean ventilating fans frequently. CAUTION: To reduce risk of fire and to properly exhaust
air, be done by NFPA.
■ WARNING: To reduce the risk of fuel burning equipment to the service panel.
■ Installation...
Use & Care Guide - Page 4
... trademarks of the range hood. The model/serial rating plate is factory set for Manufactured Home Installation 1982 (Manufactured Home Sites, Communities and Setups) ANSI A225.1/NFPA 501A, or latest edition, or with any tools listed here. Cabinet opening dimensions that all governing codes and ordinances.
Read and follow the instructions provided with local codes.
36" (91.4 cm...
Use & Care Guide - Page 6
... Duct horizontal; A copy of the range hood.
■ Wire sizes must conform with local codes and industry accepted wiring practices.
■ ...installations)
E.
The model/serial plate is adequate. mount to crossmembers tied to the pigtail leads.
2. Connect a section of the National Electrical Code, ANSI/NFPA 70 (latest edition), or CSA Standards C22. 1-94, Canadian Electrical Code, Part...
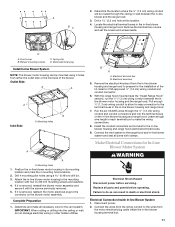
Use & Care Guide - Page 7
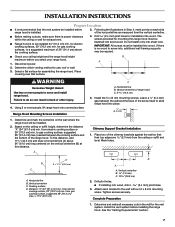
INSTALLATION INSTRUCTIONS
Prepare Location
■ It is recommended that the vent system be installed before range hood is no wood to screw into, additional wall framing supports may be required.
■ Check your range hood.
1. Do not fasten only into solid wood.
B A
2. Place covering over that their top edges are 2.0 mm) from the vertical centerline.
■ Before...
Use & Care Guide - Page 8

... the inside top or back (alternate location on some models), toward the left and right end of the range hood at the proper location for the single motor system. See "Range Hood Care" section. 2. See "Blower Motor System" in the Use and Care Guide.
2. Install the motor support bracket using two 4.2 x 8 mm screws. For internal blower...
Use & Care Guide - Page 9
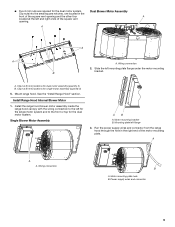
... motor system and to the front or top for dual motor assembly (quantity 5) B. Single Blower Motor Assembly
AB
A.
See the "Install Range Hood" section. Install the range hood blower motor assembly inside the range hood canopy with the wiring connection to the left and right ends of the motor mounting plate. Motor mounting plate hole...
Use & Care Guide - Page 10
This structure must be removed.
Failure to support the weight of the in the mounting plate.
C B A
A. Remove the 10 ... motor housing and set them aside.
6. Power supply connector from the blower motor assembly.
5. Disconnect the motor electrical plug from range hood
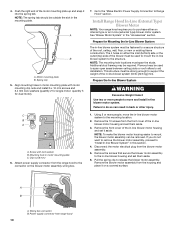
10 Install Range Hood In-Line (External Type) Blower Motor
NOTE: Your range hood requires you do ...
Use & Care Guide - Page 11
...with the screws previously removed. 5. Motor electrical plug
Install In-line Blower System
NOTE: The blower motor ...hood. Replace all necessary cuts for easy connection to the wires from the wiring conduit to the terminal boxes in the in -line blower housing terminal box.
11 Electrical terminal box B. A BC
2. Failure to make all parts and panels before servicing...
Use & Care Guide - Page 13
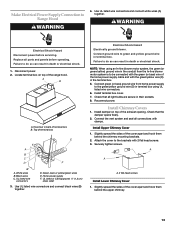
...vent system and seal all parts and panels before servicing. Make Electrical Power Supply Connection to the brackets with 2 flat head screws. 3. Replace all connections with clamps. ... or electrical shock.
Home power supply
F. Install Upper Chimney Cover
1.
Install Chimney Covers
1.
Slightly spread the sides of the range hood. A
A
A. Check that all light...
Use & Care Guide - Page 15
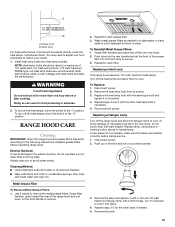
...instructions. Grasp filter handles and place rear of 175 watts each. Repeat for each filter.
Replacing a Halogen Lamp Turn off the heat lamps and allow the halogen lamp to secure. 3. Replace...set the front of the new lamp, do not operate, make sure the lamps are recommended. Replacing a Heat Lamp This range hood...Install...service. 1. Disconnect power. 2. Remove the lamp and replace...
Use & Care Guide - Page 17
...9632; Referrals to KitchenAid Canada with : ■ Features and specifications on our full line of appliances. ■ Use and maintenance procedures. To locate factory specified replacement parts in your appliance. technicians are made with : ■ Features and specifications on our full line of appliances. ■ Installation information. If you need replacement parts
If you need...
Use & Care Guide - Page 18
... correct the installation of your major appliance, to instruct you may find this information on the model and serial number label located on how to use your major appliance, to replace or repair house fuses, or to repair or replace appliance light bulbs, air filters or water filters. Service calls to correct house wiring or plumbing.
2. Consumable parts are...
Dimension Guide - Page 1

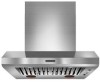
... Kit Part Number W10352733 is required. The chimney extension replaces the ...codes and industry accepted wiring practices. Range Hood - 36" (91.4 cm) and 48" (121.9 cm)
PRODUCT MODEL NUMBERS
KXW9736Y
KXW9748Y
Electrical Requirements:
q A 120 volt, 60 Hz., AC only, 15-amp, fused electrical circuit is available from gas cooking surfaces
The chimneys can be adjusted for installation...
KitchenAid KVIB606DSS Reviews
We have not received any reviews for KitchenAid yet.