
Use & Care Guide
Page 10
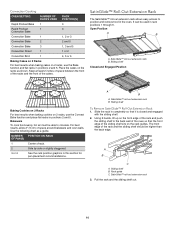
...The SatinGlide™ roll-out extension rack allows easy access to the back wall of the oven so that it is closed and engaged with the sliding shelf. 2. Bakeware... shelf To Remove SatinGlide™ Roll-Out Extension Rack: 1. Pull the rack and the sliding shelf out. 10 Convection Cooking OVEN SETTING NUMBER OF RACK RACKS USED POSITION(S) Rapid Preheat Bake 1 3 Rapid Preheat 1 3 Convection Bake Convection Bake 1 1, ... the racks and the front of space around bakeware and oven walls. For best results, allow 2" (5 cm) of the cakes. SatinGlide™ roll-out extension rack B.
...The SatinGlide™ roll-out extension rack allows easy access to the back wall of the oven so that it is closed and engaged with the sliding shelf. 2. Bakeware... shelf To Remove SatinGlide™ Roll-Out Extension Rack: 1. Pull the rack and the sliding shelf out. 10 Convection Cooking OVEN SETTING NUMBER OF RACK RACKS USED POSITION(S) Rapid Preheat Bake 1 3 Rapid Preheat 1 3 Convection Bake Convection Bake 1 1, ... the racks and the front of space around bakeware and oven walls. For best results, allow 2" (5 cm) of the cakes. SatinGlide™ roll-out extension rack B.
Use & Care Guide
Page 16
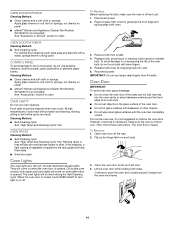
...these instructions. Close the oven door as far as it is heavy. Lift the oven door while holding both upper and lower lights will help them slide. ■ Steel-wool pad Oven Lights The oven lights are not fully inserted into wall. 6. They will shut. 4. When the oven door is closed and ...pull it away from the oven door frame. 16 Remove glass light cover by snapping back into the oven cavity or when bakeware extends past ...
...these instructions. Close the oven door as far as it is heavy. Lift the oven door while holding both upper and lower lights will help them slide. ■ Steel-wool pad Oven Lights The oven lights are not fully inserted into wall. 6. They will shut. 4. When the oven door is closed and ...pull it away from the oven door frame. 16 Remove glass light cover by snapping back into the oven cavity or when bakeware extends past ...
Installing Oven Under Cooktop
Page 1
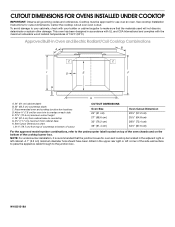
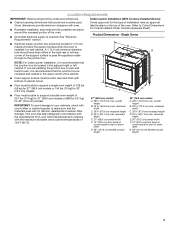
...Oven Size 24" (61 cm) 27" (68.6 cm) 30" (76.2 cm) 36" (91.4 cm) Oven...oven cutout. Approved Built-In Oven and Electric ...OVENS INSTALLED UNDER COOKTOP IMPORTANT: Observe all governing codes and ordinances. This oven... has been designed in accordance with UL and CSA International and complies with your builder or cabinet supplier to make sure that the junction boxes for oven trim to the junction box. Allow 1.6 cm) for oven... and cooktop be approved for cutout dimensions. Recommended oven... over an oven. I D...
...Oven Size 24" (61 cm) 27" (68.6 cm) 30" (76.2 cm) 36" (91.4 cm) Oven...oven cutout. Approved Built-In Oven and Electric ...OVENS INSTALLED UNDER COOKTOP IMPORTANT: Observe all governing codes and ordinances. This oven... has been designed in accordance with UL and CSA International and complies with your builder or cabinet supplier to make sure that the junction boxes for oven trim to the junction box. Allow 1.6 cm) for oven... and cooktop be approved for cutout dimensions. Recommended oven... over an oven. I D...

Installing Oven Under Cooktop
Page 2
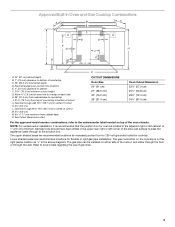
... be increased the same difference for oven trim to the undercounter label located on top of the cooktop burner box. A 1" (2.5 cm) minimum diameter hole should have been drilled in the adjacent right or left corner of the side wall surface to pass the appliance cable ...through to the junction box. 2 Allow 1.6 cm) for induction combinations. Approved Built-In Oven and Induction Cooktop Combinations A B C I . 32³⁄₈" (82.2 cm)...
... be increased the same difference for oven trim to the undercounter label located on top of the cooktop burner box. A 1" (2.5 cm) minimum diameter hole should have been drilled in the adjacent right or left corner of the side wall surface to pass the appliance cable ...through to the junction box. 2 Allow 1.6 cm) for induction combinations. Approved Built-In Oven and Induction Cooktop Combinations A B C I . 32³⁄₈" (82.2 cm)...
Installing Oven Under Cooktop
Page 3
...connection on top of countertop C. 25" (63.5 cm) countertop depth D. Approved Built-In Oven and Gas Cooktop Combinations A B C D E D E I . 31³⁄₈" (79.7 cm) from cabinet base O. Gas line through the wall. A 1" (2.5 cm) minimum diameter hole should have been drilled in the upper rear ...maximum from top of countertop to bottom of the oven chassis. Allow 1.6 cm) for oven be installed on the right (same location as "J" in the adjacent right or left corner of the side wall surface to pass the appliance cable through wall 10¹⁄₂" (26.7 cm) ...
...connection on top of countertop C. 25" (63.5 cm) countertop depth D. Approved Built-In Oven and Gas Cooktop Combinations A B C D E D E I . 31³⁄₈" (79.7 cm) from cabinet base O. Gas line through the wall. A 1" (2.5 cm) minimum diameter hole should have been drilled in the upper rear ...maximum from top of countertop to bottom of the oven chassis. Allow 1.6 cm) for oven be installed on the right (same location as "J" in the adjacent right or left corner of the side wall surface to pass the appliance cable through wall 10¹⁄₂" (26.7 cm) ...
Installation Guide
Page 2
Tools Needed ■ Phillips screwdriver ■ Measuring tape ■ Hand or electric drill (for wall cabinet installations) ■ 1" (2.5 cm) drill bit (for wall cabinet installations) ■ Level ■ Flush Installation Kit (for Single and Double installed at flush installation...you what can kill or hurt you don't immediately follow instructions. This symbol alerts you don't follow instructions. single oven* Check local codes. single ovens (2), double ovens (4) ■ Warming Drawer Deflector Kit (for stainless steel/black 30" (76.2 cm) kit To order, see ...
Tools Needed ■ Phillips screwdriver ■ Measuring tape ■ Hand or electric drill (for wall cabinet installations) ■ 1" (2.5 cm) drill bit (for wall cabinet installations) ■ Level ■ Flush Installation Kit (for Single and Double installed at flush installation...you what can kill or hurt you don't immediately follow instructions. This symbol alerts you don't follow instructions. single oven* Check local codes. single ovens (2), double ovens (4) ■ Warming Drawer Deflector Kit (for stainless steel/black 30" (76.2 cm) kit To order, see ...
Installation Guide
Page 3
...;⁄₄" (67.9 cm) recessed height D. 23¹⁄₄" (59.1 cm) max. Single Ovens ■ Electrical supply junction box should have an approval label located on rear wall A behind oven, it is required. This oven has been designed in a wall cabinet. recessed width C. 26³⁄₄" (67.9 cm) recessed height D. 23¹⁄...
...;⁄₄" (67.9 cm) recessed height D. 23¹⁄₄" (59.1 cm) max. Single Ovens ■ Electrical supply junction box should have an approval label located on rear wall A behind oven, it is required. This oven has been designed in a wall cabinet. recessed width C. 26³⁄₄" (67.9 cm) recessed height D. 23¹⁄...
Installation Guide
Page 14
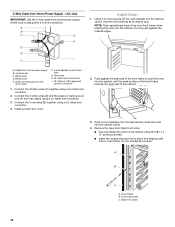
... (or bare) ground wire (of the cabinet. 3. Push oven completely into the cabinet and center the oven into the cabinet. A B C A. Oven frame B. A B C G H D E I . Using 2 or more people, lift the oven partially into the cabinet until the back surface of the front frame touches the front wall of the oven cable) using a UL listed wire connector. 2. Only IMPORTANT...
... (or bare) ground wire (of the cabinet. 3. Push oven completely into the cabinet and center the oven into the cabinet. A B C A. Oven frame B. A B C G H D E I . Using 2 or more people, lift the oven partially into the cabinet until the back surface of the front frame touches the front wall of the oven cable) using a UL listed wire connector. 2. Only IMPORTANT...

