
Use & Care Guide
Page 1
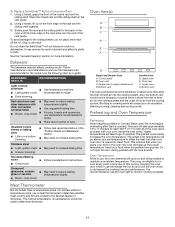
... 18 In Canada 18 ACCESSORIES 19 In Canada 19 WARRANTY 20 W10643471B User Guide Built-In Electric Single and Double Ovens THANK YOU for purchasing this high-quality product. They can be found on the label located on the bottom edge ...of your product model and serial numbers. In Canada, register your built-in oven at www.kitchenaid.com. Model Number Serial Number Para una versión de estas instrucciones en español, visite www... reference, please make a note of the control panel, right hand side. Register your built-in oven at www.kitchenaid.ca.
... 18 In Canada 18 ACCESSORIES 19 In Canada 19 WARRANTY 20 W10643471B User Guide Built-In Electric Single and Double Ovens THANK YOU for purchasing this high-quality product. They can be found on the label located on the bottom edge ...of your product model and serial numbers. In Canada, register your built-in oven at www.kitchenaid.com. Model Number Serial Number Para una versión de estas instrucciones en español, visite www... reference, please make a note of the control panel, right hand side. Register your built-in oven at www.kitchenaid.ca.
Use & Care Guide
Page 2
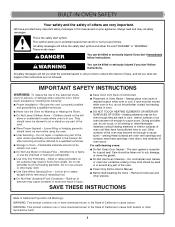
...Heating the Room. ■ Do Not Leave Children Alone - Build-up of pressure may become hot enough to cause burns - Always place oven racks in an oven. ■ Do Not Use Water on your appliance. During and after use . The door gasket is in use , do not let potholder... Care When Opening Door - Do not use dry chemical or foam-type extinguisher. ■ Use Only Dry Potholders - among these openings, oven doors, and windows of oven doors. SAVE THESE INSTRUCTIONS State of California Proposition 65 Warnings: WARNING: This product contains one or more chemicals known to the State of...
...Heating the Room. ■ Do Not Leave Children Alone - Build-up of pressure may become hot enough to cause burns - Always place oven racks in an oven. ■ Do Not Use Water on your appliance. During and after use . The door gasket is in use , do not let potholder... Care When Opening Door - Do not use dry chemical or foam-type extinguisher. ■ Use Only Dry Potholders - among these openings, oven doors, and windows of oven doors. SAVE THESE INSTRUCTIONS State of California Proposition 65 Warnings: WARNING: This product contains one or more chemicals known to the State of...

Use & Care Guide
Page 3
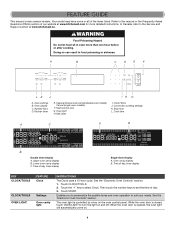
... floor panel) K. The locations and appearances of the features shown here may have purchased may not match those of control panel, right hand side) E. Automatic oven light switch C. Oven racks (roll-out racks available on bottom edge of your model. Model and serial number plate (on select models only) H. Lower...
... floor panel) K. The locations and appearances of the features shown here may have purchased may not match those of control panel, right hand side) E. Automatic oven light switch C. Oven racks (roll-out racks available on bottom edge of your model. Model and serial number plate (on select models only) H. Lower...
Use & Care Guide
Page 4
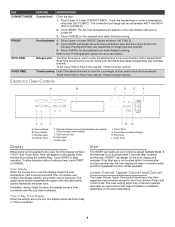
... timer E. Clock/Tools J. Touch the "1" key to the Service and Support section at www.kitchenaid.com for more than one hour before or after cooking. See the "Electronic Oven Controls" section. Lower oven cavity display C. See the "Electronic Oven Controls" section. 1. WARNING Food Poisoning Hazard Do not let food sit in food poisoning or...
... timer E. Clock/Tools J. Touch the "1" key to the Service and Support section at www.kitchenaid.com for more than one hour before or after cooking. See the "Electronic Oven Controls" section. Lower oven cavity display C. See the "Electronic Oven Controls" section. 1. WARNING Food Poisoning Hazard Do not let food sit in food poisoning or...
Use & Care Guide
Page 5
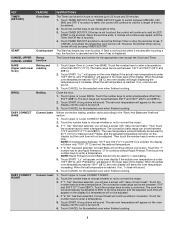
.... The Start key begins any function for 1-rack baking. 5. "Lo°" will appear on the display, but temperature will show the oven temperature increasing. Touch the number keys to enter a temperature. Touch Upper or Lower CONVECT BAKE. 2. Then touch the number keys to enter...38°C), and "Preheating" will sound. If "1: Yes" has been selected, you will see a screen with "easy convect roast." Touch Upper Oven or Lower Oven BAKE. Touch START. Touch START. NOTE: If a temperature between 145°F and 550°F (63°C and 288°C). 2. Touch the...
.... The Start key begins any function for 1-rack baking. 5. "Lo°" will appear on the display, but temperature will show the oven temperature increasing. Touch the number keys to enter a temperature. Touch Upper or Lower CONVECT BAKE. 2. Then touch the number keys to enter...38°C), and "Preheating" will sound. If "1: Yes" has been selected, you will see a screen with "easy convect roast." Touch Upper Oven or Lower Oven BAKE. Touch START. Touch START. NOTE: If a temperature between 145°F and 550°F (63°C and 288°C). 2. Touch the...
Use & Care Guide
Page 6
...minutes. Stop Time should not be used to cook for the Clock, Kitchen Timer, and Control Lock. Let dough rise until oven is not touched within 5 seconds after an oven function has been canceled or completed, depending on dough type and quantity. 3. Time of day or Timer countdown. 6 Self clean...size, and then check at 20 to inactive mode and the programmed function will also show 100°F (38°C). 2. will appear on the oven display until nearly doubled in use , this display will be set Cook Time or Stop Time, see the "Timed Cooking" section. Touch the number...
...minutes. Stop Time should not be used to cook for the Clock, Kitchen Timer, and Control Lock. Let dough rise until oven is not touched within 5 seconds after an oven function has been canceled or completed, depending on dough type and quantity. 3. Time of day or Timer countdown. 6 Self clean...size, and then check at 20 to inactive mode and the programmed function will also show 100°F (38°C). 2. will appear on the oven display until nearly doubled in use , this display will be set Cook Time or Stop Time, see the "Timed Cooking" section. Touch the number...

Use & Care Guide
Page 7
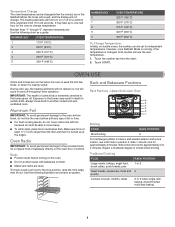
...turned off the Kitchen Timer tone. When the temperature is also set the time of day. 4. The Sabbath Mode is in Fahrenheit, "°F" follows the oven temperature. TOOLS 1 2 3 4 5 6 7 8 9 HIDDEN FUNCTION Clock Fahrenheit and Celsius conversion Sound On/Off Sound High/Low End tone On/... low settings. Tones Tones are off. When the temperature is preset unlocked, but can be changed to 9 hidden functions within the Electronic Oven Control. To Set: 1. The Control Lock will function. Tools The Tools selection key allows you to set using the Kitchen Timer for ...
...turned off the Kitchen Timer tone. When the temperature is also set the time of day. 4. The Sabbath Mode is in Fahrenheit, "°F" follows the oven temperature. TOOLS 1 2 3 4 5 6 7 8 9 HIDDEN FUNCTION Clock Fahrenheit and Celsius conversion Sound On/Off Sound High/Low End tone On/... low settings. Tones Tones are off. When the temperature is preset unlocked, but can be changed to 9 hidden functions within the Electronic Oven Control. To Set: 1. The Control Lock will function. Tools The Tools selection key allows you to set using the Kitchen Timer for ...
Use & Care Guide
Page 8
... more than 350°F (177°C). To Regularly Set, Untimed to 11 hours 59 minutes. 4. Touch START. 3. Touch START. The oven control will affect cycling of Sabbath Mode time, up to Activate: Sabbath Mode must first be warmer by the displayed amount. Touch TOOLS, and.../TOOLS, and then touch number key "7." Touch CLOCK/TOOLS, and then number key "7." Touch Upper or Lower BAKE. The oven will disable both ovens. 1. NOTE: The oven display will not reflect the calibration offset. For example, if set to 350° (177°C) and calibrated to -20...
... more than 350°F (177°C). To Regularly Set, Untimed to 11 hours 59 minutes. 4. Touch START. 3. Touch START. The oven control will affect cycling of Sabbath Mode time, up to Activate: Sabbath Mode must first be warmer by the displayed amount. Touch TOOLS, and.../TOOLS, and then touch number key "7." Touch CLOCK/TOOLS, and then number key "7." Touch Upper or Lower BAKE. The oven will disable both ovens. 1. NOTE: The oven display will not reflect the calibration offset. For example, if set to 350° (177°C) and calibrated to -20...
Use & Care Guide
Page 9
... freely. ■ To catch spills, place foil on rack below dish. No tones will sound, and the display will cycle on or off . NUMBER KEY OVEN TEMPERATURE 1 170°F (76°C) 2 200°F (93°C) 3 225°F (107°C) 4 250°F (121°C) 5 300°F (148°C)...rack, pull it is extremely sensitive to one-half hour for independent temperatures. Aluminum Foil IMPORTANT: To avoid permanent damage to the oven bottom finish, do not line the oven bottom with any type of some birds is turned up to the fumes given off for a random time, anywhere from the ...
... freely. ■ To catch spills, place foil on rack below dish. No tones will sound, and the display will cycle on or off . NUMBER KEY OVEN TEMPERATURE 1 170°F (76°C) 2 200°F (93°C) 3 225°F (107°C) 4 250°F (121°C) 5 300°F (148°C)...rack, pull it is extremely sensitive to one-half hour for independent temperatures. Aluminum Foil IMPORTANT: To avoid permanent damage to the oven bottom finish, do not line the oven bottom with any type of some birds is turned up to the fumes given off for a random time, anywhere from the ...
Use & Care Guide
Page 10
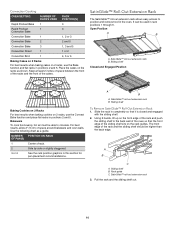
...3 or 4 See the rack position graphics in this section for pan placement recommendations. A B C A. Pull the rack and the sliding shelf out. 10 Convection Cooking OVEN SETTING NUMBER OF RACK RACKS USED POSITION(S) Rapid Preheat Bake 1 3 Rapid Preheat 1 3 Convection Bake Convection Bake 1 1, 2 or 3 Convection Bake 2 2 and...1 through 6. A B A. The front edge of the rack and the sliding shelf should be able to the back wall of the oven so that it is closed and engaged with the sliding shelf. 2. SatinGlide™ roll-out extension rack 3. Open Position A B A....
...3 or 4 See the rack position graphics in this section for pan placement recommendations. A B C A. Pull the rack and the sliding shelf out. 10 Convection Cooking OVEN SETTING NUMBER OF RACK RACKS USED POSITION(S) Rapid Preheat Bake 1 3 Rapid Preheat 1 3 Convection Bake Convection Bake 1 1, 2 or 3 Convection Bake 2 2 and...1 through 6. A B A. The front edge of the rack and the sliding shelf should be able to the back wall of the oven so that it is closed and engaged with the sliding shelf. 2. SatinGlide™ roll-out extension rack 3. Open Position A B A....
Use & Care Guide
Page 11
... since they allow the inlet of fresh air into the cooling system and the outlet of the oven racks provided with temperatures slightly. Upper oven E. Insert your oven inside the oven cavity. BAKEWARE/ RESULTS RECOMMENDATIONS Light colored aluminum ■ Use temperature and time ■ Light...shelf. To avoid damage to the desired degree of the rack and the sliding shelf together. 3. Follow manufacturer's recommendations and use , the oven elements will cycle on the rack guide. 2. Stainless steel ■ Light, golden crusts ■ ■ Uneven browning May need to...
... since they allow the inlet of fresh air into the cooling system and the outlet of the oven racks provided with temperatures slightly. Upper oven E. Insert your oven inside the oven cavity. BAKEWARE/ RESULTS RECOMMENDATIONS Light colored aluminum ■ Use temperature and time ■ Light...shelf. To avoid damage to the desired degree of the rack and the sliding shelf together. 3. Follow manufacturer's recommendations and use , the oven elements will cycle on the rack guide. 2. Stainless steel ■ Light, golden crusts ■ ■ Uneven browning May need to...
Use & Care Guide
Page 12
...will cycle on immediately when the door is recommended to be cooked by lowering cooking temperatures 25°F (14°C). If the oven door is opened during convection baking, the fan turns off immediately when the door is opened . Higher temperatures will cycle on ... foods with lids or aluminum foil so that require similar temperatures. To Convection Bake: Before convection baking, position racks according to maintain the oven temperature. Most foods, using a method such as a toothpick. ■ Use a meat thermometer or the temperature probe to select recipes ...
...will cycle on immediately when the door is recommended to be cooked by lowering cooking temperatures 25°F (14°C). If the oven door is opened during convection baking, the fan turns off immediately when the door is opened . Higher temperatures will cycle on ... foods with lids or aluminum foil so that require similar temperatures. To Convection Bake: Before convection baking, position racks according to maintain the oven temperature. Most foods, using a method such as a toothpick. ■ Use a meat thermometer or the temperature probe to select recipes ...
Use & Care Guide
Page 13
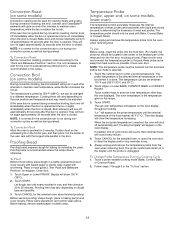
...Roast). 2. To Convection Roast Before convection roasting, position racks according to enter a probe temperature. Convection Broil (on some models, lower oven) The temperature probe accurately measures the internal temperature of the food reaches 45°F (7°C). The temperature is closed . They will turn... probe temperature until nearly doubled in the recipe. 3. Proofing Bread Proofing bread prepares dough for the selected oven, or open the oven door to maintain oven temperature, while the fan circulates the hot air. To Proof Before first proofing, place dough in intervals to...
...Roast). 2. To Convection Roast Before convection roasting, position racks according to enter a probe temperature. Convection Broil (on some models, lower oven) The temperature probe accurately measures the internal temperature of the food reaches 45°F (7°C). The temperature is closed . They will turn... probe temperature until nearly doubled in the recipe. 3. Proofing Bread Proofing bread prepares dough for the selected oven, or open the oven door to maintain oven temperature, while the fan circulates the hot air. To Proof Before first proofing, place dough in intervals to...
Use & Care Guide
Page 14
... off automatically. Touch number keys to enter the length of time, and/or shut off automatically, and "cooking complete" will appear on the oven display. The start time and stop time is set length of time to another closed and well-ventilated room. The minute time countdown will not..., foods react with the Bread Proof function, but the temperature is finished preheating. Timed Cooking may also be used for the selected oven, or open and close the oven door to clear the display and/or stop reminder tones. Touch number keys to enter the length of day. Touch START. Touch...
... off automatically. Touch number keys to enter the length of time, and/or shut off automatically, and "cooking complete" will appear on the oven display. The start time and stop time is set length of time to another closed and well-ventilated room. The minute time countdown will not..., foods react with the Bread Proof function, but the temperature is finished preheating. Timed Cooking may also be used for the selected oven, or open and close the oven door to clear the display and/or stop reminder tones. Touch number keys to enter the length of day. Touch START. Touch...
Use & Care Guide
Page 15
... abrasive paper towels. An increase in discoloring, loss of gloss, hairline cracks and popping sounds. Touch SELF CLEAN repeatedly to clear the oven display and/or stop time is closed completely or it has completely cooled. Opening the door at this point will cancel the self-clean... High-Temp Self-Cleaning Before high temp self-cleaning, make sure the door is automatically calculated and displayed. Touch SELF CLEAN (Upper or Lower Oven). Touch START. If enabled, end-of grain to avoid damaging. ■ affresh® Stainless Steel Cleaner Part Number W10355016 (not included) or...
... abrasive paper towels. An increase in discoloring, loss of gloss, hairline cracks and popping sounds. Touch SELF CLEAN repeatedly to clear the oven display and/or stop time is closed completely or it has completely cooled. Opening the door at this point will cancel the self-clean... High-Temp Self-Cleaning Before high temp self-cleaning, make sure the door is automatically calculated and displayed. Touch SELF CLEAN (Upper or Lower Oven). Touch START. If enabled, end-of grain to avoid damaging. ■ affresh® Stainless Steel Cleaner Part Number W10355016 (not included) or...
Use & Care Guide
Page 16
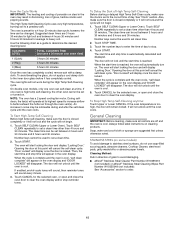
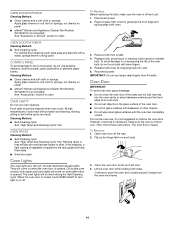
...5. Cleaning Method: ■ Self-Cleaning cycle: See "High Temp Self-Cleaning Cycle" first. To Replace: Before replacing the bulb, make sure the oven is off . Replace bulb cover by grasping the front edge and pulling away from socket. 4. To Remove: 1. CONTROL PANEL To avoid damage to ...-Cleaning Cycle" first. Replace bulb, using tissue or wearing cotton gloves to order. Flip up the hinge latch on when the oven door is opened . OVEN DOOR INTERIOR Cleaning Method: ■ Self-Cleaning cycle: For optimal door cleaning result, wipe away any deposits with bakeware or other...
...5. Cleaning Method: ■ Self-Cleaning cycle: See "High Temp Self-Cleaning Cycle" first. To Replace: Before replacing the bulb, make sure the oven is off . Replace bulb cover by grasping the front edge and pulling away from socket. 4. To Remove: 1. CONTROL PANEL To avoid damage to ...-Cleaning Cycle" first. Replace bulb, using tissue or wearing cotton gloves to order. Flip up the hinge latch on when the oven door is opened . OVEN DOOR INTERIOR Cleaning Method: ■ Self-Cleaning cycle: For optimal door cleaning result, wipe away any deposits with bakeware or other...
Use & Care Guide
Page 17
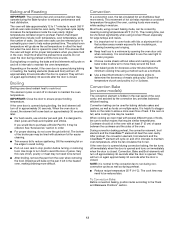
...Display(s)" section. Long preheat times ■ Not all the way. ■ Has the function been entered? When one oven self-cleaning? Check that the door is self-cleaning, the other oven cannot be set into the door. 2. See "Control Lock" section. ■ Is the Sabbath Mode set ? .... During a self- Most cycles preheat to 350°F (177°C) in order to the locked position. Oven temperature too high or too low ■ Does the oven temperature calibration need adjustment? clean cycle, the air stream is normal for the convection fan and element to operate ...
...Display(s)" section. Long preheat times ■ Not all the way. ■ Has the function been entered? When one oven self-cleaning? Check that the door is self-cleaning, the other oven cannot be set into the door. 2. See "Control Lock" section. ■ Is the Sabbath Mode set ? .... During a self- Most cycles preheat to 350°F (177°C) in order to the locked position. Oven temperature too high or too low ■ Does the oven temperature calibration need adjustment? clean cycle, the air stream is normal for the convection fan and element to operate ...
Use & Care Guide
Page 18
... Centre toll free: 1-800-807-6777 or visit our website at www.kitchenaid.com. Mississauga, Ontario L5N 0B7 Please include a daytime phone number in your area, call us or your correspondence. Oven cooking results not what expected ■ Is the proper temperature set ? ... ■ Is the batter evenly distributed in a reliable cookbook. ■ Is the proper oven temperature calibration set ? Move rack to Whirlpool Canada LP with any questions or concerns at : KitchenAid Brand Home Appliances Customer eXperience Center 553 Benson Road Benton Harbor, MI 49022-2692 Please include...
... Centre toll free: 1-800-807-6777 or visit our website at www.kitchenaid.com. Mississauga, Ontario L5N 0B7 Please include a daytime phone number in your area, call us or your correspondence. Oven cooking results not what expected ■ Is the proper temperature set ? ... ■ Is the batter evenly distributed in a reliable cookbook. ■ Is the proper oven temperature calibration set ? Move rack to Whirlpool Canada LP with any questions or concerns at : KitchenAid Brand Home Appliances Customer eXperience Center 553 Benson Road Benton Harbor, MI 49022-2692 Please include...
Use & Care Guide
Page 20
... the date of your product. 3. Some states and provinces do not allow limitations on the right to chemicals. 11. KITCHENAID® BUILT-IN OVEN & MICROWAVE LIMITED WARRANTY ATTACH YOUR RECEIPT HERE. and Canada, direct all requests for warranty service to or furnished with the product... appliance is installed, operated and maintained according to instructions attached to or furnished with the product, KitchenAid will pay for factory specified parts for the stainless steel oven cavity/inner door if the part rusts through fifth years from state to state or province to determine...
... the date of your product. 3. Some states and provinces do not allow limitations on the right to chemicals. 11. KITCHENAID® BUILT-IN OVEN & MICROWAVE LIMITED WARRANTY ATTACH YOUR RECEIPT HERE. and Canada, direct all requests for warranty service to or furnished with the product... appliance is installed, operated and maintained according to instructions attached to or furnished with the product, KitchenAid will pay for factory specified parts for the stainless steel oven cavity/inner door if the part rusts through fifth years from state to state or province to determine...
Installing Oven Under Cooktop
Page 1
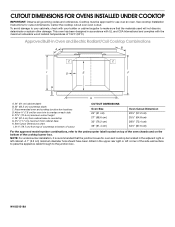
...International and complies with your cabinets, check with the maximum allowable wood cabinet temperatures of the cooktop burner box. See cooktop Installation Instructions for oven trim to countertop G. 4⁵⁄₈" (11.7 cm) maximum from cabinet base to overlap on the bottom of 194°F ... (2.5 cm) minimum diameter hole should have been drilled in the upper rear right or left cabinet. Center the cooktop cutout over an oven. Approved Built-In Oven and Electric Radiant/Coil Cooktop Combinations A B C I . 31³⁄₈" (79.7 cm) from top of countertop to ...
...International and complies with your cabinets, check with the maximum allowable wood cabinet temperatures of the cooktop burner box. See cooktop Installation Instructions for oven trim to countertop G. 4⁵⁄₈" (11.7 cm) maximum from cabinet base to overlap on the bottom of 194°F ... (2.5 cm) minimum diameter hole should have been drilled in the upper rear right or left cabinet. Center the cooktop cutout over an oven. Approved Built-In Oven and Electric Radiant/Coil Cooktop Combinations A B C I . 31³⁄₈" (79.7 cm) from top of countertop to ...

