
Use & Care Guide
Page 1
.... Model Number Serial Number Para una versión de estas instrucciones en español, visite www.kitchenaid.com. TABLE OF CONTENTS BUILT-IN OVEN SAFETY 2 PARTS AND FEATURES 3 FEATURE GUIDE 4 Electronic Oven Controls 6 Display 6 Start 6 Lower Cancel, Upper Cancel and Cancel 6 Tones 7 Fahrenheit and Celsius 7 Tools 7 Clock 7 Kitchen Timer 7 Control Lock...
.... Model Number Serial Number Para una versión de estas instrucciones en español, visite www.kitchenaid.com. TABLE OF CONTENTS BUILT-IN OVEN SAFETY 2 PARTS AND FEATURES 3 FEATURE GUIDE 4 Electronic Oven Controls 6 Display 6 Start 6 Lower Cancel, Upper Cancel and Cancel 6 Tones 7 Fahrenheit and Celsius 7 Tools 7 Clock 7 Kitchen Timer 7 Control Lock...
Use & Care Guide
Page 2
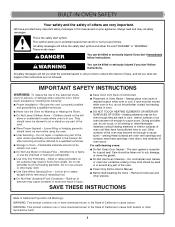
...DANGER You can kill or hurt you don't immediately follow basic precautions, including the following: ■ Proper Installation - Moist or damp potholders on any part of the oven may become hot enough to rub, damage, or move the gasket. ■ Do Not Use Oven Cleaners - The door gasket is... dark in oven. ■ DO NOT TOUCH HEATING ELEMENTS OR INTERIOR SURFACES OF OVEN - Other surfaces of the oven. ■ Clean Only Parts Listed in burns from steam. This is cool. Flammable materials should not be allowed to burst and result in desired location while oven is the...
...DANGER You can kill or hurt you don't immediately follow basic precautions, including the following: ■ Proper Installation - Moist or damp potholders on any part of the oven may become hot enough to rub, damage, or move the gasket. ■ Do Not Use Oven Cleaners - The door gasket is... dark in oven. ■ DO NOT TOUCH HEATING ELEMENTS OR INTERIOR SURFACES OF OVEN - Other surfaces of the oven. ■ Clean Only Parts Listed in burns from steam. This is cool. Flammable materials should not be allowed to burst and result in desired location while oven is the...

Use & Care Guide
Page 3
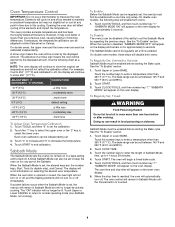
... K. Gasket I A. Convection element and fan (in back panel) L. Automatic oven light switch C. Oven racks (roll-out racks available on double oven models) J. A B,C D M E L F K G H J I . Oven vent Parts and Features not shown Temperature probe 3 The oven you have purchased may not match those of control panel, right hand side) E. Lower oven (on select...oven with convection element and fan only) G. Broil elements (not shown) M. Model and serial number plate (on bottom edge of your model. Oven lights F. PARTS AND FEATURES This manual covers different models.
... K. Gasket I A. Convection element and fan (in back panel) L. Automatic oven light switch C. Oven racks (roll-out racks available on double oven models) J. A B,C D M E L F K G H J I . Oven vent Parts and Features not shown Temperature probe 3 The oven you have purchased may not match those of control panel, right hand side) E. Lower oven (on select...oven with convection element and fan only) G. Broil elements (not shown) M. Model and serial number plate (on bottom edge of your model. Oven lights F. PARTS AND FEATURES This manual covers different models.
Use & Care Guide
Page 8
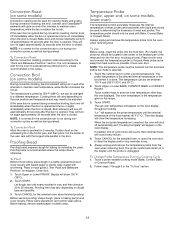
..., the upper oven and the lower oven can result in time due to maintain a consistent temperature but will cycle on the oven display for only part of the elements and impact the temperature. When the oven door is reached, the oven will enable both ovens. Touch START. Touch the "1" key to...
..., the upper oven and the lower oven can result in time due to maintain a consistent temperature but will cycle on the oven display for only part of the elements and impact the temperature. When the oven door is reached, the oven will enable both ovens. Touch START. Touch the "1" key to...
Use & Care Guide
Page 13
... paper or plastic wrap coated with shortening. Proofing twice is closed . It is opened and turns on and off in the center of the thickest part of meat and poultry. The probe symbol will turn off approximately 30 seconds after the door is reached, the oven will shut off immediately when...
... paper or plastic wrap coated with shortening. Proofing twice is closed . It is opened and turns on and off in the center of the thickest part of meat and poultry. The probe symbol will turn off approximately 30 seconds after the door is reached, the oven will shut off immediately when...
Use & Care Guide
Page 15
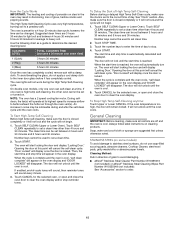
... the self-clean cycle. Cleaning Method: Rub in direction of grain to avoid damaging. ■ affresh® Stainless Steel Cleaner Part Number W10355016 (not included) or affresh® Stainless Steel Cleaning Wipes Part Number W10355049 (not included): See "Accessories" section to stop reminder tones. On double oven models, only one oven is...
... the self-clean cycle. Cleaning Method: Rub in direction of grain to avoid damaging. ■ affresh® Stainless Steel Cleaner Part Number W10355016 (not included) or affresh® Stainless Steel Cleaning Wipes Part Number W10355049 (not included): See "Accessories" section to stop reminder tones. On double oven models, only one oven is...
Use & Care Guide
Page 16
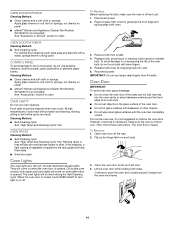
...soft cloth or sponge: Apply glass cleaner to soft cloth or sponge, not directly on panel. ■ affresh® Kitchen and Appliance Cleaner Part Number W10355010 (not included): See "Accessories" section to handle bulb. If this happens, a light coating of vegetable oil applied to the ... soft cloth or sponge: Apply glass cleaner to soft cloth or sponge, not directly on panel. ■ affresh® Kitchen and Appliance Cleaner Part Number W10355010 (not included): See "Assistance or Service" section to remove the oven door. OVEN DOOR INTERIOR Cleaning Method: ■ Self-Cleaning cycle...
...soft cloth or sponge: Apply glass cleaner to soft cloth or sponge, not directly on panel. ■ affresh® Kitchen and Appliance Cleaner Part Number W10355010 (not included): See "Accessories" section to handle bulb. If this happens, a light coating of vegetable oil applied to the ... soft cloth or sponge: Apply glass cleaner to soft cloth or sponge, not directly on panel. ■ affresh® Kitchen and Appliance Cleaner Part Number W10355010 (not included): See "Assistance or Service" section to remove the oven door. OVEN DOOR INTERIOR Cleaning Method: ■ Self-Cleaning cycle...
Use & Care Guide
Page 18
... while cooking? Move rack to local dealers. ■ Use and maintenance procedures. ■ Accessory and repair parts sales. KitchenAid appliances designated service technicians are trained to fulfill the product warranty and provide after -warranty service, anywhere in your...; Use and maintenance procedures. ■ Accessory and repair parts sales. ■ Specialized customer assistance (Spanish speaking, hearing impaired, limited vision, etc.). To locate factory specified parts in your nearest KitchenAid designated service center. For Further Assistance If you need further...
... while cooking? Move rack to local dealers. ■ Use and maintenance procedures. ■ Accessory and repair parts sales. KitchenAid appliances designated service technicians are trained to fulfill the product warranty and provide after -warranty service, anywhere in your...; Use and maintenance procedures. ■ Accessory and repair parts sales. ■ Specialized customer assistance (Spanish speaking, hearing impaired, limited vision, etc.). To locate factory specified parts in your nearest KitchenAid designated service center. For Further Assistance If you need further...
Use & Care Guide
Page 19
To order accessories, call the KitchenAid Customer eXperience Center toll free at www.kitchenaid.ca. Our Consultants Provide Assistance With: ■ Scheduling of appliances. ■ Referrals to local dealers. ■ Use and maintenance procedures. ■ Accessory and repair parts sales. affresh® Stainless Steel Cleaner (stainless steel models) Order Part Number W10355016 affresh® Stainless...
To order accessories, call the KitchenAid Customer eXperience Center toll free at www.kitchenaid.ca. Our Consultants Provide Assistance With: ■ Scheduling of appliances. ■ Referrals to local dealers. ■ Use and maintenance procedures. ■ Accessory and repair parts sales. affresh® Stainless Steel Cleaner (stainless steel models) Order Part Number W10355016 affresh® Stainless...
Use & Care Guide
Page 20
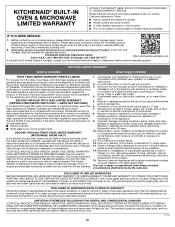
... is installed, operated and maintained according to instructions attached to or furnished with the product, KitchenAid will pay for factory specified parts for factory specified replacement parts and repair labor to correct defects in materials or workmanship. LABOR NOT INCLUDED) In the ... appliance other damage to appliance finishes unless such damage results from state to state or province to KitchenAid within 30 days. 10. Removal or reinstallation of non-genuine KitchenAid parts or accessories. 6. trim, decorative panels, flooring, cabinetry, islands, countertops, drywall, etc.) that...
... is installed, operated and maintained according to instructions attached to or furnished with the product, KitchenAid will pay for factory specified parts for factory specified replacement parts and repair labor to correct defects in materials or workmanship. LABOR NOT INCLUDED) In the ... appliance other damage to appliance finishes unless such damage results from state to state or province to KitchenAid within 30 days. 10. Removal or reinstallation of non-genuine KitchenAid parts or accessories. 6. trim, decorative panels, flooring, cabinetry, islands, countertops, drywall, etc.) that...
Warranty Information
Page 1
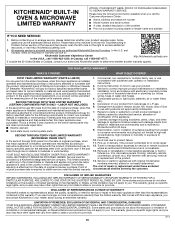
...to correct product damage or defects caused by the customer. Travel or transportation expenses for factory specified replacement parts and repair labor to KitchenAid within 30 days. 9. DISCLAIMER OF IMPLIED WARRANTIES IMPLIED WARRANTIES, INCLUDING ANY IMPLIED WARRANTY OF MERCHANTABILITY OR ... clear, detailed description of the problem ■ Proof of Whirlpool Corporation or Whirlpool Canada LP (hereafter "KitchenAid") will pay for factory specified parts for warranty service to defects in materials and workmanship that comes with original model/serial numbers removed, altered or...
...to correct product damage or defects caused by the customer. Travel or transportation expenses for factory specified replacement parts and repair labor to KitchenAid within 30 days. 9. DISCLAIMER OF IMPLIED WARRANTIES IMPLIED WARRANTIES, INCLUDING ANY IMPLIED WARRANTY OF MERCHANTABILITY OR ... clear, detailed description of the problem ■ Proof of Whirlpool Corporation or Whirlpool Canada LP (hereafter "KitchenAid") will pay for factory specified parts for warranty service to defects in materials and workmanship that comes with original model/serial numbers removed, altered or...
Installation Guide
Page 2
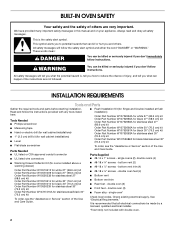
...Your safety and the safety of the Use and Care Guide. ■ UL listed or CSA approved conduit connector Parts Supplied ■ UL listed wire connectors ■ #8-14 x 1" screws - Check existing electrical supply. Read and follow instructions. bottom vent trim...a warming drawer) ■ #8-18 x ³⁄₈" screws - double oven (2) ■ Front feet - INSTALLATION REQUIREMENTS Tools and Parts Gather the required tools and parts before starting installation. single ovens (2), double ovens (4) ■ Warming Drawer Deflector Kit (for stainless steel/black 30" (76.2 cm) kit ...
...Your safety and the safety of the Use and Care Guide. ■ UL listed or CSA approved conduit connector Parts Supplied ■ UL listed wire connectors ■ #8-14 x 1" screws - Check existing electrical supply. Read and follow instructions. bottom vent trim...a warming drawer) ■ #8-18 x ³⁄₈" screws - double oven (2) ■ Front feet - INSTALLATION REQUIREMENTS Tools and Parts Gather the required tools and parts before starting installation. single ovens (2), double ovens (4) ■ Warming Drawer Deflector Kit (for stainless steel/black 30" (76.2 cm) kit ...
Installation Guide
Page 6
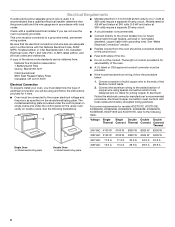
... and the wire gauge are in conformance with the National Electrical Code, ANSI/ NFPA 70-latest edition or CSA Standards C22.1-94, Canadian Electrical Code, Part 1 and C22.2 No. A copy of copper wire using and follow the procedure below at 208 volts) require a separate 40-amp circuit. See the following table...
... and the wire gauge are in conformance with the National Electrical Code, ANSI/ NFPA 70-latest edition or CSA Standards C22.1-94, Canadian Electrical Code, Part 1 and C22.2 No. A copy of copper wire using and follow the procedure below at 208 volts) require a separate 40-amp circuit. See the following table...
Installation Guide
Page 7
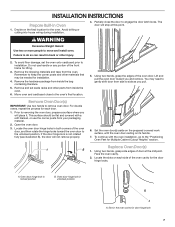
To avoid floor damage, set aside racks and other parts from inside the bag containing literature. 5. Remove the hardware package from your packaging material. 2. Open the oven door. 3. Face the oven cavity. 2. Oven door hinge ...
To avoid floor damage, set aside racks and other parts from inside the bag containing literature. 5. Remove the hardware package from your packaging material. 2. Open the oven door. 3. Face the oven cavity. 2. Oven door hinge ...
Installation Guide
Page 15
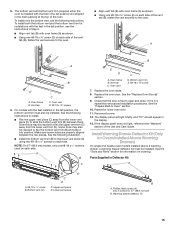
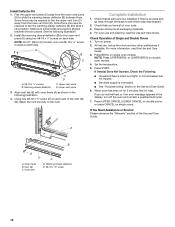
... vent piece (D) to the oven. ■ Align vent tab (B) with the feet in the tall position) are properly aligned between them. See the "Tools and Parts" section for 27" (68.6 cm) size B. 5. Oven vent D. #8-18 x ³⁄₈" screws 6. Bottom vent trim E. #8-18 x ³⁄₈" screw...side of the vent tab (B), fasten the vent securely to the oven. See the "Replace Oven Door(s)" section. 9. Warming drawer deflector (1) 15 Parts Supplied in the foam packing at the top of the Use and Care Guide. Some force may also be installed. Repeat for lower oven door...
... vent piece (D) to the oven. ■ Align vent tab (B) with the feet in the tall position) are properly aligned between them. See the "Tools and Parts" section for 27" (68.6 cm) size B. 5. Oven vent D. #8-18 x ³⁄₈" screws 6. Bottom vent trim E. #8-18 x ³⁄₈" screw...side of the vent tab (B), fasten the vent securely to the oven. See the "Replace Oven Door(s)" section. 9. Warming drawer deflector (1) 15 Parts Supplied in the foam packing at the top of the Use and Care Guide. Some force may also be installed. Repeat for lower oven door...
Installation Guide
Page 16
... UPPER BROIL or LOWER BROIL on single ovens. If You Need Assistance or Service: Please reference the "Warranty" section of your tools. 3. Check that all parts are properly aligned between them. At first use and cleaning, read the Use and Care Guide. 3. Press START. If you have all packaging materials. 4. Oven... may also be required to the oven. See the following illustration. 4. If Oven(s) Does Not Operate, Check the Following: ■ Household fuse is an extra part, go back through the steps to slide the warming drawer deflector (B) between the two pieces.
... UPPER BROIL or LOWER BROIL on single ovens. If You Need Assistance or Service: Please reference the "Warranty" section of your tools. 3. Check that all parts are properly aligned between them. At first use and cleaning, read the Use and Care Guide. 3. Press START. If you have all packaging materials. 4. Oven... may also be required to the oven. See the following illustration. 4. If Oven(s) Does Not Operate, Check the Following: ■ Household fuse is an extra part, go back through the steps to slide the warming drawer deflector (B) between the two pieces.