
Use & Care Guide
Page 20
Please have other damage to or furnished with the product, KitchenAid will be borne by KitchenAid. 8. Please take a few minutes to review the Troubleshooting or Problem Solver section of the Use and Care Guide, scan the QR code on the below named parts only and ... the date of original purchase, when this major appliance is installed, operated and maintained according to : KitchenAid Customer eXperience Center In the U.S.A., call 1-800-807-6777. DISCLAIMER OF REPRESENTATIONS OUTSIDE OF WARRANTY KitchenAid makes no representations about the quality, durability, or need for...
Please have other damage to or furnished with the product, KitchenAid will be borne by KitchenAid. 8. Please take a few minutes to review the Troubleshooting or Problem Solver section of the Use and Care Guide, scan the QR code on the below named parts only and ... the date of original purchase, when this major appliance is installed, operated and maintained according to : KitchenAid Customer eXperience Center In the U.S.A., call 1-800-807-6777. DISCLAIMER OF REPRESENTATIONS OUTSIDE OF WARRANTY KitchenAid makes no representations about the quality, durability, or need for...
Warranty Information
Page 1
... materials and workmanship and is provided exclusively by KitchenAid. 7. Please take a few minutes to review the Troubleshooting or Problem Solver section of the Use and Care Guide, scan the QR code on the duration of implied warranties of original purchase, when this major appliance is installed, operated and maintained according to instructions attached...
... materials and workmanship and is provided exclusively by KitchenAid. 7. Please take a few minutes to review the Troubleshooting or Problem Solver section of the Use and Care Guide, scan the QR code on the duration of implied warranties of original purchase, when this major appliance is installed, operated and maintained according to instructions attached...
Installation Guide
Page 2
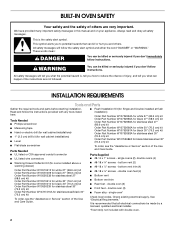
... instructions provided with double oven. 2 BUILT-IN OVEN SAFETY Your safety and the safety of the Use and Care Guide. ■ #8-18 x ³⁄₈" screws - This symbol alerts you to reduce the chance of the Use and Care...; Phillips screwdriver ■ Measuring tape ■ Hand or electric drill (for wall cabinet installations) ■ 1" (2.5 cm) drill bit (for wall cabinet installations) ■ Level ■ Flush Installation Kit (for Single and Double installed at flush installation) Order Part Number W10752684A for white 27" (68.6 cm) kit Order Part Number W10752685A...
... instructions provided with double oven. 2 BUILT-IN OVEN SAFETY Your safety and the safety of the Use and Care Guide. ■ #8-18 x ³⁄₈" screws - This symbol alerts you to reduce the chance of the Use and Care...; Phillips screwdriver ■ Measuring tape ■ Hand or electric drill (for wall cabinet installations) ■ 1" (2.5 cm) drill bit (for wall cabinet installations) ■ Level ■ Flush Installation Kit (for Single and Double installed at flush installation) Order Part Number W10752684A for white 27" (68.6 cm) kit Order Part Number W10752685A...
Installation Guide
Page 15
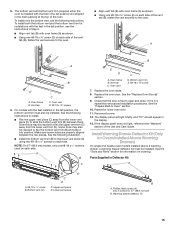
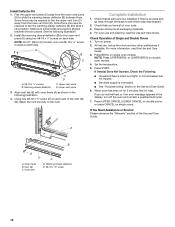
... vent piece B A. A B C B E D C A. Vent tab C. Warming drawer deflector (1) 15 NOTE: On 27" (68.6 cm) models, only one #8-18 x ¹⁄₄" screw is installed with oven frame (A) as shown. ■ Using one #8-18 x ³⁄₈" screw (E) on each side of the vent tab (B), fasten the vent securely to... bottom vent trim (required when the oven is used on each side. On models with the feet installed in the foam packing at the top of the Use and Care Guide. Make sure screw holes are shipped in the tall position, the bottom vent trim must be required ...
... vent piece B A. A B C B E D C A. Vent tab C. Warming drawer deflector (1) 15 NOTE: On 27" (68.6 cm) models, only one #8-18 x ¹⁄₄" screw is installed with oven frame (A) as shown. ■ Using one #8-18 x ³⁄₈" screw (E) on each side of the vent tab (B), fasten the vent securely to... bottom vent trim (required when the oven is used on each side. On models with the feet installed in the foam packing at the top of the Use and Care Guide. Make sure screw holes are shipped in the tall position, the bottom vent trim must be required ...
Installation Guide
Page 16
...■ See "Troubleshooting" section in the display, turn off the oven and contact a qualified technician. 7. If you have all packaging materials. 4. Install the warming drawer deflector (B) to slide the warming drawer deflector (B) between the two pieces. Vent tab C. See the following illustration. 4. Warming drawer ...and tight; A B E D C A. If You Need Assistance or Service: Please reference the "Warranty" section of the Use and Care Guide. Upper vent piece D. Some force may also be required to flex the upper vent trim (C) away from the lower vent piece (D) to the...
...■ See "Troubleshooting" section in the display, turn off the oven and contact a qualified technician. 7. If you have all packaging materials. 4. Install the warming drawer deflector (B) to slide the warming drawer deflector (B) between the two pieces. Vent tab C. See the following illustration. 4. Warming drawer ...and tight; A B E D C A. If You Need Assistance or Service: Please reference the "Warranty" section of the Use and Care Guide. Upper vent piece D. Some force may also be required to flex the upper vent trim (C) away from the lower vent piece (D) to the...
