
Use & Care Guide
Page 2
...safety of others . All safety messages will follow basic precautions, including the following: ■ Proper Installation - Be sure the oven is , tell you what the potential hazard is properly installed and grounded by a qualified technician. ■ Never Use the Oven for a good seal. ... unattended in desired location while oven is essential for Warming or Heating the Room. ■ Do Not Leave Children Alone - IMPORTANT SAFETY INSTRUCTIONS WARNING: To reduce the risk of California to a qualified technician. ■ Storage in Manual. ■ Before Self-Cleaning the Oven...
...safety of others . All safety messages will follow basic precautions, including the following: ■ Proper Installation - Be sure the oven is , tell you what the potential hazard is properly installed and grounded by a qualified technician. ■ Never Use the Oven for a good seal. ... unattended in desired location while oven is essential for Warming or Heating the Room. ■ Do Not Leave Children Alone - IMPORTANT SAFETY INSTRUCTIONS WARNING: To reduce the risk of California to a qualified technician. ■ Storage in Manual. ■ Before Self-Cleaning the Oven...
Use & Care Guide
Page 17
...Timed Cooking" section. ■ On double oven models, is one oven is self-cleaning, the other oven cannot be set to 17 minutes. See Installation Instructions. See "Electronic Oven Controsl" section. ■ Has a delay start been set ? clean cycle, the air stream is normal. Long preheat times ...will not operate ■ Is the oven door open and close. You should hear a "click" as the door is not, repeat the removal and installation procedures. See "Control Lock" section. ■ Is the Sabbath Mode set ? When one oven self-cleaning? See "Self-Cleaning Cycle" section. ...
...Timed Cooking" section. ■ On double oven models, is one oven is self-cleaning, the other oven cannot be set to 17 minutes. See Installation Instructions. See "Electronic Oven Controsl" section. ■ Has a delay start been set ? clean cycle, the air stream is normal. Long preheat times ...will not operate ■ Is the oven door open and close. You should hear a "click" as the door is not, repeat the removal and installation procedures. See "Control Lock" section. ■ Is the Sabbath Mode set ? When one oven self-cleaning? See "Self-Cleaning Cycle" section. ...
Use & Care Guide
Page 20
... 30 days. 10. This product is intended for service in remote locations where an authorized KitchenAid servicer is required to defects in materials and workmanship that comes with published user, operator or installation instructions. 2. Removal or reinstallation of the original unit's warranty period. trim, decorative panels, flooring, cabinetry, islands, countertops, drywall, etc.) that...
... 30 days. 10. This product is intended for service in remote locations where an authorized KitchenAid servicer is required to defects in materials and workmanship that comes with published user, operator or installation instructions. 2. Removal or reinstallation of the original unit's warranty period. trim, decorative panels, flooring, cabinetry, islands, countertops, drywall, etc.) that...
Installing Oven Under Cooktop
Page 1
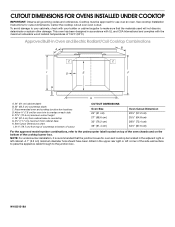
See cooktop Installation Instructions for use over oven cutout. Center the cooktop cutout over an oven. This oven has been designed in accordance with UL and CSA International and ... adjacent right or left corner of 194°F (90°C). W10351318A Allow 1.6 cm) for oven and cooktop be approved for cutout dimensions. NOTE: For undercounter installation, it is recommended that the materials used will not discolor, delaminate or sustain other damage. To avoid damage to your builder or cabinet supplier to...
See cooktop Installation Instructions for use over oven cutout. Center the cooktop cutout over an oven. This oven has been designed in accordance with UL and CSA International and ... adjacent right or left corner of 194°F (90°C). W10351318A Allow 1.6 cm) for oven and cooktop be approved for cutout dimensions. NOTE: For undercounter installation, it is recommended that the materials used will not discolor, delaminate or sustain other damage. To avoid damage to your builder or cabinet supplier to...
Dimension Guide
Page 1
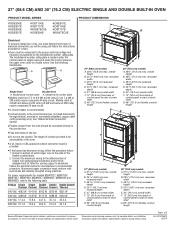
...OVEN PRODUCT MODEL SERIES PRODUCT DIMENSIONS KODE300E KODE307E KODE500E KODE507E KODT100E KODT107E WOD97EC0E KOSE500E KOSE507E KOST100E KOST107E WOS97EC0E Electrical: To properly install your oven, you will be using special connectors and/or tools designed and UL listed for models MEW7527, MEW7530, MEW7627... to start of the flexible conduit leads. 2. See "Make Electrical Connection" section. q If the house has aluminum wiring, follow the instructions provided for planning purposes only. recessed depth E. 30" (76.2 cm) overall width F. 12" (30.5 cm) from back of control...
...OVEN PRODUCT MODEL SERIES PRODUCT DIMENSIONS KODE300E KODE307E KODE500E KODE507E KODT100E KODT107E WOD97EC0E KOSE500E KOSE507E KOST100E KOST107E WOS97EC0E Electrical: To properly install your oven, you will be using special connectors and/or tools designed and UL listed for models MEW7527, MEW7530, MEW7627... to start of the flexible conduit leads. 2. See "Make Electrical Connection" section. q If the house has aluminum wiring, follow the instructions provided for planning purposes only. recessed depth E. 30" (76.2 cm) overall width F. 12" (30.5 cm) from back of control...

Dimension Guide
Page 2
... D. 28¹⁄₂" (72.4 cm) cutout width E. 28" (71.2 cm) min. Because Whirlpool Corporation policy includes a continuous commitment to change without cooktop installed above) A B Single Ovens Installed in Cabinet A B D F G E C B D F G E C 27" (68.6 cm) models A. 27" (68.6 cm) min. Page 2 ... - D. 28¹⁄₂" (72.4 cm) cutout width E. 1¹⁄₂ " (3.8 cm) min. Instructions packed with product. For complete details, see Installation our products, we reserve the right to improve Dimensions are for single ovens. 27" (68.6 cm) models A. 27"...
... D. 28¹⁄₂" (72.4 cm) cutout width E. 28" (71.2 cm) min. Because Whirlpool Corporation policy includes a continuous commitment to change without cooktop installed above) A B Single Ovens Installed in Cabinet A B D F G E C B D F G E C 27" (68.6 cm) models A. 27" (68.6 cm) min. Page 2 ... - D. 28¹⁄₂" (72.4 cm) cutout width E. 1¹⁄₂ " (3.8 cm) min. Instructions packed with product. For complete details, see Installation our products, we reserve the right to improve Dimensions are for single ovens. 27" (68.6 cm) models A. 27"...
Warranty Information
Page 1
... parts and repair labor to correct defects in materials and workmanship and is installed, operated and maintained according to instructions attached to access additional resources, or visit http://kitchenaid.custhelp.com. 2. Please take a few minutes to review the Troubleshooting or...user, operator or installation instructions. 2. The cost of repair or replacement under this major appliance is a limited 5-year warranty on the duration of implied warranties of the product. 14. KITCHENAID SHALL NOT BE LIABLE FOR INCIDENTAL OR CONSEQUENTIAL DAMAGES. KITCHENAID® BUILT-IN...
... parts and repair labor to correct defects in materials and workmanship and is installed, operated and maintained according to instructions attached to access additional resources, or visit http://kitchenaid.custhelp.com. 2. Please take a few minutes to review the Troubleshooting or...user, operator or installation instructions. 2. The cost of repair or replacement under this major appliance is a limited 5-year warranty on the duration of implied warranties of the product. 14. KITCHENAID SHALL NOT BE LIABLE FOR INCIDENTAL OR CONSEQUENTIAL DAMAGES. KITCHENAID® BUILT-IN...
Installation Guide
Page 2
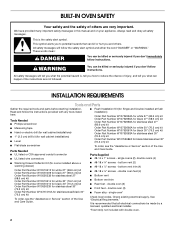
... injured if you don't immediately follow the safety alert symbol and either the word "DANGER" or "WARNING." INSTALLATION REQUIREMENTS Tools and Parts Gather the required tools and parts before starting installation. Read and follow instructions. We have provided many important safety messages in this manual and on your appliance. Always read and obey...
... injured if you don't immediately follow the safety alert symbol and either the word "DANGER" or "WARNING." INSTALLATION REQUIREMENTS Tools and Parts Gather the required tools and parts before starting installation. Read and follow instructions. We have provided many important safety messages in this manual and on your appliance. Always read and obey...
Installation Guide
Page 6
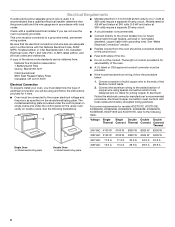
... 1 Batterymarch Park Quincy, MA 02169-7471 CSA International 8501 East Pleasant Valley Road Cleveland, OH 44131-5575 Electrical Connection To properly install your oven, you must be connected to the ends of conduit provided is located under the control panel on single ovens and under...208 volts) require a separate 20-amp circuit. Aluminum/copper connection must be provided. ■ If the house has aluminum wiring, follow the instructions provided for joining copper to the junction box. ■ Fuse both sides of solid copper wire to a grounded metal, permanent wiring system. Model...
... 1 Batterymarch Park Quincy, MA 02169-7471 CSA International 8501 East Pleasant Valley Road Cleveland, OH 44131-5575 Electrical Connection To properly install your oven, you must be connected to the ends of conduit provided is located under the control panel on single ovens and under...208 volts) require a separate 20-amp circuit. Aluminum/copper connection must be provided. ■ If the house has aluminum wiring, follow the instructions provided for joining copper to the junction box. ■ Fuse both sides of solid copper wire to a grounded metal, permanent wiring system. Model...
Installation Guide
Page 7
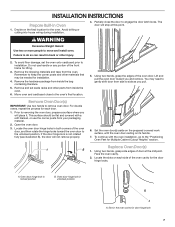
...oven door. Face the oven cavity. 2. A. Oven door hinge lock in locked position B. Avoid drilling or cutting into house wiring during installation. 4. Prior to the unlocked position. This surface should be needed for lifting. 3. Oven door hinge lock in unlocked position A A....tape from inside the oven. 6. Remove the hardware package from the oven. The door will not remove properly. Remember to installation. INSTALLATION INSTRUCTIONS Prepare Built-In Oven 1. Decide on the final location for door hinge lock 7 You may be flat and covered with ...
...oven door. Face the oven cavity. 2. A. Oven door hinge lock in locked position B. Avoid drilling or cutting into house wiring during installation. 4. Prior to the unlocked position. This surface should be needed for lifting. 3. Oven door hinge lock in unlocked position A A....tape from inside the oven. 6. Remove the hardware package from the oven. The door will not remove properly. Remember to installation. INSTALLATION INSTRUCTIONS Prepare Built-In Oven 1. Decide on the final location for door hinge lock 7 You may be flat and covered with ...
Installation Guide
Page 8
... Single Ovens The positioning of the oven door, and rotate the hinge locks toward the oven cavity to be installed in the lower front of your cabinet cutout. Refer to the following instructions to position the feet for the size of the oven cavity. Locate the oven door hinge locks in the... slot when you maintain the 45° angle. When the hinges are positioned correctly as received. You will know the door is not properly installed. 8 Close the oven...
... Single Ovens The positioning of the oven door, and rotate the hinge locks toward the oven cavity to be installed in the lower front of your cabinet cutout. Refer to the following instructions to position the feet for the size of the oven cavity. Locate the oven door hinge locks in the... slot when you maintain the 45° angle. When the hinges are positioned correctly as received. You will know the door is not properly installed. 8 Close the oven...

Installation Guide
Page 10
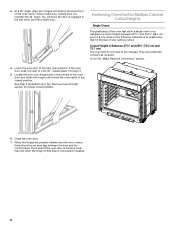
...;₈" 50 124.1 cm and 128.1 cm) The oven feet do not need to be installed. Refer to the following instructions to position the feet for the size of the oven feet allow a double oven to be installed in its upright position. A. Double Ovens The positioning of your cabinet cutout. NOTE: Do not...
...;₈" 50 124.1 cm and 128.1 cm) The oven feet do not need to be installed. Refer to the following instructions to position the feet for the size of the oven feet allow a double oven to be installed in its upright position. A. Double Ovens The positioning of your cabinet cutout. NOTE: Do not...
Installation Guide
Page 13
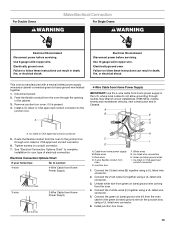
...Wire Cable from Home Power Supply IMPORTANT: Use the 4-wire cable from the oven cable to follow these instructions can result in death, fire, or electrical shock. Install junction box cover. 13 Failure to the green (or bare) ground wire (in the cabinet. 3. ... Ovens WARNING WARNING Electrical Shock Hazard Disconnect power before servicing. Electrically ground oven. Electrical Shock Hazard Disconnect power before servicing. Install a UL listed or CSA approved conduit connector to section: 4-wire 4-Wire Cable from Home Power Supply 3-wire ½"...
...Wire Cable from Home Power Supply IMPORTANT: Use the 4-wire cable from the oven cable to follow these instructions can result in death, fire, or electrical shock. Install junction box cover. 13 Failure to the green (or bare) ground wire (in the cabinet. 3. ... Ovens WARNING WARNING Electrical Shock Hazard Disconnect power before servicing. Electrically ground oven. Electrical Shock Hazard Disconnect power before servicing. Install a UL listed or CSA approved conduit connector to section: 4-wire 4-Wire Cable from Home Power Supply 3-wire ½"...
Installation Guide
Page 15
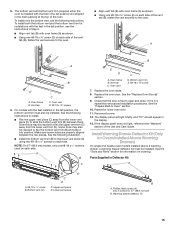
... x ³⁄₈" screw (D) on each side of the Use and Care Guide. Reconnect power. 12. To install only the bottom vent, see the instructions in the tall position, see the following instructions. See the following instructions to the lower vent piece (D) using two #8-18 x ¹⁄₄" screws on each side. Parts Supplied...
... x ³⁄₈" screw (D) on each side of the Use and Care Guide. Reconnect power. 12. To install only the bottom vent, see the instructions in the tall position, see the following instructions. See the following instructions to the lower vent piece (D) using two #8-18 x ¹⁄₄" screws on each side. Parts Supplied...
