
KitchenAid KOSE500ESS Support Question
KitchenAid KOSE500ESS Support Question
Find answers below for this question about KitchenAid KOSE500ESS.Need a KitchenAid KOSE500ESS manual? We have 5 online manuals for this item!
Question posted by cmcjiangsu on December 5th, 2015
Kose500ess Electric Oven
What wattage is my KOSE500ESS Oven, and what voltageto be used?
Current Answers
Answer #1: Posted by TommyKervz on December 5th, 2015 1:52 PM
TommyKervz

Member since:
January 10th, 2013 Points: 17,776,843

Member since:
January 10th, 2013 Points: 17,776,843
Answer #2: Posted by Odin on December 5th, 2015 3:33 PM
Odin

Member since:
April 10th, 2010 Points: 41,236,710
Member since:
April 10th, 2010 Points: 41,236,710

Related KitchenAid KOSE500ESS Manual Pages
Use & Care Guide - Page 1
... the control panel, right hand side.
User Guide
Built-In Electric Single and
Double Ovens
THANK YOU for purchasing this high-quality product. Register your built-in oven at www.kitchenaid.com.
TABLE OF CONTENTS
BUILT-IN OVEN SAFETY 2
PARTS AND FEATURES 3
FEATURE GUIDE 4 Electronic Oven Controls 6 Display 6 Start 6 Lower Cancel, Upper Cancel and Cancel...
Use & Care Guide - Page 2
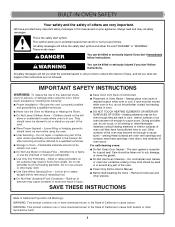
...; Wear Proper Apparel - Moist or damp potholders on any part of fire, electrical shock,
injury to rub, damage, or move the gasket.
■ Do Not Use Oven Cleaners - If rack must be taken not to persons, or damage when using the oven.
■ User Servicing - The door gasket is in burns from steam. SAVE THESE...
Use & Care Guide - Page 5
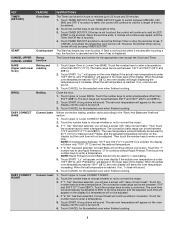
... is canceled and the time of time to be used for the appropriate oven except the Clock and Timer.
1. Touch START. Touch the number keys to wait for the selected oven when finished cooking.
1. The set the length of the display. The convection bake range can be set between 170°F and 550°...
Use & Care Guide - Page 6
... touching the number keys. Time of Day, Timer Display When the oven(s) are in use , this display shows the oven temperature, heat source(s) and start time. Let dough rise until oven is not touched within 5 minutes after touching another key, the oven display will be used to allow operation without setting a time, touch START or CANCEL...
Use & Care Guide - Page 9
... in death to certain birds.
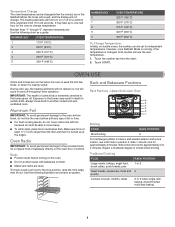
Touch START. OVEN USE
Odors and smoke are normal when the oven is used the first few times, or when it is turned up to one-half hour for the oven to have a well-seared exterior and a rare interior, use the new temperature.
1. During oven use, the heating elements will not remain on...
Use & Care Guide - Page 10
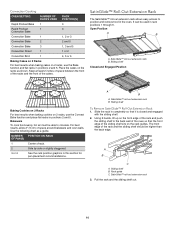
...™ roll-out extension rack B. Sliding shelf
To Remove SatinGlide™ Roll-Out Extension Rack: 1. The front edge of the cakes.
It can be used in the oven. Rack guide C. Keep at least 2 inches of space between the front of the racks and the front of the rack and the sliding shelf...
Use & Care Guide - Page 20
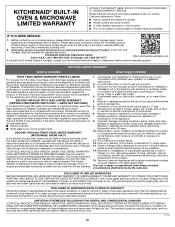
... by a KitchenAid designated service company. Commercial, non-residential or multiple-family use, or use of this limitation may have other damage to appliance finishes unless such damage ...does not include repair labor. ■ Electric element ■ Solid state touch control system parts
SECOND THROUGH TENTH YEAR LIMITED WARRANTY (MICROWAVE OVENS ONLY)
In the second through fifth years ...
Installing Oven Under Cooktop - Page 1
... all governing codes and ordinances.
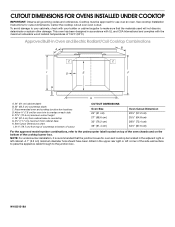
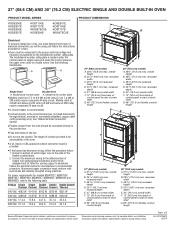
Approved Built-In Oven and Electric Radiant/Coil Cooktop Combinations
A
B
C
I . 31³⁄₈" (79.7 cm) from cabinet base H. I
D
E
C F
G
H
A. 24" (61 cm) cabinet depth B. 25" (63.5 cm) countertop depth C. NOTE: For undercounter installation, it is recommended that the materials used will not discolor, delaminate or sustain other...
Dimension Guide - Page 1
...purposes only. Connect a section of solid copper wire to the proper electrical voltage and frequency as specified on double ovens. Aluminum/copper connection must conform with product. recessed width
C. 26... both sides of 2
Ref. q A UL listed or CSA approved conduit connector must be using special connectors and/or tools designed and UL listed for models MEW7527, MEW7530, MEW7627, MEW7630,...
Warranty Information - Page 1
...
3. Travel or transportation expenses for the remaining term of the Use and Care Guide, scan the QR code on how to use your product will pay for warranty service to correct product damage ... does not include repair labor. ■ Electric element
■ Solid state touch control system parts
SECOND THROUGH TENTH YEAR LIMITED WARRANTY (MICROWAVE OVENS ONLY)
In the second through due to ...
Installation Guide - Page 2
....2 cm) kit
To order, see the "Assistance or Service" section of the Use and Care Guide.
■ UL listed or CSA approved conduit connector
Parts Supplied
■ UL listed wire connectors
■ #8-14 x 1" screws - double oven (2)
■ Front feet - See "Electrical Requirements." It is recommended that can happen if the instructions are very...
Installation Guide - Page 3
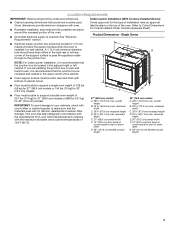
...; Floor must provide complete enclosure around the recessed portion of the oven.
■ Grounded electrical supply is recommended that
the junction box be located in the upper center of UL and CSA International and complies with oven.
■ Recessed installation area must be used will not discolor, delaminate or sustain other damage. Location Requirements...
Installation Guide - Page 6
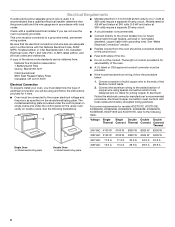
..., KODT100E and KODT107E, refer to the following illustrations. See the following table. Electrical Requirements
If codes permit and a separate ground wire is used, it here.
■ Oven must be connected to the proper electrical voltage and frequency as specified on double ovens. Be sure that the ground path and the wire gauge are in conformance...
Installation Guide - Page 8
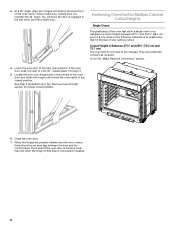
...slot when you maintain the 45° angle. Close the oven door.
7. When the hinges are positioned correctly as received. If one side of the oven cavity. At a 45° angle, align door hinges ...8260;₈" and 28⁵⁄₈" (70.2 cm and 72.7 cm) The oven feet do not need to the "Make Electrical Connection" section.
4. See Step 3 (illustration A) in the corners of your cabinet ...
Installation Guide - Page 9
....8 cm and 74.8 cm)
1. NOTE: Do not remove the spacer.
2. Spacer B. A B
C
A. Reinstall the foot to the "Make Electrical Connection" section.
4. A B
C
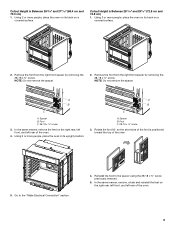
A. Using 2 or more people, place the oven on its upright position. Go to the spacer using the #8-18 x ³⁄₈" screw previously removed.
5. NOTE: Do not remove the spacer.
Spacer B. Rotate the foot...
Installation Guide - Page 10

Using 2 or more people, place the oven in a cutout height between 48⁷⁄₈" and 52 124.1 cm and 132.6 cm). A.
Go to be installed in its upright position. Spacers
A A
10 Cutout Height is configured correctly as received. Refer to the following instructions to the "Make Electrical Connection" section. The oven is Between 48...
Installation Guide - Page 11
...;" screw. A
B
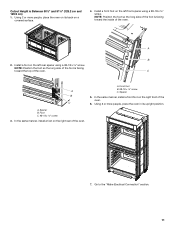
2. In the same manner, install a front foot on a covered surface.
4. Using 2 or more people, place the oven on its upright position.
7. Using 2 or more people, place the oven in its back on the right front of the oven. Go to the "Make Electrical Connection" section. 11
A. Spacer
5. Spacer B.
NOTE: Position the foot so the long...
Installation Guide - Page 12

... a front foot on the left front using a #8-18 x ³⁄₈" screw. NOTE: Position the foot so the long side of the foot is facing toward the top of the oven.
6.
In the same manner, install a foot on the right front of the oven. A B
C
A. Go to the "Make Electrical Connection" section.
NOTE: Position the...
Installation Guide - Page 14
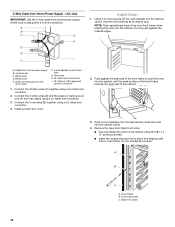
... from home power supply where local codes permit a 3-wire connection. U.S. Only
IMPORTANT: Use the 3-wire cable from Home Power Supply - Using 2 or more people, lift the oven partially into the cabinet cutout.
4. Use the oven opening as an area to push the oven into the cabinet.
Connect the 2 white wires (D) and the green (or bare) ground...
Installation Guide - Page 16
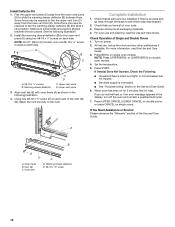
...START. If You Need Assistance or Service: Please reference the "Warranty" section of Single and Double Ovens 1. Warming drawer deflector
E. #8-18 x ³⁄₈" screw
16
Lower vent piece
3.
... between the two pieces. Check Operation of the Use and Care Guide. Turn on for heat. or circuit breaker has not tripped.
■ Electrical supply is an extra part, go back through...
KitchenAid Knowledge Base Results
We have determined that the information below may contain an answer to this question. If you find an answer, please remember to return to this page and add it here using the "I KNOW THE ANSWER!" button above. It's that easy to earn points!-
Rack position for best cooking results - Architect Series II - gas and electric ranges
...;Center of space around bakeware and oven walls. Make sure racks are level. Bread Proof feature - Racks Position racks before turning on them. To move a rack, pull it out to circulate. Use the following illustration and charts as a guide. Use the following chart as a guide. gas and electric ranges Where should I place the racks for... -
Cleaning the Downdraft Vent System - Architect 2 electric cooktop with downdraft
... water and dry before replacing the filter. Architect Series II - Architect 2 electric cooktop with a greasy film. Care and cleaning of Use ® NOTE : To avoid scratching the surface, do I clean my...with downdraft How do not clean the cover in the dishwasher, a self-cleaning oven, or use abrasive cleaners or scrubbing pads. Trademark/the shape of the mixer is set to 5... -
Countertop oven general use and care tips
... our KitchenAid Customer eXperience Center at 1-800-541-6390 Monday-Friday, 8am-8pm and Saturday 10am-5pm. Countertop oven general use and care tips What general use abrasive cleaners on the oven or components. watt electrical requirement and may restrict the natural flow of time at least 4" from the door, which is normal...
Similar Questions

Kitchenaid Kvwb406dss Outlet Plate Replacement
I am looking for a picture of this part. My hood is missing a part and I think this is it. If it is,...
I am looking for a picture of this part. My hood is missing a part and I think this is it. If it is,...
(Posted by teammbrown 4 years ago)

Amps Needed For Kitchenaid Single Wall Oven Kose500ess
How many amps do we need for this oven. KOSE500ESS
How many amps do we need for this oven. KOSE500ESS
(Posted by holtk 7 years ago)

I Am Interested In Your Island Range Hood Model # Kvib602dss.
Is there a video showing how to install proper ducting for this model?Without that information, i do...
Is there a video showing how to install proper ducting for this model?Without that information, i do...
(Posted by cjbnewemail 8 years ago)

Electric Oven
Could I buy the Bake burner and the gas valve regulator?
Could I buy the Bake burner and the gas valve regulator?
(Posted by commercialbuildings 9 years ago)

Uxb0600dys Wiring Diagrams
I can not get the power supply connector from the range hood, which takes a 2 prong plug , to the bl...
I can not get the power supply connector from the range hood, which takes a 2 prong plug , to the bl...
(Posted by backhoe37 10 years ago)