
KitchenAid UXB0600DYS Support Question
KitchenAid UXB0600DYS Support Question
Find answers below for this question about KitchenAid UXB0600DYS.Need a KitchenAid UXB0600DYS manual? We have 4 online manuals for this item!
Question posted by backhoe37 on October 22nd, 2013
Uxb0600dys Wiring Diagrams
I can not get the power supply connector from the range hood, which takes a 2 prong plug , to the blower which takes a 5 pin connector. How can I hard wire it so I can have the 3 speeds? What wires to what?
Current Answers
Related KitchenAid UXB0600DYS Manual Pages
Installation Guide - Page 2

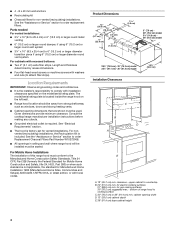
... REQUIREMENTS 3 Tools and Parts 3 Location Requirements 4 Venting Requirements 5 Electrical Requirements 6
INSTALLATION INSTRUCTIONS 7 Prepare Location 7 Install Range Hood 9 Complete Installation 10
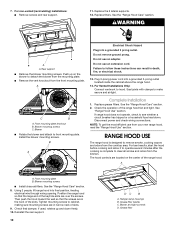
RANGE HOOD USE 10 Range Hood Controls 11
RANGE HOOD CARE 11 Cleaning 11
WIRING DIAGRAM 12 ASSISTANCE OR SERVICE 13
In the U.S.A 13 In Canada 13 Accessories 13 WARRANTY 14
TABLE DES...
Installation Guide - Page 3

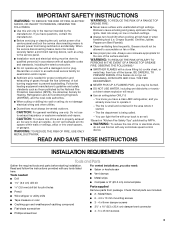
...9632; Clean ventilating fans frequently.
Discard fan or return to prevent power from package. WARNING: TO REDUCE THE RISK OF A RANGE TOP
GREASE FIRE:
■ Never leave surface units unattended at service...any fan with any solid-state speed control device. You can fight the fire with a close fitting lid, cookie sheet, or metal tray, then turn hood ON when cooking at high heat...
Installation Guide - Page 4
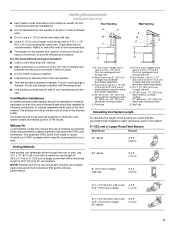
...Requirements
IMPORTANT: Observe all governing codes and ordinances. ■ It is located inside the range hood on the model/serial rating plate. The model/serial rating plate is the installer's ... Four flat-head wood screws or machine screws with local codes. bottom of this range hood must be used.
Given dimensions provide minimum clearance. upper cabinet to order replacement filters....
Installation Guide - Page 5

... 35 ft (10.7 m) or 6" (15.2 cm) or larger round vent with the range hood.
■ Use caulking to locale. Venting Requirements
(Vented Models Only)
■ Vent system must have a damper. Makeup Air
Local building codes may require the use damper supplied with a maximum length of the thermal break. For the most efficient and...
Installation Guide - Page 6
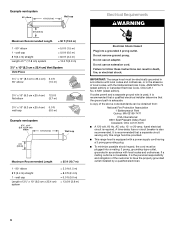
If codes permit and a separate ground wire is used, it is required. A time-delay fuse or circuit... that a separate circuit serving only this range hood be provided.
■ This range hood is equipped with a power supply cord having a 3 prong grounding plug.
■ To minimize possible shock hazard, the cord must be plugged into a grounded 3 prong outlet. Example vent system
90˚ ...
Installation Guide - Page 7
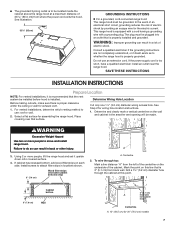
...an extension cord.
■ The grounded 3 prong outlet is equipped with a cord having a grounding wire with a grounding plug. See illustration.
33 85 cm)
GROUNDING INSTRUCTIONS
■ For a grounded, cord-connected range hood: This range hood must be installed before hood is 2" (5.1 cm) from where the power cord exits the hood.
Cabinet bottom
3" (7.6 cm)
Wall
2" (5.1 cm)
A
from...
Installation Guide - Page 9
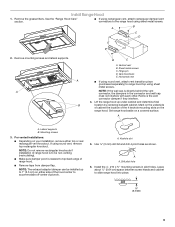
... screws. Sheet metal screws C. NOTE: If the wall cap is directly behind the vent connector, the dampers in pilot holes.
Drill pilot hole
6. See the "Range Hood Care" section.
■ If using rectangular vent, attach rectangular damper/vent connectors to slide range hood into place.
¹⁄₄" (6.4 mm)
9 A A
B
B
C
A. Mark on the underside of cabinet the...
Installation Guide - Page 10
... the mounting plate.
■ Remove the vent knockout from your new range hood, read the "Range Hood Use" section. Plug 3-prong power cord into a grounded 3 prong outlet. Front mounting plate knockout B. Install the blower mounting screws. Disconnect power and check wiring connections.
For best results, start the hood before cooking and allow it to operate several minutes after the cooking...
Installation Guide - Page 11

... each filter by pressing the desired blower speed button. Replacing a Halogen Lamp
Turn off the range hood and allow the halogen lamp to handle lamp. Insert aluminum filter into place. 6. Pins C. If new lights do not touch lamp with a 120-volt, 40-watt maximum, halogen lamp made for Off.
Reconnect power.
11 Replace with clean water...
Installation Guide - Page 12
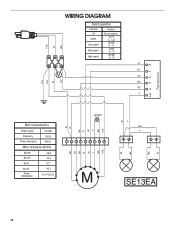
...
La
Motor characteristics
Power supply Frequency
120 VAC 60 Hz
Power absorption
240 W
Motor resistance (Ohms)
BU-BK
28.8
BU-GY
30.3
BU-R
37.7
BU-W
Room temperature
45.1 73.4˚F (23˚C)
W
BU
W
GY
BK
BK
R
R
12.5uF
1 2 34 56 7 8 9
M
W
W
Y
Y
BR
BR
Y/G
Y/G
W
W
Y BK
BU Y
SE13EA
BK
W
12 Push button board
W
Y/G
WIRING DIAGRAM
Switch operation
Function...
Use & Care Guide - Page 2
... REQUIREMENTS 3 Tools and Parts 3 Location Requirements 4 Venting Requirements 5 Electrical Requirements 6
INSTALLATION INSTRUCTIONS 7 Prepare Location 7 Install Range Hood 9 Complete Installation 10
RANGE HOOD USE 10 Range Hood Controls 11
RANGE HOOD CARE 11 Cleaning 11
WIRING DIAGRAM 12 ASSISTANCE OR SERVICE 13
In the U.S.A 13 In Canada 13 Accessories 13 WARRANTY 14
TABLE DES...
Use & Care Guide - Page 3
...
PERSONS IN THE EVENT OF A RANGE TOP GREASE FIRE, OBSERVE THE FOLLOWING:a
■ SMOTHER FLAMES with a close fitting lid, cookie sheet, or metal tray, then turn hood ON when cooking at high heat...Installation work and electrical wiring must always be sure to an exit. you have questions, contact the manufacturer.
■ Before servicing or cleaning the unit, switch power off the burner.
...
Use & Care Guide - Page 4

... 35⁷⁄₈" (91.1 cm) - 36" (91.4 cm) model
Installation Clearances
19³⁄₄" (50.2 cm)
C
B D
A
E
A. 18" (45.7 cm) min. bottom of this range hood must conform to comply with local codes. cabinet opening dimensions that are shown must be sealed. Length and thickness determined by recess dimensions.
■ Four...
Use & Care Guide - Page 5
... 35 ft (10.7 m) or 6" (15.2 cm) or larger round vent with the range hood.
■ Use caulking to seal exterior wall or roof opening around the cap. Roof cap...vent or a 3¹⁄₄" x 10" (8.3 x 25.4 cm) rectangular metal vent. Round vent: use damper supplied with a maximum length of the thermal break. Consult your HVAC professional for vent system. Use 3¹⁄₄" x 10...
Use & Care Guide - Page 6

... that a separate circuit serving only this range hood be plugged into a grounded 3 prong outlet. or 20-amp, fused electrical circuit is also recommended.
Do not use an extension cord. Do not remove ground prong.
If codes permit and a separate ground wire is used, it is equipped with a power supply cord having a 3 prong grounding plug.
■ To minimize possible shock hazard...
Use & Care Guide - Page 7

...doubt exists as to move and install range hood. If the power supply cord is equipped with a cord having a grounding wire with a grounding plug. To wire through the cabinet at a maximum ...the range hood.
■ The grounded 3 prong outlet is to be grounded. For vented installations, determine which venting method to use an extension cord. Select a flat surface for wiring hole...
Use & Care Guide - Page 9

....
NOTE: The exhaust adaptor/damper can be non-venting (recirculating). ■ Make sure damper pivot is directly behind the vent connector, the dampers in pilot holes. A
A. Install Range Hood
1. Remove the grease filters.
A A
B
B
C
A. Hinge pin D. NOTE: If the wall cap is nearest to 1" (2.5 cm) on either top or rear rectangular vent knockout. Remove the...
Use & Care Guide - Page 10

...Push up and down freely. 10. Failure to detach the blower from the mounting plate.
■ Remove the vent knockout from the cooktop area. Replace grease filters. RANGE HOOD USE
The range hood is complete to hood. Replace filters. C
B
A. Plug 3-prong power cord into final position, feeding
electrical wire through wiring opening. NOTE: To get the most efficient use an extension...
Use & Care Guide - Page 11
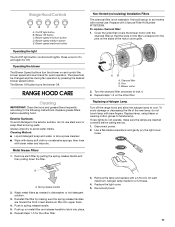
...filter correspond to the pins on and control the blower speed and sound level for the other filter. RANGE HOOD CARE
Cleaning
IMPORTANT: Clean the hood and grease filters ...the following instructions. Reconnect power.
11
Replace grease filters before calling service.
1.
Replace lamp, using tissue or wearing cotton gloves to cool. Blower speed medium button E. Exterior ...
Use & Care Guide - Page 12

...Y/G
La
Motor characteristics
Power supply Frequency
120 VAC 60 Hz
Power absorption
240 W
Motor resistance (Ohms)
BU-BK
28.8
BU-GY
30.3
BU-R
37.7
BU-W
Room temperature
45.1 73.4˚F (23˚C)
W
BU
W
GY
BK
BK
R
R
12.5uF
1 2 34 56 7 8 9
M
W
W
Y
Y
BR
BR
Y/G
Y/G
W
W
Y BK
BU Y
SE13EA
BK
W
12 Push button board
W
Y/G
WIRING DIAGRAM
Switch operation
Function...
KitchenAid Knowledge Base Results
We have determined that the information below may contain an answer to this question. If you find an answer, please remember to return to this page and add it here using the "I KNOW THE ANSWER!" button above. It's that easy to earn points!-
Recommended installation for electrical, drain and water supply connections for dishwashers.
... cabinet opening will be improved Thank you must extend to connect dishwasher electrical supply line animation Do not kink or pinch copper tubing, drain hose, power supply cord, or direct wire between dishwasher and cabinet while completely moving dishwasher into house wiring junction box. How to a waste tee or waste disposer. Run other end of... -
Hot water dispenser does not operate
... is on. Check to the "Off" position. Make sure the water supply has not been turned off. If the hot water dispenser does not operate, check the following. Check the power supply cord and make sure it is plugged into a grounded 3 prong outlet. Hot water dispenser does not operate Why is my ... -
Under-counter refrigerator will not operate
... have an outdoor under -counter refrigerator to resolve the issue, your appliance may require service from a local authorized KitchenAid service provider. Is the power supply cord unplugged? Plug into a grounded 3 prong outlet.
Similar Questions

Wire Diagram
Two wires on the bottom of my dishwasher came loose and I can not tell where they went. Is there a w...
Two wires on the bottom of my dishwasher came loose and I can not tell where they went. Is there a w...
(Posted by tickedoffgrooming 2 years ago)

Kitchenaid Kvwb406dss Outlet Plate Replacement
I am looking for a picture of this part. My hood is missing a part and I think this is it. If it is,...
I am looking for a picture of this part. My hood is missing a part and I think this is it. If it is,...
(Posted by teammbrown 4 years ago)
I Am Interested In Your Island Range Hood Model # Kvib602dss.
Is there a video showing how to install proper ducting for this model?Without that information, i do...
Is there a video showing how to install proper ducting for this model?Without that information, i do...
(Posted by cjbnewemail 8 years ago)

Kbnu367vss Power Supply
A recent electrical storm has damaged the grill control circuit, KA service has been there 3 times a...
A recent electrical storm has damaged the grill control circuit, KA service has been there 3 times a...
(Posted by mro100 10 years ago)
Need Wiring Diagram
Need a wiring diagram for Kitchenaid KUDS24SEWH3
Need a wiring diagram for Kitchenaid KUDS24SEWH3
(Posted by Jetajeff 12 years ago)