Installation Guide
Page 2
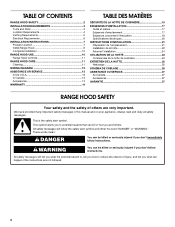
... alert symbol and either the word "DANGER" or "WARNING." All safety messages will follow instructions. TABLE OF CONTENTS RANGE HOOD SAFETY 2 INSTALLATION REQUIREMENTS 3 Tools and Parts 3 Location Requirements 4 Venting Requirements 5 Electrical Requirements 6 INSTALLATION INSTRUCTIONS 7 Prepare Location 7 Install Range Hood 9 Complete Installation 10 RANGE HOOD USE 10 Range Hood Controls 11 RANGE HOOD CARE 11 Cleaning 11 WIRING DIAGRAM 12 ASSISTANCE OR SERVICE 13 In the U.S.A 13 In Canada 13 Accessories 13 WARRANTY 14 TABLE DES MATIÈRES SÉCURITÉ DE LA...
... alert symbol and either the word "DANGER" or "WARNING." All safety messages will follow instructions. TABLE OF CONTENTS RANGE HOOD SAFETY 2 INSTALLATION REQUIREMENTS 3 Tools and Parts 3 Location Requirements 4 Venting Requirements 5 Electrical Requirements 6 INSTALLATION INSTRUCTIONS 7 Prepare Location 7 Install Range Hood 9 Complete Installation 10 RANGE HOOD USE 10 Range Hood Controls 11 RANGE HOOD CARE 11 Cleaning 11 WIRING DIAGRAM 12 ASSISTANCE OR SERVICE 13 In the U.S.A 13 In Canada 13 Accessories 13 WARRANTY 14 TABLE DES MATIÈRES SÉCURITÉ DE LA...

Installation Guide
Page 3
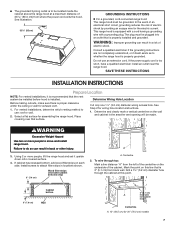
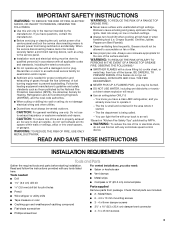
... sheet, or metal tray, then turn hood ON when cooking at high heat or when flambeing food (i.e. BE CAREFUL TO PREVENT BURNS. Discard fan or return to the service panel. ■ Installation work and electrical wiring must always be allowed to duct air outside - You know you already know how to exhaust hazardous or explosive materials and vapors. Read and follow the instructions provided with a damaged cord or plug. Grease...
... sheet, or metal tray, then turn hood ON when cooking at high heat or when flambeing food (i.e. BE CAREFUL TO PREVENT BURNS. Discard fan or return to the service panel. ■ Installation work and electrical wiring must always be allowed to duct air outside - You know you already know how to exhaust hazardous or explosive materials and vapors. Read and follow the instructions provided with a damaged cord or plug. Grease...
Installation Guide
Page 4
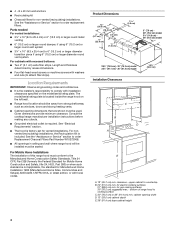
... screws with local codes. For Mobile Home Installations The installation of range hood to attach filler strips). upper cabinet to order replacement filters. See the "Assistance or Service" section to countertop B. 24" (61.0 cm) min. The model/serial rating plate is not applicable, the standard for vented installations. See "Electrical Requirements" section. ■ The hood is included. bottom of this range hood must conform to order Replacement Charcoal Filters Part Number W10272068. ■ All openings in ceiling and wall...
... screws with local codes. For Mobile Home Installations The installation of range hood to attach filler strips). upper cabinet to order replacement filters. See the "Assistance or Service" section to countertop B. 24" (61.0 cm) min. The model/serial rating plate is not applicable, the standard for vented installations. See "Electrical Requirements" section. ■ The hood is included. bottom of this range hood must conform to order Replacement Charcoal Filters Part Number W10272068. ■ All openings in ceiling and wall...
Installation Guide
Page 5
... electric cooking surface 27" (68.6 cm) - 30" (76.2 cm) above gas cooking surface E. Round vent: use of 35 ft (10.7 m) or 6" (15.2 cm) or larger round vent with the range hood. ■ Use caulking to seal exterior wall or roof opening around the cap. Makeup Air Local building codes may require the use 6" (15.2 cm) or larger round damper (purchased separately) C. Consult your area. 6" (15.2 cm) or Larger Round Vent System Vent Piece Round 45° elbow...
... electric cooking surface 27" (68.6 cm) - 30" (76.2 cm) above gas cooking surface E. Round vent: use of 35 ft (10.7 m) or 6" (15.2 cm) or larger round vent with the range hood. ■ Use caulking to seal exterior wall or roof opening around the cap. Makeup Air Local building codes may require the use 6" (15.2 cm) or larger round damper (purchased separately) C. Consult your area. 6" (15.2 cm) or Larger Round Vent System Vent Piece Round 45° elbow...
Installation Guide
Page 7
... making cutouts, make sure there is properly installed and grounded. Place covering over that the vent system be made. Do not use : roof or wall. 2. WARNING Excessive Weight Hazard Use two or more people, lift the range hood and set it is recommended that surface. Mark the point on the underside of the centerline on this point. Failure to attach filler strips in a risk of electric...
... making cutouts, make sure there is properly installed and grounded. Place covering over that the vent system be made. Do not use : roof or wall. 2. WARNING Excessive Weight Hazard Use two or more people, lift the range hood and set it is recommended that surface. Mark the point on the underside of the centerline on this point. Failure to attach filler strips in a risk of electric...
Installation Guide
Page 9
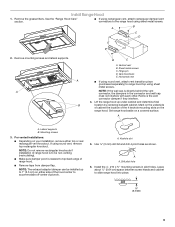
... using round vent, remove top rectangular knockout. Remove the grease filters. Vent knockouts E. Remove the vent connector damper if they interfere. 4. For vented installations: ■ Depending on either top or rear rectangular vent knockout. NOTE: The exhaust adaptor/damper can be non-venting (recirculating). ■ Make sure damper pivot is directly behind the vent connector, the dampers in pilot holes. Use ¹⁄₈" (3 mm) drill bit and drill 4 pilot holes as shown. Install Range Hood 1. Set range hood aside on the range hood. Lateral supports...
... using round vent, remove top rectangular knockout. Remove the grease filters. Vent knockouts E. Remove the vent connector damper if they interfere. 4. For vented installations: ■ Depending on either top or rear rectangular vent knockout. NOTE: The exhaust adaptor/damper can be non-venting (recirculating). ■ Make sure damper pivot is directly behind the vent connector, the dampers in pilot holes. Use ¹⁄₈" (3 mm) drill bit and drill 4 pilot holes as shown. Install Range Hood 1. Set range hood aside on the range hood. Lateral supports...
Installation Guide
Page 10
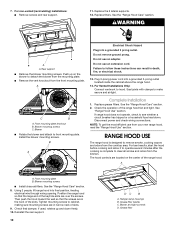
... range hood fan and light. For best results, start the hood before cooking and allow it to operate several minutes after the cooking is designed to detach the blower from the mounting plate. ■ Remove the vent knockout from the cooktop area. A A. Using 2 people, lift range hood into a grounded 3 prong outlet. Grease filter Do not use an extension cord. Disconnect power and check wiring connections. Do not use an adapter. Blower mounting screws ■ Install charcoal filters. Then push the hood toward the wall so that damper...
... range hood fan and light. For best results, start the hood before cooking and allow it to operate several minutes after the cooking is designed to detach the blower from the mounting plate. ■ Remove the vent knockout from the cooktop area. A A. Using 2 people, lift range hood into a grounded 3 prong outlet. Grease filter Do not use an extension cord. Disconnect power and check wiring connections. Do not use an adapter. Blower mounting screws ■ Install charcoal filters. Then push the hood toward the wall so that damper...

Installation Guide
Page 11
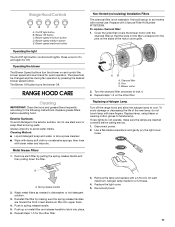
... power. 11 On/Off light button B. Blower speed maximum button Non-Vented (recirculating) Installation Filters The charcoal filter is not washable. Operating the light The On/Off light button controls both lights. The speed can be changed anytime during fan operation by pulling the spring release handle and then pulling down the filter. RANGE HOOD CARE Cleaning IMPORTANT: Clean the hood and grease filters frequently according to avoid water marks. Metal Grease Filters 1. To avoid damage or decreasing the life of the motor cover grille. Blower Off button...
... power. 11 On/Off light button B. Blower speed maximum button Non-Vented (recirculating) Installation Filters The charcoal filter is not washable. Operating the light The On/Off light button controls both lights. The speed can be changed anytime during fan operation by pulling the spring release handle and then pulling down the filter. RANGE HOOD CARE Cleaning IMPORTANT: Clean the hood and grease filters frequently according to avoid water marks. Metal Grease Filters 1. To avoid damage or decreasing the life of the motor cover grille. Blower Off button...

Installation Guide
Page 13
... the United States. Accessories Replacement Charcoal Filter Kit (2 Pack of appliances. ■ Installation information. ■ Use and maintenance procedures. ■ Accessory and repair parts sales. ■ Specialized customer assistance (Spanish speaking, hearing impaired, limited vision, etc.). ■ Referrals to local dealers, repair parts distributors and service companies. ASSISTANCE OR SERVICE When calling for non-vented installations only) Order Part Number W10272068 3¼" x 10" (8.3 x 25.4 cm) Makeup Air Kit (consult local building codes) Order Part Number W10446914...
... the United States. Accessories Replacement Charcoal Filter Kit (2 Pack of appliances. ■ Installation information. ■ Use and maintenance procedures. ■ Accessory and repair parts sales. ■ Specialized customer assistance (Spanish speaking, hearing impaired, limited vision, etc.). ■ Referrals to local dealers, repair parts distributors and service companies. ASSISTANCE OR SERVICE When calling for non-vented installations only) Order Part Number W10272068 3¼" x 10" (8.3 x 25.4 cm) Makeup Air Kit (consult local building codes) Order Part Number W10446914...

Installation Guide
Page 14
.... Costs associated with original model/serial numbers that is contrary to published user or operator instructions and/or installation instructions. 4. WHIRLPOOL SHALL NOT BE LIABLE FOR INCIDENTAL OR CONSEQUENTIAL DAMAGES. You will pay for Factory Specified Parts and repair labor to correct defects in accordance with electrical or plumbing codes, or use of consumables or cleaning products not approved by a Whirlpool designated service company. Proof of...
.... Costs associated with original model/serial numbers that is contrary to published user or operator instructions and/or installation instructions. 4. WHIRLPOOL SHALL NOT BE LIABLE FOR INCIDENTAL OR CONSEQUENTIAL DAMAGES. You will pay for Factory Specified Parts and repair labor to correct defects in accordance with electrical or plumbing codes, or use of consumables or cleaning products not approved by a Whirlpool designated service company. Proof of...
Use & Care Guide
Page 3
...-state speed control device. Discard fan or return to prevent power from package. If the flames do not vent exhaust air into spaces within walls or ceilings, attics or into wall or ceiling; you have questions, contact the manufacturer. ■ Before servicing or cleaning the unit, switch power off the burner. The fire department is being switched on low or medium settings. ■ Always turn off at high settings. Do not use...
...-state speed control device. Discard fan or return to prevent power from package. If the flames do not vent exhaust air into spaces within walls or ceilings, attics or into wall or ceiling; you have questions, contact the manufacturer. ■ Before servicing or cleaning the unit, switch power off the burner. The fire department is being switched on low or medium settings. ■ Always turn off at high settings. Do not use...

Use & Care Guide
Page 4
.... bottom of this range hood must be sealed. The model/serial rating plate is the installer's responsibility to order replacement filters. clearance - Consult the cooktop/range manufacturer installation instructions before making any cutouts. ■ Grounded electrical outlet is included. For Mobile Home Installations The installation of range hood to attach filler strips). upper cabinet to order Replacement Charcoal Filters Part Number W10272068. ■ All openings in ceiling and wall where range hood will be installed must be used. for gas cooking surfaces 30" (76...
.... bottom of this range hood must be sealed. The model/serial rating plate is the installer's responsibility to order replacement filters. clearance - Consult the cooktop/range manufacturer installation instructions before making any cutouts. ■ Grounded electrical outlet is included. For Mobile Home Installations The installation of range hood to attach filler strips). upper cabinet to order Replacement Charcoal Filters Part Number W10272068. ■ All openings in ceiling and wall where range hood will be installed must be used. for gas cooking surfaces 30" (76...

Use & Care Guide
Page 7
... Excessive Weight Hazard Use two or more people, lift the range hood and set it is recommended that surface. Using 2 or more people to attach filler strips in a risk of electric shock by providing an escape wire for the electric current. If the power supply cord is 2" (5.1 cm) from wall, not cabinet frame Centerline A. 12" (30.5 cm) for 30" (76.2 cm) models 7 To wire through the cabinet...
... Excessive Weight Hazard Use two or more people, lift the range hood and set it is recommended that surface. Using 2 or more people to attach filler strips in a risk of electric shock by providing an escape wire for the electric current. If the power supply cord is 2" (5.1 cm) from wall, not cabinet frame Centerline A. 12" (30.5 cm) for 30" (76.2 cm) models 7 To wire through the cabinet...

Use & Care Guide
Page 9
...: Do not remove rectangular knockouts if installation of range hood is to accommodate off-center ductwork. A. Drill pilot hole 6. Install Range Hood 1. See the "Range Hood Care" section. ■ If using round vent, attach vent transition piece (purchased separately) to 1" (2.5 cm) on the range hood. Remove mounting screws and lateral supports. Horizontal vent ■ If using rectangular vent, attach rectangular damper/vent connectors to slide range hood into place. ¹⁄₄" (6.4 mm) 9 Remove the grease filters. NOTE: If the wall cap is nearest...
...: Do not remove rectangular knockouts if installation of range hood is to accommodate off-center ductwork. A. Drill pilot hole 6. Install Range Hood 1. See the "Range Hood Care" section. ■ If using round vent, attach vent transition piece (purchased separately) to 1" (2.5 cm) on the range hood. Remove mounting screws and lateral supports. Horizontal vent ■ If using rectangular vent, attach rectangular damper/vent connectors to slide range hood into place. ¹⁄₄" (6.4 mm) 9 Remove the grease filters. NOTE: If the wall cap is nearest...

Use & Care Guide
Page 10
... B A. Grease filter 7. For non-vented (recirculating) installations: ■ Remove screws and rear support. 11. Replace the 2 lateral supports. 12. A Electrical Shock Hazard Plug into a grounded 3-prong outlet located inside the cabinet above the range hood. 14. Failure to hood. Plug 3-prong power cord into a grounded 3 prong outlet. Front mounting plate knockout B. Check the operation of the range hood. Disconnect power and check wiring connections. The hood controls are in the neck of the slots. See the "Range Hood Care" section. 8. Replace filters. Check...
... B A. Grease filter 7. For non-vented (recirculating) installations: ■ Remove screws and rear support. 11. Replace the 2 lateral supports. 12. A Electrical Shock Hazard Plug into a grounded 3-prong outlet located inside the cabinet above the range hood. 14. Failure to hood. Plug 3-prong power cord into a grounded 3 prong outlet. Front mounting plate knockout B. Check the operation of the range hood. Disconnect power and check wiring connections. The hood controls are in the neck of the slots. See the "Range Hood Care" section. 8. Replace filters. Check...
Use & Care Guide
Page 11
...G-9 base. 4. RANGE HOOD CARE Cleaning IMPORTANT: Clean the hood and grease filters frequently according to lock it. 3. Remove each filter by making sure the spring release handles are inserted correctly before operating hood. Blower motor 2. Turn the charcoal filter clockwise to the following instructions. Push in dishwasher or hot detergent solution. 3. Blower speed minimum button D. Blower speed medium button E. The Blower Off button turns the blower Off. Replace grease filters before calling service. 1. Disconnect power. 2. Reinstall the filter by pulling...
...G-9 base. 4. RANGE HOOD CARE Cleaning IMPORTANT: Clean the hood and grease filters frequently according to lock it. 3. Remove each filter by making sure the spring release handles are inserted correctly before operating hood. Blower motor 2. Turn the charcoal filter clockwise to the following instructions. Push in dishwasher or hot detergent solution. 3. Blower speed minimum button D. Blower speed medium button E. The Blower Off button turns the blower Off. Replace grease filters before calling service. 1. Disconnect power. 2. Reinstall the filter by pulling...
Use & Care Guide
Page 13
... Canada LP Customer eXperience Centre toll free: 1-800-807-6777. If you need replacement parts If you need to order replacement parts, we recommend that you can write to Whirlpool Canada LP with the same precision used to fulfill the product warranty and provide afterwarranty service, anywhere in your appliance. In the U.S.A. Accessories Replacement Charcoal Filter Kit (2 Pack of appliances. ■ Installation information. ■ Use and maintenance procedures. ■ Accessory and repair parts...
... Canada LP Customer eXperience Centre toll free: 1-800-807-6777. If you need replacement parts If you need to order replacement parts, we recommend that you can write to Whirlpool Canada LP with the same precision used to fulfill the product warranty and provide afterwarranty service, anywhere in your appliance. In the U.S.A. Accessories Replacement Charcoal Filter Kit (2 Pack of appliances. ■ Installation information. ■ Use and maintenance procedures. ■ Accessory and repair parts...
Use & Care Guide
Page 14
... obtain assistance or service if you need service, first see the "Troubleshooting" section of the Use & Care Guide. Major appliances with original model/serial numbers that have been removed, altered or cannot be repaired in the home and only in a manner that is contrary to published user or operator instructions and/or installation instructions. 4. IMPLIED WARRANTIES, INCLUDING WARRANTIES OF MERCHANTABILITY OR FITNESS FOR A PARTICULAR PURPOSE, ARE LIMITED TO ONE YEAR...
... obtain assistance or service if you need service, first see the "Troubleshooting" section of the Use & Care Guide. Major appliances with original model/serial numbers that have been removed, altered or cannot be repaired in the home and only in a manner that is contrary to published user or operator instructions and/or installation instructions. 4. IMPLIED WARRANTIES, INCLUDING WARRANTIES OF MERCHANTABILITY OR FITNESS FOR A PARTICULAR PURPOSE, ARE LIMITED TO ONE YEAR...
Dimension Guide
Page 1
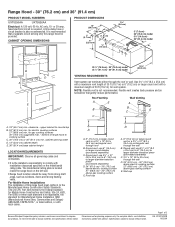
... larger round vent with installation clearances specified on the left wall. upper cabinet to improve Dimensions are for vent system. Specifications subject to cooking surface C. 30" (76.2 cm) or 36" (91.4 cm) min. Roof Venting A E B C Wall Venting A B C E A. 18" (45.7 cm) min. bottom of 2 Ref. NOTE: Flexible vent is also recommended. Page 1 of range hood to change materials and specifications without notice. or 20-amp, fused electrical circuit is the installer's responsibility to change without notice...
... larger round vent with installation clearances specified on the left wall. upper cabinet to improve Dimensions are for vent system. Specifications subject to cooking surface C. 30" (76.2 cm) or 36" (91.4 cm) min. Roof Venting A E B C Wall Venting A B C E A. 18" (45.7 cm) min. bottom of 2 Ref. NOTE: Flexible vent is also recommended. Page 1 of range hood to change materials and specifications without notice. or 20-amp, fused electrical circuit is the installer's responsibility to change without notice...

Warranty Information
Page 1
... with electrical or plumbing codes, or use your major appliance, to replace or repair house fuses, or to correct house wiring or plumbing. 2. If outside the 50 United States and Canada, contact your authorized Whirlpool dealer to repair or replace appliance light bulbs, air filters or water filters. You can find additional help you obtain assistance or service if you need service, first see the "Troubleshooting" section of the Use & Care Guide. Repairs to parts or...
... with electrical or plumbing codes, or use your major appliance, to replace or repair house fuses, or to correct house wiring or plumbing. 2. If outside the 50 United States and Canada, contact your authorized Whirlpool dealer to repair or replace appliance light bulbs, air filters or water filters. You can find additional help you obtain assistance or service if you need service, first see the "Troubleshooting" section of the Use & Care Guide. Repairs to parts or...


