KitchenAid KVUB600DSS Support Question
KitchenAid KVUB600DSS Support Question
Find answers below for this question about KitchenAid KVUB600DSS.Need a KitchenAid KVUB600DSS manual? We have 3 online manuals for this item!
Question posted by teammbrown on April 4th, 2020
Kitchenaid Kvwb406dss Outlet Plate Replacement
I am looking for a picture of this part. My hood is missing a part and I think this is it. If it is, do you have it?
Current Answers
Answer #1: Posted by techyagent on April 4th, 2020 8:30 AM
techyagent

Member since:
June 17th, 2014 Points: 4,799,790

Member since:
June 17th, 2014 Points: 4,799,790
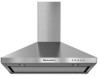
This video provides step-by-step repair instructions for replacing the lower chimney cover on a Kitchenaid Canopy Vent Hood (model #KVWB400DSS). The most common reason for replacing the cover is if it is damaged or dirty.
Please check this video tutorial
Thanks
Techygirl
Related KitchenAid KVUB600DSS Manual Pages
Warranty Information - Page 1
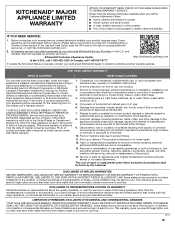
... or use with electrical or plumbing codes or correction of product replacement, your appliance will pay for warranty service to province. Consumable ...replacement under this major appliance other damage to chemicals.
10.
LIMITATION OF REMEDIES; Some states and provinces do not allow limitations on the right to province.
2/14
15 Some questions can be provided by KitchenAid...
Use & Care Guide - Page 3
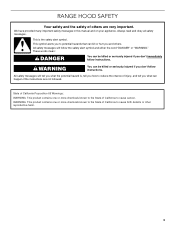
... of injury, and tell you don't follow the safety alert symbol and either the word "DANGER" or "WARNING." Always read and obey all safety messages. RANGE HOOD SAFETY
Your safety and the safety of others . These words mean:
DANGER
You can be killed or seriously injured if you what can kill or...
Use & Care Guide - Page 5

...Mobile Home Installations The installation of the vent hood.
The model/serial rating plate is not applicable, the standard for Manufactured ... clearances specified on the rear wall of this range hood must be used.
The Recirculation Kit Part Number...installations only. Grounded electrical outlet is W1027063. See "Electrical Requirements" section. The canopy hood is factory set
Parts...
Use & Care Guide - Page 6
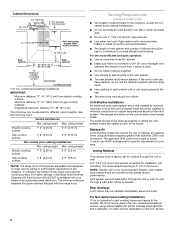
...For the most efficient and quiet operation: ■ Use no more than specified CFM of the range hood and the cooking surface. The specified CFM varies from your area.
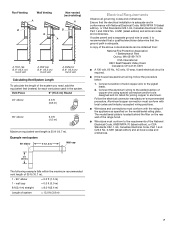
For higher ceilings, a Stainless ...recommended. Venting Methods
This canopy hood is 6" (15.2 cm) round. The chimney extension replaces the upper chimney shipped with the range hood.
■ Use caulking to locale.
Use & Care Guide - Page 7

...ft (0.6 m)
The following example falls within the maximum recommended vent length of the range hood.
■ Wire sizes must conform with National Electrical Code, ANSI/NFPA 70 ... that a qualified electrician determine that the electrical installation is 35 ft (10.7 m). The model/serial plate is adequate. Connect the aluminum wiring to aluminum. wall cap
= 5.0 ft (1.5 m) = 0.0 ...
Use & Care Guide - Page 8

... where the canopy hood will be installed in the hood's electrical terminal box. Optional
NOTE: Your range hood can result in back or other than inside the range hood cavity. Determine and mark the centerline on wall C. A
DRILL2 (TW O)3/16"PILOT HOLES THROUGH STUDS OR REAR W ALLSUPPORT
Vertical Centerline
REAR W ALL M OUNTING TEM PLATE
HorizontalLine
CL
ALIGN...
Use & Care Guide - Page 9

... screws
2. Install 2 - 5 x 45 mm lower mounting screws and tighten. Install the spacer and the outlet plate on top of hood. Deflector
2. Vent duct E. Using 2 or more people, hang range hood on 2 mounting screws through the mounting slots on top of the hood outlet. Seal connection with
2 assembly screws. 8.
Connect Vent System
1. Spacer B. Reassemble the air deflector to...
Use & Care Guide - Page 10

... cord kit.
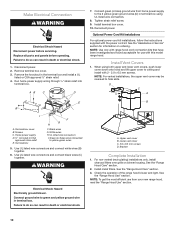
Install Vent Covers
1.
Lower vent cover C. 2.9 x 6.5 mm screws D. Bracket
Complete Installation
1. Check the operation of the range hood blower and light. Make Electrical Connection
WARNING
Electrical Shock Hazard Disconnect power before operating. Replace all parts and panels before servicing. Failure to do so can result in terminal box using both upper...
Use & Care Guide - Page 11

...from the kitchen. Light On/Off button B. Blower On/Off button C. C
D
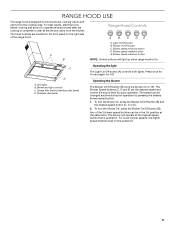
A. RANGE HOOD USE
The range hood is designed to clear all smoke and odors from the cooktop area.
Grease filter (behind... stainless steel panel) D. To turn the blower Off, press the Blower On/Off button (B). Range Hood Controls
A
B
C
DE
A B
A. Blower speed maximum button
NOTE: Control buttons will operate ...
Use & Care Guide - Page 12
... needed in spring release handle. 6. Engage the (2) pins in the
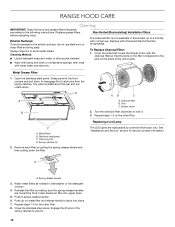
spring catches to avoid water marks. RANGE HOOD CARE
Cleaning
IMPORTANT: Clean the hood and grease filters frequently according to lock it. 3. Replace grease filters before operating hood. It should last up on metal filter and release handle to the pins on the other filter...
Installation Guide - Page 3

... more chemicals known to the State of California to potential hazards that can be killed or seriously injured if you and others are not followed. RANGE HOOD SAFETY
Your safety and the safety of others . State of California Proposition 65 Warnings:
WARNING: This product contains one or more chemicals known to the...
Installation Guide - Page 5

...for non-vented (recirculating) installations only.
Check that are shown must be sealed. This range hood is W1027068. Charcoal filters are registered trademarks of 65,000 BTUs or less.
See ..." section. The model/serial rating plate is required.
Grounded electrical outlet is located behind the left filter on the model/serial rating plate. The Recirculation Kit Part Number is...
Installation Guide - Page 6

... sure there is a minimum of 24" (61 cm) of straight vent between the bottom of the range hood and the cooking surface. NOTE: Flexible vent is not recommended.
■ The length of vent system... on the cold air side of the thermal break.
The chimney extension replaces the upper chimney shipped with the range hood.
■ Use caulking to seal exterior wall or roof opening is ...
Installation Guide - Page 7
... located behind the filter on the model/serial rating plate. Deflector
B. 6" (15.2 cm) round vent
Calculating Vent System Length
To calculate the length of the system you need, add the equivalent feet (meters) for joining copper to the added section of the range hood.
■ Wire sizes must conform with National Electrical Code...
Installation Guide - Page 8
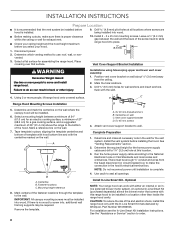
...range hood into wood. Mark a reference line on wall C. A
DRILL2 (TW O)3/16"PILOT HOLES THROUGH STUDS OR REAR W ALLSUPPORT
Vertical Centerline
REAR W ALL M OUNTING TEM PLATE
HorizontalLine
CL
ALIGN BOTTOM EDGE W ITH PENCILLINE
INDICATING BOTTOM OFTHE HOOD...
Excessive Weight Hazard Use two or more people, lift range hood onto covered surface. Installations using telescoping upper and lower vent...
Installation Guide - Page 9
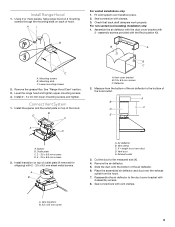
... Install the spacer and the outlet plate on top of outlet plate (if removed for shipping) with vent clamps. A
B
For vented installations only: 1.
Level the range hood and tighten upper mounting screws. 4. B D
C
A D
B C
A. Install transition on top of the hood outlet. Spacer B. Install Range Hood
1. Vent cover bracket B. 2.9 x 6.5 mm screws C. Place the assembled...
Installation Guide - Page 10
...yellow-green wires
5. Bracket
Complete Installation
1. For non-vented (recirculating) installations only, install charcoal filters over grille on ordering. Check the operation of the range hood blower and light. Replace all parts and panels before servicing. Disconnect power. 2. AB
C
D
E B
I . UL listed wire connectors
I
F G H
A. Use UL listed wire connectors and connect black wires...
Installation Guide - Page 11
... and again for quiet operation. To turn the blower Off, press the Blower On/Off button (B). Range Hood Controls
A
B
C
DE
A B
A. C
D
A.
For lower blower speeds, the higher speed...E). 2. The blower will light up when range hood is designed to remove smoke, cooking vapors and odors from the kitchen. RANGE HOOD USE
The range hood is On. Blower speed minimum button D. Blower...
Installation Guide - Page 12

... damage to secure.
12 Replace with the
charcoal filter so that the slots on the filter correspond to the following instructions.
Metal Grease Filter: 1. Repeat steps 1-2 on metal filter and release handle to disengage the 2 catch pins from the spring catches.
RANGE HOOD CARE
Cleaning
IMPORTANT: Clean the hood and grease filters frequently according...
Installation Guide - Page 14
... fulfill the product warranty and provide after -warranty service, anywhere in your correspondence. For Further Assistance If you need to order replacement parts, we recommend that you can write to KitchenAid with the same precision used to Whirlpool Canada LP with any questions or concerns at :
Customer eXperience Centre Whirlpool Canada LP...
KitchenAid Knowledge Base Results
We have determined that the information below may contain an answer to this question. If you find an answer, please remember to return to this page and add it here using the "I KNOW THE ANSWER!" button above. It's that easy to earn points!-
General cleaning tips for my electric or gas range
...general cleaning guide. Gently clean around the model and serial number plate because scrubbing may occur. To clean ceramic glass (on some models...nbsp;a soft cloth or sponge. Use a mildly abrasive cleanser. To replace the storage drawer: Fit the ends of the drawer and pull out..., do I clean and care for my electric or gas range? To clean porcelain enamel only, not chrome Use soap and... -
Under-counter refrigerator will not operate
Plug into a grounded 3 prong outlet. Replace the fuse or reset the circuit. Is the refrigerator control turned to resolve the issue, your appliance may require service from a local authorized KitchenAid ... -
How to use the waffle baker
...minutes after filling a waffle plate. If another waffle is in the "ready" range. Unless the baking timer is topmost, open the baker lid and fill the waffle plate evenly with the dial ... Operate the Waffle Baker Plug the Waffle Baker cord into a grounded 3 prong outlet. The needle on the baking timer display; Set the baking timer by lifting the topmost handle...
Similar Questions

How Do You Replace The Grease Filter? Do You Need To Unscrew The Lock? Thanks!
(Posted by Matag43 1 year ago)

I Am Interested In Your Island Range Hood Model # Kvib602dss.
Is there a video showing how to install proper ducting for this model?Without that information, i do...
Is there a video showing how to install proper ducting for this model?Without that information, i do...
(Posted by cjbnewemail 8 years ago)

Blower Flywheel Breaks
inside the blower assembly is a black plastic flywheel. Twice ours has broken to pieces. Since its $...
inside the blower assembly is a black plastic flywheel. Twice ours has broken to pieces. Since its $...
(Posted by Rockwoodanderson 8 years ago)
Where Do I Find The Serial Number For My Installed Kxu8036yss?
(Posted by srinitechpacific 9 years ago)

Uxb0600dys Wiring Diagrams
I can not get the power supply connector from the range hood, which takes a 2 prong plug , to the bl...
I can not get the power supply connector from the range hood, which takes a 2 prong plug , to the bl...
(Posted by backhoe37 10 years ago)