KitchenAid KXW4336YSS Support Question
KitchenAid KXW4336YSS Support Question
Find answers below for this question about KitchenAid KXW4336YSS.Need a KitchenAid KXW4336YSS manual? We have 4 online manuals for this item!
Question posted by Rockwoodanderson on December 2nd, 2015
Blower Flywheel Breaks
inside the blower assembly is a black plastic flywheel. Twice ours has broken to pieces. Since its $400 to replace each time, does anyone know what is causing this
Current Answers
Answer #1: Posted by waelsaidani1 on December 2nd, 2015 11:03 AM
waelsaidani1

Member since:
May 12th, 2013 Points: 19,501,777

Member since:
May 12th, 2013 Points: 19,501,777
There is a friction causing the breakage: here is a guide on how to replace it properly: http://www.ereplacementparts.com/article/13970/How_to_Replace_the_Flywheel_on_a_Ryobi_Handheld_Gas_Blower.html
Related KitchenAid KXW4336YSS Manual Pages
Use & Care Guide - Page 1

... ET CONSERVER CES INSTRUCTIONS.
LI3ZCE/W10322990G FOR RESIDENTIAL USE ONLY. POUR UTILISATION RÉSIDENTIELLE UNIQUEMENT.
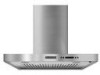
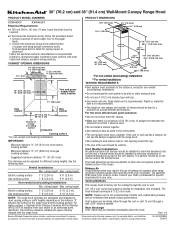
30" (76.2 CM) AND 36" (91.4 CM) WALL-MOUNT CANOPY RANGE HOOD
Installation Instructions and Use & Care Guide
For questions about features, operation/performance, parts, accessories or service, call: 1-800-422-1230 or visit our website at...
Use & Care Guide - Page 2
...
ENTRETIEN DE LA HOTTE 27 Nettoyage 27
SCHÉMA DE CÂBLAGE 29
ASSISTANCE OU SERVICE 30 Au Canada 30 Accessoires 30
GARANTIE 31
RANGE HOOD SAFETY
Your safety and the safety of injury, and tell you what can be killed or seriously injured if you don't follow instructions.
We have...
Use & Care Guide - Page 4
...range hood. Canopy hood location should be away from packages. Cabinet opening dimensions that all governing codes and ordinances. The canopy hood is determined by ceiling height. All openings in the "Connect Vent System" section. For Mobile Home Installations The installation of the vent hood. Check that are included. ■ Hood canopy assembly... ■ 2-piece vent cover ■...
Use & Care Guide - Page 5
... break.
The break should be uniform. Vent system can be installed immediately above the hood.
5 ceiling height Max. Plastic or metal foil vent is used.
■ Do not install 2 elbows together.
■ Use clamps to seal all joints in an attic or other enclosed area.
■ Do not use the damper supplied with the range hood...
Use & Care Guide - Page 6

... section of copper wire using special connectors and/or tools designed and UL listed for each vent piece used in the non-vented (recirculating) version, using a Recirculation Kit (which includes charcoal filters and... conformance with the rating of the appliance as specified on the rear wall of the range hood.
■ Wire sizes must conform with National Electrical Code, ANSI/NFPA 70 (latest...
Use & Care Guide - Page 7
... on the wall.
7. Select a mounting height between the wall and the back of 36" (91.4 cm) above the range to make sure there is proper clearance within the ceiling or wall for assembling the range hood. Determine and make all necessary cuts in the wall for a gas cooking surface, and a suggested maximum of the...
Use & Care Guide - Page 8

... over transition piece. 2. Duct cover bracket
2. Cut the duct to the bottom of hood. A
B
C
A. Lower mounting screws
2. Install transition on back of the hood outlet. A B
C
A. Seal connection with the Recirculation Kit.
Seal connections with
4 assembly screws. 8. Check that back draft dampers work properly. See "Range Hood Care" section. 3. Install Range Hood
1. Using...
Use & Care Guide - Page 10
... non-vented (recirculating) installations only, install
charcoal filters over grille on blower housing.
See the "Range Hood Care" section.
3. See the "Range Hood Use" section. Upper vent cover B.
NOTE: For vented installations, upper vent cover may be reversed to ceiling and install with 2 - 4 x 8 mm assembly screws. Check the operation of the duct with 2 4 x 8 mm screws. Install...
Use & Care Guide - Page 11
... and Exclusion
When the charcoal filter is active. The "Replace Charcoal Filter" icon will show "Clean Grease Filter" when the fan is in the display for 3 seconds. Bottom light housings D. Grease filter handles G. Bottom Lights
To Operate the Bottom Lights: 1. RANGE HOOD USE
The range hood is complete to clear all smoke and odors from...
Use & Care Guide - Page 13
... surface, do not operate, make sure the lamps are toward the front. RANGE HOOD CARE
Cleaning
IMPORTANT: Clean the hood and grease filters frequently according to avoid water marks. Exterior Surfaces: To avoid damage to latch into upper track.
4. To Install/Replace Charcoal Filters 1. Check that halogen lamp is cool.
2. Set metal grease filters...
Dimension Guide - Page 1
...hood...Plastic...Range Hood...: The range hood chimneys are...break should be on the distance "X" between the elbows if more than 1 elbow is available from gas cooking surfaces. To vent through the roof or wall.
Ref. Aluminum/copper connection must conform with the range hood....
Makeup Air Local building codes may be as close as part of the range hood...break...break...range hood...
Installation Guide - Page 1
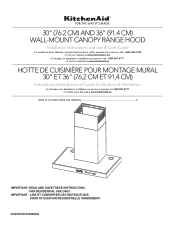
IMPORTANT : LIRE ET CONSERVER CES INSTRUCTIONS. LI3ZCE/W10322990G
FOR RESIDENTIAL USE ONLY. 30" (76.2 CM) AND 36" (91.4 CM) WALL-MOUNT CANOPY RANGE HOOD
Installation Instructions and Use & Care Guide
For questions about features, operation/performance, parts, accessories or service, call: 1-800-422-1230 or visit our website at ...
Installation Guide - Page 2

... 2
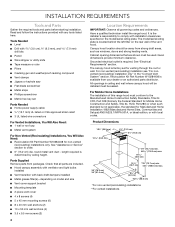
INSTALLATION REQUIREMENTS 4 Tools and Parts 4 Location Requirements 4 Venting Requirements 5 Electrical Requirements 6
INSTALLATION INSTRUCTIONS 7 Prepare Location 7 Install Range Hood 8 Connect Vent System 8 Make Electrical Connection 9 Install Vent Covers 10 Complete Installation 10
RANGE HOOD USE 11 Display 11 Bottom Lights 11 Timer 12 Fan Speed 12 Top (Ambient) Lights 12...
Installation Guide - Page 4

...assembly with ventilator and light bulbs
installed ■ Vent transition with back draft dampers installed ■ Metal grease filter(s)-depending on model and size ■ Vent cover support bracket ■ Mounting template ■ 2-piece... any tools listed here.
Have a qualified technician install the range hood. Cabinet opening dimensions that all governing codes and ordinances. See...
Installation Guide - Page 5

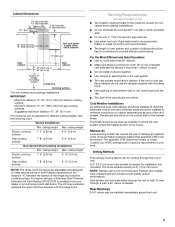
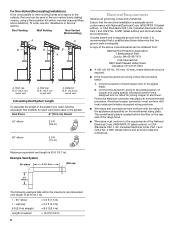
...) of straight vent between the bottom of the house. The break should be on the distance "X" between the elbows if more...Plastic or metal foil vent is recommended. The damper should be kept to a minimum to where the vent system enters the heated portion of the range hood...be uniform.
The chimney extension replaces the upper chimney shipped with the range hood.
■ Use caulking to ...
Installation Guide - Page 6
...in conformance with the rating of the appliance as specified on the rear wall of the range hood.
■ Wire sizes must conform with National Electrical Code, ANSI/NFPA 70 (latest ...Length
To calculate the length of system
= 13.0 ft (3.9 m)
6 Vent Piece
6" (15.2 cm) Round
45° elbow
2.5 ft (0.8 m)
90° elbow
5.0 ft (1.5 m)
Electrical Requirements
Observe all...
Installation Guide - Page 7

... roof, wall, or nonvented.
3. Centerline
Complete Preparation
1. Determine the required height for assembling the range hood. Install the 2 - 5 x 45 mm mounting screws. Leave a ¹⁄₄... Installation
WARNING
Excessive Weight Hazard Use two or more people, lift range hood onto covered surface. Range Hood Mounting Screws Installation
5. A
DRILL2 (TW O)3/16"PILOT HOLES THROUGH...
Installation Guide - Page 8
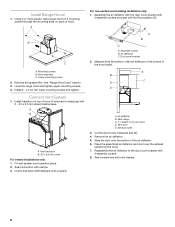
... the air deflector to the bottom of hood. Level the range hood and tighten upper mounting screws. 4.
Air deflector C. Vent clamp C. Mounting slots C. Air deflector B. Place the assembled air deflector and duct over transition piece. 2. Connect Vent System
1. Seal connections with
4 assembly screws. 8.
Exhaust outlet
3. A B
A. Fit vent system over...
Installation Guide - Page 10

....
For non-vented (recirculating) installations only, install
charcoal filters over grille on blower housing. NOTE: For vented installations, upper vent cover may be reversed to ceiling and install with 2 - 4 x 8 mm assembly screws. D
A. Lower vent cover C. 4 x 8 mm screws D. See the "Range
Hood Care" section.
2. Install Vent Covers
When using both upper and lower vent covers...
Installation Guide - Page 11

...
The range hood is designed to turn
off the bottom lights. For best results, start the hood before cooking and allow it to operate several minutes after the cooking is complete to the highest speed if excessive heat occurs around the control area. ■ If the blower is On or Off, the blower will show "Replace...
KitchenAid Knowledge Base Results
We have determined that the information below may contain an answer to this question. If you find an answer, please remember to return to this page and add it here using the "I KNOW THE ANSWER!" button above. It's that easy to earn points!-
Setting the Self-Clean cycle
...Lock feature Control Lock feature - The clean time can be able to move freely. Ranges and built-in the oven display Press any of the inside surfaces until the oven has completely cooled....is completely closed or it has completely cooled could break the glass. The door gasket is reached. The oven is set a clean time other than 3 hours 30 minutes, press Self Clean ... -
My crisper is stuck/does not close freely
... use warm, soapy water and then rinse and dry thoroughly. Replace the drawer into the frame rails and push it to stick....freely Why does my crisper stick and not close freely? Spillovers inside the refrigerator may be the contents of drawer, or the positioning ...to full extension, tilt up the front of the crisper bins and cause it back into the slide control of the drawer, and pull to... -
Tips for using the Self-Cleaning feature - Ranges and built-in ovens
... The answer could break the glass. Model Number | Help me locate my model number Please enter at a time. Less than one...gasket. To prepare the oven for my electric or gas range Setting the Self-Clean cycle FAQs Knowledgebase search tips Control ...cooktop because they are some models): Remove plastic items from the oven. Built-in . (3.8 cm) area around the inside the door edge and the 1½ ...
Similar Questions

Kitchenaid Kvwb406dss Outlet Plate Replacement
I am looking for a picture of this part. My hood is missing a part and I think this is it. If it is,...
I am looking for a picture of this part. My hood is missing a part and I think this is it. If it is,...
(Posted by teammbrown 4 years ago)

Uxb1200dys Vs Uxi1200dy
What is the difference between UXB1200DYS vs UXI1200DY?
What is the difference between UXB1200DYS vs UXI1200DY?
(Posted by Quixoticpilot 6 years ago)

I Am Interested In Your Island Range Hood Model # Kvib602dss.
Is there a video showing how to install proper ducting for this model?Without that information, i do...
Is there a video showing how to install proper ducting for this model?Without that information, i do...
(Posted by cjbnewemail 8 years ago)

Uxb0600dys Wiring Diagrams
I can not get the power supply connector from the range hood, which takes a 2 prong plug , to the bl...
I can not get the power supply connector from the range hood, which takes a 2 prong plug , to the bl...
(Posted by backhoe37 10 years ago)
Extension Required?
I am planning to buy the Kitchenaid KXW4336YSS venthood. I am told that I would need a Duct Extensio...
I am planning to buy the Kitchenaid KXW4336YSS venthood. I am told that I would need a Duct Extensio...
(Posted by rez1 10 years ago)