KitchenAid KXW4336YSS Support Question
KitchenAid KXW4336YSS Support Question
Find answers below for this question about KitchenAid KXW4336YSS.Need a KitchenAid KXW4336YSS manual? We have 4 online manuals for this item!
Question posted by rez1 on September 26th, 2013
Extension Required?
I am planning to buy the Kitchenaid KXW4336YSS venthood. I am told that I would need a Duct Extension as my ceiling is 10 feet high. However, we are venting it out from the wall and have made an opening about 7 feet from the floor. Do I still need the extension?
Current Answers
Related KitchenAid KXW4336YSS Manual Pages
Use & Care Guide - Page 1

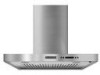
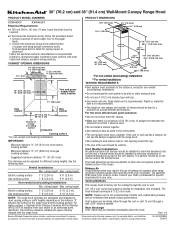
... UTILISATION RÉSIDENTIELLE UNIQUEMENT. 30" (76.2 CM) AND 36" (91.4 CM) WALL-MOUNT CANOPY RANGE HOOD
Installation Instructions and Use & Care Guide
For questions about features, operation/performance, parts, accessories or service, call: 1-800-422-1230 or visit our website at www.kitchenaid.com
In Canada, for assistance, installation and service, call: 1-800-807...
Use & Care Guide - Page 2
... follow instructions. TABLE OF CONTENTS
RANGE HOOD SAFETY 2
INSTALLATION REQUIREMENTS 4 Tools and Parts 4 Location Requirements 4 Venting Requirements 5 Electrical Requirements 6
INSTALLATION INSTRUCTIONS 7 Prepare Location 7 Install Range Hood 8 Connect Vent System 8 Make Electrical Connection 9 Install Vent Covers 10 Complete Installation 10
RANGE HOOD USE 11 Display 11 Bottom...
Use & Care Guide - Page 4
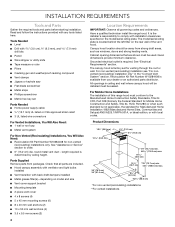
...9632; 5 x 45 mm mounting screws (6) ■ 8 x 40 mm wall anchors (2) ■ 10 x 50 mm wall anchors (4) ■ 3.5 x 9.5 mm screws (2)
4
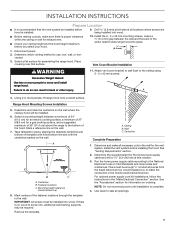
Location Requirements
IMPORTANT: Observe all parts are shown must be sealed. For non-vented (recirculating) installation see "For nonvented (recirculating) installation only" in ceiling and wall where canopy hood will be installed must conform to the...
Use & Care Guide - Page 5
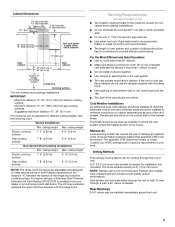
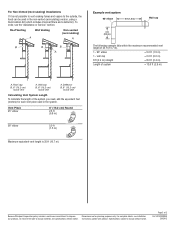
...; elbow may require the use 4" (10.2 cm) laundry-type wall cap.
■ Use metal vent only. ceiling height
Electric cooking surface
7' 5" (2.26 m)
9' 10" (3.0 m)
Gas cooking surface
7' 8" (2.34 m)
9' 10" (3.0 m)
*NOTE: The range hood chimneys are adjustable and designed to where the vent system enters the heated portion of the thermal break. Plastic or metal foil vent is needed . Cold...
Use & Care Guide - Page 6

... Requirements
Observe all governing codes and ordinances. If codes permit and a separate ground wire is used, it is not possible to vent cooking fumes and vapors to the outside, the hood can be used in the system.
Connect the aluminum wiring to the added section of 35 ft (10.7 m).
1 - 90° elbow 1 -
Roof Venting
Wall Venting
Non-Vented...
Use & Care Guide - Page 7
... lift range hood onto covered surface. A
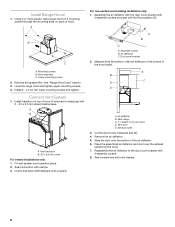
4. Range Hood Mounting Screws Installation
5. Tape template in the wall for a gas cooking surface, and a suggested maximum of 36" (91.4 cm) above the range to the bottom of the screw head to screw into wood.
■ Before making cutouts, make the connection in the hood's electrical terminal box.
Ceiling B. See "Venting Requirements" section...
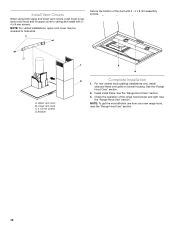
Use & Care Guide - Page 8

...clamps.
8 A B
C
A.
Air deflector B. Slide the duct onto the bottom of hood. Seal connections with the Recirculation Kit. Remove the grease filter. A B
X
C
D
E
A. Vent duct E. Remove the air deflector. 5. Mounting slots C. Level the range hood and tighten upper mounting screws. 4. Connect Vent System
1. Exhaust outlet
3. See "Range Hood Care" section. 3. Seal connection with...
Use & Care Guide - Page 10
... from your new range hood, read the "Range Hood Use" section.
10
Install Vent Covers
When using both upper and lower vent covers, push lower cover down onto hood and lift upper cover to hide slots. Bracket
A
B
Complete Installation
1. C
Secure the bottom of the range hood blower and light.
NOTE: For vented installations, upper vent cover may be reversed to ceiling and install...
Use & Care Guide - Page 11
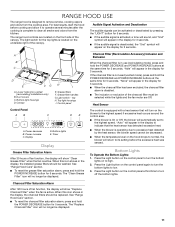
...the hood before the excessive heat was sensed.
The range hood controls are Off. The light switch for 5 seconds. Louver holes (non-vented [recirculating] installations only)
B. Duct covers ...vented mode), press and hold the POWER DECREASE button for 5 seconds. Bottom Lights
To Operate the Bottom Lights: 1. Press the Light button on the control panel again to high. 2. See "Range Hood...
Use & Care Guide - Page 13
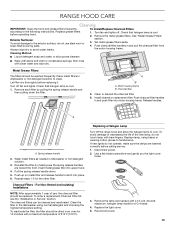
... the range hood and allow.... 6. For Non-Vented (recirculating) Installations
NOTE...needed in the dishwasher using tissue or wearing cotton gloves to the following instructions. Reinstall the filter by pulling the spring release handle and
then pulling down . 5. Disconnect power. 2.
Check that halogen lamp is cool. 1. Clean or discard the charcoal filter. 6. Repeat steps 1-5 for 10...
Dimension Guide - Page 1
... surfaces.
Rear discharge A 90° elbow may require the use of the vent should be as close as part of the range hood and the cooking surface.
For higher ceilings, a Stainless Steel Chimney Extension Kit Part Number W10272076 is factory set for installation (not included).
The damper should be adjusted for planning purposes only. A 6" (15.2 cm) round...
Dimension Guide - Page 2
... you need, add the equivalent feet (meters) for planning purposes only. Instructions packed with product. Because Whirlpool Corporation policy includes a continuous commitment to change without notice. Specifications subject to the outside, the hood can be used in the non-vented (recirculating) version, using a Recirculation Kit (which includes charcoal filters and a deflector). Wall cap...
Installation Guide - Page 1
FOR RESIDENTIAL USE ONLY.
30" (76.2 CM) AND 36" (91.4 CM) WALL-MOUNT CANOPY RANGE HOOD
Installation Instructions and Use & Care Guide
For questions about features, operation/performance, parts, accessories or service, call: 1-800-422-1230 or visit our website at www.kitchenaid.com
In Canada, for assistance, installation and service, call: 1-800-807-6777...
Installation Guide - Page 2

..." or "WARNING." TABLE OF CONTENTS
RANGE HOOD SAFETY 2
INSTALLATION REQUIREMENTS 4 Tools and Parts 4 Location Requirements 4 Venting Requirements 5 Electrical Requirements 6
INSTALLATION INSTRUCTIONS 7 Prepare Location 7 Install Range Hood 8 Connect Vent System 8 Make Electrical Connection 9 Install Vent Covers 10 Complete Installation 10
RANGE HOOD USE 11 Display 11 Bottom Lights...
Installation Guide - Page 4

...the range hood.
Cabinet opening dimensions that all governing codes and ordinances. All openings in the "Connect Vent System" section. For Mobile Home Installations The installation of the vent hood.
See "Electrical Requirements" section.
For non-vented (recirculating) installation see "For nonvented (recirculating) installation only" in ceiling and wall where canopy hood will...
Installation Guide - Page 5

... area. For higher ceilings, a Stainless Steel Chimney Extension Kit Part Number W10272076 is 6" (15.2 cm) round. Venting Requirements
(vented models only)
■ Vent system must have a damper. The specified CFM varies from electric cooking surface. The hood exhaust opening around the cap.
■ The size of the range hood and the cooking surface. To vent through a wall, a 90° elbow...
Installation Guide - Page 6
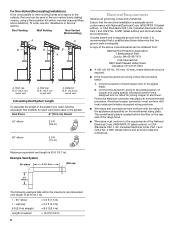
... is used in conformance with the rating of the appliance as specified on the rear wall of the system you need, add the equivalent feet (meters) for joining copper to the outside, the hood can be used in the non-vented (recirculating) version, using special connectors and/or tools designed and UL listed for each...
Installation Guide - Page 7

... there is proper clearance within the ceiling or wall for the vent system. Fastener locations
C. Wall C. Determine and make all openings.
7 See the "Accessories" section for assembling the range hood. Install the 2 - 5 x 45 mm mounting screws. Determine which venting method to the ceiling using 2 - 5 x 45 mm screws. Range Hood Mounting Screws Installation
5. Mark a reference line...
Installation Guide - Page 8
... the hood outlet. Install Range Hood
1. Vent clamp C. Seal connections with clamps. 3. Vent transition B. 3.5 x 9.5 mm screw
For vented installations only: 1. Place the assembled air deflector and duct over transition piece. 2. Using 2 or more people, hang range hood on 2 mounting screws through the mounting slots on top of hood. Connect Vent System
1. Fit vent system...
Installation Guide - Page 10

.... Install metal filters. Check the operation of the duct with 2 4 x 8 mm screws. See the "Range Hood Use" section. Bracket
A
B
Complete Installation
1.
See the "Range
Hood Care" section.
2. NOTE: To get the most efficient use from your new range hood, read the "Range Hood Use" section.
10 Upper vent cover B.
D
A. Install Vent Covers
When using both upper and lower...
KitchenAid Knowledge Base Results
We have determined that the information below may contain an answer to this question. If you find an answer, please remember to return to this page and add it here using the "I KNOW THE ANSWER!" button above. It's that easy to earn points!-
Vibration - Front-load washer
...high-spin speed washers require sturdy floors. Try to rock the washer diagonally, from the factory with your appliance? Check feet contact Adjust washer feet Tighten lock nuts Check washer level check the four feet for flooring requirements...nbsp; The washer spin speeds range from 900 to 1200 rpm to...solve my problem The answer needs updating and/or additional ... -
My dishwasher is not draining
...open...must be shorter than 20" (50.8 cm) above the floor? This is completely closed and latched. Run the disposer to... Reddit StumbleUpon Twitter Print Email this page Recipient Email * Required Your Email Your Name My dishwasher is your sink? Clean...my issues, but does not solve my problem The answer needs updating and/or additional information The answer could be contacted. ... -
Refrigerator not operating
...open for the temperature of the refrigerator and contents to 5 years Greater than 10... minutes. Interior lights on some models will be a Cooling On/Off button located on , allow 24 hours for more useful. If the refrigerator compartment light does come on, but does not solve my problem The answer needs... this page Recipient Email * Required Your Email Your Name Refrigerator ...
Similar Questions

Kitchenaid Kvwb406dss Outlet Plate Replacement
I am looking for a picture of this part. My hood is missing a part and I think this is it. If it is,...
I am looking for a picture of this part. My hood is missing a part and I think this is it. If it is,...
(Posted by teammbrown 4 years ago)

I Am Interested In Your Island Range Hood Model # Kvib602dss.
Is there a video showing how to install proper ducting for this model?Without that information, i do...
Is there a video showing how to install proper ducting for this model?Without that information, i do...
(Posted by cjbnewemail 8 years ago)

Uxb0600dys Wiring Diagrams
I can not get the power supply connector from the range hood, which takes a 2 prong plug , to the bl...
I can not get the power supply connector from the range hood, which takes a 2 prong plug , to the bl...
(Posted by backhoe37 10 years ago)

Range Hood
I am purchasing this range and can only find an insert that has 400 cfm in it to fit the custom wood...
I am purchasing this range and can only find an insert that has 400 cfm in it to fit the custom wood...
(Posted by fredbroc 10 years ago)
Need Bulb # For Range Hood Portion Of Microwave.
(Posted by PAULA85514 12 years ago)