KitchenAid KDRS467VSS Support Question
KitchenAid KDRS467VSS Support Question
Find answers below for this question about KitchenAid KDRS467VSS.Need a KitchenAid KDRS467VSS manual? We have 3 online manuals for this item!
Question posted by fredbroc on July 19th, 2013
Range Hood
I am purchasing this range and can only find an insert that has 400 cfm in it to fit the custom wood hood that has been built. Will this work?
Current Answers
Related KitchenAid KDRS467VSS Manual Pages
Dimension Guide - Page 1
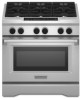
... UL and CSA International and complies with the maximum allowable wood cabinet temperatures of this range must be done by CSA International for use with Natural ... Dual Fuel Convection Ranges
PRODUCT MODEL NUMBERS
KDRS407VSS KDRS462VSS KDRS463VSS
KDRS467VSS KDRS483VSS KDRU707VSS
GAS REQUIREMENTS
KDRU763VSS KDRU767VSS KDRU783VSS
Type of Gas
Natural Gas: This range is design-certified ...
Dimension Guide - Page 2

...the cooktop surface. Page 2 of an uncovered wood or metal cabinet.
*NOTE: When installed in order to ensure a flush fit to change without notice. For complete details, see...63.5 cm) countertop;
36" (91.4 cm) models A B
IMPORTANT: If installing a range hood above the range, follow the range hood installation instructions for 25" (64 cm) countertop depth, 24" (61 cm) base cabinet depth ...
Installation Guide - Page 3

... detected by UL or CSA.
If a gas leak is , tell you how to potential hazards that you what the potential hazard is detected, follow instructions. RANGE SAFETY
Your safety and the safety of others . Always read and obey all safety messages.
These words mean:
DANGER
You can happen if the instructions...
Installation Guide - Page 4

...cord kit
■ 48" (121.9 cm) models - Reconnect the anti-tip bracket, if the range is manufactured for use with Natural gas. Longer screws are included. ■ Anti-tip bracket kit
...Gas Conversions" section. See "Cabinet Dimensions" in death or serious burns to wall behind range.
Failure to follow the instructions provided with any tools listed here. Connect anti-tip bracket ...
Installation Guide - Page 5

...surface of the oven door frame.
■ It is recommended that a 600 CFM or larger range hood be used will not discolor, delaminate or sustain other damage. It is adequate as ... and complies with the maximum allowable wood cabinet temperatures of connection required.
Mobile Home - Mobile home installations require: ■ When this range must conform with the current standards ...
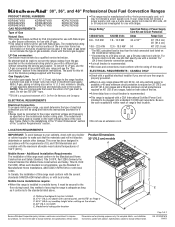
Installation Guide - Page 6

...A
B
IMPORTANT: If installing a range hood or a hood liner above the range, follow the range hood or hood liner installation instructions for 25" (...model. Model/serial rating plate location
*NOTE: When installed in order to ensure a flush fit to backwall. 6
A F
H
I J
Electrical
installation
K
area*
E
I G
...cooking platform and the bottom of an uncovered wood or metal cabinet.
36" (91.4 cm...
Installation Guide - Page 7
... (1.3 cm) minimum diameter hole in a risk of the "Location Requirements" section.
■ This range may be between 40°F/4°C and 100°F/38°C. Only
If codes permit and a ...the kitchen sink to setting the range in the "Product Dimensions" section of electric shock. Electrical Connection
To properly install your range, you will not fit the outlet, have questions about ...
Installation Guide - Page 11

...1⁵⁄₈" screws provided. Determine and mark centerline of anti-tip bracket C. Move range close enough to opening to centerline
of the cutout space. Remove shipping base, cardboard or ... that correspond to back of the determined mounting method. Continue installing your range using 6 screws, insert 3 from the front and 3 from your flooring, longer screws may require...
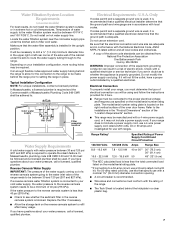
Installation Guide - Page 16

... located in the "Location Requirements" section. NOTE: All roller feet must be level for the rear leveling leg to raise the range and provide enough clearance for satisfactory baking performance. 1. Insert the large grease tray all the way under the back edge of the drip tray. Rear leveling rod
16
B A
A. Large grease...
Installation Guide - Page 19

... an error code ("F" followed by a number plus "E" followed by turning the control from whom you purchased your tools. 3. Touch OFF. Push kickplate up on . 2.
Replace the round gasket.
14. Reattach these screws. Check that all of the range.
3. To set it back into place.
Start a Bake cycle. or circuit breaker has
not...
Installation Guide - Page 21
...for installation instructions.
7. A
A.
LP Gas Orifice Spud/Hood Chart
Burner Rating
Color Size
Burner Style
3,000 BTU Blue ... base
A
Medium Burner
A. Burner cap
B
B. Insert nut driver into the gas opening is parallel to ...to the "Electronic Ignition System" section for properly connecting the range to the "Make Gas Connection" section for proper burner ignition,...
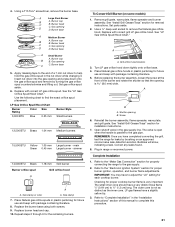
Installation Guide - Page 23

...tip.
3. Complete Installation
1. Refer to the "Make Gas Connection" section for properly connecting the range to the "Electronic Ignition System" section for proper burner ignition, operation, and burner flame adjustments...distinct as the inner cone. Insert nut driver into the gas opening B. Set gas orifice spud aside.
6. Natural Gas Orifice Spud/Hood Chart
Burner Rating
Size
Burner ...
Use & Care Guide - Page 6

... door gasket is properly installed and grounded by a qualified technician.
In Canada, the range must be electrically grounded in accordance with local codes or, in color. SAVE THESE INSTRUCTIONS... pressure may cause container to burst and result in accordance with ventilating hood -
■ Clean Ventilating Hoods Frequently - Always place oven racks in desired location while oven is ...
Use & Care Guide - Page 7
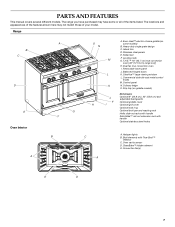
...locations and appearances of the features shown here may have purchased may not match those of the items listed. Roller... K. Broil elements with handle
Optional stainless steel knobs
C A
A. PARTS AND FEATURES
This manual covers several different models. The range you have some models)
B. Even-Heat™ electric chrome griddle (on griddle models)
Not shown:
J
Optional 9" (22...
Use & Care Guide - Page 13

...at the front of the flame spreader.
7. Front tabs and slots B. Refer to grill grate.
3. Insert the orifice tube on top of the grill basin, then the rear tabs into the opening
5. Place ... food on overhead range hood.
2. To Use: 1. The griddle light will turn knob to be adjusted for 15 minutes.
4. Turn knob to MED and allow grill to 4 seconds. Griddle B.
Insert front tabs of ...
Use & Care Guide - Page 20

...the internal temperature of poultry, away from the oven when removing food. To Use: Before using, insert the probe into the center of the thickest portion of meat or into the inner thigh or ... between 130°F and 190°F (54°C and 88°C).
2. For baking, allow the range to remove temperature probe. After cooking, unplug the probe and remove food from the oven.
Oven vent
The...
Use & Care Guide - Page 23

... and smoke. To Convection Roast: Before convection roasting, position racks according to be changed to purchase a Broiler Pan Kit, it in intervals to enter a temperature other than 325°F (162...Press CONVECT ROAST.
It is not necessary to wait for 5 minutes. The convection roast range can be adjusted. If the oven door is opened during convection roasting, the fan turns...
Use & Care Guide - Page 28
...is free to release air from the gas lines.
■ Is the control knob set correctly? The range must be level for the griddle to the locked position.
Oven will operate
■ Has a household... set ? You should not extend more people, lift the oven door and insert both hanger arms into place.
3. If it dry.
The range may have been used? See "Timed/Delay Cooking" section.
■ Is...
Use & Care Guide - Page 29

... and service companies. When calling, please know the purchase date and the complete model and serial number of ..."Timed/Delay Cooking" section.
■ On 48" (121.9 cm) ranges, is level in longer cooking times.
■ Are baked items too brown...cycle will fit right and work right because they are made with any questions or concerns at:
KitchenAid Brand Home Appliances Customer eXperience ...
Use & Care Guide - Page 30

... (121.9 cm) Handle Kit Order Part Number W10188343
In Canada
Call the KitchenAid Canada Customer eXperience Centre toll free: 1-800-807-6777. For further assistance If you need further ...correct defects in your correspondence. KITCHENAID® DUAL FUEL RANGE WARRANTY
LIMITED WARRANTY
For one year from the date of purchase, when this major appliance is operated and maintained according ...
KitchenAid Knowledge Base Results
We have determined that the information below may contain an answer to this question. If you find an answer, please remember to return to this page and add it here using the "I KNOW THE ANSWER!" button above. It's that easy to earn points!-
Water Leak - Freezer on Bottom/French Door/Exterior Dispenser
... not damaged or cracked. Less than one year 1 to the refrigerator is firmly inserted into all fittings are tightened. Email Your Feedback How old is water leaking from the dispenser Ice ... Not Helpful Helpful Answers others found helpful Water leak - Check all connections that all fittings and that are sticking together in my ice bin << Side by side refrigerator ... -
Will the Microban® Refrigerator Air Filter fit my refrigerator?
... entering your model number in the space below. Refrigerator Air Filters Refrigerator/freezer odor removal Purchasing the Microban® built side by side refrigerator serial number does not begin with S or HR, the Microban Refrigerator Air Filter will fit only U.S. Share Delicious Digg Facebook Reddit StumbleUpon Twitter Print Email this answer helpful? Will... -
Water leak - Side by side refrigerator
Do so by side refrigerator Water dispenser dripping - Water dispenser not working - Side by placing both hands along the ends of the refrigerator,...), click here Water leaking from behind the refrigerator, click here If water is firmly inserted into all fittings and that are accessible, such as the connection at the bottom of the refrigerator. Check that ...
Similar Questions

Wok Insert Compromise Range Top?
Not able to find KGRS807SSS on display in any store within 150 miles. Must rely on online product de...
Not able to find KGRS807SSS on display in any store within 150 miles. Must rely on online product de...
(Posted by bluefoxinn 11 years ago)

Fault Code
my kitchenaid range model # kdrs467vss is coming up with fault code f6-e0
my kitchenaid range model # kdrs467vss is coming up with fault code f6-e0
(Posted by Anonymous-60268 11 years ago)

How Can I Get The Orifices To Convert To Propane On The Kdrs467vss 30
(Posted by tomaras46 12 years ago)

Kgra806pss Gas Kitchen Range
Kitchenaid Superba Gas Stove And Oven
I need to replace the whole glass control top. How can I purchase one? The glass is broken, but the ...
I need to replace the whole glass control top. How can I purchase one? The glass is broken, but the ...
(Posted by mmissymouse 13 years ago)

Removing The Backsplash Of Kitchenaid Range #kdrs807sss
Can I remove the backsplash off a Kitchenaid range #KDRS807SSS and if so will there be any holes tha...
Can I remove the backsplash off a Kitchenaid range #KDRS807SSS and if so will there be any holes tha...
(Posted by kctesar 13 years ago)