KitchenAid KDRS807SSS Support Question
KitchenAid KDRS807SSS Support Question
Find answers below for this question about KitchenAid KDRS807SSS - 30 Inch Dual Fuel Range.Need a KitchenAid KDRS807SSS manual? We have 3 online manuals for this item!
Question posted by kctesar on April 27th, 2010
Removing The Backsplash Of Kitchenaid Range #kdrs807sss
Can I remove the backsplash off a Kitchenaid range #KDRS807SSS and if so will there be any holes that are exposed? We want a cooktop look but we can not because of the height of our cabinents,
Current Answers
Related KitchenAid KDRS807SSS Manual Pages
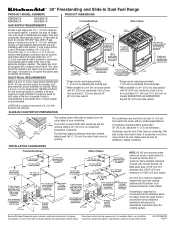
Dimension Guide - Page 1
... NOTE.
5" (12.7 cm) min.
® 30" Freestanding and Slide-In Dual Fuel Range
PRODUCT MODEL NUMBERS
PRODUCT DIMENSIONS
KDRS807S KDRS807X
KDSS907S KDSS907X
GAS SUPPLY REQUIREMENTS
Provide a gas supply line of the line. Freestanding Range
Slide-in Range
30" (76.2 cm)
5³⁄₄" (14.6 cm)
30 77.6 cm)
36" (91.4 cm) cooktop trim height with leveling legs screwed all...
Installation Guide - Page 2
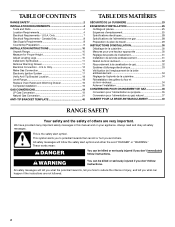
... Countertop Preparation 9
INSTALLATION INSTRUCTIONS 10 Unpack Range 10 Measure for Proper Height 10 Adjust Leveling Legs 10 Install Anti-Tip Bracket 11 Remove Warming Drawer 11 Electrical Connection -
WARNING
You...plan de travail 29
INSTRUCTIONS D'INSTALLATION 30 Déballage de la cuisinière 30 Mesures pour une hauteur appropriée 30 Réglage des pieds de nivellement ...
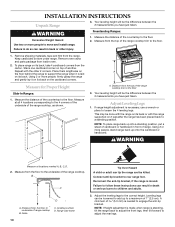
Installation Guide - Page 5

...Mobile home installations require:
■ When this range must be revised. Product Dimensions Freestanding Range
Slide-in Range
B
A
A
F
C*
B*
D*
C E
D E** F**
A. 5³⁄₄" (14.6 cm)
B. 30" (76.2 cm)
C. 41³⁄₄" (106.0 cm) overall height with leveling legs screwed all the way in.*
D. 36" (91.4 cm) cooktop trim height with leveling legs screwed all the way...
Installation Guide - Page 9

...removed from the supply and fuel lines so range will not be equipped with the range connection. If countertop is not level, range will be level and in the same room but external to the range...each front corner and/or rounded edge flattened.
30" (76.2 cm)
30 ¾" (78.1 cm)
³⁄&#...Ranges Only)
The cooktop sides of the slide-in -line connection to shutoff valve. Range...
Installation Guide - Page 10
... one cardboard corner on its back or with the other injury.
INSTALLATION INSTRUCTIONS
Unpack Range
3. Your leveling height will be the difference between the 2 measurements you have just taken. Measure the distance of the range cooktop trim to the floor. Remove shipping materials, tape and film from the floor to a standing position. Keep cardboard bottom...
Installation Guide - Page 11

... range.
8. When the range is at the same time, then pull drawer out another inch.
4.
Tape template into its fully open position. 2. Remove template from floor.
3. Before sliding range into holes ...(3.2 mm) holes at the positions marked on both loops forward at the correct height, check that specified in the "Location Requirements" section, adjust template so range will be...
Installation Guide - Page 12
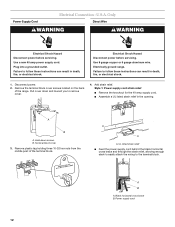
... shock.
1. A
A. A B
A. Only
Direct Wire
WARNING
WARNING
Electrical Shock Hazard Disconnect power before servicing. Failure to remove cover.
4. Failure to the terminal block.
Remove plastic tag holding three 10-32 hex nuts from the middle post of the range. Power Supply Cord
Electrical Connection - Plug into a grounded outlet. A
B
A. Power supply cord
12 Electrical Shock...
Installation Guide - Page 13
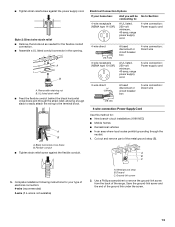
...ground strap (B). Electrical Connection Options
If your type of the range. Ground-link screw
2. A
B
A.
Style 2: Direct wire strain relief ■ Remove the knockout as needed for : ■ New branch-... grounding through the strain relief, allowing enough slack to easily attach the wiring to remove the ground-link screw from the back of electrical connection: 4-wire (recommended)
3-...
Installation Guide - Page 15
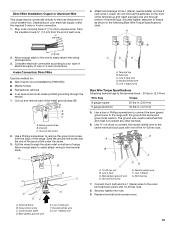
... grounding through bottom of the metal ground strap (B). Securely tighten hex nuts.
9. Attach terminal lugs to expose wires.
Neutral (white) wire E. G A
B F
C
A. 10-32 hex nut B. Line ... gauge copper 6 gauge aluminum
25 lbs-in. (2.8 N-m) 35 lbs-in the wire to remove the ground-link screw from the end of the range. Bare (green) ground wire D. Line 1 (black) G. Line 2 (red) wire ...
Installation Guide - Page 16

... connections may be used to connect the range to the supply line type, size and location. 1. Ground-link screw C. Line 1 (black) wire
Bare Wire Torque Specifications Attaching terminal lugs to do not remove) the setscrew on the front of the terminal lug and insert exposed wire end through the conduit on cord/conduit...
Installation Guide - Page 17

... connector F. Place burner grates over left front burner. Open the manual shutoff valve in range or reconnect power.
For further information, please refer to the adapters. 2. Using a ...gas shutoff valve. Correct any leak found.
3. Remove cooktop burner caps and grates from parts package. Align notches in place of the cooktop. Burner caps should be at the rear corner ...
Installation Guide - Page 18

... flashlight
and look underneath the bottom of the range. ■ Look for satisfactory baking performance. Check Operation of Cooktop Burners
Standard ..."POWER BURNER HI" ("DUAL HI" on burner
bases. To start -up or down until the range is removed from "LO" to ... TripleTier® Flame burner: 1.
Adjust Flame Height
Adjust the height of the range, first side to one side of pliers. ...
Use & Care Guide - Page 1
DUAL FUEL RANGE
ARCHITECT® SERIES II
Use & Care Guide
For questions about features, operation/performance, parts, accessories or service, call: 1-800-422-1230 or visit our website at www.kitchenaid.com
In Canada, call for assistance, installation and service, call: 1-800-807-6777 or visit our website at www.KitchenAid.ca
CUISINIÈRE À...
Use & Care Guide - Page 8

...and LO.
s Simmer. To Set: 1. Cooktop grate with the control knob turned to a low...the high heat setting, and is functioned by a dual valve control knob, which controls 2 separate burners....brown or sear food. All of the burner controls provide a range of food or liquid and using the TripleTier® Flame Burner...™ Grate supports 12" to 14" (30.5 cm to 35.6 cm) Wok pans and...
Use & Care Guide - Page 9
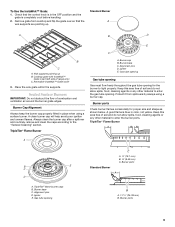
...the flow of range only) C. ...E
C
D
A. Igniter E. Burner ports
A
B
A. 1-1¹⁄₂" (25-38 mm) B. Remove grate from spillovers by always using a surface burner. Standard Burner A
A
B
D
B
C
A. Gas ... opening
Standard Burner
C A 19.1 mm) B 9.53 mm)
C. Protect it from cooktop and flip the grate over so that the control knob is completely cool before handling.
2....
Use & Care Guide - Page 16

... pan from the oven when removing the food. Position food on , 1 tone will turn off in 30 seconds to preheat before placing food in the display until the set temperature is under 170°F (77°C). Choose Center Broil when broiling smaller amounts of food with the range.
"Lo" will also appear in...
Use & Care Guide - Page 22

...
2
3 hours
3 (Regular)
3 hours 30 minutes
4
4 hours
5 (Maxi)
4 hours 30 minutes
Once the oven has completely cooled, remove ash with soft, lint-free cloth. General Cleaning
IMPORTANT: Before cleaning, make sure the door is automatically calculated and displayed along with one-time or limited use soap-filled scouring pads, abrasive cleaners, Cooktop Polishing Creme, steel...
Use & Care Guide - Page 23
... range or reconnect power.
23
Replace bulb and bulb cover by turning clockwise. 5. When replacing knobs, make sure the oven and cooktop are cool and the control knobs are in the back of vegetable oil applied to remove. Turn the glass bulb cover in the Off position. Cleaning Method: s Mild detergent (for both) s KitchenAid...
Use & Care Guide - Page 24

...loops foward at the same time, then pull drawer out another inch. Continue to remove the drawer. Pull both sides. Move the hinge levers back to remove the oven door. If it is set into the door....the drawer.
3. Then, follow these instructions. Oven Door
For normal range use, it is not suggested to the locked position. To Remove: 1. Open drawer to open position. 2. To Replace: 1.
Use & Care Guide - Page 28
...KitchenAid designated service company. The removal and reinstallation of your major appliance. This warranty is required to KitchenAid within 30 days from the date of purchase.
6.
KITCHENAID ...cleaning products not approved by KitchenAid.
5. Major appliances with original model/serial numbers that is used for repairs. KITCHENAID® DUAL FUEL RANGE WARRANTY
LIMITED WARRANTY
For one...
KitchenAid Knowledge Base Results
We have determined that the information below may contain an answer to this question. If you find an answer, please remember to return to this page and add it here using the "I KNOW THE ANSWER!" button above. It's that easy to earn points!-
General cleaning tips for my electric or gas range
... cooktop. Pull knobs straight away from control panel to clean the storage drawer. To clean the oven roasting racks Remove ...Cooktop Polishing Creme, steel-wool pads, gritty washcloths or certain paper towels. Damage may affect the finish. then pull out the drawer another inch...Ranges and Cooktops Cleaning and caring stainless steel surfaces Rainbow colors in the Off position. -
Cleaning the Downdraft Vent System - Architect 2 electric cooktop with downdraft
...the ventilation system without the filter. The filter sits in the ventilation chamber. Removing the filter will expose the ventilation chamber. Clean the walls of a vent cover, filter and ...ventilation system IMPORTANT: Make sure ventilation system control is set to Off and the cooktop is set to 5 years Greater than five years The answer describes my issues, but does not... -
How to use the waffle baker
...thermometer faces upwards. When baking is 3 minutes, 30 seconds (3:30). Wait for the Waffle Baker to decrease the ...remove the waffle using a non-metallic utensil. The display background will return to blue and the timer will automatically shut off . Rotate the baking unit so the baker lid with the dial thermometer again faces upward. The baking time can be in the "ready" range...
Similar Questions

All Four Burners Lost The Spark All At Once. Suspect The Spark Module. Which
suspect the spark module. Which part is it for my kitchenaid KDSS907SSS DUAL FUEL range. Also. I app...
suspect the spark module. Which part is it for my kitchenaid KDSS907SSS DUAL FUEL range. Also. I app...
(Posted by Andrewenman 6 years ago)

Remove Splash Guard On Model Kdrs807sss
If I removed the splash guard for looks, would that be a problem. How would it look from top?
If I removed the splash guard for looks, would that be a problem. How would it look from top?
(Posted by mjfm5 9 years ago)
Kitchenaid Stove Kdrp407hss4 Dual Fuel Oven Does Not Heat Up
(Posted by lmante 10 years ago)

Burner Lighters Don't Spark
The sparking function that lights the burners on my KitchnAid KDRP407HSS dual-fuel range has stopped...
The sparking function that lights the burners on my KitchnAid KDRP407HSS dual-fuel range has stopped...
(Posted by sprows 10 years ago)

Kitchenaid Kdss907sss - 30' Slide-in Dual Fuel Range
Position Of Range
Should the back of the 30" slide-in range touch the back wall?
Should the back of the 30" slide-in range touch the back wall?
(Posted by patriciainsf 11 years ago)