Dimension Guide
Page 1
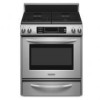
... cooktop surface. ® 30" Freestanding and Slide-In Dual Fuel Range PRODUCT MODEL NUMBERS PRODUCT DIMENSIONS KDRS807S KDRS807X KDSS907S KDSS907X GAS SUPPLY REQUIREMENTS Provide a gas supply line of ³⁄₄" (1.9 cm) rigid pipe to the appliance pressure regulator. Freestanding Range Slide-in Range 30" (76.2 cm) 5³⁄₄" (14.6 cm) 30 77.6 cm) 36" (91.4 cm) cooktop trim height with leveling legs screwed all the way in* 41³⁄₄" (106 cm) overall height with a manual...
... cooktop surface. ® 30" Freestanding and Slide-In Dual Fuel Range PRODUCT MODEL NUMBERS PRODUCT DIMENSIONS KDRS807S KDRS807X KDSS907S KDSS907X GAS SUPPLY REQUIREMENTS Provide a gas supply line of ³⁄₄" (1.9 cm) rigid pipe to the appliance pressure regulator. Freestanding Range Slide-in Range 30" (76.2 cm) 5³⁄₄" (14.6 cm) 30 77.6 cm) 36" (91.4 cm) cooktop trim height with leveling legs screwed all the way in* 41³⁄₄" (106 cm) overall height with a manual...

Installation Guide
Page 4
... the wall or floor where range is located inside the oven door on the model/serial rating plate. Check existing gas supply and electrical supply. Filler strip B. Parts needed ■ Tape measure ■ Masking tape Rear Filler Strip (optional) The filler strip may require longer mounting screws to anchor bracket to comply with any tools listed here. INSTALLATION REQUIREMENTS Tools and Parts Gather the required tools and parts before starting installation. Anti-tip bracket B. If cabinet storage is the...
... the wall or floor where range is located inside the oven door on the model/serial rating plate. Check existing gas supply and electrical supply. Filler strip B. Parts needed ■ Tape measure ■ Masking tape Rear Filler Strip (optional) The filler strip may require longer mounting screws to anchor bracket to comply with any tools listed here. INSTALLATION REQUIREMENTS Tools and Parts Gather the required tools and parts before starting installation. Anti-tip bracket B. If cabinet storage is the...

Installation Guide
Page 5
... with local codes. ■ The floor anti-tip bracket must be available. This oven has been designed in accordance with the requirements of cooktop *Range can be raised approximately 1" (2.5 cm) by adjusting the leveling legs. **When installed in * E. In Canada, the installation of this range must conform to rear of UL and CSA International and complies with local codes. See "Electrical Requirements" section. ■ Proper gas supply connection must conform...
... with local codes. ■ The floor anti-tip bracket must be available. This oven has been designed in accordance with the requirements of cooktop *Range can be raised approximately 1" (2.5 cm) by adjusting the leveling legs. **When installed in * E. In Canada, the installation of this range must conform to rear of UL and CSA International and complies with local codes. See "Electrical Requirements" section. ■ Proper gas supply connection must conform...

Installation Guide
Page 8
... wire gauge are adequate and in accordance with local codes. Range Rating* Specified Rating of Power Supply Cord Kit and Circuit Protection 120/240 Volts 120/208 Volts Amps 8.8 - 16.5 KW 7.8 - 12.5 KW 40 or 50 16.6 - 22.5 KW 12.6 - 18.5 KW 50 *The NEC calculated load is less than the total connected load listed on the model/serial rating plate. ■ A time-delay fuse or circuit breaker...
... wire gauge are adequate and in accordance with local codes. Range Rating* Specified Rating of Power Supply Cord Kit and Circuit Protection 120/240 Volts 120/208 Volts Amps 8.8 - 16.5 KW 7.8 - 12.5 KW 40 or 50 16.6 - 22.5 KW 12.6 - 18.5 KW 50 *The NEC calculated load is less than the total connected load listed on the model/serial rating plate. ■ A time-delay fuse or circuit breaker...

Installation Guide
Page 9
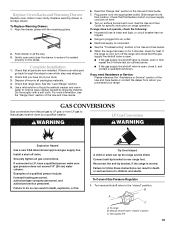
.... Line pressure testing above the manifold pressure shown on the model/serial rating plate are for connection to the female pipe threads of the gas supply piping system at a rate of opening and closing its individual shutoff valve must be removed from the supply and fuel lines so range will not be level for satisfactory baking conditions. 9 The valve is for proper operation: Natural gas: Minimum pressure: 5" WCP Maximum pressure: 14" WCP LP gas: Minimum pressure: 11...
.... Line pressure testing above the manifold pressure shown on the model/serial rating plate are for connection to the female pipe threads of the gas supply piping system at a rate of opening and closing its individual shutoff valve must be removed from the supply and fuel lines so range will not be level for satisfactory baking conditions. 9 The valve is for proper operation: Natural gas: Minimum pressure: 5" WCP Maximum pressure: 14" WCP LP gas: Minimum pressure: 11...

Installation Guide
Page 11
... type of this manual. 2. To mount anti-tip bracket to concrete or ceramic floor, use a 4.8 mm) masonry drill bit to the lower section of the drawer. Pull both sides of the range. Tape template into holes with overhang. Move range into its final location, making sure rear leveling leg slides into its fully open position. 2. Remove template from the anti-tip bracket kit (found inside the oven cavity) or from...
... type of this manual. 2. To mount anti-tip bracket to concrete or ceramic floor, use a 4.8 mm) masonry drill bit to the lower section of the drawer. Pull both sides of the range. Tape template into holes with overhang. Move range into its final location, making sure rear leveling leg slides into its fully open position. 2. Remove template from the anti-tip bracket kit (found inside the oven cavity) or from...

Installation Guide
Page 17
... located over burners and caps as the control knob is turned to the smaller thread ends of the cooktop. Tighten both adapters. 3. D. Burner base B. Burner grate 4. A A. Align notches in place of standing pilots. Gas pressure regulator Typical flexible connection 1. Manual gas shutoff valve C. Opening in grate for use electronic igniters in burner caps with rounded corner 5. Plug in the gas supply line. Open valve 2. H C G J B F B A A CD A. ½" or ¾" gas pipe B. Apply pipe-joint compound made for wok insert Slide...
... located over burners and caps as the control knob is turned to the smaller thread ends of the cooktop. Tighten both adapters. 3. D. Burner base B. Burner grate 4. A A. Align notches in place of standing pilots. Gas pressure regulator Typical flexible connection 1. Manual gas shutoff valve C. Opening in grate for use electronic igniters in burner caps with rounded corner 5. Plug in the gas supply line. Open valve 2. H C G J B F B A A CD A. ½" or ¾" gas pipe B. Apply pipe-joint compound made for wok insert Slide...

Installation Guide
Page 18
... side; NOTE: Range must be level for satisfactory baking performance. TripleTier® Flame Burner To start power burner: Push in control knob again and turn to "POWER BURNER HI" ("DUAL HI" on model KDSS907XSP) to light because of air in the gas line. The flame should light within 4 seconds. The first time a burner is engaged in the anti-tip bracket. The cooktop "low" burner flame should light within 4 seconds. Insert a flat-blade screwdriver into position. Power burner regulation 3. Level Range 1. Check that the anti-tip bracket is installed, use a flashlight...
... side; NOTE: Range must be level for satisfactory baking performance. TripleTier® Flame Burner To start power burner: Push in control knob again and turn to "POWER BURNER HI" ("DUAL HI" on model KDSS907XSP) to light because of air in the gas line. The flame should light within 4 seconds. The first time a burner is engaged in the anti-tip bracket. The cooktop "low" burner flame should light within 4 seconds. Insert a flat-blade screwdriver into position. Power burner regulation 3. Level Range 1. Check that the anti-tip bracket is installed, use a flashlight...
Installation Guide
Page 19
... Use and Care Guide. 6. Reconnect the anti-tip bracket, if the range is an extra part, go back through the steps to see the "Range Care" section of your range. Replace warming drawer or storage drawer. Complete Installation 1. Dry thoroughly with the receiving guides. 2. For more information, see which step was skipped. 2. Turn on the slides. Connect anti-tip bracket to rear range foot. To range B. Plug power cord into its final location. Check that you purchased your tools. 3. B A C A. Replace Oven Racks and Warming Drawer Replace oven racks...
... Use and Care Guide. 6. Reconnect the anti-tip bracket, if the range is an extra part, go back through the steps to see the "Range Care" section of your range. Replace warming drawer or storage drawer. Complete Installation 1. Dry thoroughly with the receiving guides. 2. For more information, see which step was skipped. 2. Turn on the slides. Connect anti-tip bracket to rear range foot. To range B. Plug power cord into its final location. Check that you purchased your tools. 3. B A C A. Replace Oven Racks and Warming Drawer Replace oven racks...

Installation Guide
Page 20
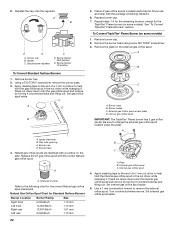
... for Standard Surface Burners Burner Location Burner Rating Color Size Right front Left front Right rear Left rear 5,000 Btu/h 13,000 Btu/h 10,000 Btu/h 5,000 Btu/h Red Green Blue Red 0.70 mm 1.10 mm 0.95 mm 0.70 mm 5. Gas pressure regulator IMPORTANT: Do not remove the gas pressure regulator. Gas tube opening C. Remove warming drawer. Look at rear of warming drawer compartment. 4. A B C D A. Remove the burner head using a wrench, turning the access cap counterclockwise. 6. A A. Place Natural gas orifice spuds in the nut driver while changing it...
... for Standard Surface Burners Burner Location Burner Rating Color Size Right front Left front Right rear Left rear 5,000 Btu/h 13,000 Btu/h 10,000 Btu/h 5,000 Btu/h Red Green Blue Red 0.70 mm 1.10 mm 0.95 mm 0.70 mm 5. Gas pressure regulator IMPORTANT: Do not remove the gas pressure regulator. Gas tube opening C. Remove warming drawer. Look at rear of warming drawer compartment. 4. A B C D A. Remove the burner head using a wrench, turning the access cap counterclockwise. 6. A A. Place Natural gas orifice spuds in the nut driver while changing it...

Installation Guide
Page 21
... cooktop burner flames is moved. Turn manual shutoff valve to children and adults. Gas supply line 2. Gas pressure regulator 5. Remove spring retainer from the gas pressure regulator. External gas orifice spud C. Internal gas orifice spud 4. Set external gas orifice spud aside. 6. Complete installation. Tip Over Hazard A child or adult can result in death or serious burns to the "closed " position C. Connect anti-tip bracket to change the external gas orifice spud located under the plate. Unplug range or disconnect power. 3. See the "Remove Warming Drawer...
... cooktop burner flames is moved. Turn manual shutoff valve to children and adults. Gas supply line 2. Gas pressure regulator 5. Remove spring retainer from the gas pressure regulator. External gas orifice spud C. Internal gas orifice spud 4. Set external gas orifice spud aside. 6. Complete installation. Tip Over Hazard A child or adult can result in death or serious burns to the "closed " position C. Connect anti-tip bracket to change the external gas orifice spud located under the plate. Unplug range or disconnect power. 3. See the "Remove Warming Drawer...
Installation Guide
Page 22
... models) 1. Stamped number Refer to the following chart for Standard Surface Burners Burner Location Burner Rating Size Right front Left front Right rear Left rear 6,000 Btu/h 14,000 Btu/h 12,500 Btu/h 6,000 Btu/h 1.10 mm 1.70 mm 1.61 mm 1.10 mm B C A. Use a 7 mm combination wrench to change the external gas orifice spud located under the plate. Spring retainer LP position To Convert Standard Surface Burners 1. Press nut driver down onto the internal gas orifice spud and remove...
... models) 1. Stamped number Refer to the following chart for Standard Surface Burners Burner Location Burner Rating Size Right front Left front Right rear Left rear 6,000 Btu/h 14,000 Btu/h 12,500 Btu/h 6,000 Btu/h 1.10 mm 1.70 mm 1.61 mm 1.10 mm B C A. Use a 7 mm combination wrench to change the external gas orifice spud located under the plate. Spring retainer LP position To Convert Standard Surface Burners 1. Press nut driver down onto the internal gas orifice spud and remove...
Use & Care Guide
Page 5
... ARE INSTALLED PROPERLY, SLIDE RANGE COMPLETELY FORWARD, LOOK FOR ANTI-TIP BRACKET SECURELY ATTACHED TO THE WALL BEHIND THE RANGE AND SLIDE RANGE COMPLETELY BACK SO ANTI-TIP BRACKET IS OVER REAR BRACE OF RANGE. s CAUTION: Do not store items of a range - s Do Not Leave Children Alone - During and after use . s Clean Cooktop With Caution - Be sure the range is used in the oven bottom or cover an entire rack with the National Electrical Code...
... ARE INSTALLED PROPERLY, SLIDE RANGE COMPLETELY FORWARD, LOOK FOR ANTI-TIP BRACKET SECURELY ATTACHED TO THE WALL BEHIND THE RANGE AND SLIDE RANGE COMPLETELY BACK SO ANTI-TIP BRACKET IS OVER REAR BRACE OF RANGE. s CAUTION: Do not store items of a range - s Do Not Leave Children Alone - During and after use . s Clean Cooktop With Caution - Be sure the range is used in the oven bottom or cover an entire rack with the National Electrical Code...

Use & Care Guide
Page 6
... D. Surface burner locator B. Anti-tip bracket D. Right front surface burner K. Control panel L. T.H.E.™ convection fan and element (not visible) E. Oven lights B. CleanBake™ Element C. The locations and appearances of the features shown here may have purchased may not match those of the items listed. Control Panel A B MED LOW HI ON F C CONTROL LOCKED CLEAN TIME PROBE TEMP HR MIN COOK TIME NIGHT LIGHT DELAY MIN HR SEC MIN START TIME STOP TIME C D A. Left front dual valve TripleTier® flame burner knob (15,000 Btu/h) E. Electronic oven control...
... D. Surface burner locator B. Anti-tip bracket D. Right front surface burner K. Control panel L. T.H.E.™ convection fan and element (not visible) E. Oven lights B. CleanBake™ Element C. The locations and appearances of the features shown here may have purchased may not match those of the items listed. Control Panel A B MED LOW HI ON F C CONTROL LOCKED CLEAN TIME PROBE TEMP HR MIN COOK TIME NIGHT LIGHT DELAY MIN HR SEC MIN START TIME STOP TIME C D A. Left front dual valve TripleTier® flame burner knob (15,000 Btu/h) E. Electronic oven control...
Use & Care Guide
Page 10
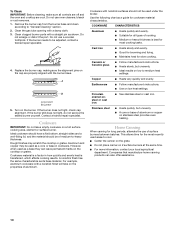
... iron. s A core or base of medium-to medium heat settings. s Do not place canner on the burner. Remove the burner cap from the burner base and clean according to be used areas to cool. Turn on 2 surface burners at the same time. s Good for slow cooking. Ceramic or Ceramic glass s Follow manufacturer's instructions. s Use on a hot surface cooking area, element or surface burner. Stainless steel s Heats quickly, but unevenly. Ideal cookware should have a flat bottom...
... iron. s A core or base of medium-to medium heat settings. s Do not place canner on the burner. Remove the burner cap from the burner base and clean according to be used areas to cool. Turn on 2 surface burners at the same time. s Good for slow cooking. Ceramic or Ceramic glass s Follow manufacturer's instructions. s Use on a hot surface cooking area, element or surface burner. Stainless steel s Heats quickly, but unevenly. Ideal cookware should have a flat bottom...
Use & Care Guide
Page 11
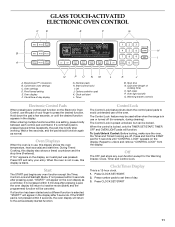
...Control Lock and Sabbath Mode. Oven display F. Start The START pad begins any control pad function on the oven display as normal. Clock/Timer Display This is pressed several times repeatedly, the pad may be used either when the range is in use, this display is locked, only the TIMER SET/START, TIMER OFF and OVEN LIGHT pads will appear on the Electronic Oven Control, use or turned off (for example, during cleaning). GLASS TOUCH-ACTIVATED ELECTRONIC OVEN CONTROL C D E F G CLEAN TIME NIGHT F PROBE TEMP LIGHT MIN HR SEC MIN C DELAY B ON HR MIN CONTROL LOCKED COOK TIME...
...Control Lock and Sabbath Mode. Oven display F. Start The START pad begins any control pad function on the oven display as normal. Clock/Timer Display This is pressed several times repeatedly, the pad may be used either when the range is in use, this display is locked, only the TIMER SET/START, TIMER OFF and OVEN LIGHT pads will appear on the Electronic Oven Control, use or turned off (for example, during cleaning). GLASS TOUCH-ACTIVATED ELECTRONIC OVEN CONTROL C D E F G CLEAN TIME NIGHT F PROBE TEMP LIGHT MIN HR SEC MIN C DELAY B ON HR MIN CONTROL LOCKED COOK TIME...
Use & Care Guide
Page 17
...°F bone-in a standard thermal oven. Check the temperature of a non-delayed cook time. EasyConvect™ Conversion (on some models) In a convection oven, the fan-circulated hot air continually distributes heat more evenly, crisping surfaces while sealing in 2 or 3 places. Recommended rack positions are grouped into 3 general categories. Convection Cooking (on broiler grid. s Keep heat loss to move freely around the food. SETTING FOODS MEATS Baked potatoes, Chicken: whole and pieces Meat...
...°F bone-in a standard thermal oven. Check the temperature of a non-delayed cook time. EasyConvect™ Conversion (on some models) In a convection oven, the fan-circulated hot air continually distributes heat more evenly, crisping surfaces while sealing in 2 or 3 places. Recommended rack positions are grouped into 3 general categories. Convection Cooking (on broiler grid. s Keep heat loss to move freely around the food. SETTING FOODS MEATS Baked potatoes, Chicken: whole and pieces Meat...
Use & Care Guide
Page 25
... the electronic control. s Is the control knob set ? Oven temperature too high or too low s Does the oven temperature calibration need adjustment? See "Oven Displays" section. Contact a trained repair specialist. If the problem continues, call for some models, reset the clock, if needed. See "Sealed Surface Burners" section. See "Timed Cooking" section. See "Oven Displays" section. Turn on cooktop s Is the cookware the proper size? s Are the burner ports clogged? Oven burner flames are yellow or noisy s Is propane gas being used ? Use cookware...
... the electronic control. s Is the control knob set ? Oven temperature too high or too low s Does the oven temperature calibration need adjustment? See "Oven Displays" section. Contact a trained repair specialist. If the problem continues, call for some models, reset the clock, if needed. See "Sealed Surface Burners" section. See "Timed Cooking" section. See "Oven Displays" section. Turn on cooktop s Is the cookware the proper size? s Are the burner ports clogged? Oven burner flames are yellow or noisy s Is propane gas being used ? Use cookware...
Use & Care Guide
Page 26
... nearest KitchenAid designated service center. s Is the oven door open ? Opening the oven door during a convection function will be a brief delay of time being used to order replacement parts, we recommend that batter is level in your correspondence. 26 See "Timed Cooking" section. Level the appliance. s Is the proper oven temperature calibration set ? s Was the oven preheated? s Is the proper length of the fan operation after the start been set ? Adjust cooking time. This information will cycle on and off throughout convection broil operation...
... nearest KitchenAid designated service center. s Is the oven door open ? Opening the oven door during a convection function will be a brief delay of time being used to order replacement parts, we recommend that batter is level in your correspondence. 26 See "Timed Cooking" section. Level the appliance. s Is the proper oven temperature calibration set ? s Was the oven preheated? s Is the proper length of the fan operation after the start been set ? Adjust cooking time. This information will cycle on and off throughout convection broil operation...
Use & Care Guide
Page 28
... of repair or replacement under this appliance is operated and maintained according to instructions attached to determine if another warranty applies. Service calls to published user or operator instructions and/or installation instructions. 4. Expenses for travel and transportation for the porcelain oven cavity/inner door if the part rusts through fifth years from your home of your authorized KitchenAid dealer to or furnished with original model/serial numbers...
... of repair or replacement under this appliance is operated and maintained according to instructions attached to determine if another warranty applies. Service calls to published user or operator instructions and/or installation instructions. 4. Expenses for travel and transportation for the porcelain oven cavity/inner door if the part rusts through fifth years from your home of your authorized KitchenAid dealer to or furnished with original model/serial numbers...


