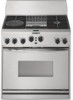
KitchenAid KDRP462LSS - 36" Pro-Style Dual Fuel Range Support and Manuals
Get Help and Manuals for this KitchenAid item
View All Support Options Below
Free KitchenAid KDRP462LSS manuals!
Problems with KitchenAid KDRP462LSS?
Ask a Question
Free KitchenAid KDRP462LSS manuals!
Problems with KitchenAid KDRP462LSS?
Ask a Question
Most Recent KitchenAid KDRP462LSS Questions

Kdrp462lss0 Oven Will Randomly Not Heat Past The Second Notch Thanks
(Posted by egerardi 10 years ago)
Popular KitchenAid KDRP462LSS Manual Pages
Use and Care Guide - Page 3
...if you don't follow instructions. Do not store or use any other flammable vapors and liquids in the vicinity of this manual and on your appliance. The California Safe ...
instructions.
• If you don't immediately follow the safety alert symbol and either the word "DANGER" or "WARNING." You can be performed by a qualified installer, service agency or the gas supplier.
This appliance ...
Use and Care Guide - Page 4
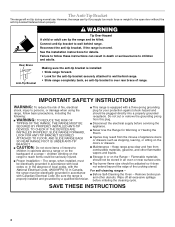
...TIP BRACKET SECURELY ATTACHED TO FLOOR, AND SLIDE RANGE BACK SO REAR RANGE FOOT IS UNDER ANTI-TIP BRACKET. Flammable materials
s Proper Installation - Remove broiler pan and other flammable vapors and liquids. Wipe off all excessive spillage before servicing the
SECURED BY PROPERLY INSTALLED ANTI-TIP
appliance. SAVE THESE INSTRUCTIONS
4
The range, when installed, must be plugged...
Use and Care Guide - Page 5
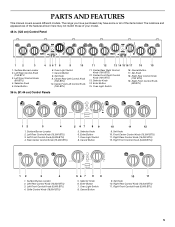
.... Oven Light Switch
16. Set Knob
18. Right Front Control Knob (6K BTU)
36 in . (122 cm) ...model.
48 in . (91.44 cm) Control Panels
12
3
4
1. Selector Knob
5. Oven Light Switch 8. Center Front Left Control Knob (15K BTU)
11. The range you have purchased may not match those of the items listed. Right Front Control Knob (6,000 BTU)
5 Cancel Button
8. PARTS AND FEATURES
This manual...
Use and Care Guide - Page 9

... instructions can be lit manually....chart as a guide when setting heat levels.
IMPORTANT: Your range is factory set for cooking ...repair specialist to check the wall receptacle to see if it is in death or fire. Power failure In case of prolonged power failure, the surface burners can result in use or (on the grate.
Before setting a control knob, place filled cookware on some models...
Use and Care Guide - Page 10
... caps according to low range on the cooktop when ...over the grate (as shown. Replace the burner cap, making sure...
1. It can be adjusted, contact a trained repair specialist.
1
4.
Alignment pins 4. Protect it ...oven and cooktop are properly aligned with burner settings in . (25-38 mm) 2. Remove... area free of soil and do not service the sealed burner yourself. Correct
5. Simmer...
Use and Care Guide - Page 11
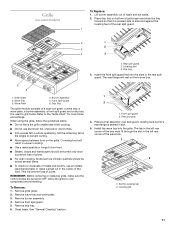
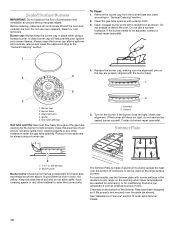
...feet 3. Grille Grate 2. Slit the remaining fat on some models)
To Replace: 1. s Use a metal spatula or tongs to grill...slot in the rear spill guard. Slot for cook times and settings. Locating tab
11 Rear spill guard 2. Insert the front spill .... REMEMBER: Before removing or replacing grille, make a small cut in the center of the wave tray. 1
2
1. Install the wave tray into the slots...
Use and Care Guide - Page 12
... cold water on overhead range hood.
2.
Do not use ....Turn knob to operate properly. FOOD
SETTING
COOK TIME TOTAL MINUTES
Steak
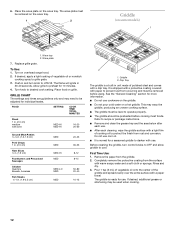
1 ...recipe or package instructions. s The griddle must be level to desired cook setting. Before cleaning ...on the wave tray. GRILLE CHART
The settings and times are guidelines only and may ...normal for more information. Replace grille grate.
Remove the...
Use and Care Guide - Page 13
...not place canner on two surface cooking areas, elements or surface burners at desired temperature setting. Companies that manufacture home canning products can leave permanent marks on the properties of aluminum...s Do not wash griddle in how quickly and evenly heat is a factor in the dishwasher. Rough finishes may warp the griddle, producing an uneven cooking surface. However, when used...
Use and Care Guide - Page 14
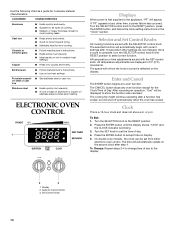
... unevenly. Once a cycle is first supplied to the appliance, "PF" will appear.
To Change: Repeat steps 2-4 to change time of day to the RESET position, press the ENTER button, and follow the clock setting instructions in 5°F (3°C) increments. Use the following chart as a guide for the Clock/Time of Day.
ELECTRONIC OVEN CONTROL...
Use and Care Guide - Page 16
....
4. s For proper draining, do not cover the grid with the range. s Trim excess fat to prevent curling. Slit the remaining fat on ... the function will come back on the display
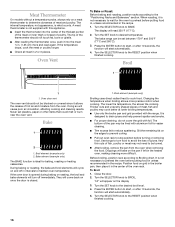
3. Meat Thermometer
On models without a temperature probe, always rely on a meat thermometer to cook...with this appliance. Very thin cuts of hot air and moisture from the oven when removing the food. Turn the SET knob to...
Use and Care Guide - Page 21
...dishwasher.
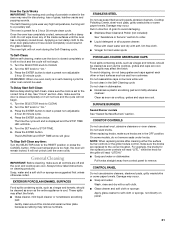
When replacing knobs, make sure the door is set to avoid damaging. s Soap and water or dishwasher... knobs. SURFACE BURNERS
Sealed Burner models See "Sealed Surface Burners" section...Polish (not included):
See "Assistance or Service" section to CLEAN. 2. s Glass ... the entire appliance is closed ...instructions on cleaning products. s Glass cleaner, mild liquid cleaner or ...
Use and Care Guide - Page 23
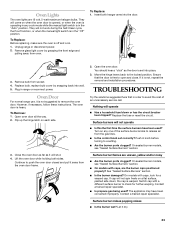
... repair specialist. To Replace: Before replacing, make sure the oven is not suggested here first in range or reconnect power. Remove glass light cover by snapping back into the door.
3. Surface burners will come on any cook mode while the manual light switch is operating in any one of an unnecessary service call.
On sealed burner models...
Use and Care Guide - Page 24
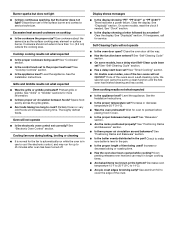
... models, has a delay start been set to 14°C). Clear the display. s Has a delay start Self-Clean cycle been set...Installation Instructions. Increase or decrease temperature 25°F (14°C).
Excessive heat around bakeware? Level the appliance...appliance level? Preheat grille or griddle. s Are foods taking too long to cover the edge of the surface burner and contact a service...
Use and Care Guide - Page 25

... and specifications on our full line of your correspondence.
Or visit our website at 1-800-442-9991 and follow the instructions below. Saturday 8:30 a.m. - 4:30 p.m. (EST).
If you still need to build every new KITCHENAID® appliance. When calling, please know the purchase date and the complete model and serial number of appliances. If you need replacement parts...
Use and Care Guide - Page 26
... areas. 8.
On ranges and built-in ovens, in the second through fifth years from the date of purchase, when this appliance is operated and maintained according to instructions attached to or furnished with the product, KitchenAid will not pay for: 1.
Replacement parts or repair labor costs for in-warranty service.
If you ever need service, first see the "Troubleshooting" section of...
KitchenAid KDRP462LSS Reviews
We have not received any reviews for KitchenAid yet.